• Skip to primary navigation
  • Skip to main content
  • Skip to primary sidebar
  • Home
  • Recipes
  • Features
    • Cookbook Reviews
    • Ingredient of the Week
    • Sunday Dinner
    • Fitness Goals
  • Travel
  • About
    • Privacy Policy
    • Cookie Policy
  • Work With Me

Katie at the Kitchen Door

Globally-inspired, seasonal recipes

Blog Page

Israeli Couscous "Pastina" with Parmesan and Black Pepper {Katie at the Kitchen Door}

3 March 16, 2019 Current Feature 2

Pastina for Grown-Ups

Israeli Couscous "Pastina" with Parmesan and Black Pepper {Katie at the Kitchen Door}

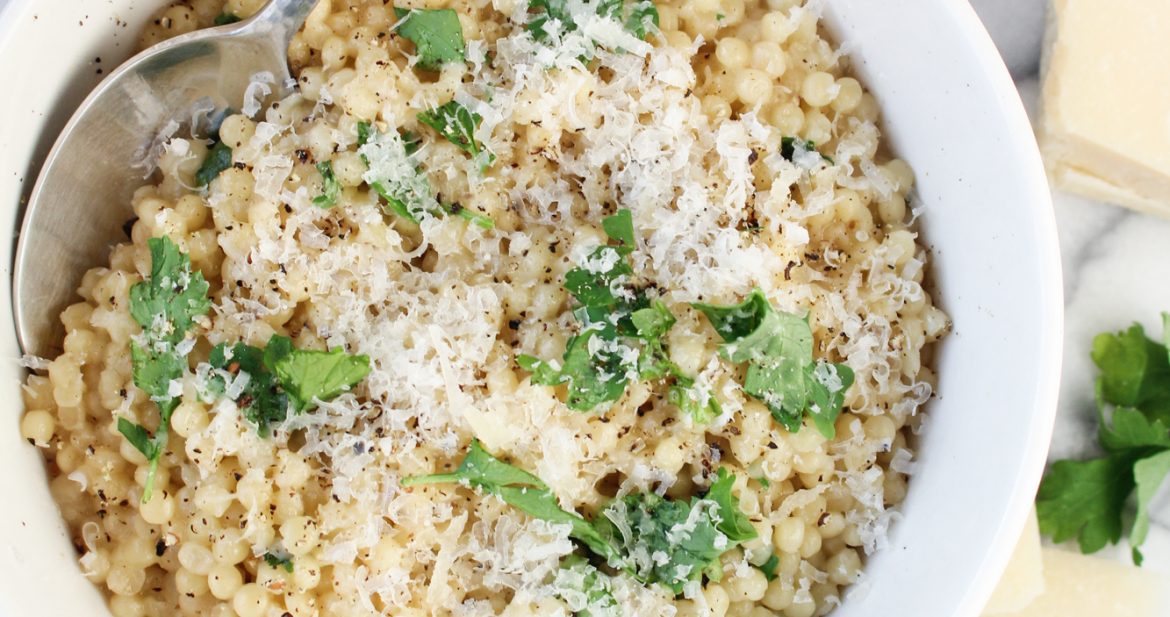
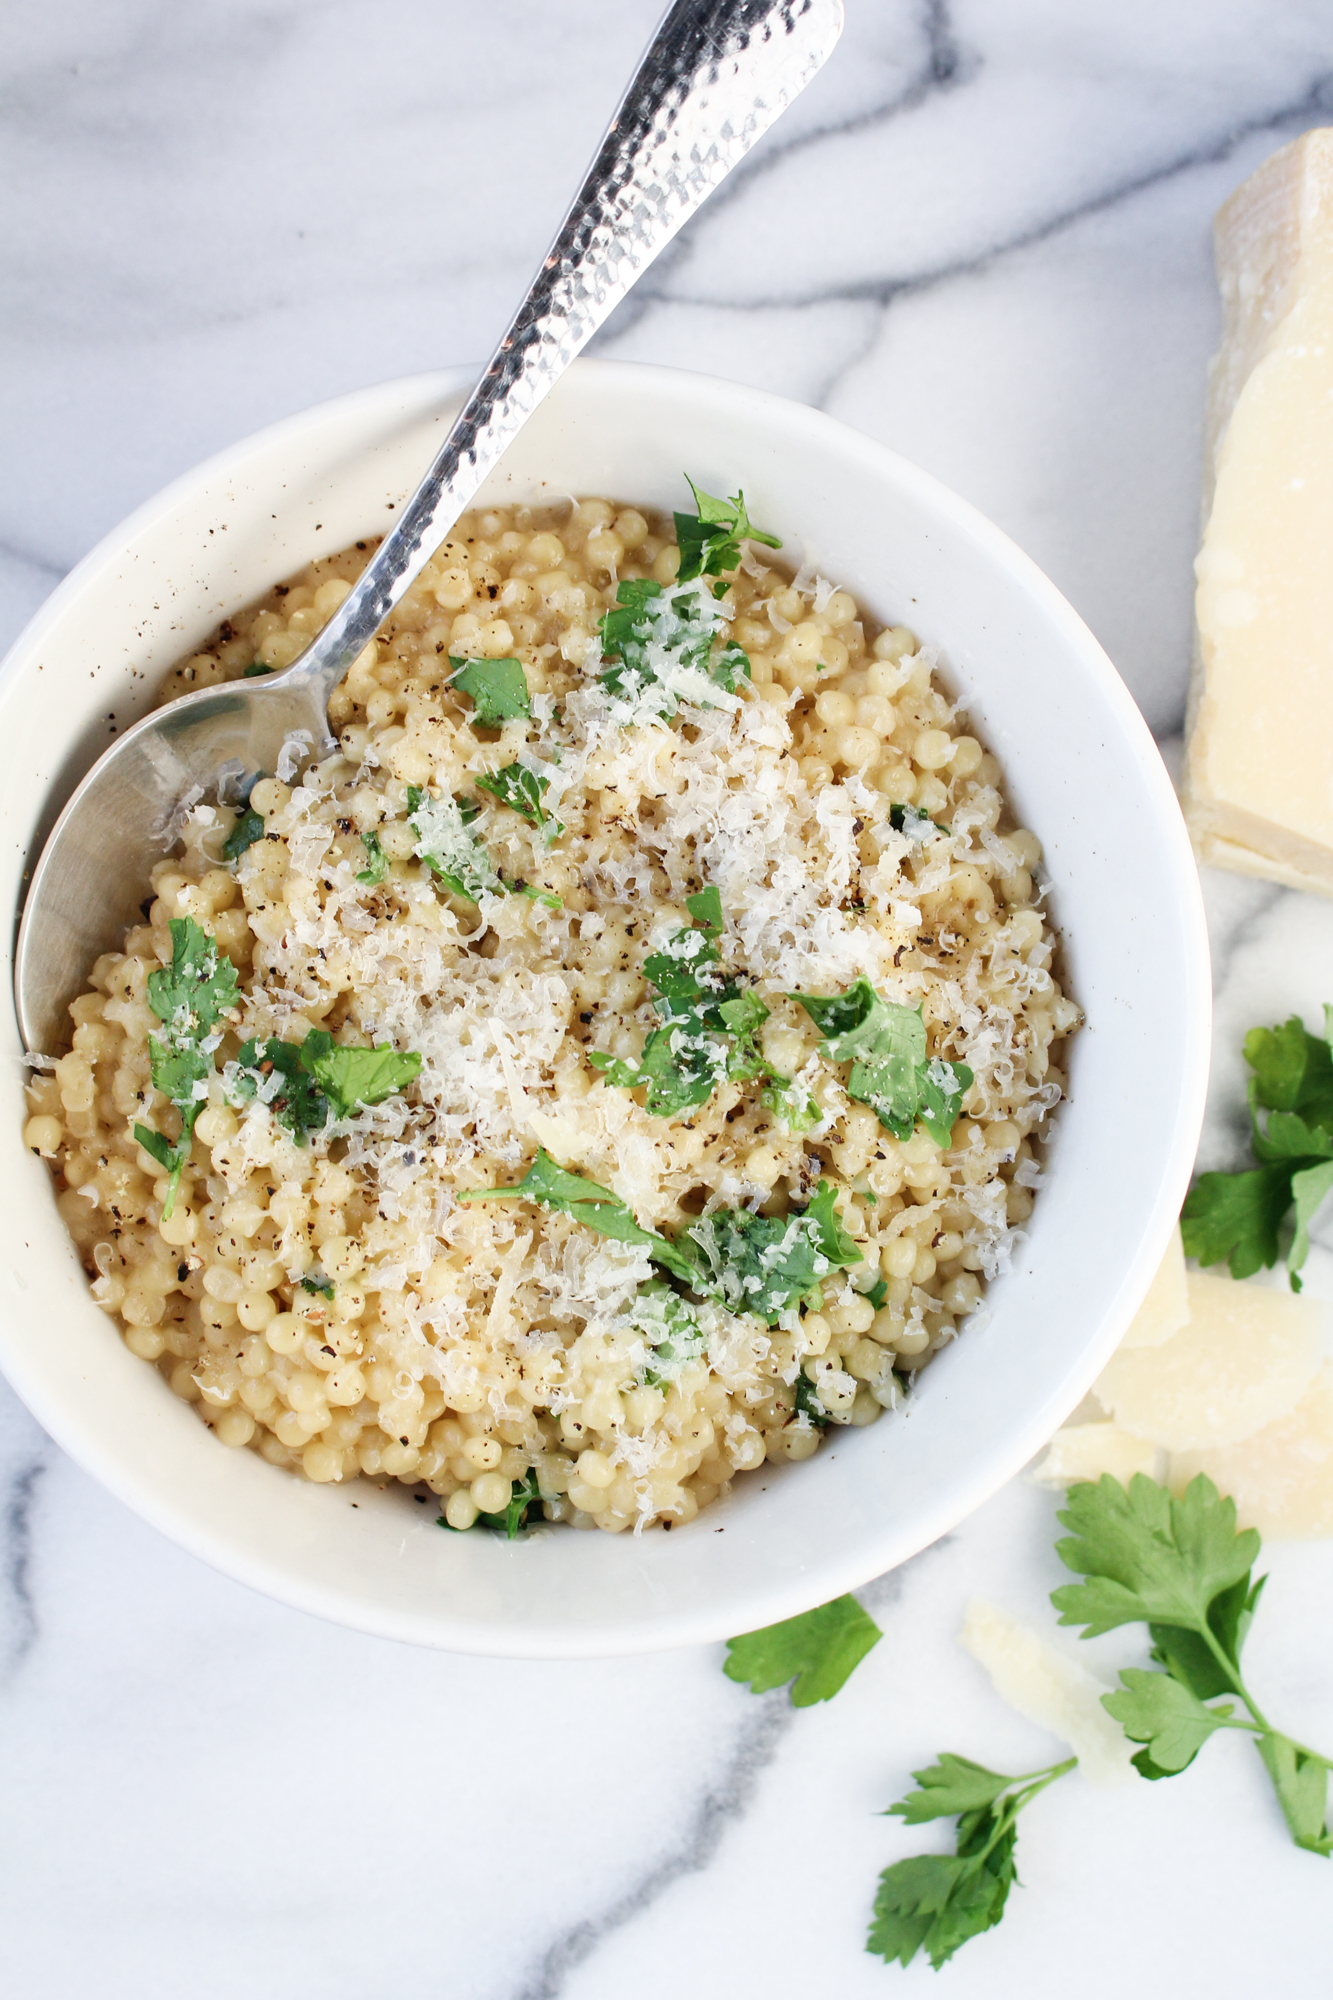
As a teenager, I spent what felt like entire summers babysitting for the kids across the street. There were three of them, aged 4-10, and they were a handful. But they also had a pool and they paid well, so it was a good job all in all. The kids used to love eating pastina, basically tiny little pasta stars, with masses of butter and that shakeable powdered parmesan cheese. I rarely had to cook anything for them (their mom was a great cook and there was always tons of food in their house), but I made pastina once or twice. It was perfect comfort food for kids, no spice, all warmth and simplicity.

Israeli Couscous "Pastina" with Parmesan and Black Pepper {Katie at the Kitchen Door}

Israeli Couscous "Pastina" with Parmesan and Black Pepper {Katie at the Kitchen Door}

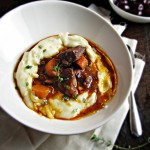
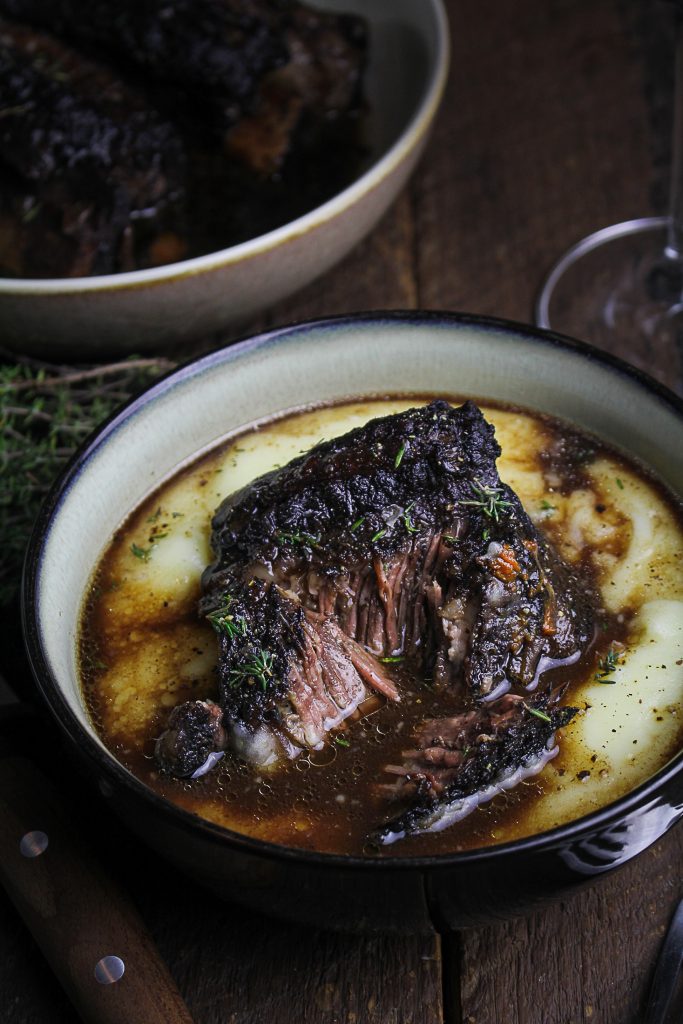
Fast forward 15 years. Trevor and I just started a major kitchen renovation (!) and the house is full of dust. It’s still cold and snowy, and it’s that time of year where you’re just on the edge of being sick all the time. We’re ready for spring and it’s not here yet. Comfort food is in order pretty much every day. A few weeks back (before the renovation started!), in this late winter state of being, I was staring forlornly inside the fridge, hoping for inspiration to strike from a handful of leftovers. I was in a bad mood. I was tired. And there was really very little in the fridge since we’d been proactively cleaning it out. So I dumped half a container of homemade kitchen stock in a pot and boiled some Israeli couscous in it. I added a huge amount of freshly grated parmesan cheese and some cracked black pepper. I plopped it unceremoniously in a bowl and took a bite. And it turned out to be the most perfect thing – creamy, savory, comforting, cheesy – and just like pastina with butter, but all grown-up.

I’ve finessed this recipe a little bit to share with you, but it really is very simple. Use the best chicken stock you can as that’s where all the flavor comes from. Don’t be shy with the parmesan or the pepper or the parsley. Your reward for 10 minutes of effort will be a bowl of super delicious pasta to get you through these last few weeks of winter.

Israeli Couscous "Pastina" with Parmesan and Black Pepper {Katie at the Kitchen Door}

Print

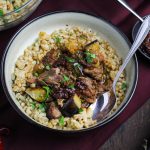
Israeli Couscous “Pastina”

Israeli Couscous "Pastina" with Parmesan and Black Pepper {Katie at the Kitchen Door}

A super simple, super comforting pasta, rich with the flavors of chicken broth and parmesan cheese.

  • Author: Katie at the Kitchen Door

Ingredients

Scale
  • 2 cups high quality chicken stock, preferably homemade
  • 1 cup Israeli couscous (also sold as pearled couscous)
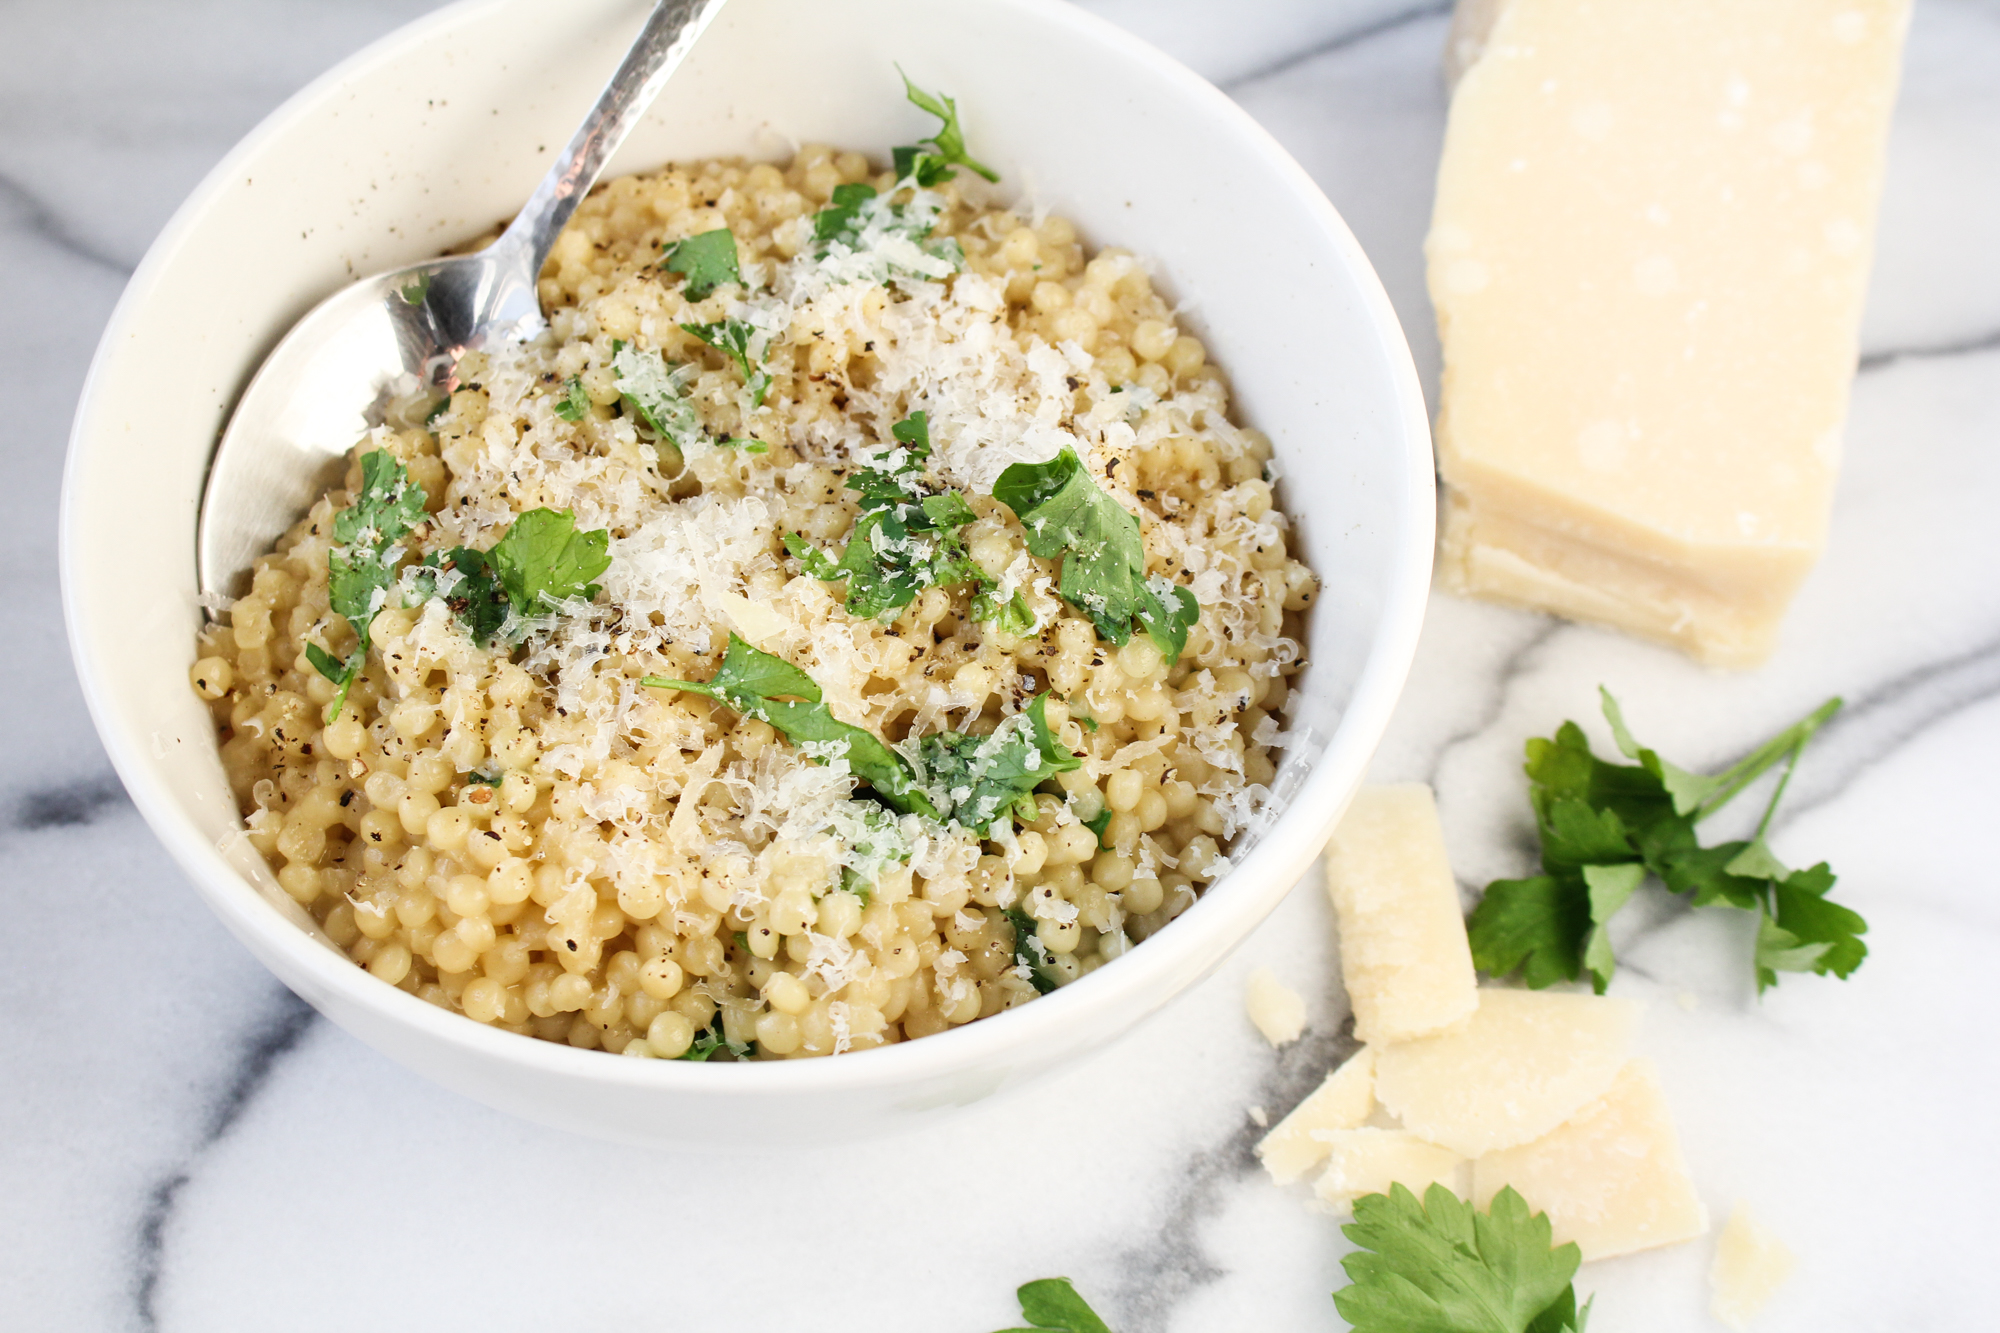
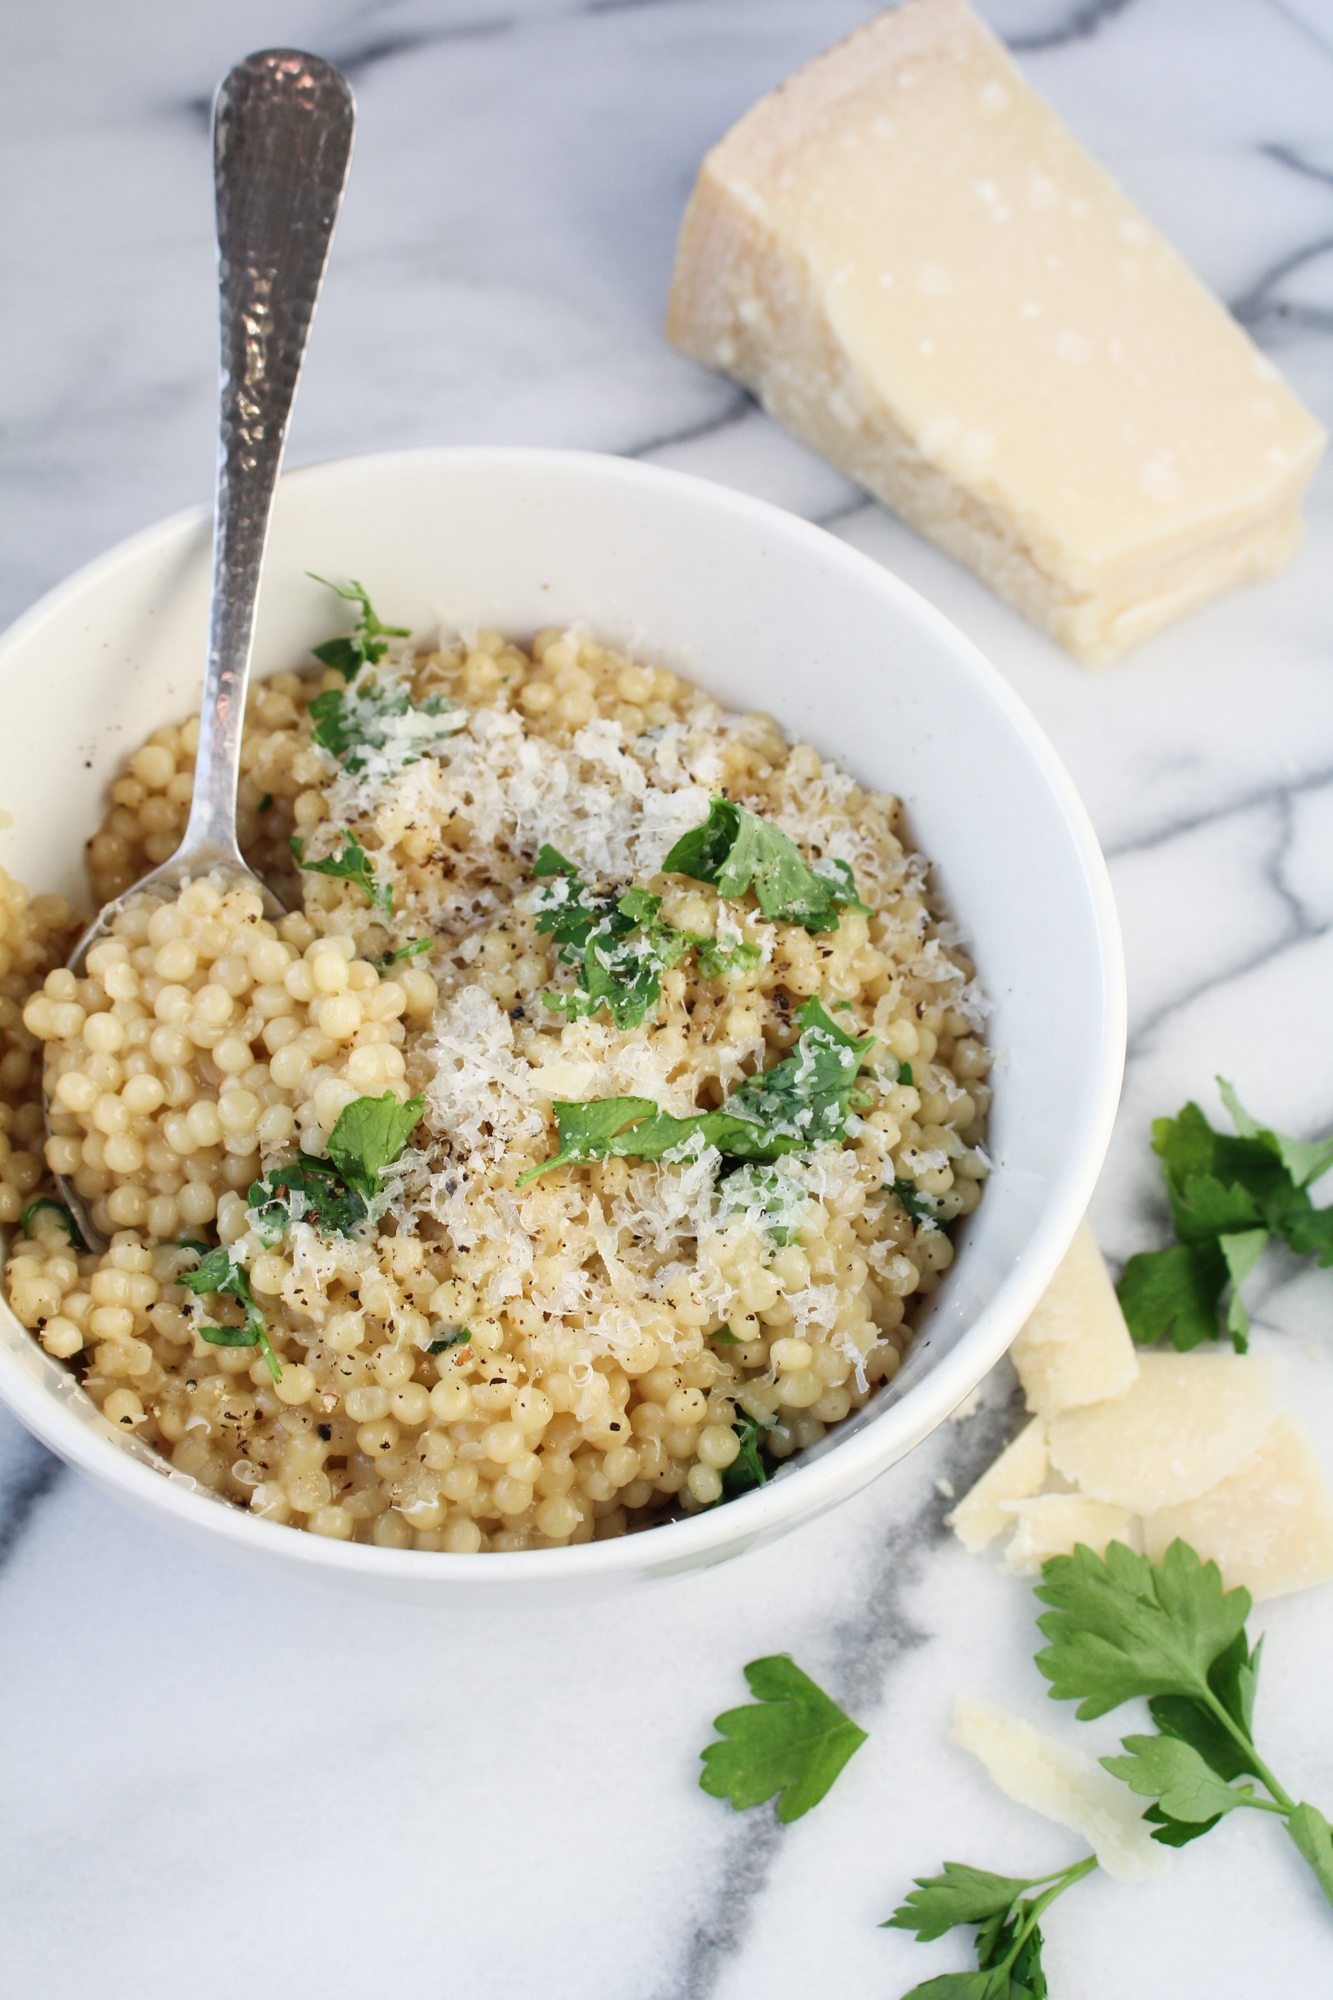
  • 3/4 cup freshly grated parmesan cheese, plus more for serving
  • Freshly ground black pepper
  • 1/4 cup minced fresh parsley

Instructions

  1. Add the chicken stock to a small saucepan and bring just to a boil. As soon as it reaches a boil, add the Israeli couscous (don’t wait as your stock will evaporate and there won’t be enough left to fully cook the couscous). Let stock return to a simmer. Simmer the couscous, stirring occasionally, until the couscous is tender and the chicken stock has been almost completely absorbed, about 7 to 8 minutes.
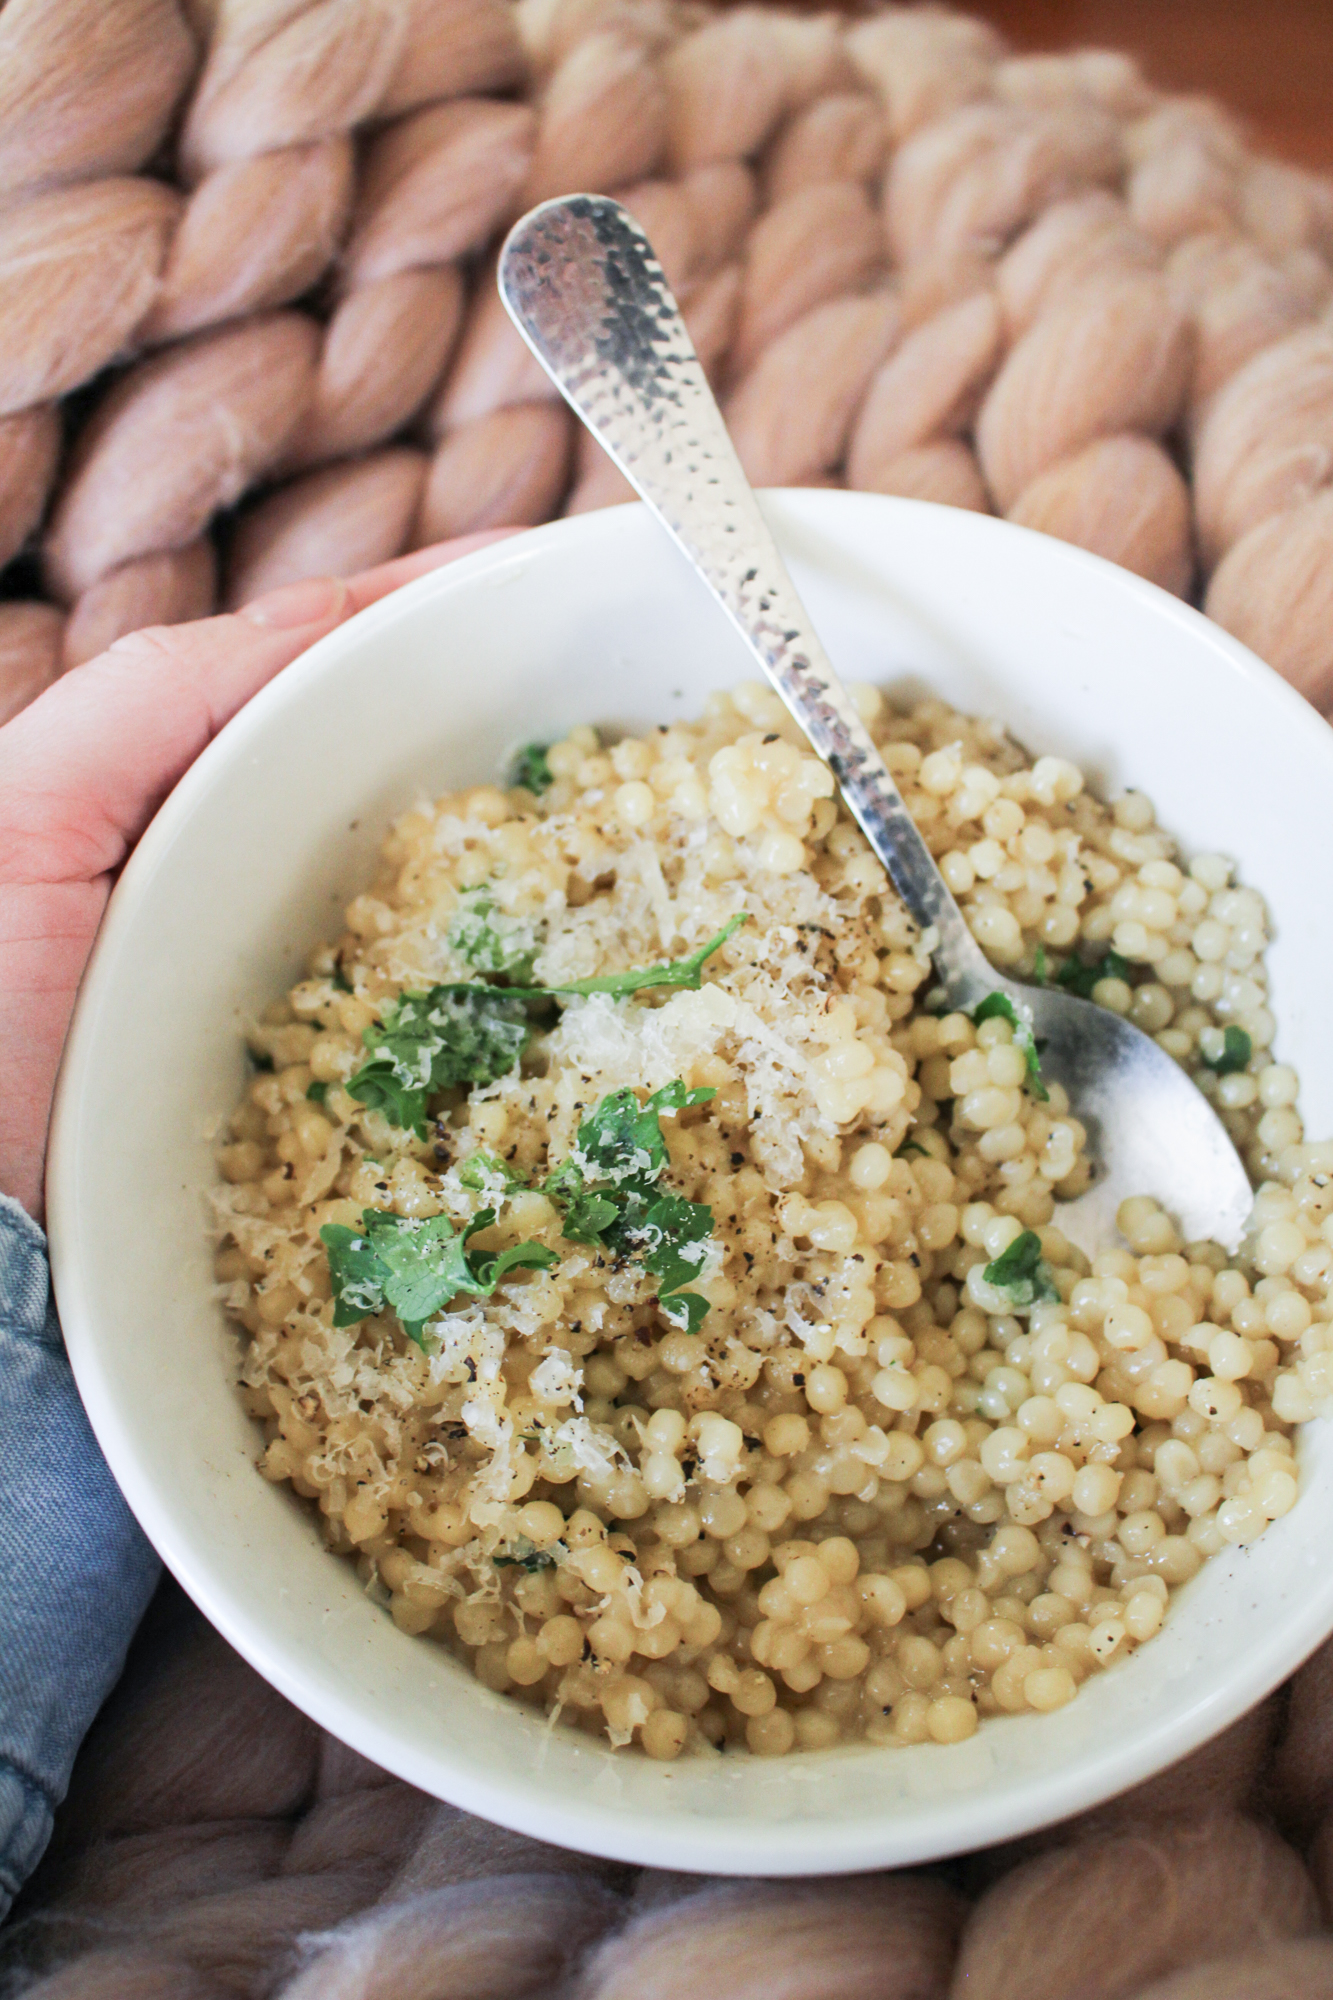
  2. Remove the pan from the heat. Don’t drain it – the couscous will continue to absorb the stock, and it should have a slightly loose, creamy texture. Add the 3/4 cup of grated parmesan cheese, a generous amount of black pepper, and the chopped parsley. Stir until the cheese has melted into the couscous. Serve immediately, topped with additional parmesan and black pepper if desired.

Did you make this recipe?

Share a photo and tag us — we can't wait to see what you've made!

Middle-Eastern Grain Bowl with Sweet Potatoes and Cauliflower {Katie at the Kitchen Door}

2 December 9, 2018 Fall

Middle-Eastern Grain Bowl with Sweet Potatoes and Cauliflower

Middle-Eastern Grain Bowl with Sweet Potatoes and Cauliflower {Katie at the Kitchen Door}

December is the season of cookies and champagne and lots and lots of cheese. Everyone has their own favorite food traditions this month. I indulge in Bailey’s-spiked hot chocolate with real whipped cream, in two slices of cranberry-vanilla coffee cake on Christmas morning, and in the truly excellent gouda my grandfather sometimes brings to our house. This year we are headed to Munich and Brussels around Christmastime, so I expect there will also be Belgian waffles, glühwein, pretzels, and lots of yummy Belgian beer. I try not to feel guilty about these indulgences – it’s part of the season! – but I do find myself strongly craving vegetables after a few days of heavy meals. Of course, it’s freezing cold in Boston, so the vegetables still have to be warm and comforting, which is where grain bowls save the day.

Middle-Eastern Grain Bowl with Sweet Potatoes and Cauliflower {Katie at the Kitchen Door}

Middle-Eastern Grain Bowl with Sweet Potatoes and Cauliflower {Katie at the Kitchen Door}

Grain bowls are a pretty regular feature of our weekly menu. Usually they are a pretty basic affair. Roast brussels sprouts and sweet potatoes are a staple, along with a few pieces of whatever cheese we have sitting in the fridge. There is maybe a dollop of hummus that serves as dressing and a handful of greens. The grain itself is whatever we have on hand – usually farro or rice. These grain bowls are always satisfying, but they aren’t always cohesive – it’s just a mess of stuff I like to eat on one plate. So every once in a while, I like to put a little more thought into how the components of the bowl will go together. Recently, we made a Middle-Eastern inflected grain bowl that came out so well that I thought it was worth sharing here (as well as documenting for myself!).

This grain bowl has a lot of goodness in it. Spicy honey-cinnamon roast sweet potatoes. Cumin-scented roast cauliflower with sticky dates. Crispy brussels sprouts. To pull it together there’s a tangy tahini-yogurt sauce, creamy goat cheese, and jewel-like pomegranate seeds. Each individual component is highly flavorful – the sweet and spicy sweet potatoes in particular are addictive. All together in one bowl each component enhances the others, for a warming, slightly exotic meal. Plus, if you double up on the quantities below you’ll have plenty of leftovers to see you through the week.

Middle-Eastern Grain Bowl with Sweet Potatoes and Cauliflower {Katie at the Kitchen Door}


Print

Middle-Eastern Grain Bowl with Sweet Potatoes and Cauliflower

Middle-Eastern Grain Bowl with Sweet Potatoes and Cauliflower {Katie at the Kitchen Door}

A step above your average throw-it-all-together grain bowl. This recipe combines honey-cinnamon-roasted sweet potatoes with cumin-spiced cauliflower and tahini dressing for a Middle-Eastern inflected grain bowl.

Cauliflower recipe is adapted from Dining In. 

  • Author: Katie at the Kitchen Door
  • Prep Time: 20
  • Cook Time: 30
  • Total Time: 50 minutes
  • Yield: 2-3 1x

Ingredients

Scale
  • 3/4 cup dry farro

For the sweet potatoes:

  • 1 large sweet potato, peeled and cut into wedges
  • 2 TBS olive oil
  • 1 TBS honey
  • 1/2 tsp ground cinnamon
  • 1/8 tsp ground cayenne pepper
  • sea salt and black pepper to taste

For the cauliflower and brussels sprouts:

  • 1 head of cauliflower, washed and cut into florets
  • 20–30 brussels sprouts, outer leaves removed, cut in half
  • 3 TBS olive oil
  • 1 tsp whole cumin seed
  • sea salt and black pepper to taste
  • 8 dates, halved

For the dressing:

  • 3 TBS tahini
  • 3 TBS plain Greek yogurt or skyr (the tangier the better!)
  • 1 TBS honey
  • 1/4 cup lukewarm water
  • Juice from 1/2 a lemon
  • Sea salt and pepper to taste

Toppings/other:

  • Several handfuls fresh baby spinach
  • 2 oz. fresh goat cheese, crumbled
  • Arils from 1/2 a pomegranate, about 1/2 cup

Instructions

  1. Preheat the oven to 400F. Bring a pot of salted water to a boil. When the water is boiling, add the farro. Cook until al dente, about 20-25 minutes. Drain farro and set aside.
  2. For the sweet potatoes: whisk the olive oil, honey, cinnamon, cayenne, salt and pepper together in a large bowl. Add the sweet potato wedges and toss to completely coat with the honey-olive oil mixture. Spread the sweet potatoes out on a rimmed baking sheet and place in the oven. Roast until very tender, about 25-30 minutes.
  3. For the cauliflower: in the same bowl you used for the sweet potatoes, whisk together the olive oil, cumin seed, salt, and pepper. Add the cauliflower florets and toss, making sure to thoroughly coat the tops of each floret with the olive oil mixture. Add the halved brussels sprouts to the bowl and toss to coat. Spread out on a rimmed baking sheet and roast until the vegetables are tender in the middle and crispy on the edges, about 30 minutes. About 10 minutes, before the vegetables are done, add the halved dates to the roasting pan so that they roast slightly (they will get a little bit more sticky and caramelized).
  4. For the bowls: whisk all dressing ingredients together in a medium bowl until smooth, then adjust seasoning to taste. Divide the cooked farro and the baby spinach between two bowls. Top each bowl with several roast sweet potato wedges, pieces of cauliflower and brussels sprouts. Crumble goat cheese on top of the bowls, then sprinkle with pomegranate arils. Drizzle with dressing and serve immediately.

Notes

All the cooked ingredients have approximately the same cooking time, meaning if you start the farro at the same time as you put the vegetables in the oven, everything will be ready almost at once.

Did you make this recipe?

Share a photo and tag us — we can't wait to see what you've made!


The Liquid Ditty: Bourbon, Calvados and Cider Cocktail {Katie at the Kitchen Door}

2 September 1, 2018 Current Feature 2

Our Wedding // Liquid Ditty Cocktail


Our Wedding - Maine Barn Wedding {Katie at the Kitchen Door}

All wedding pictures in this post are by our very talented photographers, The Spragues. These photos cannot be used without their permission.

Almost a year later, I have finally managed to sit down and write about our wedding. It was largely a DIY affair, brought to life by many, many helping hands. We celebrated with a small group of 40 people – just immediate family and close friends – at my parents’ house in Maine, where Trevor and I have been going together since high school. Insanely, wonderfully, my parents built a barn on the hill above our house to host our reception. By hand. I know, we are incredibly spoiled. It took many weekends of labor to bring the boat barn to fruition, but in some ways building the barn was the part of the wedding I loved most of all. Working alongside both sets of parents to build a structure to house our friends and family felt purposeful and unifying. And walking up the hill that day to see the barn filled with our handmade oak farm tables, tables covered in copper vases and pink flowers, candles and string lights filling the whole space with warmth… it was so incredibly beautiful. I don’t really have a photo that adequately captures the magic of that space, but these come close.

Our Wedding - Maine Barn Wedding {Katie at the Kitchen Door}

Our Wedding - Maine Barn Wedding {Katie at the Kitchen Door}

Our Wedding - Maine Barn Wedding {Katie at the Kitchen Door}

I don’t remember the day in that much detail, but what sticks with me the strongest is our ceremony. Standing under the pine trees clinging to Trevor’s arm, my brother welcoming our friends, my mother standing at my side, and the teary-eyed faces of so many of the people that I love staring back at me, I felt a truly powerful surge of love and wonder. We spent the weeks leading up to the wedding writing our ceremony, which was difficult, but important: when we stood up there, we knew exactly what we were saying and why. My brother officiated, and standing in the basement in a bit of a panic moments before the ceremony, hearing my friends laugh as he stood up there joking with the crowd was truly what calmed me enough to get myself out the door.

Our Wedding - Maine Barn Wedding {Katie at the Kitchen Door}

Our Wedding - Maine Barn Wedding {Katie at the Kitchen Door}

And then, we were off. People stood in clusters on the lawn drinking white wine and playing lawn games, or sat on the dock watching the light change over the lake. As the sun started to set we were seated at the long farm tables and the toasts began, making me cry, for the first time that day. Then we ate, and laughed, and talked, and it felt exactly like the wonderful dinner party we were envisioning.

After dinner, the evening devolved, as we had hoped it would, into tequila shots and dancing barefoot on the lawn, friends sneaking off into the woods and out on the canoe, sitting around the campfire and eating s’mores. This is less a memory and more a blur of mental snapshots. Immediately after the wedding I felt devastated by the fact that I couldn’t remember each moment, but a year later, I’ll take the happy blur. Happy blur is what we were going for, after all.

Our Wedding - Maine Barn Wedding {Katie at the Kitchen Door}


Our Wedding - Bouquet: dahlias, eucalyptus, astilbe, roses, hypericum {Katie at the Kitchen Door}

As for the details, for those of you who get into this kind of thing: the ceremony benches were planks of white oak milled from trees on the property. The tables, too, were made by hand and painstakingly finished to showcase the beautiful wood. I did the flowers myself, with the help of my bridesmaids, using homegrown dahlias, garden roses, astilbe, eucalyptus and hypericum. Plus cosmos, Queen Anne’s lace, and leucothoe borrowed from a neighbor’s garden two days before the wedding when it turned out one of the flower companies I had ordered from was a scam. Those missing flowers were the only near disaster of the whole DIY affair, and the day was promptly saved by my incredible friend Veronika, who bought all the roses at Wholefoods before she left Boston, and several generous neighbors. Cosmos and Queen Anne’s lace have a special place in my garden now.

Our Wedding - Maine Barn Wedding {Katie at the Kitchen Door}

Our Wedding - Maine Barn Wedding {Katie at the Kitchen Door}

Our Wedding - Maine Barn Wedding {Katie at the Kitchen Door}

And, since this is a food blog, the menu: for the happy hour, ceviche, buttermilk fried chicken bites in a waffle cone, and sliders (at the bride’s insistence!) with blue cheese and candied bacon. Dinner was family style, and heaping platters of espresso-rubbed flank steak, lemon rosemary roasted chicken, sweet corn succotash, and smoked gouda mashed potatoes made their way up and down the length of each table. We skipped the cake and instead went for mini pumpkin cheesecakes, blueberry pies, and banoffee parfaits. Everything was incredible and our caterers, Bar Harbor Catering Company, did a truly fantastic job. Not only was the food delicious but the event planning and coordination that they provided was just really game changing. Last but far from least, The Spragues captured everything perfectly, while somehow managing to seamlessly  join our guests in the party.

The Liquid Ditty: Bourbon, Calvados and Cider Cocktail {Katie at the Kitchen Door}

The Liquid Ditty: Bourbon, Calvados and Cider Cocktail {Katie at the Kitchen Door}

Beyond these pictures and memories, I have one more thing to share with you: our signature cocktail recipe. We wanted something that was autumnal without being overly cozy, to suit that in-between season of mid-September in Maine. We ended up with the Liquid Ditty: bourbon, dry hard cider from Bantam, Calvados, and honey-sage syrup. (An aside, Trevor and I just engaged in a rigorous debate about what to name this cocktail. A search on “Golden Apple” led us down a Wikipedia rabbit hole through Greek mythology to recently discovered dwarf planets. “Apple of Discord” was deemed unfit for a wedding cocktail, and I couldn’t convince him that “Apple of Bliss-chord” was hilarious. We considered “The Spitz,” named after the Esopus Spitzenburg apple tree in our front yard., but ultimately, we’ve settled on the “Liquid Ditty.” It’s a reference to Poe’s poem “The Bells,” which Trevor strongly associates with our wedding day. Plus, it’s catchy. Alternate name suggestions still welcome.) Nearly a year later, I’ve mixed up another batch to drink on the porch with Trevor. It’s just as delicious as I remember it – crisp and appley with just a hint of sage. We’ll be drinking these all September.

The Liquid Ditty: Bourbon, Calvados and Cider Cocktail {Katie at the Kitchen Door}

Print

The Liquid Ditty: Bourbon, Calvados, and Cider Cocktail

The Liquid Ditty: Bourbon, Calvados and Cider Cocktail {Katie at the Kitchen Door}

A crisp and refreshing cocktail for the season in between summer and fall. Hard cider, Bourbon, Calvados, and honey-sage syrup come together for a chilled autumnal sipper. We came up with this drink to celebrate our wedding and now it’s a September favorite.

A Katie at the Kitchen Door original recipe.

  • Author: Katie at the Kitchen Door

Ingredients

Scale

For the honey-sage syrup:

  • 1/2 cup water
  • 1/2 cup honey
  • 15 leaves fresh sage, roughly chopped

For each cocktail:

  • 1 part Calvados
  • 2 part Bourbon
  • 1 part honey-sage syrup
  • 1 part chilled hard dry cider, such as Bantam Wunderkind
  • 1 sage leaf, for garnish
  • ice

Instructions

For the honey-sage syrup:

Bring all ingredients to a simmer. Let simmer for 3-5 minutes, until sage is bright green and syrup is foamy. Remove from heat and let steep for 10 minutes.

For each cocktail:

Stir together Calvados, honey-sage syrup, and Bourbon to combine. Pour over ice in an old-fashioned glass. Top off with cider, garnish with a sage leaf, and serve.

Did you make this recipe?

Share a photo and tag us — we can't wait to see what you've made!


Red Currant Coffee Cake {Katie at the Kitchen Door}

5 August 4, 2018 Breakfast

Red Currant Coffee Cake

Red Currant Coffee Cake {Katie at the Kitchen Door}

Every year in the middle of July there’s a spike of traffic on my red currant posts – these red currant crumb bars are particularly popular. And I get so excited, because it means that there are other people out there who like these beautiful berries as much as I do! We get a bumper crop of red currants every year around the second week of July: they are easily the most productive, easiest crop in our little garden. We transplanted one small bush 3 years ago when we moved in, and this year we picked almost four pounds of currants from it.

Red Currant Coffee Cake {Katie at the Kitchen Door}

Red Currant Coffee Cake {Katie at the Kitchen Door}

Four pounds of currants is quite a few. Thankfully, they freeze very well. But I also try to come up with at least one new red currant recipe every year. Judging by the search traffic on my other red currant recipes and your comments on this post, I can tell that lots of you are still wondering what to do with these sour little berries. And it’s a good question! There aren’t a ton of recipes out there, as these berries are still relatively uncommon in the US.

This year I made an easy Red Currant Coffee Cake to use up some of our bounty. Coffee cake is such a great American recipe. Of course, like most American things, it originated somewhere else – Germany in this case. But 150 years on, I think it’s fair to say that there’s a distinct American tradition of coffee cake that has evolved from its German roots. There’s something so satisfying about a crumbly-topped, cinnamon-scented slice of cake eaten with a mug of tea or coffee. It isn’t dainty like British tea-time snacks, it’s unapologetically just… cake for breakfast. And when packed with red currants, it has a great sour, juicy tang to counter some of that over-the-top sweetness.

I managed to cram two cups of berries into one cake (making cake for breakfast feel almost virtuous) but we still have loads of currants to use up. If you’re in the same boat and looking for more inspiration, why not try out some of my other red currant recipes, below!

Like what you just read? Subscribe to Katie at the Kitchen Door in the box on the right, on Feedly or Bloglovin‘, or follow along on Facebook, Twitter, Pinterest, and Instagram. Thanks for reading!

More Red Currant Recipes…

Red Currant Crumb Bars

Red Currant Kompot

Red Currant Chutney

Red Currant Crème Brûlée

Red Currant Crème Brûlée


Red Currant Coffee Cake {Katie at the Kitchen Door}


Print

Red Currant Coffee Cake

Red Currant Coffee Cake {Katie at the Kitchen Door}

A simple Red Currant Coffee Cake – moist cake, sweet crumb topping, crammed full of sour red currant berries.

Cake recipe adapted from Cranberry Vanilla Coffee Cake, originally sourced from Gourmet.

  • Author: katieatthekitchendoor
  • Prep Time: 30
  • Cook Time: 50
  • Total Time: 1 hour 20 minutes
  • Yield: 8-10 1x

Ingredients

Scale

For the cake:

  • 2 cups flour
  • 2 tsp baking powder
  • Pinch salt
  • 1 cup sugar
  • 1 stick softened butter
  • 2 eggs
  • 1/2 cup whole milk
  • 1 tsp vanilla extract
  • 2 cups (12 oz.) fresh red currants, tossed with 2 tsp flour

For the streusel:

  • 3 TBS butter, room temperature
  • 3 TBS brown sugar
  • 3 TBS white sugar
  • 1/4 cup flour
  • 1/4 tsp ground cinnamon

Instructions

  1. Make the cake: Preheat the oven to 375F. Butter and lightly flour a 9 inch cake pan or springform pan. Tap any excess flour out over the sink. Set prepared pan aside.
  2. Whisk together the flour, baking powder, and salt in a medium bowl. Set aside.
  3. Add the softened butter and the sugar to the bowl of a mixer and beat on medium until light and fluffy. Beat in the eggs one at a time, beating just until they are incorporated, then stopping the mixer. Add half of the flour mixture to the butter-sugar-egg batter and beat just until incorporated. Now add the milk and beat on low just until incorporated. Add the remaining half of the flour mixture and beat until incorporated. Remove the bowl from the mixer – you’ll do the rest by hand.
  4. Stir in the vanilla extract until it is evenly mixed into the batter. Add the flour-coated currants (the light flour coating helps prevent them from sinking when mixed into the cake) and gently stir until they are evenly distributed throughout the batter. Use a spatula to scrape the batter into the prepared cake pan. Smooth out gently so the batter is level.
  5. Make the streusel: In a small bowl, use your fingers to mix together the butter, brown sugar, sugar, flour, and cinnamon until it forms a crumbly mixture with pieces the size of peas. Sprinkle over the top of the cake batter.
  6. Bake the cake: Transfer the cake to the pre-heated oven and bake until a toothpick inserted in the center comes out clean and the top of the cake is golden brown, about 50-60 minutes. Remove from oven. Let cool for 15 minutes, then remove from the pan, slice, and serve warm.

Did you make this recipe?

Share a photo and tag us — we can't wait to see what you've made!

Earl Grey Cake with Fig Jam Buttercream {Katie at the Kitchen Door}

2 June 2, 2018 Current Feature 2

Earl Grey Cake with Honey-Fig Buttercream

Earl Grey Cake with Fig Jam Buttercream {Katie at the Kitchen Door}

I just spent the loveliest six weeks at home. It’s the first time this year that I’ve been home for more than a few weeks at a stretch and boy did I need it. I leaned hard in to the rhythms of being home: cooking dinner, evening runs, couch time with Trevor, grocery shopping, sleeping in, long yoga sessions, learning a new sonata on the piano. I have always been a creature of habit and a bit of a homebody – a few weeks of chill is a type of bliss for me. Travel makes the pleasures of being home that much sweeter.

Earl Grey Cake with Fig Jam Buttercream {Katie at the Kitchen Door}

Since getting home, I turned 29. Trevor turned 29. I got my first pair of glasses, and was amazed by the clarity of trees in the distance, and of our TV. The fruit trees bloomed and faded in a whirlwind few days. Our garden turned from a patch of dirt with a handful of lonely daffodils into a plot bursting with green potential. The first rose opened, and the irises are brilliant in full bloom. Every day we get a few perfectly ripe strawberries – whatever the pesky robin doesn’t get overnight. We had a rainy mother’s day brunch by the fire that turned into a brilliantly sunny walk in the woods an hour later. My best friend from high school got married in the Boston Public Library on a chilly grey day filled with love and champagne. It’s a beautiful time of year to be in Boston and I’m so grateful to be home for it!

Earl Grey Cake with Fig Jam Buttercream {Katie at the Kitchen Door}

Earl Grey Cake with Fig Jam Buttercream {Katie at the Kitchen Door}

For each of our birthdays I made a cake. For mine, a vanilla sponge with strawberry jam and strawberry buttercream. For Trevor, an earl grey sponge with honey-fig buttercream. Both cakes disappeared without a problem, but Trevor’s earl grey cake was truly special. Pretty cakes are not my strong suit (a buttercream expert I am not) but this tasted so good that I covered it up with fresh figs and flowers and snapped a few pictures so I could share it with you. I can’t take credit for either recipe component, only the combination. The earl grey cake is from Liv for Cake and the Italian meringue fig buttercream is from Sticky Spatula. I struggled a bit with the buttercream splitting after a night in the fridge, but the flavor was beautiful and paired perfectly with the cake. If you have a special occasion coming up that calls for subtle flavors and a bit of refinement, I highly recommend this cake!

Earl Grey Cake with Fig Jam Buttercream {Katie at the Kitchen Door}

Print

Earl Grey Cake with Honey-Fig Buttercream

Earl Grey Cake with Fig Jam Buttercream {Katie at the Kitchen Door}

A beautifully-flavored and moist Earl Grey Cake topped with an Italian Meringue Buttercream flavored with fig jam. Elegant and refined for a celebration. This makes a 3-tier, 6-inch cake.

Cake recipe adapted from Liv for Cake. Frosting recipe adapted from Sticky Spatula.

  • Author: Katie at the Kitchen Door

Ingredients

Scale

For the cake:

  • 1 cup whole milk
  • 4 bags of early grey tea, divided
  • 1 1/2 sticks salted butter, at room temperature
  • 1 1/2 cups sugar
  • 3 large eggs, at room temperature
  • 1 1/2 tsp vanilla extract
  • 2 1/4 cups AP flour
  • 2 tsp baking powder
  • 1/2 tsp sea salt

For the buttercream frosting:

  • 1/2 lb. ripe figs
  • 1 1/4 cup granulated sugar, divided
  • 4 TBS honey
  • 3 egg whites at room temperature
  • 1/4 cup water
  • 1 1/2 sticks unsalted butter, at room temperature
  • 1/2 tsp vanilla extract

For decorating:

  • 6 fresh figs
  • honey

Instructions

For the cake:

  1. Microwave the milk on high until steaming, about 60-90 seconds. Add three of the earl grey teabags to the milk and let steep for 10 minutes. Remove the teabags, pressing any extra milk out of them with a spoon. and discard the teabags. Set earl grey milk aside, allowing it to come to room temperature.
  2. Add the butter and the sugar to a mixer and beat with a paddle attachment on medium until it is pale, creamy and very smooth, about 2 minutes. Turn off. Add one egg and beat on low just until the egg is incorporated. Repeat with the remaining eggs, one at a time. Scrape the sides of the bowl with a spatula as needed to ensure that all the ingredients are being evenly mixed.
  3. In a medium bowl, whisk togther the flour, baking powder and sea salt. Cut open the remaining earl grey tea bag and pour the tea into the flour mixture. (If the tea is in very large pieces, pulse it in a coffee grinder before adding to the flour). Whisk to combine.
  4. Add 1/3 of the flour mixture to the batter and beat on low just to incorporate, about 30 seconds. Add 1/2 of the earl grey milk and beat just to incorporate, another 30 seconds. Repeat twice more, ending with the final 1/3 of the flour mixture. You should have a smooth, spreadable batter without any lumps.
  5. Preheat the oven to 350F. Butter the bottom and sides of three, 6-inch cake tins. Cut a round of parchment paper to fit into the bottom of each tin and use this to line the bottom of the each tin. Divide the cake batter between the tree tins, using a spatula to evenly smooth the batter out. Batter should fill a little more than half-way up each tin. Bake the cakes in the preheated oven for 40-50 minutes. They are done when the cake surface springs back when lightly pushed down, and a toothpick inserted into the center of the cake comes out clean. Remove from the oven and let cool for 10 minutes, then run a knife around the inside of each cake tin and invert to release the cake. Let cakes cool completely on a cooling rack before frosting.

For the frosting:

  1. Wash and quarter the figs, removing and discarding any remaining stems. Place in a saucepan with 1/2 cup of the sugar and the honey. Gently mash the figs with a wooden spoon. Bring to a simmer over medium heat. Simmer, stirring often, until the figs are soft and jammy, about 15 minutes. Strain the jam through a mesh strainer, setting the thinner jelly aside to add to the frosting. Save any remaining fig chunks for another purprose (or just eat them!).
  2. Place the remaining 3/4 cup of sugar in a saucepan. Add the 1/4 cup water and stir to fully moisten the sugar, taking care not to get sugar water on the sides of the pan (which may cause the syrup to crystallize). Bring the sugar water to a boil over a medium-high heat. Clip a candy thermometer to the side of the pan and bring the sugar to 240F. As soon as it reaches this temperature, turn off the heat.
  3. Add the egg whites to the bowl of a mixer. Beat on high until they are white and frothy and form soft peaks. At this stage, continue beating while very slowly and carefully drizzling the hot sugar syrup down the side of the bowl into the egg whites. Pour in a thin stream until you have used all the sugar syrup up – egg whites should be glossy and hold stiff peaks.
  4. Continue beating the egg whites on medium speed until it is room temperature with no warmth felt through the bowl. At this stage, begin adding the butter 1 TBS at a time. Butter should incorporate into the frosting smoothly. Once all the butter is incorporated and the frosting is smooth and glossy, add the fig jelly to the buttercream and beat until incorporated. If you’re having trouble with the buttercream, try reading some of the tips in this article.

For assembly:

  1. If necessary, use a serrated knife to cut any domed top off of each cake so that both the top and bottom of each cake is flat. Use a dab of frosting to stick the bottom layer cake to a cake stand. Smooth a thick layer of buttercream on top of the bottom layer of cake, then top with the next layer of cake. Repeat until you have three layers of cake with two layers of buttercream between them.
  2. Smooth a thin layer of buttercream all around the cake. If the cake is crumbling into the frosting, pause here and refrigerate the cake for 30 minutes to set the crumb coat, then continue frosting so that you have a smooth, thick layer of buttercream on all sides of the cake. Top with fresh figs, sliced in half, and a drizzle of honey.

Did you make this recipe?

Share a photo and tag us — we can't wait to see what you've made!

Bún Bò Xào - Vietnamese Rice Noodle Salad with Lemongrass Beef

33 March 24, 2018 Asian and Indian

Bún Bò Xào – Vietnamese Rice Noodle Salad with Lemongrass Beef

Bún Bò Xào - Vietnamese Rice Noodle Salad with Lemongrass Beef

The first three months of the year have been a total whirlwind. Since the last time I checked in, I’ve spent two weeks in Hong Kong, a week and a half in Singapore, and a few days in Thailand. And in the brief in between times back in the US, I left home again for weekend trips to Austin, Nashville, and Montreal. So despite the snowy remnants of the last few March Nor’easters, I’m relishing a few quiet weeks at home. I’m planning the garden and reading and cooking and just generally doing the small things that make me happiest. And it means I have the chance to blog for the first time since January!

Bún Bò Xào - Vietnamese Rice Noodle Salad with Lemongrass Beef

Bún Bò Xào - Vietnamese Rice Noodle Salad with Lemongrass Beef

Generally, I quite like the food in Asia. Particularly so in Hong Kong and Singapore, where you can find pretty much any type of food you want. It helps that Hong Kongers and Singaporeans are obsessed with food so everything meets a minimum standard of good. But after two weeks on the road, lots of Chinese and Thai and room-service gets heavy. When I hit that point, I turn to Vietnamese for brightness and fresh vegetables. Compared to the cuisines of neighboring countries, Vietnamese food is light and refreshing. Lots of mint, basil, cilantro, and pickled vegetables bring a greenness that I really crave when traveling.

Bún Bò Xào - Vietnamese Rice Noodle Salad with Lemongrass Beef

One of my go-to orders is bún, a rice noodle salad with several options for customization. I like it best with grilled lemongrass beef and a mass of pickled carrots. After my last trip I attempted making it at home, and it was surprisingly easy to make a convincing replica of my favorite restaurant versions. I love the slightly floral sweetness that the lemongrass lends to the beef, and the contrast the hot beef provides to the cool noodles and vegetables. Bún is good pretty much any time of year, but it’s particularly refreshing when the weather is hot and swampy. So, why make it in March? Brightness. I realize we’re pretty far from days that qualify as “hot,” but I’m so, so ready to eat bright-tasting things in March. This fits the bill perfectly!

Bún Bò Xào - Vietnamese Rice Noodle Salad with Lemongrass Beef

Print

Bún Bò Xào – Vietnamese Rice Noodle Salad with Lemongrass Beef

Bún Bò Xào - Vietnamese Rice Noodle Salad with Lemongrass Beef

A quick and refreshing Vietnamese rice noodle salad named Bún Bò Xào. Stir-fried lemongrass beef, pickled carrots, and sweet-salty nuoc cham sauce bring tons of flavor to this bright dinner.

Adapted from Vietnamese Home Cooking.

  • Author: Katie at the Kitchen Door
  • Yield: 4 1x

Ingredients

Scale

For the Lemongrass Beef:

  • 2 stalks fresh lemongrass
  • 5 cloves garlic
  • 1 TBS sugar
  • 1 tsp sea salt
  • 1 TBS soy sauce
  • 1 TBS sesame oil
  • 2 TBS canola oil
  • 1 lb thinly sliced flank steak

For the pickled carrots:

  • 2 large carrots, peeled
  • 1/3 cup distilled white vinegar
  • 1/3 cup sugar
  • 1/3 cup water
  • 1 whole star anise

For the nuoc cham:

  • 1/4 cup fish sauce
  • 3 TBS sugar
  • 1/3 cup warm water
  • 3 TBS white vinegar
  • 1 Thai chile, stemmed and finely minced
  • 1 clove garlic, peeled and finely minced

For the bowls and assembly:

  • 10 oz. dried rice vermicelli noodles
  • 1 TBS canola oil
  • One bunch of fresh mint, leaves picked off and washed
  • 1/2 cup chopped peanuts, toasted in a dry pan for 3–4 minutes

Instructions

  1. To make the beef marinade: Remove and discard the outer layer of each piece of lemongrass. Trim about 3-inches of the dry, stick-like part of the lemongrass from the top so that you are left with the plumper, white interior. Slice this interior into small coins, and then finely chop those coins until evenly minced. Place minced lemongrass in a medium bowl. Peel and mince the garlic and add to the bowl with the lemongrass. Add the sugar, salt, soy sauce, sesame oil and canola oil to the bowl and stir to combine. Add the sliced flank steak and stir to coat with the marinade. Cover with plastic wrap and refrigerate for at least 4 hours.
  2. To make the pickled carrots: Use a julienne peeler to shred the carrots into long, noodle-like strips. If you don’t have a julienne peeler, carefully chop the carrots into long, thin match-sticks. Place the carrots in a heatproof bowl. Add the vinegar, sugar, water, and star anise to a small saucepan. Bring to a simmer over medium heat, stirring to dissolve the sugar. Simmer just for 30 seconds, then pour the hot liquid over the carrots. Cover with plastic wrap and refrigerate until ready to use, at least an hour. Discard the star anise before serving.
  3. To make the nuoc cham: Place all of the ingredients in a medium bowl. Stir until the sugar is dissolved. Taste and adjust seasoning if desired.
  4. To finish and assemble the bowls: Cook the rice noodles according to the package directions. Drain and rinse.
  5. Just before serving, cook the beef. Heat the canola oil in a large, heavy-bottomed frying pan over medium-high heat. When the pan is hot, add the marinated beef to the pan in batches (each batch of beef should easily fit in the pan in a single layer). Cook the beef for 1-2 minutes on each side, until deeply caramelized on the outside but just tender in the center. Remove to a plate and continue until you have cooked all the beef.
  6. To serve, fill each bowl halfway with rice noodles. Top with a quarter of the pickled carrots, several pieces of the cooked beef, a small handful of fresh mint leaves, and 2 tablespoons of chopped peanuts. Serve the bowls with the nuoc cham sauce on the side, so that each person can dress their bowl according to taste.

Notes

If you pickle the carrots at the same time that you marinate the beef, this will only take about 20 minutes to finish up before serving.

Did you make this recipe?

Share a photo and tag us — we can't wait to see what you've made!


Winter Pasta with Slow-Cooked Kale, Kabocha Squash, and Golden Raisins

18 January 7, 2018 Current Feature 2

2017 – A Year in Review // Winter Pasta with Slow-Cooked Kale, Kabocha Squash, and Golden Raisins


Winter Pasta with Slow-Cooked Kale, Kabocha Squash, and Golden Raisins

Although I’m a bit later than usual this year, my annual year-end post is one of my favorite things to write each year. I love reading other people’s posts, too, even people I don’t know personally. I like reflecting on how much growth and change and activity a single year can hold. It gives me perspective. But, if you’re not a big fan of this sort of thing, or of lengthy personal blog posts, skip on down to the end. There’s a recipe for a kale, golden raisin, and kabocha squash pasta that’s been getting me through this cold snap. I’ve made it four or five times to get the balance just right, and now it’s become my go-to winter pasta.

For those of you sticking with me for the long haul, let’s talk about 2017. For me, 2017 was the year of the wedding, first and foremost. After that, there was travel – but less of it than 2016 and 2015 and more of it for fun than for work. It was a year of great and easy friendships, of growing beautiful flowers, of work weekends in Maine. It was a good year, perhaps not a great year, but a good one.

Outdoor Maine Wedding

Katie & Trevor's Maine Barn Wedding

The big thing – our wedding

Of course, we knew before the year even started that 2017 would be the year of the wedding. It dominated the whole year. Our wedding day turned out more beautiful than we had imagined, but it was a huge amount of work to get there. We had our wedding at my parent’s house in Maine, and it was very much a from-scratch affair. We built the barn by hand (and by we I mean mostly my parents), which was an enormous undertaking. We had gorgeous hand-made farm tables milled from trees on the property. I did my own flowers, and grew half of them. (As an aside, 2017 was 100% a year of flowers for me. I fell in love with flower gardening and arranging and I can’t wait to get my seeds started in the spring.) Every aspect of the wedding was personal and lovely, but it was so much work. I’m really glad we got married and had our closest friends and family there by our sides, and I’m really glad we’re not doing it again.

Fimmvörðuháls Waterfall Hike, Iceland

Twenty-eight countries and counting

Trevor and I kicked off the year with five weeks in Portugal, an incredible escape from the cold and dark of January in Boston. Of course, I was working the whole time, but we still got to explore on weekends and immerse ourselves in the wonderful Portuguese culture. I leave a little part of my heart everywhere I travel, but I left a big piece in Portugal. I miss the food and the wine, the lonely sounds of fado in tiny clubs, the white light reflecting off the cobblestones. I miss the café culture and the gentle winter sunshine. I miss the people, my coworkers and friends, who opened their hearts to us so easily. I miss the language, which I still practice almost daily, in hopes that I’ll need it again. I’m glad that we’re staying put this winter, after relocating for January and February in the past two years, but it was a wonderful experience to live in Lisbon.

In July, I took a long-anticipated trip to Iceland with three of my best girlfriends. It was a short trip – just five days – but absolutely packed. Iceland was stunning and wild, exceeding my already high expectations. It was also wonderful (if very tiring) to travel with friends, something I hadn’t done before beyond short weekend trips in the states. I already can’t wait to return to Iceland and continue exploring. And in November, we made a Thanksgiving trip to Colorado and Utah to visit my extended family. The sun was life-giving, and we were outside hiking in the beautiful desert every day.

Dreznica, Slovenia

And then of course, there was our honeymoon. We were gone three full weeks, making our way up the Croatian coastline, driving through the Slovenian alps, then wrapping up with a city break in Prague. It was an epic trip. It was also so nice to just be with Trevor for three weeks and… hang out. Of course we were exploring and adventuring but we were also just being us, something I had missed in the chaos leading up to the wedding. I’ll write about our trip properly someday, but for now, I’ll just mention the highlights. There was a sunset bike ride through the sleepy hill-top olive groves in Korcula, followed by an unforgettable candlelit dinner under pomegranate trees. We spent an afternoon drinking champagne and watching the sun slowly sink over the Adriatic at a seaside bar where you could climb down into the ocean at any point. We hiked up through the emerald gorges in Slovenia, following a wooden sign with a piece of cheese on it, until we reached a beautiful alpine valley with two houses, one of which did, indeed, serve us some cheese. We designed our own brewery tour in Prague, sampling the best of the Czech Republic’s beer scene. We fit so much into three weeks – it will be a hard trip to top.

For other work travel, there was one follow-up trip to Portugal in April, for my birthday in fact. Never have I received so many hugs on a single day. A July trip to Hong Kong and Singapore registers as barely a blip on my mental calendar of the year, although it was my first time in Singapore. I’ll be back to both countries in a few weeks, and I’m excited to escape the cold (and for the food! Always the food). Then just a few weeks ago, a December trip to a small town in Northern Ireland followed by two days in Dublin. I love Ireland for so many reasons but this trip was a blur, especially getting home just three days before Christmas. Overall, work travel felt much more manageable this year – hopefully I can carry that through into 2018.


The best people

I’m not particularly quick to make new friends – I’ve always done better with a small group of people I’m really close to. But after 6 years living in Boston, I have such a solid crew, many of them high school friends who have moved back to the area. They are all good, smart people who are easy to be with, and some of my best memories of this year were with them. A lazy August Sunday spent tubing down the Saco river was a highlight, as was a weekend at a friend’s Maine island cottage, complete with hours of wine-laced Molkky, a candlelit lobster dinner, the poetry reading that his father mandates, beautiful sailing, and a late night bonfire dance party. And, I almost forgot, our 10 year Andover reunion. I imagine most people don’t look forward to their high school reunions as much as we do. It was a blissful weekend full of super impressive people, an all day kickball lawn party (complete with kegs), midnight dancing, and collapsing on the lawn in fits of giggles around 2am. Sunday we couldn’t move, because we’re old now, but it was worth it. Add to this the many other dinner parties, bar nights, one epic scavenger hunt birthday party and a casual NYE game night turned dance party to close out the year, and it sums up to a year of really good playtime with really good friends.

Winter Pasta with Slow-Cooked Kale, Kabocha Squash, and Golden Raisins

Working and blogging and growing

I feel a huge amount of relief going into 2018 with an understanding of what I want this blog to be. I spent the first half of 2017 listening to blogging podcasts ad nauseam, investing in a new design and a mailing list and SEO plugins. I thought a lot about my content and who I wanted it to reach, and I pored over my analytics to understand how I could grow. Basically, I hustled. It was stressful and frustrating and overwhelming. And then somewhere in the middle of all that hustle I realized that I don’t want to blog as a business-owner. That’s not why I started, and that’s not what brings me joy. I have a stable, compelling career that I love and it’s not blogging – so why should I turn blogging into work when it doesn’t need to be? I want to create beautiful content and delicious recipes and tell stories as long as it feels like a hobby and not a chore. Of course, it’s nice when a hobby has financial perks, but making business success the goal of blogging took all the fun out of it. Realizing this has been so helpful.

On the flip side of this blogging decisions lies my real work. Although I went through a similar questioning phase about what I wanted my next career move to be, I came out the other side with the realization that I really like my job. I’m going into 2018 in a new role, with a team and multiple projects to manage, and I’m excited. I have a lot to learn but I work in a team with the smartest, best people, which makes all the learning and growing easier.

Now for 2018

I’ve been reflecting this week about how open 2018 feels. It’s a wonderful feeling. Of course, we have things planned – weddings to attend and house projects and a few trips with friends already on our calendar. But largely, the year feels full of potential, untethered to major life milestones. I’m excited to see where it takes us, what new opportunities and adventures it will bring. My intentions for 2018 are to bring a sense of calm into every day, to spend as much time as I can outside in nature, to prioritize my health, and to learn and grow.

Winter Pasta with Slow-Cooked Kale, Kabocha Squash, and Golden Raisins

Winter Pasta

And if you made it through all of that… I’m impressed. I’m guessing even my mother will skim this one. So now, what most of you are here for, a recipe for a delicious winter pasta. A few year’s back I read a magazine article about how you should always be finishing your pasta in the pan with the sauce and a splash of the pasta cooking water, and it has totally changed the way I cook pasta. It’s such a simple trick and it makes a huge difference. Since reading that article, I’ve been experimenting with what I think of as “perfect seasonal pastas.” I test them over and over again until they are just right, foolproof, and full of seasonal ingredients. So far I have a summer pasta, with heirloom yellow tomatoes and sweet onions, a creamy mushroom spaghetti that is irresistible in the fall, and a spring carbonara with ramps and meyer lemon zest. Over the past 5 or 6 weeks I’ve been testing what I’ve come to think of as my winter pasta, and I’m ready to share it. This pasta has tuscan kale and shallots slow-cooked in white wine, plump golden raisins, a hint of chile, and sweet roasted kabocha squash. It is hearty and wintery without being overly heavy or creamy. It’s on weekly rotation in our house and I hope it will be in yours, too.

Happy 2018 to all of you!

Past New Years’ posts…

2016: Feta and Onion Phyllo Pie
2015: Brown-Butter Chestnut Waffles with Poached Pears and Mascarpone
2014: Rye Blini, Smoked Salmon Dip, Russian Beet Dip, Pretty in Pink Cocktail
2013: Raspberry Sherbet Champagne Floats
2012: Butter-Roasted Cinnamon Chicken with Almonds and Pomegranates

Like what you just read? Subscribe to Katie at the Kitchen Door in the box on the right, on Feedly or Bloglovin‘, or follow along on Facebook, Pinterest, or Instagram. Thanks for reading!

Winter Pasta with Slow-Cooked Kale, Kabocha Squash, and Golden Raisins

Print

Winter Pasta with Slow-Cooked Kale, Kabocha Squash, and Golden Raisins

Winter Pasta with Slow-Cooked Kale, Kabocha Squash, and Golden Raisins

A seasonal winter pasta with slow-cooked Tuscan kale, roasted kabocha squash and golden raisins. Satisfying and warming without being heavy.

Inspired by Sunday Suppers at Lucques.

  • Author: Katie at the Kitchen Door
  • Yield: 2-3 1x

Ingredients

Scale
  • 1/2 small kabocha squash, peeled, seeded, and cut into 1/2 inch cubes
  • 5 TBS olive oil, divided
  • sea salt and black pepper to taste
  • 4 shallots, peeled and thinly sliced
  • 4 cloves garlic, peeled and thinly sliced
  • 1 sprig fresh rosemary, needles finely chopped
  • 1 chile de arbol, broken in half (or 1/4 tsp red pepper flakes)
  • 1 bunch Tuscan kale, center ribs removed, torn into bite-sized pieces
  • 1/2 cup white wine
  • 1/4 cup golden raisins
  • 1/2 lb. orechiette pasta (or other similar shape)
  • 1/2 cup freshly grated parmesan cheese

Instructions

  1. Preheat the oven to 400F. Toss the cubed squash with 2 TBS of olive oil and spread out on a rimmed baking sheet. Season with sea salt and black pepper. Roast in the preheated oven until tender, about 25-30 minutes. Flip the squash cubes over halfway through cooking.
  2. Bring a large pot of salted water to boil.
  3. Heat 1 of the remaining tablespoons of olive oil in a large saute pan over medium-low heat. Add the sliced shallots, sliced garlic, chopped rosemary, and the chile de arbol to the pan. Saute until the shallots are soft and golden brown, about 5 minutes. Add the kale along with the remaining 2 tablespoons of olive oil. Season with sea salt. Cook the kale in the olive oil for 3-4 minutes, stirring frequently, then add the wine and the raisins to the pan. As soon as you add the wine, stir to scrape any burnt bits off the bottom of the pan.
  4. Cook the kale over low heat for about 10 minutes. After 10 minutes, add the pasta to the boiling water. Continue cooking the kale while the pasta cooks. When the pasta is just barely al dente, use a skimmer to add the pasta to the pan with the kale. Add a few splashes of the pasta cooking water to the pan as well, along with the grated parmesan cheese. Add the roasted squash to the pan. Cook everything together for 2-3 minutes, stirring to fully coat the pasta in the sauce and to evenly distribute the vegetables. Serve immediately.

Did you make this recipe?

Share a photo and tag us — we can't wait to see what you've made!

Russian New Year's Eve Menu - Potato Bites with Caviar

10 December 28, 2017 Holiday

Russian New Year’s Recipes and Celebration Menu with La Crema

Russian New Year's Eve Menu

This post is sponsored by La Crema Wines. All opinions here are my own. You can find the companion recipes over on the La Crema blog. 

Way back in 2013 (seems like ages ago now, doesn’t it?) I spent a lot of time in Russia. I’ve written about those trips a little bit, here and here, but never in great depth. I studied Russian throughout high school and college, so getting the chance to travel there for work was a dream. My primary destination was St. Petersburg, a glamorous, coastal city of old-world charm. I was there frequently between July – when the beauty and midnight sunsets of the white nights kept the whole city feeling celebratory – and December. And in December, it is very dark.

The dark is more shocking than the cold. In fact, at least in coastal St. Petersburg, it’s not much colder than New England. This week, for example, lows there are a balmy 29°F, while here in Boston we’re bracing ourselves for a week of -3°F nights. The dark, however, is a real challenge. For most of December, the sun rises at 10am and sets around 3:30. It never quite feels like daytime. The sun arcs low across the sky, resulting in sort of a 5 hour-long sunrise/sunset. In the context of all this darkness, it’s not hard to understand how New Year’s Eve became the bright spot of a Russian winter. It celebrates light and warmth, and requires feasting with friends long into the dark night.

For my final La Crema post of the year, I put together a celebratory menu of Russian-inspired New Year’s treats. A typical Russian New Year’s Eve spread consists of lots of small plates, salads, pickles, breads, and plenty to drink. A few years back I did a Russian-inspired end-of-year post, with recipes for rye blini, hot-smoked salmon dip, beet dip, and a pink vodka cocktail. This menu builds on those recipes. Taken all together, you could put together a pretty serious New Year’s Eve spread.

Russian New Year's Eve Menu - Potato Bites with Caviar

The first dish – Potato Bites with Caviar – is one of the easiest holiday appetizers I’ve ever made. All they require is boiling a pot of small potatoes, slicing them in half, scooping out a bit of the center, and dolloping each potato half with sour cream, a few pearls of caviar, and a tiny sprig of dill. That’s it – that’s the whole recipe in one sentence. And they are delicious! I was surprised by how addictive each little bite was.

The next dish is a bit strange to the American palate, but it’s super traditional. Herring Under A Fur Coat is a classic layered salad consisting of pickled herring, potatoes, carrots, onion, mayonnaise, beets, and hard-boiled eggs. I attempted to modernize it a bit, with the goal of making each layer taste good on its own. The changes I made were to cut out the mayo, add grated apple to the carrot and onion layer, and use smoked salmon in one half and pickled herring in the other. I also served them individually, for easier party-consumption. They were pretty good, although arguably still an acquired taste. Check out the recipe over on the La Crema blog if you’re feeling adventurous!

Russian New Year's Eve Menu - Mushroom Pirozhki

Russian New Year's Eve Menu - Herring Under a Fur Coat

Last in the menu is a party friendly version of my favorite Russian recipe – Mushroom Pirozhki. These are a bite-sized, vegetarian version of the Rabbit and Mushroom Pie I posted a few years back. These little guys are addictive, and the perfect party food (warm, carby, easy to carry, and great with wine!). The filling for these Mushroom Pirozhki is a tasty mixture of wild mushrooms, sour cream, wine, and dill.

With all these recipes, you probably don’t need much dessert. If you must have something sweet, put out some Russian chocolates (like Alenka if you can find them!) and fresh fruit. And of course, we can’t forget the drinks. While vodka is the traditional drink at a Russian New Year’s party, there’s plenty of room for other libations. I’m definitely more of a wine girl than a vodka girl, and I opened a bottle of La Crema’s Monterey Chardonnay and one of the Monterey Pinot Noir for this menu. The potatoes and herring salad are both best with the Chardonnay. Mushrooms are deeply earthy, so the pirozhki pair well with the Pinot Noir – but if you’re only opening one bottle, the dill and sour cream in the filling also make them a good match with the Chardonnay.

Enjoy, and don’t forget to head over to the La Crema blog via the links below for all the recipes:

  • Potato Bites with Caviar
  • “Herring Under a Fur Coat” Salad
  • Mushroom Pirozhki
Pecan Crescent Cookies {Katie at the Kitchen Door}

0 December 23, 2017 Current Feature

Pecan Crescent Cookies


Pecan Crescent Cookies {Katie at the Kitchen Door}

I’m home from my last trip of the year and very ready for a few days off for Christmas. Originally I had all kinds of last minute errands planned for today, but it’s treacherously icy outside. After a brief trip to the grocery store, the freezing rain had us turning tail to get back inside. Now we’re all sorts of cozy – wrapping presents, baking cookies, assembling this year’s gingerbread house, and listening to Christmas swing music. Although I still have a bunch of miscellaneous little things to do tomorrow, I’m so much happier for being forced to take a rest day. December always feels like a bit of a sprint, and now I want to slow way, way down.

If you’ve left your Christmas baking to the last minute, like I inevitably do, I have a simple little cookie recipe for you. They may not be the world’s prettiest cookie, but these Pecan Crescent Cookies are wonderfully tasty. I just took a batch out of the oven and can verify that they are just as good as I remember. You can also make them from start-to-finish in less than 45 minutes with only pantry ingredients. Perfect for a day when you really don’t want to leave the house (see: freezing rain).

Pecan Crescent Cookies {Katie at the Kitchen Door}
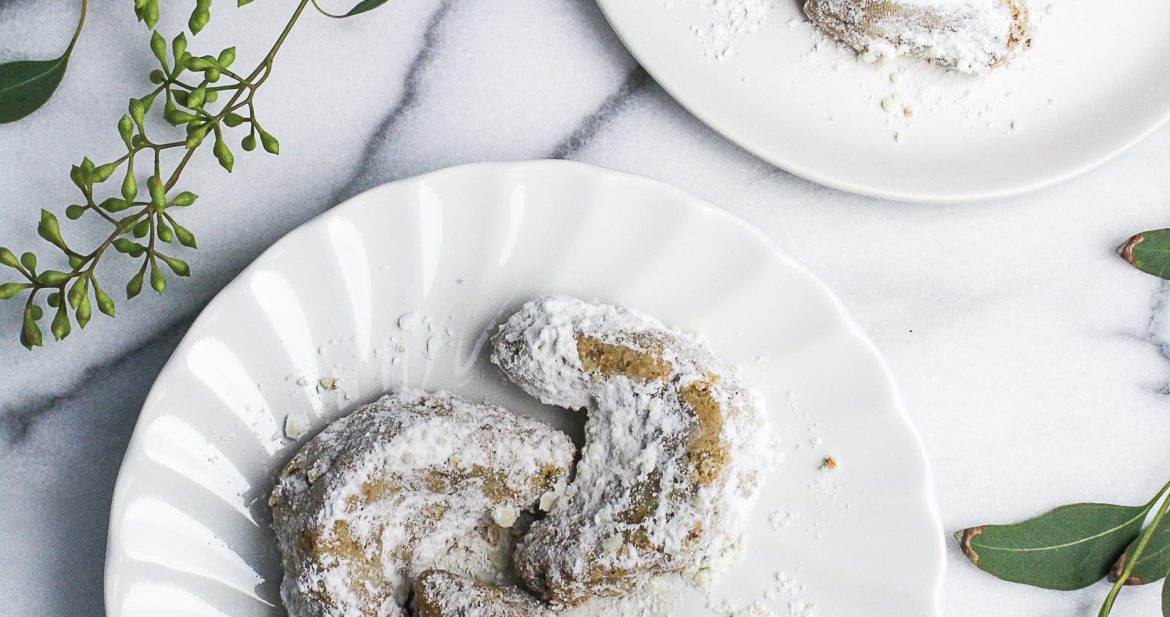
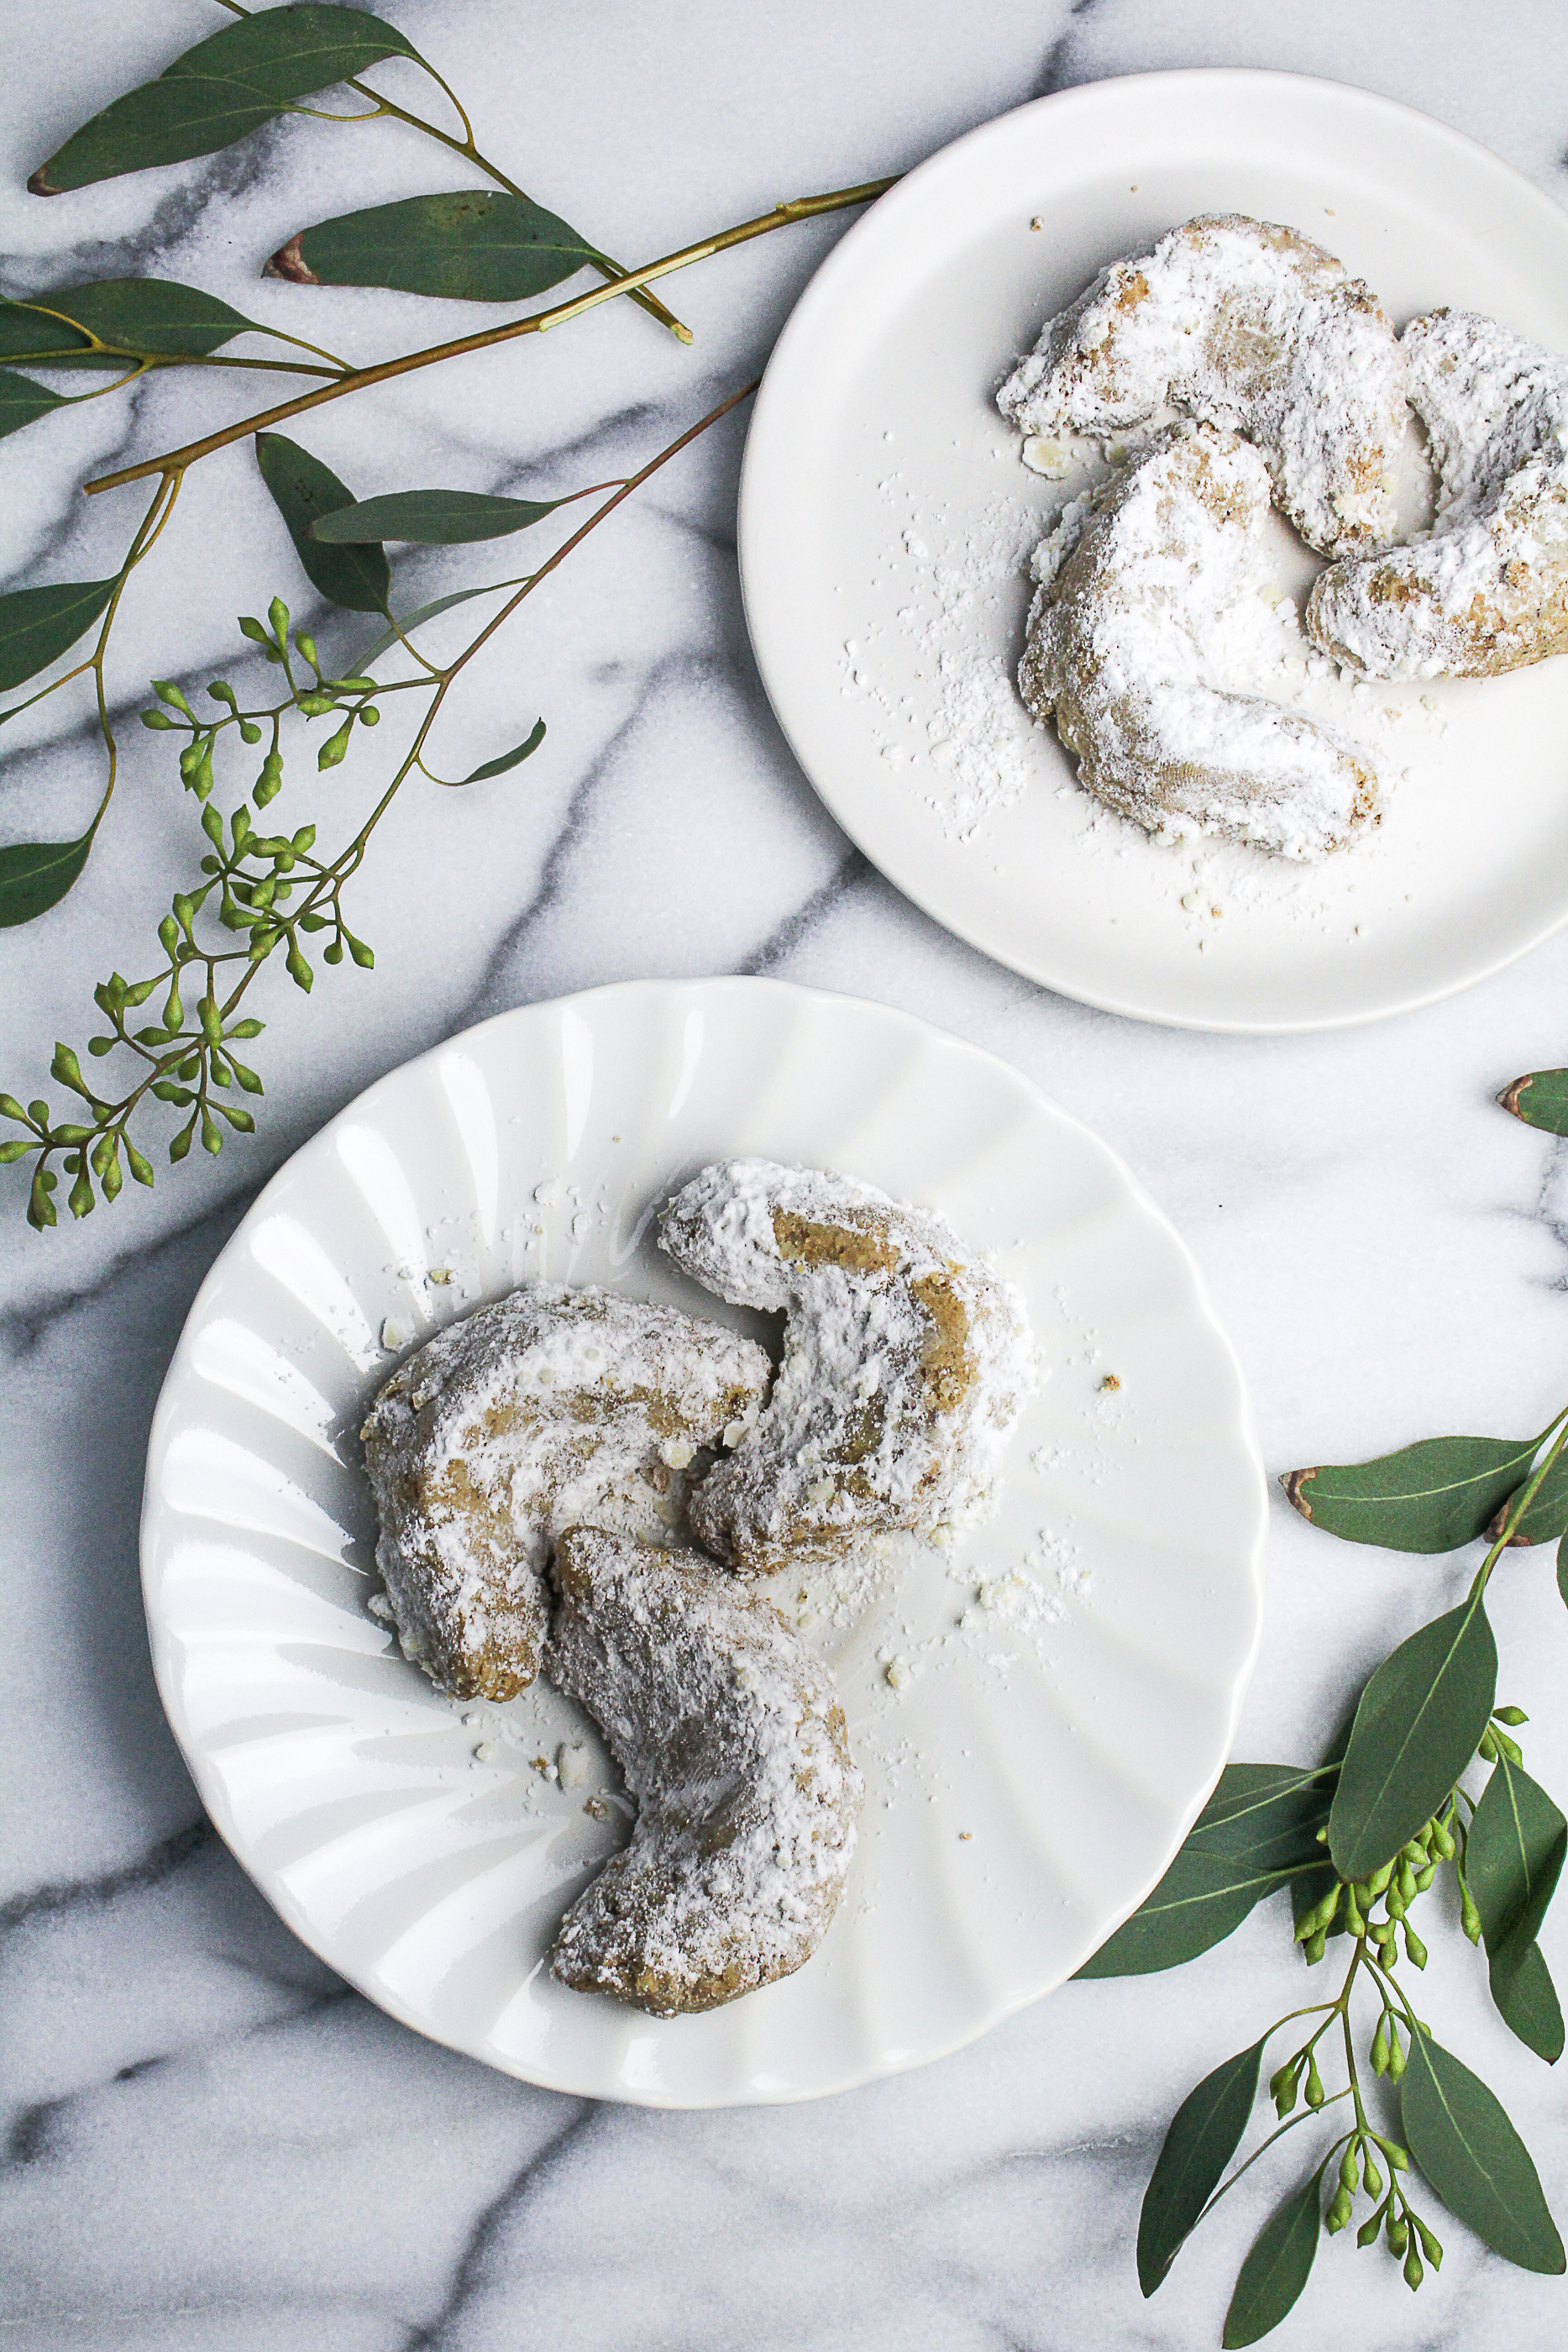
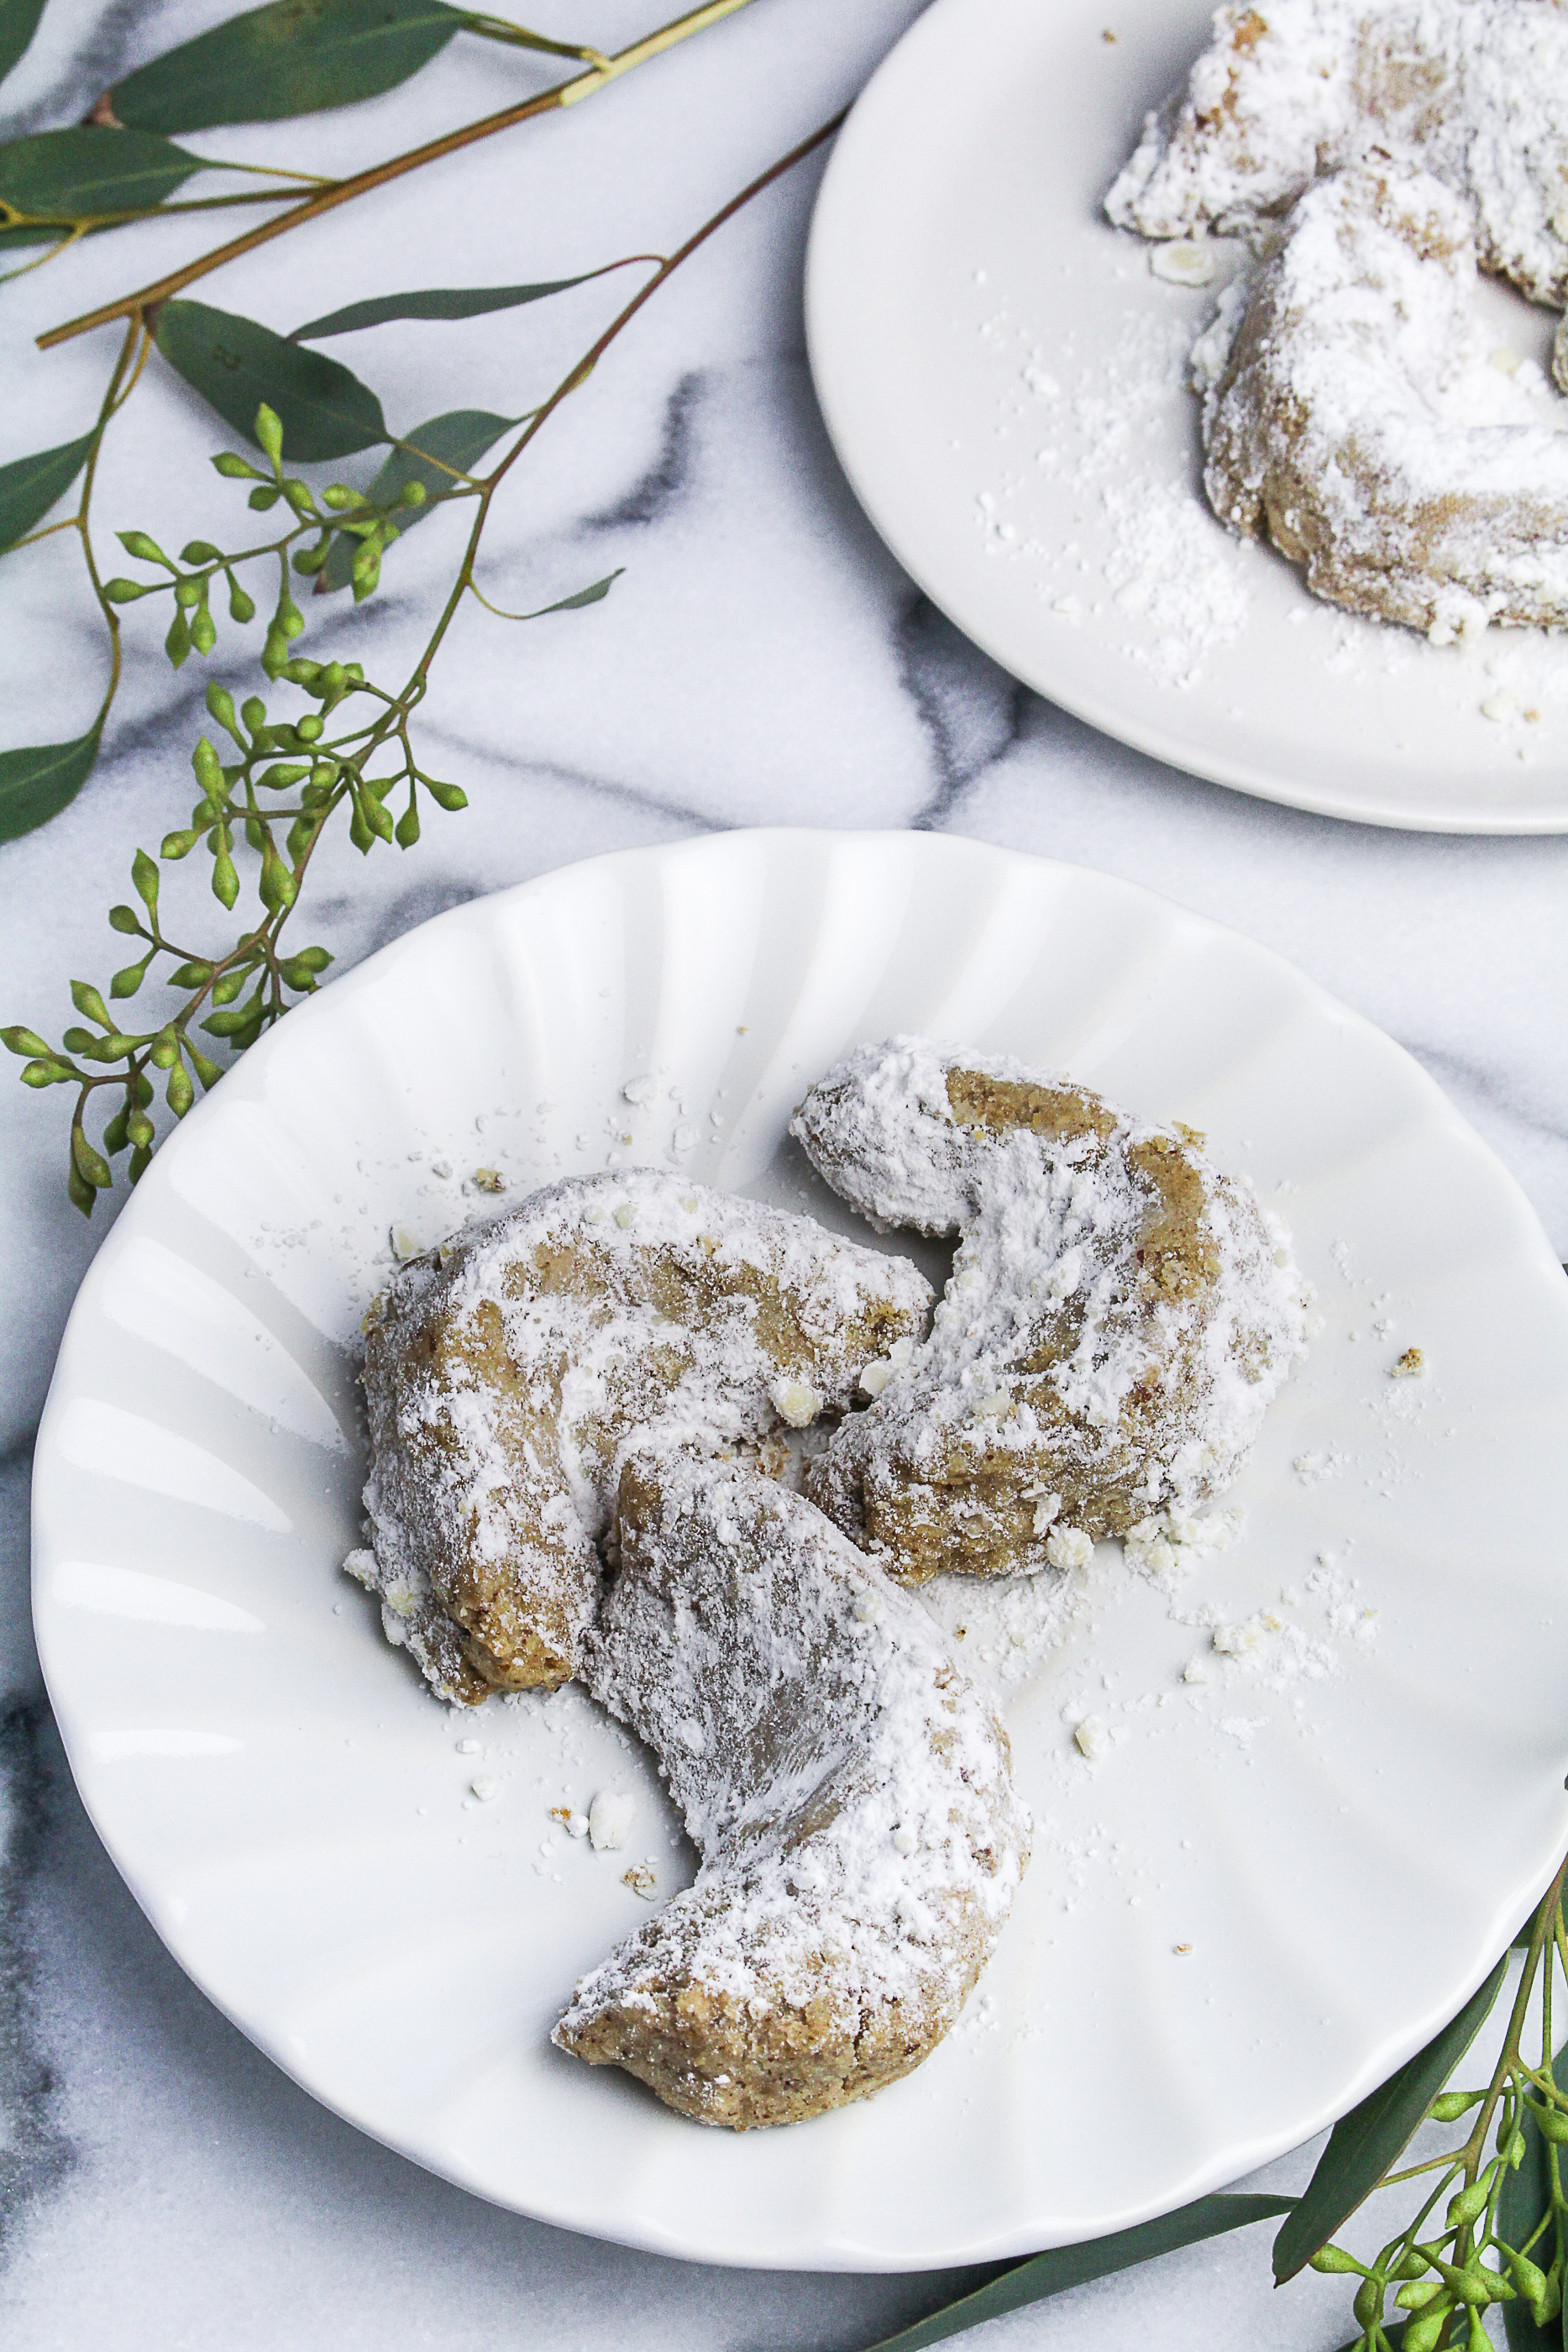
These cookies are incredibly easy to make. All you need to do is pulse the ingredients in a food processor, then shape and bake the cookies. I found the recipe in the giant Bon Appetit Cookbook last year, hidden amongst dozens of other cookie recipes. After the first batch received rave reviews, I made a second and third tray. Now in their second year on our Christmas cookie tray, I think we can declare these a Christmas staple. They’re crumbly and tender but not dry, and just barely sweet. They almost toe the line between sweet and savory. In fact, if you opt to skip the powdered sugar, they are delicious with a little blue cheese.

I hope all of you find a day or two to slow down over the next week. Have a wonderful Christmas if you’re celebrating!

Like what you just read? Subscribe to Katie at the Kitchen Door in the box on the right, on Feedly or Bloglovin‘, or follow along on Facebook, Twitter, Pinterest, and Instagram. Thanks for reading!Pecan Crescent Cookies {Katie at the Kitchen Door}


Print

Pecan Crescent Cookies

A simple, nutty, pecan crescent cookie perfect for the Christmas cookie tray. 

Recipe from The Bon Appetit Cookbook.

  • Author: Katie at the Kitchen Door
  • Yield: 20 cookies 1x

Ingredients

Scale
  • 3/4 cup pecans
  • 1 cup AP flour
  • 1 stick chilled butter
  • 1/4 cup packed dark brown sugar
  • 1 tsp vanilla extract
  • 1/2 tsp ground cinnamon
  • pinch sea salt
  • powdered sugar

Instructions

  1. Preheat the oven to 325F. Place the pecans on a cookie sheet. Toast in the oven for 4-5 minutes, until just fragrant. Take care not to let them burn.
  2. Add the toasted pecans and all other ingredients to a food processor. Pulse several times until the dough looks crumbly, then process on high until the dough begins to come together. Press a bit of dough together between your fingers – if it holds together, the dough is ready. If not, blend a bit longer.
  3. Use your hands to gather the dough together. Pinch off a little more than a tablespoon of dough and form a short rope of dough by squeezing the dough in the palm of your hand. Place the rope on a cookie sheet and shape into a crescent, smoothing any lumpy parts. Repeat until you have used all the dough. Bake the cookies for 25-30 minutes, until just barely firm to the touch. Let cool completely, then sift powdered sugar over the top of the cookies.

Did you make this recipe?

Share a photo and tag us — we can't wait to see what you've made!

Classic Red Wine-Braised Short Ribs {Katie at the Kitchen Door}

103 December 3, 2017 Beef

Classic Red Wine-Braised Beef Short Ribs

Classic Red Wine-Braised Beef Short Ribs {Katie at the Kitchen Door}

It’s one of those gray December days that makes me feel like cozying up on the couch with a blanket and a cup of hot chocolate. I know that it’s too warm for snow, but it looks like it could start flurrying any minute. It’s early enough in the season that I don’t mind. It still feels festive to stay inside by the Christmas tree, or even to bundle up and walk through the neighborhood at dusk, looking at everyone’s lights (and, let’s be real, the plethora of horribly tacky but also endearing Christmas inflatables in our neighborhood).

Classic Red Wine-Braised Beef Short Ribs {Katie at the Kitchen Door}

Classic Red Wine-Braised Beef Short Ribs {Katie at the Kitchen Door}

It’s also the perfect sort of day for slow cooking. It will be dark by 4pm, at which point we’ll start thinking about dinner and wonder what we have that we can pop in the oven. That’s what this short rib recipe is for. It’s for days when you have hours to while away indoors, when you crave something rich and tender, when you want an excuse to open a nice bottle of red wine before 5. This is your excuse – you’ll need a cup or two of wine to braise the short ribs. This is also your excuse to stay put while the short ribs roast, filling your house with the savory scent of beef slumping into red wine.

These short ribs are classic but wonderful. If you do a little research, you’ll find that most short rib recipes out in the world are fairly similar, with only minor tweaks in the order of operations and a secret ingredient here or there. You could argue that this means the recipe is ripe for innovation, or you could just take what’s been tried and tested by the world’s greatest chefs and go with it. This version is most closely inspired by Sunday Suppers at Lucques, my favorite cookbook. I go through periods when I can’t seem to cook from any other book, as I’ve mentioned before. It also takes a few cues from this Daniel recipe. Whichever recipe you use, the tricks I’ve picked up for great short ribs are as follows. One, season generously.  Two, brown until caramelized, not just grayish-brown. Three, set aside at least 3 hours cooking time and don’t be tempted to take the ribs out before they are super tender. Four, refrigerate overnight before serving in order to skim and discard as much fat as you can.

Classic Red Wine-Braised Beef Short Ribs {Katie at the Kitchen Door}

I had originally planned on doing a follow-up post as well – a short rib grilled cheese sandwich. They offer a similar sandwich, on rich challah bread, at Tatte. We made the sandwiches but, shockingly, they were too rich for me. It turned out I had met my match when it comes to how much richness you can squeeze into one bite. So I’ll save the short rib grilled cheese for another day, when I’ve cracked that recipe. For now, I hope these delicious red wine-braised beef short ribs will warm up your kitchen this winter.

Like what you just read? Subscribe to Katie at the Kitchen Door in the box on the right, on Feedly or Bloglovin‘, or follow along on Facebook, Twitter, Pinterest, and Instagram. Thanks for reading!

More winter braises…

Tunisian Lamb-and-Eggplant Stew with Farro and Harissa

Braised Lamb Shanks with Blue Cheese Polenta

French Beef Stew with Red Wine

French Beef Stew with Red Wine

Classic Red Wine-Braised Beef Short Ribs {Katie at the Kitchen Door}

Print

Classic Red Wine-Braised Beef Short Ribs

Classic Red Wine-Braised Short Ribs {Katie at the Kitchen Door}

Classic beef short ribs, braised in red wine for hours until meltingly tender. Best served over creamy mashed potatoes, potato gnocchi, or buttered egg noodles.

Adapted from Sunday Suppers at Lucques and Daniel (via Serious Eats)

  • Author: Katie at the Kitchen Door

Ingredients

Scale
  • 4 bone-in short ribs, about 10-12 oz each (3 lbs. total)
  • 1/2 tsp freshly ground black pepper
  • 1/2 tsp coarse sea salt
  • 1 TBS fresh thyme leaves
  • 1 TBS olive oil
  • 1 onion, peeled and finely chopped
  • 2 carrots, peeled and finely chopped
  • 2 stalks of celery, finely chopped
  • 5 cloves garlic, peeled and finely chopped
  • 2 whole bay leaves
  • 2 cups full-bodied red wine, such as Cabernet Sauvignon
  • 1/2 cup port wine
  • 3 TBS saba or aged balsamic vinegar
  • 3 cups beef broth
  • 1 bunch fresh parsley

Instructions

  1. Preheat the oven to 325F.
  2. Pat the short ribs day and sprinkle the pepper, sea salt, and thyme leaves on top of them. Rub the seasoning in to fully coat the short ribs on all sides. Heat the olive oil in a dutch oven or medium heat, then add the short ribs to the pan (do this in batches if they don’t fit in a single layer). Brown the short ribs on all sides, about 2-3 minutes per side, until a nice, caramelized brown crust has formed on the exterior of the ribs. Remove the browned short ribs to a plate.
  3. Drain the rendered fat from the pan, reserving only 1 TBS of fat in the pan. Return the pan to the heat and lower the heat to medium-low. Add the chopped onions, carrots, celery, garlic and bay leaves to the pan. Saute until the vegetables are tender and translucent, about 5-7 minutes.
  4. Add the red wine, port wine and balsamic vinegar to the pan with the vegetables. Bring to a simmer and scrape up any browned bits stuck to the bottom of the pan with a wooden spoon. Simmer the wine until it has reduce by one third, which should take 5-8 minutes.
  5. Add the beef broth to the reduced wine and stir to combine, then place the short ribs back in the pan. They should fit snugly in the pan and be just barely covered by the liquid. Tuck the parsley in to the pan around the side of the ribs. Cover with a lid and transfer to the preheated oven. Roast the short ribs for 2 1/2 to 3 1/2 hours, checking every 30-45 minutes and turning the ribs over in the pan at least once. When finished, the ribs should be completely tender, such that you can easily pull the meat apart with a fork. Remove them from the oven and let cool for 20 minutes. For best results, cover and transfer them to the fridge overnight before serving.
  6. When ready to serve, remove the ribs from the fridge. Skim off and discard the hard white fat on top of the dish (there will likely be a lot of this). Preheat the oven to 400F, and return the ribs, uncovered, to the oven for 15-20 minutes – this is to both reheat the ribs and to gently brown the exterior. Before serving, ladle the sauce and vegetables out of the pan and strain through a fine mesh strainer. Discard the vegetables. Serve the ribs on mashed potatoes, gnocchi, or buttered egg noodles, topped with the strained sauce.

Did you make this recipe?

Share a photo and tag us — we can't wait to see what you've made!

  • Go to page 1
  • Go to page 2
  • Go to page 3
  • Interim pages omitted …
  • Go to page 57
  • Go to Next Page »

Primary Sidebar

Subscribe!

Get creative recipes and menu ideas delivered straight to your inbox.

Most Popular

A House // Sweet Potato and Coconut Milk Soup with Brown Rice and Lentils

Monthly Fitness Goals: July // Homemade Spinach Wraps with Chopped Greek Salad

A New Job // Classic Seven-Layer Bars

Butternut Squash Carbonara with Fried Sage and Caramelized Onions

Happy Birthday, Trevor! // Peanut Butter Fudge

Cookbook Review and Giveaway: Home Made Winter

Drizly

Please note!

Full disclosure: if you purchase anything at Amazon using the above links or any other links to Amazon on this site, I will receive a small commission. Just so you know!

Copyright© 2025 · Cookd Pro Theme by Shay Bocks

This site uses cookies: Find out more.