• Skip to primary navigation
  • Skip to main content
  • Skip to primary sidebar
  • Home
  • Recipes
  • Features
    • Cookbook Reviews
    • Ingredient of the Week
    • Sunday Dinner
    • Fitness Goals
  • Travel
  • About
    • Privacy Policy
    • Cookie Policy
  • Work With Me

Katie at the Kitchen Door

Globally-inspired, seasonal recipes

Blog Page

43 February 12, 2014 Asian and Indian

Spiced Potato and Pea Parathas

Spiced Potato and Pea Parathas {Katie at the Kitchen Door} #Indian #recipe

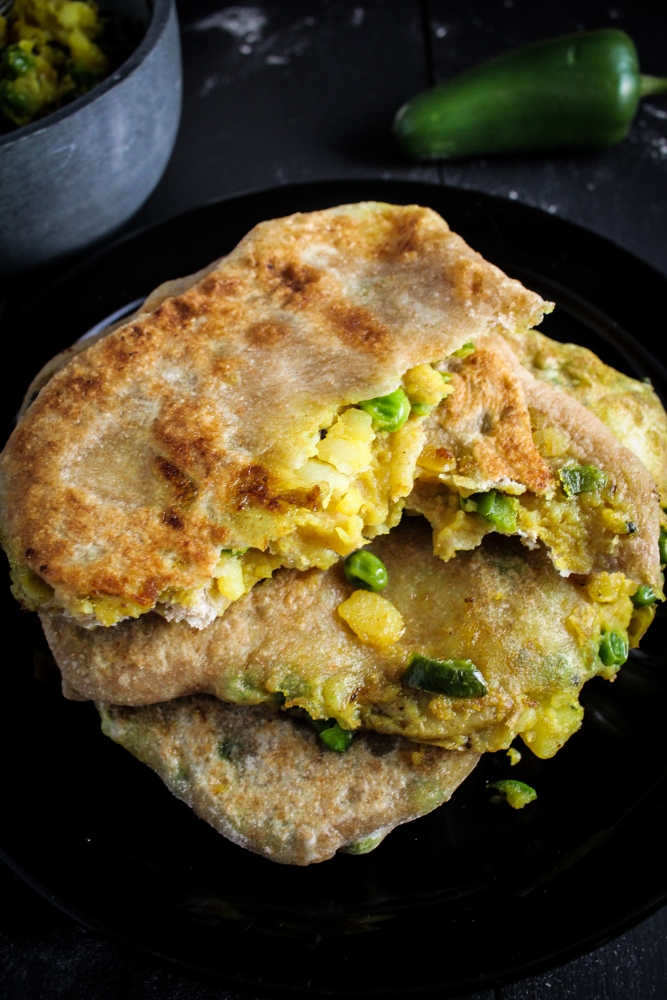
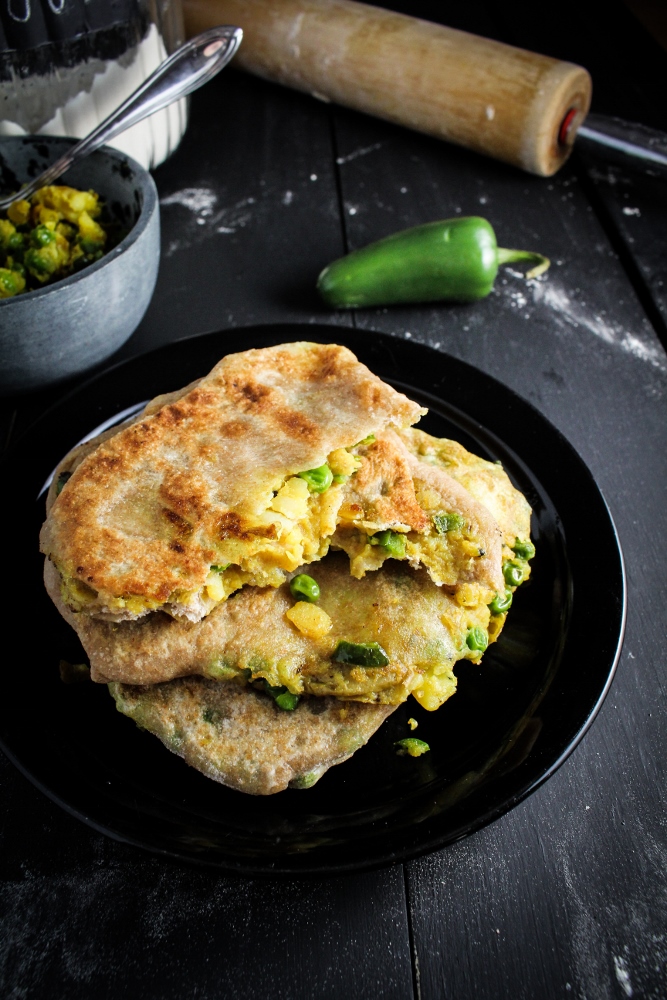
Part of me wishes I had never discovered this recipe, because now I’m kind of obsessed with these tasty little pan-fried breads. Seriously. They are the best thing that I’ve made in a long, long time. You know that feeling where even as you’re putting something into your mouth your belly is telling you “too much! You will regret this!”? And yet you do it anyways, because whatever you’re eating is really tasty or somebody put a bowl of oreos in front of you or you’re just bored and noshing mindlessly? Well that has happened to me all three times I ate these, except when I’ve finished them and am sitting on the couch with a very full belly, instead of regretting it, I think “that was so worth it.”

Spiced Potato and Pea Parathas {Katie at the Kitchen Door} #Indian #recipe

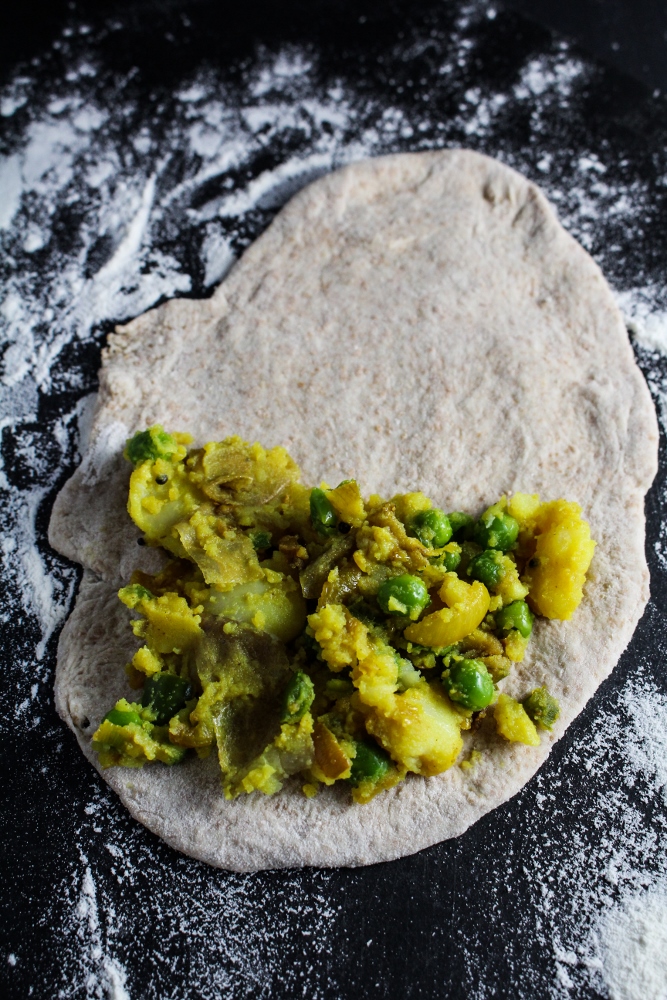
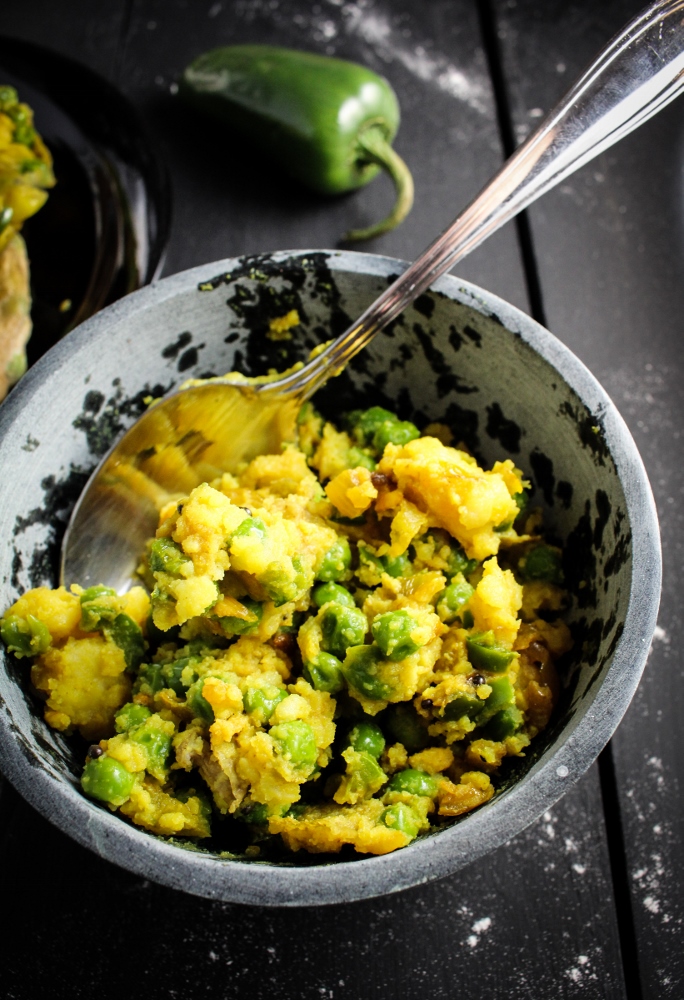
Parathas are a type of stuffed, Indian flatbread. You make a filling – in this case a mildly spiced mixture of smashed potatoes and green peas – plop some into the center of a piece of simple whole wheat dough, fold the dough over the filling twice, and then roll it out again so that the potatoes and peas get all mushed into the dough itself. You fry it in a little hot oil for a minute or two, until the dough is cooked and the inside is hot, then you tear it open and devour it, potentially pausing to dip it in a sweet chutney if you have that sort of self control. They’re soft and doughy, addictively salty and spicy, and just so full of savory goodness. They’re a little bit messy to roll out, but even as someone who hates cleaning sticky dough off counters, these are worth the trouble. This particular recipe for parathas is another hit from Mangoes & Curry Leaves – I’m so glad I finally bought myself a copy of this book! For those of you who know me in person, don’t be surprised if I serve you Indian food anytime you come over to my house in the next few months.

Like what you just read? Subscribe to Katie at the Kitchen Door on Feedly or Bloglovin’, or follow along on Facebook, Twitter, Pinterest, and Instagram. Thanks for reading!

Spiced Potato and Pea Parathas {Katie at the Kitchen Door} #Indian #recipe

Spiced Potato and Pea Parathas

Recipe adapted very slightly from Mangoes & Curry Leaves. Makes 8 parathas, serves 4-8.

  • 1 c. whole wheat flour
  • 1 c. AP flour
  • 1 tsp salt
  • scant 1 c. lukewarm water
  • 2 c. Spiced Potato and Pea filling, recipe below
  • 2 TBS vegetable oil
  1. Mix flours and salt together in a medium bowl. Stir in lukewarm water, then turn dough out into floured surface and knead until smooth, about 5 minutes. Return to bowl, cover with plastic wrap, and let stand for 2 hours.
  2. Split dough into 8 equal sized pieces, keeping the ones you are not working with loosely covered. Roll a piece of dough out to an 8-inch round. Spread 3-4 TBS of the potato filling over one half of the dough. Fold the dough in half to cover the filling, then fold in half again in the other direction so that you have effectively folded the dough into quarters. Roll out again into an 8 inch circle, smushing the filling into the dough. Don’t worry if you’re filling starts to break out of the dough and gets a little messy. Repeat with the remaining pieces of dough and filling.
  3. Heat 1 TBS of the vegetable oil in a skillet over medium heat. Once the oil is hot, add a partatha to the pan and cook for 1 minute. Flip over and cook for 1 minute on the other side. Both sides should be golden brown. If they aren’t, cook for another 30-60 seconds on each side. Remove to a plate, add a little bit more oil to the pan, and repeat with remaining parathas. Serve immediately with sweet chutney.

Indian Spiced Potato-and-Pea Mash - For samosas, parathas, etc. {Katie at the Kitchen Door}

Spiced Potato and Pea Filling

Recipe adapted very slightly from Mangoes & Curry Leaves. Makes 3 cups.

  • 1 lb. Yukon Gold potatoes, scrubbed and cut into 1 inch cubes
  • 2 TBS vegetable oil
  • 1/2 tsp black mustard seeds
  • 1/2 tsp turmeric
  • 2 tsp minced garlic or garlic mashed to a paste (1 large clove)
  • 1 c. finely chopped onion
  • 2 jalapenos, seeded and minced
  • 1 c. frozen peas
  • 1 tsp salt, or to taste
  1. Place diced potatoes in a large pot and cover with cold water. Bring to a boil over medium-high heat, and boil potatoes until tender, about 15-20 minutes. Drain, let cool slightly, and roughly mash potatoes with a potato masher or a fork. Leave some chunks.
  2. Heat oil in a large frying pan on medium-high. When oil is shimmering, add mustard seeds, cook for 45 seconds, until they stop spluttering, add the turmeric and garlic and stir-fry for 30 seconds, then add the chopped onion. Lower heat to medium. Cook, stirring frequently, for about 5-8 minutes, until onion is soft and staring to brown. Add jalapenos and cook for 2 minutes longer, then add potatoes and peas and stir to mix thoroughly together. Cook just to heat peas and potatoes through, about 2-3 minutes, then remove from heat. Season to taste with salt. Let cool and use as filling for parathas or samosas. Also tasty on it’s own, or shaped into cakes and pan-fried.

1 February 10, 2014 Asian and Indian

Monthly Fitness Goals: February // Pakistani Chickpea Pulao with Sweet Hot Date-Onion Chutney

Pakistani Chickpea Pulao with Hot-Sweet Date-Onion Chutney {Katie at the Kitchen Door} #vegan

My January fitness challenge went pretty well – although I may not have stuck to the letter of the goal, I certainly accomplished the spirit of it. Starting from a place of zero athleticism at the end of the year, I wanted to work my way back into regular exercising, so I bit the bullet, joined the Y, and vowed that I’d go there at least ten times during the month of January. I only ended up making it to the Y eight times, but I also went to Brooklyn Boulders twice for a combo rock climbing and treadmill workout, so I’m counting those as well, because, well, they’re both gyms, right? All told, I worked out on 23 of the 31 days of the month, and I think I deserve a big pat on the back for sticking with the plan. I’ve definitely gotten my base back, both from an aerobic and strength perspective, and now it’s time to build on that. I had a lot of thoughts about how February’s goal could build on January’s success: I could focus on speed, stamina, strength, or workout frequency. But really, I think the next step is that stubborn number on the scale, and that basically means one thing: healthier eating.

Pakistani Chickpea Pulao with Hot-Sweet Date-Onion Chutney {Katie at the Kitchen Door} #vegan

Boooo, I can hear you all thinking, what is this, January? But hear me out, I promise it’s not that bad. After waffling back and forth between trying to not eat out at all during the week (including coffee breaks, takeout, happy hours, and the snack drawer), and doing Mark Bittman’s Vegan Before 6:00 program (wanna know more? check out Emma’s honest review here), I decided to start simple and just choose one meal a day that would be vegan. Now, I don’t ever want to actually be vegan, but I know that cheese, milk, butter, eggs, and salty meats (bacon, sausage, prosciutto) are frequently part of my go-to comfort foods, so I wanted to consciously remind myself that there are other options, and replace one potentially cheesy meal each day with something more fresh-vegetable-based. I’ve also been trying to be generous with the term “meal” by making it encompass a full 3-4 hour period after the meal itself, to keep myself from cheating and sneaking on non-vegan snacks immediately afterwards. E.g., if I have a green smoothie at 9, no latte at 10, and no brownie at 3pm after my virtuous lunchtime salad. You get the picture. So far I’ve stuck to it 95% of the time, with a slip or two for which I blame the allure of the office chocolate box in the afternoons. I think the biggest benefit is just that I’m more aware of what I’m eating. And I’m already hyper-aware of food, so that’s saying something. I have also noticed that it forces me to actively plan out my meals every day, because I know that every single day I need to have budgeted in something healthy and vegan and I can’t just wing it. Ten days in, I’m happy with it, but we’ll see if it has any impact on the scale by the end of the month.

Now, on to the good part – the food! I recently bought myself a copy of Mangoes & Curry Leaves, the first cookbook I’ve purchased for myself in over a year. Cooking Indian food that tastes even reasonably well-balanced is tricky, and I love Indian food so much that I really wanted to learn how to do it well, step-by-step. This book is great for that, and also happens to be the perfect resource for finding vegan recipes that don’t taste like they’re “missing” something – so much of Indian and Asian cooking is naturally vegan, with spices and precise cooking techniques supplying the flavor we often rely on dairy for. I’ve been cooking up a storm from this book – from Sri Lankan Beef Curry, to Mountain Dal, to Potato-and-Pea Parathas, to this Pakistani Chickpea Pulao that I’m sharing with you today – and everything has been amazing. This pulao is definitely comfort food, but the kind you can feel good about. Warming, filling, and slightly saucy, the mixture of rice, chickpeas, sweet onions, tomatoes, and spices is packed full of heartiness and flavor, and has lots of good protein and vitamins. With a spoonful of the sweet and spicy date and onion chutney stirred in, it becomes a head-clearing mess of goodness that’s almost impossible to stop eating (completely negating my weight goals, but c’est la vie).

Like what you just read? Subscribe to Katie at the Kitchen Door on Feedly or Bloglovin’, or follow along on Facebook, Twitter, Pinterest, and Instagram. Thanks for reading!

Pakistani Chickpea Pulao with Hot-Sweet Date-Onion Chutney {Katie at the Kitchen Door} #vegan

Pakistani Chickpea Pulao

Adapted very slightly from Mangoes & Curry Leaves. Serves 4.

Note: The rice needs to be soaked at least an hour in advance, so plan ahead. This can be made on the stovetop or in the oven. If you plan to finish it in the oven, make sure you use an ovenproof pot with a lid for the initial stages. Because the cooking times are relatively short for each stage, it’s important to have your ingredients prepared ahead of time – i.e. measure out your spices, pound your garlic and ginger, and slice your onions before you start cooking.

  • 2  c. cooked chickpeas
  • 1 1/2 tsp coarse sea salt, divided
  • 1 c. basmati rice
  • 4 c. water, divided
  • 2 TBS vegetable oil
  • one small piece of cinnamon stick
  • 2 cloves
  • 2 cardamom pods
  • 1 bay leaf
  • 2 cloves garlic, peeled
  • 1 inch piece of ginger, peeled
  • 2 medium onions, peeled, halved, and thinly sliced
  • 1 tsp ground coriander
  • 1/2 tsp ground cumin
  • 1/2 tsp freshly ground black pepper
  • 1/4 tsp cayenne
  • 1 c. crushed tomatoes
  • 1/2 tsp turmeric
  • 1/2 c. coarsely chopped almonds, for garnish (optional)
  • 1/2 c. chopped cilantro, for garnish (optional)
  • Sweet Hot Date-Onion Chutney, for serving (optional, recipe below)
  1. Toss together the chickpeas and 3/4 of a tsp of salt. Set aside. Rinse the rice in several changes of cold water, then add 3 cups of cold water and let the rice soak for at least one and up to three hours. After this time, drain the rice and set it aside.
  2. If using the oven (for finishing the cooking, you may also use the stovetop), preheat it to 325°F. Place a wide, heavy-bottomed pot that has a lid over medium heat (use an ovensafe pot if finishing in the oven). Add the vegetable oil, cinnamon stick, cloves, cardamom, and bay leaf, stir together, and cook for 1-2 minutes, until fragrant.
  3. Place the garlic and ginger into a mortar and pestle and pound into a paste. Alternatively, finely mince both. Add the garlic and the ginger to the spices and stir fry, stirring constantly for about 1-2 minutes, until golden brown. Add the sliced onions and cook, stirring frequently, until very soft, about 10 minutes. If onions are starting to brown before they soften, lower the heat – you want the onions to remain a pale golden color.
  4. Add the chickpeas, coriander, cumin, black pepper, and cayenne to the pot, stir to coat the chickpeas with the spices, and cook for another 2-3 minutes. Then, add the tomatoes, turmeric, and remaining 1 c. water to the pot. Bring to a boil, then sprinkle the drained rice over the top. Return to a boil, then lower the heat and tightly cover. Place covered pot in preheated oven, if using, or keep at a simmer on the stovetop. Cook for 45 minutes in the oven or 30-40 minutes on the stovetop,then remove from heat and let stand, still covered, for 15 minutes. If you’re cooking on the stovetop, you may want to check once or twice for burning on the bottom while it’s cooking – just give it a quick stir and then replace the lid.
  5. If you can spot them, fish out the cardamom pods, cinnamon stick, clove, and bay leaf before serving, to avoid inadvertently biting into them. Serve in bowls with chopped almonds, cilantro, and sweet hot date-onion chutney.

Hot-Sweet Date-Onion Chutney {Katie at the Kitchen Door}

Sweet Hot Date-Onion Chutney

Adapted very slightly from Mangoes & Curry Leaves. Makes about 1 cup.

  • 3 dried Thai chilies, stems removed
  • 1 TBS vegetable oil
  • 1 TBS sesame oil
  • 1 large sweet white onion, about 1/2 pound, peeled and coarsely chopped
  • 1/2 tsp coarse sea salt
  • 1/4 c. chopped pitted dates
  1. Bring a kettle of water to a boil, then pour about 2 cups of the boiling water over the dried chilies in a heatproof bowl. Let stand and soften for 10 minutes.
  2. Add the vegetable and sesame oils to a frying pan, and heat over medium heat. Add the chopped onion and the salt and cook, stirring occasionally, until onions are golden brown all over with darker brown spots, about 10 minutes. Remove from heat.
  3. Drain the chilies from the water, then place chilies in a food processor with the chopped dates and pulse several times to coarsely chop. Add the cooked onions to the food processor and pulse several more times until the mixture is coarsely ground. Season to taste with salt. Store in a sealed glass container in the fridge for up to several weeks.

10 February 7, 2014 Cookbook

Book Club: Summerland // Italian Wedding Soup with Lamb Meatballs

Italian Wedding Soup with Lamb Meatballs {Katie at the Kitchen Door}

The Book: Although we’re smack in the middle of winter, Summerland: Recipes for Celebrating with Southern Hospitality, is helping me daydream my way back to a place where winter means a short break from sundresses – Georgia. This book, written by the owner of Summerland Farm and chef-owner of a number of prominent Southern restaurants, is organized into themed menus by month, starting with September, “From Pasture to Plate: A Celebration of the Pig,” and moving right on through the holidays, the spring, and ending in August with “The Dog Days of Summer: A Fig Feed.” Because it’s written from a farm, it falls very naturally into the farm-to-table ethos, without seeming like it’s trying to be something it’s not – each menu is seasonal, in a Southern way (i.e. there’s no winter) and based around the rhythms of farm life. I’m a sucker for themes, and for full explorations of a single ingredient, so I like that everything goes together in each chapter. The “Fig Feed” in particular sounds amazing – if only our fig tree would produce enough figs for something like that! The menus and recipes manage to be both elaborate and “back-to-basics” at the same time, making it a book that I’ll turn to for special occasions, but not so much for everyday dinner recipes. And as for the look and feel of the book, it’s a large format cookbook with high quality paper and design, and a beautiful, atmospheric photography style that I really love. The photographs manage to bring each season to life – the winter photos are dark and moody, while in spring and summer they’re bright and outdoorsy. It’s a beautiful book.

The Food: Our test recipe for this book was this Italian Wedding Soup, made with homemade noodles, spicy mustard greens, and big lamb meatballs. We actually made this back in December, in the middle of feasting season, so the simplicity and homeyness of this soup is what appealed to us. Most of the recipes from the December section of the book were designed for entertaining, as they’re all part of the “Holiday Retreat” menu, so we skipped ahead to March (“The Rites of Spring: A Lamb Fete”) to find this one. It was just what we needed at the time. Although I’ll happily gobble down homemade noodles and meatballs in any form, I think my favorite part of this soup was the spiciness of the mustard greens – it was the perfect counterpoint to the rich and gamey flavor of the meatballs. Next time, I think we’d make the extra effort and use homemade stock, as the broth is a prominent feature of this particular soup.

Recipe Shortlist:  Meyer Lemon Gelato; Warm Pumpkin Pudding with Hard Sauce; Broccoli Soup with Sabayon and Shaved Perigord Truffle; Breakfast Sausage; My Bloody Valentine Cocktail (Blood Orange Nectar, St. Germain, Prosecco); Squab with Beets and Beet Green Pesto; Lamb Pot au Feu; Charred Pomegranate Popsicles; Slow-Roasted Porchetta; Korean Beef Jerky; Sweet Tea Cocktail; Peach Semifreddo; Gazpacho Salad; Branzino Steamed in Fig Leaves with Fig Butter and Pecans; Yogurt Parfait with Fig Gelee and Peanut Brittle

Like what you just read? Subscribe to Katie at the Kitchen Door on Feedly or Bloglovin’, or follow along on Facebook, Twitter, Pinterest, and Instagram. Thanks for reading!

Disclaimer: I received a review copy of Summerland free of charge from Rizzoli, but I was not otherwise compensated and all thought and opinions are my own.

Italian Wedding Soup with Lamb Meatballs {Katie at the Kitchen Door}

Italian Wedding Soup with Lamb Meatballs

Recipe from Summerland: Recipes for Celebrating with Southern Hospitality. Serves 4-6.

  • 1 lb. lean ground lamb
  • 1 large egg, beaten
  • 1/4 c. unseasoned bread crumbs
  • 2 TBS chopped fresh mint
  • zest from 1 Meyer lemon, finely grated
  • kosher salt
  • freshly ground black pepper
  • 3/4 c. flour
  • 1 c. vegetable oil, for shallow frying
  • 1 TBS olive oil
  • 1 sweet onion, peeled and coarsely chopped
  • 3 garlic cloves, peeled and thinly sliced
  • 1 sprig fresh thyme
  • pinch of crushed red pepper flakes
  • 1 c. fresh or frozen field peas or pink-eyed peas (we substituted cannelini beans)
  • 1 bunch mustard greens, torn
  • 4 c. lamb stock or chicken stock
  • 3/4 lb. fresh pasta dough, rolled out and cut into wide noodles (or substitute 3/4 lb. of egg noodles, pre-cooked to al dente).
  • leaves from 3 sprigs fresh flat leaf parsley, chopped, for garnish
  1. For the meatballs: combine lamb, egg, bread crumbs, mint, and lemon zest in a large bowl. Season with salt and pepper, then mix well by hand. Form into balls about the size of golf balls (you should have around 18, 1-oz. balls). Place the flour in a shallow bowl, and roll the meatballs in it, tapping off any excess. Heat the vegetable oil in a large frying pan over medium heat. Fry the meatballs in batches until golden brown on all sides, about 7-9 minutes total. To test to see if they are done, stick a metal knife into the center of a meatball – if the blade comes out hot, they are done (but don’t burn yourself  checking!). Drain the meatballs on a paper-towel covered plate and set aside.
  2. For the soup: Heat the olive oil in a medium saucepan over medium heat. Add the onion and garlic and saute until translucent, about 4-5 minutes, stirring to prevent them from burning. Reduce the heat to low and add the thyme and red pepper flakes. Add the peas or beans and cook over low heat for 10 minutes, stirring occasionally. Add the mustard greens and stock and bring to a simmer. Add the fresh pasta and cook over low heat until tender, 2 to 3 minutes (if using pre-cooked noodles, cook just long enough to heat through). Place the meatballs in the saucepan and cook until heated through, another 1-2 minutes. Adjust the seasoning with salt, and serve, garnished with the parsley leaves.

2 February 4, 2014 Beef

Alamos Wine Dinner // Arugula Salad with Quince and Prosciutto, Beef Short Ribs, Potato Gnocchi

Alamos Wine Dinner

Alamos Wine Dinner

Last year, I decided that I wanted to be into wine. I knew that I liked drinking wine in general, and I liked drinking wine with food, but beyond that, my knowledge was pretty limited. If I had to choose a glass of wine at a restaurant, the only thing I knew I liked was Merlot, and I started feeling boring pretty quickly always ordering the same thing. So I started learning. The wine world can be pretty daunting at first, especially because it has something of a reputation for snobbery. But the best way to get past that is just to dive in and start tasting, so that’s what I did. I began trying new wines, writing down whether or not I liked them, and trying to determine why I liked them, using whatever words came to me and not worrying about whether they were real “wine” words or if they were accurate (I use Vivino to keep track of what I’ve tried and how I felt about it). I started going to the tastings at Bacco’s after work and asking whoever was running the tasting a lot of basic questions about each bottle. At IFBC I signed up for all the wine events possible – tasting sessions and winery tours – and paid close attention to the details of each presentation (well, I paid attention at least through the third glass). I discovered that tasting 4 or 5 wines in a row really helped me pinpoint the differences between them, and that if you’re paying attention to it, food can make a huge difference in the way a wine tastes.

Alamos Wine Dinner

And after all this learning? I know that I like Merlot and Chardonnay. But also a really yummy, smoky Pinot Noir from Chile, and a New Zealand Sauvignon Blanc that’s loaded with grapefruit flavor. And that there are some wines I really don’t like. I feel like I’m just beginning to scratch the surface, but it’s less daunting now, and mostly just fun. And I want to share that fun with you, so I’m starting a “Wine Dinner” series here, where every once in a while I work with a winery or regional wine board to put together a little dinner party focused on the wine they promote, and recipes to pair with them. I kicked things off last weekend with Alamos Wines, an Argentinean winery that I connected with at IFBC. They sent me two bottles of wine and I invited my roommates from last year, Allison and Jane, over for a little dinner – they seemed like safe first guests since they already know that I’m weird and take a lot of pictures of my food. It was so fun to see them, and to come up with the recipes, and to evaluate the wine – but it turns out I need to practice my dinner party photography! Don’t judge me too harshly, I’m still learning.

Arugula, Quince and Prosciutto Salad - Alamos Wine Dinner

Wine #1: Torrontés – For the first course, Alamos sent me a bottle of their 2012 Torrontés. I’d never tried Torrontés before, but I read that it’s a fairly sweet white wine, sometimes compared to Gewürtztraminer and Riesling. Pairing suggestions included sweet fruits, rich meats such as salmon and foie gras, and spicy food. I went the sweet/rich route and prepared an arugula salad, lightly dressed with a Meyer lemon and maple dressing, then tossed with poached quince, manchego, and prosciutto. Most of the quinces available in the U.S. come from Argentina, so it seemed like an appropriate ingredient. I was really into this salad – sweet, salty, bitter, and rich, it hit all my flavor high points. The Torrontés was indeed a bit sweet, but with a crisp, dry finish. The Alamos wines are on the lower end of the price scale, with the Torrontés coming in at under $10 a bottle, so I wasn’t expecting very much complexity, and didn’t find it, but for a $10 bottle of wine it was full-flavored and very drinkable. No complaints here.

Alamos Wine Dinner

Wine #2: Malbec – Malbec was the varietal of choice for the second course. Another wine that I don’t have a ton of experience with, Malbec is frequently characterized as an intensely fruity wine with berry and plum flavors, and a good budget alternative to Cabernet Sauvignon and Syrah. I liked this particular bottle – my first thought was “mmm, tastes like Merlot” (I was relieved to see other writers compare it to Merlot, as well). Another good value, this medium-bodied wine would make a good everyday red. Since Malbec pairs well with rich flavors, red meat, and aromatic herbs, we served this with a beef short rib braise and potato gnocchi. Argentina’s cuisine has a lot of Italian influence, so the gnocchi aren’t at all out of place in this dish, and the pillowy dumplings soak up the beefy red wine sauce really well.

Like what you just read? Subscribe to Katie at the Kitchen Door on Feedly or Bloglovin’, or follow along on Facebook, Twitter, Pinterest, and Instagram. Thanks for reading!

Disclaimer: Alamos provided me with two bottles of wine to use in this post, but I was not otherwise compensated and all thought and opinions are my own.

Arugula, Quince and Prosciutto Salad - Alamos Wine Dinner

Arugula Salad with Poached Quince, Prosciutto, and Manchego

Adapted from Food52. Serves 4.

  • 3 quince
  • 1/2 c. sugar
  • 4 c. water
  • 1 Meyer lemon
  • 1 TBS maple syrup
  • 1/4 c. olive oil
  • salt and pepper to taste
  • 5 oz. baby arugula
  • 4 oz. manchego cheese, cut into small cubes
  • 2 oz. prosciutto, sliced into thin strips
  1. At least 3 hours before you’d like to serve the salad, poach the quince. Use a vegetable peeler to peel the quince, then very carefully slice the fruit away from the core and seeds  in wedges – careful, quince can be kind of slippery. Place the sugar and the water in a large pot and bring to a simmer. Place the quince wedges in the simmering syrup, and place a plate over the top of the fruit to keep them submerged. Keep at a gentle simmer until quince have turned rosy and are very tender, about 1 1/2 to 2 hours. Add a little more water if the syrup gets too low. Pour the quince and their syrup into a bowl, cover, and refrigerate until chilled.
  2.  Cut the lemon in half and remove as many seeds as possible. Squeeze the lemon juice into a jar or small bowl. Add the maple syrup, olive oil, and salt and pepper to taste. Cover jar with lid and shake to mix dressing, or whisk vigorously if using a bowl. Set aside.
  3. About 15 minutes before serving, add the arugula to a large salad bowl and gently toss with the dressing. Let sit for a few minutes, then divide dressed greens between four plates. Top each plate with a few slices of quince, cubes of manchego, and strips of prosciutto. Serve immediately.

Beef Short Ribs and Potato Gnocchi - Alamos Wine Dinner

Braised Beef Short Ribs

Inspired by Bon Appetit and Emeril Lagasse. Serves 6-8.

  • 2 TBS paprika
  • 2 TBS sea salt
  • 1 TBS garlic powder
  • 2 tsp black pepper
  • 2 tsp dried oregano
  • 1 1/2 tsp cayenne powder
  • 4 lbs. bone-in beef short ribs
  • 2 TBS vegetable oil
  • 2 medium onions, peeled and diced
  • 2 medium carrots, peeled and diced
  • 3 TBS flour
  • 2 TBS tomato paste
  • 2 c. red wine
  • 8 sprigs thyme
  • 2 c. crushed tomatoes
  • 2 c. beef stock
  • Potato Gnocchi, to serve (store bought is fine, too)
  1. In a small bowl, stir together the paprika, sea salt, garlic powder, black pepper, oregano, and cayenne until evenly combined. Rub this spice mixture all over the short ribs, covering all sides. Heat the vegetable oil in a large dutch oven over medium heat. Add as many short ribs as will comfortably fit, and brown on all sides, about 8 minutes total per rib. Once browned, transfer the ribs to a plate and set aside. Repeat until all the ribs are browned.
  2. Discard all but 2 TBS of the fat from the pan, and return to the heat. Add the diced onions and carrots and cook for 5-7 minutes, until onions are translucent, stirring frequently. Add the flour and stir to coat the veggies, and allow to cook for 1 minute. Then stir in the tomato paste, and slowly add the red wine, stirring and allowing the mixture to thicken slightly between each addition. Once you’ve added all the wine to the pot, return the ribs to the pot. Reduce heat to a gentle simmer and let simmer, uncovered, for 25 minutes. Meanwhile, preheat the oven to 350°F.
  3. After the ribs have simmered for 25 minutes, add the tomatoes and beef stock to the pan, stir to combine, and cover with a lid. Place in the oven and cook, turning every hour or so, until ribs are very tender, about 2 1/2 to 3 hours. Remove from oven, and skim as much fat from the surface as possible. If you want a more elegant preparation, remove the ribs, strain the sauce and discard the vegetables – this is optional, and we served this rustic-style. Season sauce to taste with salt and pepper, and serve the ribs and their sauce over freshly cooked potato gnocchi.

8 January 31, 2014 Drink

Captain’s Table Superbowl // Captain’s Lime Shandy

Captain's Lime Shandy {Katie at the Kitchen Door} #captainstable #superbowl

It’s time for our very last Captain’s Table Challenge recipe – a drink suitable for enjoying during the big game this Sunday. I’m not really much of a football fan (understatement; I actually don’t watch sports at all), but I am a fan of parties, whether they revolve around football or not. And although I don’t know much about the sport, I do know that people like to drink beer while watching it, so our contribution to this edition of the challenge is a classy beer cocktail, the Captain’s Lime Shandy. A classic shandy is typically a mixture of light beer and sparkling lemonade, but we upped the potency with a shot of Captain Morgan White Rum, and played off the tropical, lime-y flavors in the rum with a slightly sweetened clarified key lime juice in place of the lemonade. A dash of bitters  added a hint of sweetness and complexity, and we had ourselves a drink worth watching football for. Not too sweet, not too bitter, these perfectly combine the drinkability of a beer with the more nuanced flavors of a good cocktail.

But be careful, these are highly drinkable! A fact we discovered last night when we found ourselves inadvertently tipsy while recipe testing. Perhaps if we had been noshing on these Mini Shrimp Tacos at the same time we would have been better off.

Like what you just read? Subscribe to Katie at the Kitchen Door on Feedly or Bloglovin’, or follow along on Facebook, Twitter, Pinterest, and Instagram. Thanks for reading!

Captain's Lime Shandy {Katie at the Kitchen Door} #captainstable #superbowl

Captain’s Lime Shandy

Serves 2.

  • 2 shots (1 1/2 oz. each) Captain Morgan White Rum
  • 1 shot ( 1 1/2 oz.) Clarified Key Lime Juice (available at WholeFoods, or use a mix of fresh key lime juice and sugar)
  • 4 dashes Fee Brothers bitters
  • ice
  • 1 bottle light bodied beer, chilled
  • sparkling lime soda, chilled
  • key lime slices, for garnish
  1. Add the rum, key lime juice, bitters, and ice to a cocktail shaker. Shake vigorously for 30 seconds, then strain into two Old-Fashioned or juice glasses. Pour the beer over the liquor to fill the glasses almost to the top, then top each glass off with a splash of sparkling lime soda. Stir briefly to mix, serve immediately.

0 January 28, 2014 Food

Captain’s Table Superbowl // Mini Rum-Glazed Shrimp Tacos with Boozy Tropical Salsa

Mini Rum-Glazed Shrimp Tacos with Boozy Tropical Salsa {Katie at the Kitchen Door} #captainstable #superbowl

I forgot how soul-sucking winter is. Maybe I purposefully blocked it out. The only mental note I seem to have left for myself from last winter was “plan a warm vacation for February or March, you’ll need it.” And I did that, we’re going to Ecuador in March and I can’t wait, but still: soul-sucking. The cold has turned my usually pleasant 15 minute walk to the subway into 15 minutes of breath-stealing torture. The other day my breath was actually freezing on my eyelashes and then melting onto my face every time I blinked. The other Bostonian commuters and I have been reduced to a pair of eyes surrounded by layers of black wool, and that small open part of my cheeks that my scarf doesn’t cover are perpetually windburnt. So even though we try our best to stick with root veggies and dried beans and hearty winter greens in January, last weekend the only solution to the cold was to turn to fantasy, and go all out with tropical flavors.

Mini Rum-Glazed Shrimp Tacos with Boozy Tropical Salsa {Katie at the Kitchen Door} #captainstable #superbowl

Mini Rum-Glazed Shrimp Tacos with Boozy Tropical Salsa {Katie at the Kitchen Door} #captainstable #superbowl

Two mangoes, one papaya, and a whole pineapple later, we were successfully pretending that we live somewhere with greenery, sunshine, and brightly-colored birds. These Mini Shrimp Tacos are our contribution to the Superbowl edition of the Captain’s Table Challenge. They’re glazed with Captain Morgan’s newest product, Captain Morgan White Rum, which is lighter and slightly fruitier than their spiced rums. The glaze also has honey, lime, bell pepper, and smoked paprika, for a pleasant mixture of sweet, tangy, and smoky. Wrapped in mini tortillas and topped with avocado, lettuce, and a bright pineapple-papaya-mango salsa (that also has a bit of rum in it for good measure), they’re great football-watching finger food that will also help cure your winter blues.

Mini Rum-Glazed Shrimp Tacos with Boozy Tropical Salsa {Katie at the Kitchen Door} #captainstable #superbowl

For anyone who’s been stopping by here for a while, you might have noticed that these tacos have the honor of being the first seafood recipe I’ve ever shared on this blog. Yep, the 1st post out of 333. I’ve never been much of a seafood-eater (in fact, as my parents can attest to, it absolutely disgusted me as a kid), but the past year or so I’ve been trying to get myself to come around to it. I can honestly say that I like smoked salmon, but shrimp is still a bit of a stretch – I ate one of these and liked it OK, but Trevor did some leftover shredded chicken in the same rum glaze, and that was much more my speed. Still, it’s progress! But whether you make these tacos with shrimp or chicken, for a football party or for sitting on your couch at home and watching rom-coms, I promise they’ll be a bright spot in your week.

Like what you just read? Subscribe to Katie at the Kitchen Door on Feedly or Bloglovin’, or follow along on Facebook, Twitter, Pinterest, and Instagram. Thanks for reading!

Mini Rum-Glazed Shrimp Tacos with Boozy Tropical Salsa {Katie at the Kitchen Door} #captainstable #superbowl

Mini Rum-Glazed Shrimp Tacos with Boozy Tropical Salsa

Makes 10 mini-tacos.

  • ¼ c. red onion
  • 2 T honey
  • juice of ½ lime
  • ¼ c. orange juice
  • ½ c. Captain Morgan White Rum
  • ¼ c. chopped bell pepper
  • 2 tsp sea salt
  • ¼ tsp smoked paprika
  • 1 tsp red pepper flakes
  • 2 cloves garlic, smashed
  • ground black pepper to taste
  • 1 ½ tsp cornstarch
  • 10 10-15 ct. shrimp
  • 10 mini-tortillas (we cut circles out of small tortillas)
  • 1 c. shredded romaine lettuce
  • 1 avocado, peeled, seeded, and cut into small cubes
  • 1 c. boozy tropical salsa, recipe below
  1. Finely chop the red onion, and bell pepper (I used orange bell peppers because they’re attractive), then combine everything except the cornstarch and shimp in a medium-sized bowl. Whisk together the ingredients, making sure the honey is fully dissolved in the marinade. Taste it before you add the shrimp! Make sure it’s delicious.
  2. Devein shrimp and remove shells up the tail. Add the shrimp to the marinade and let them rest for an hour in the refrigerator.
  3. Preheat your grill or pan to medium-high heat. Take the shrimp out of the refrigerator and skewer them (this isn’t strictly necessary, but I find their easier to handle this way), reserving about a cup of the marinade.
  4. In a small bowl, add about a tablespoon of the marinade to the cornstarch, whisking briskly until no lumps remain. Brush the shrimp on both sides with the reserved marinade. Grill the shrimp for about a minute on each side, flipping them every 30 seconds and brushing the hot side with the reserved marinade after flipping, until they are bright pink and slightly charred.
  5. Remove the shrimp from the skewers. Place one shrimp on top of each mini-taco, then top with lettuce, avocado, and salsa. Fold them in half and use a toothpick to secure. Serve immediately.

Boozy Tropical Salsa

Makes about 3 cups.

  • 1 c. finely cubed fresh papaya
  • 1 c. finely cubed fresh mango
  • 1 c. finely cubed fresh pineapple
  • 1/2 c. finely diced red onion
  • 1 jalapenos, seeded and finely diced
  • juice from 4 key limes (about 2-3 TBS)
  • 1 TBS Captain Morgan White Rum
  • 1 TBS orange juice
  • 2 TBS finely minced cilantro
  • 1/2 tsp sea salt
  1. Add all of the ingredients to a large bowl and toss gently to combine. Taste and adjust seasonings (juices, cilantro, salt, jalapeno) as desired. Keeps in the fridge for a few days.

0 January 26, 2014 Food

Winter Cleanse 2014: Week Two

Winter Cleanse Recipes 2014

I’m not gonna lie, I’m excited to go back to posting non-health-food recipes here. I’ve been enjoying a lot of delicious, good-for-you food, with a handful of not-so-good-for-you indulgences, and I plan to keep eating well, but writing solely about salads and soups etc. is getting a little boring. But before we jump ahead to brownie sundaes and boozy milkshakes (can you tell what I’m craving?), I have the plan for the second week of this year’s winter cleanse to share with you.

You can read a bunch more about the idea behind this cleanse, why I even call it a cleanse, and find the plan for week one over on last week’s post. I should also note that this second week plan relies heavily on leftovers from week one, so if you’re going to play along, you’ll probably want to start there anyways. In the link below, you’ll find the daily menu, grocery list, and prep tips for week two, and at the bottom of this post links to all the new breakfast/lunch/dinner recipes for this week. And if you’re one of the stalwart few who plans to continue your diet resolution into February, you can find four more weeks of meal plans in these cleanse posts from 2012 and 2013 (also, good for you!).

Happy eating!

Winter Cleanse 2014: Week Two – Grocery List, Meal Plan, and Prep Tips

New Recipes for Week Two

Healthy Winter Recipes - Baked Herb and Pistachio Falafel

Baked Herb and Pistachio Falafel

Healthy Winter Recipes - Roasted Kale and Broccoli Caesar

Roasted Broccoli and Kale Caesar Salad

Healthy Winter Recipes - Bulghur with Butter-Roasted Almonds and Chicken

Bulghur with Butter-Roasted Almonds and Cinnamon Chicken

Healthy Winter Recipes - Roasted Carrot and Tahini Soup

Roasted Carrot and Tahini Soup with Chickpeas

Healthy Winter Recipes - Greek Egg and Lemon Soup with Brown Rice, Chicken, and Chickpeas

Greek Egg and Lemon Soup with Brown Rice and Chickpeas

Healthy Winter Recipes - Quinoa Puttanesca

Quinoa Puttanesca

Healthy Winter Recipes - Kale and Pecorino Salad

Kale and Pecorino Salad

Healthy Winter Recipes - Strawberry Balsamic Salad with Candied Pecans and Goat Cheese

Strawberry Balsamic Salad with Candied Pecans and Goat Cheese

Healthy Winter Recipes - Whole Wheat Fruit and Nut Pancakes

Whole Wheat Fruit and Nut Pancakes

Healthy Winter Recipes - Apple Pie Oatmeal

Apple Pie Oatmeal

1 January 22, 2014 Food

Baked Herb and Pistachio Falafel

Baked Herb and Pistachio Falafel with Quick-Pickled Turnips {Katie at the Kitchen Door}

Baked Herb and Pistachio Falafel with Quick-Pickled Turnips {Katie at the Kitchen Door}

Falafel is kind of a health-food poser. Sure, it has nutritious ingredients like chickpeas and herbs, and healthy fast-food chains like Pret a Manger and Sweetgreen put them on top of salads, but really, eating falafel feels kind of indulgent. It’s certainly better for you than a grilled cheese sandwich or pasta carbonara or fried dough or a lot of other things, but at it’s heart, it’s fried street food. Delicious. Just not that good for you.

However, falafel can be easily transformed into something healthier – just nix the oil and trade the soft, floury pita for a crunchy cabbage wrap, and your craveable Middle-Eastern snack has become downright virtuous. David and Luise of Green Kitchen Stories have done just that with their Baked Herb and Pistachio Falafel, a flavor-and-nutrition-packed recipe from their book, Vegetarian Everyday (one of my favorites). These falafels are about 50% chickpeas and 50% pistachios, a combo that gives them a wonderful and unexpected creamy sweetness. Baked instead of fried, nestled into a crisp leaf of cabbage, drizzled with lemon-honey tahini sauce, and topped off with bright pink beet and turnip pickles, they make a filling and delicious meal that’s vegan and gluten-free. And you’d never know from the taste how much your body will thank you for giving it all those good things.

Baked Herb and Pistachio Falafel with Quick-Pickled Turnips {Katie at the Kitchen Door}

P.S., one of my first posts ever was about falafel, too. 2010! So many years ago! Does having been a food blogger for four years mean I’m getting old? Also, reading that post reminds me that those polka dot plates that I kind of hate are also four years old, and it really would not be a crime if I got some newer, more attractive ones. They have been used well, and served their purpose. I’m totally just trying to justify that I might spend a good portion of my snow day online shopping for kitchen things. I mean working.

Like what you just read? Subscribe to Katie at the Kitchen Door on Feedly or Bloglovin’, or follow along on Facebook, Twitter, Pinterest, and Instagram. Thanks for reading!

Baked Herb and Pistachio Falafel with Quick-Pickled Turnips {Katie at the Kitchen Door}

Baked Herb and Pistachio Falafel

Recipe adapted slightly from Vegetarian Everyday. Makes about 24-30 falafels, serves 4-5.

  • leaves from 8 sprigs of mint
  • leaves from 8 sprigs of parsley
  • 2 c. shelled raw pistachios (8-1/2 oz.)
  • 2 garlic cloves
  • 1/2 medium onion, peeled
  • 3 TBS olive oil
  • 2 c. cooked chickpeas (or drained, canned chickpeas)
  • 1 tsp ground cumin
  • 1 TBS buckwheat flour (or another gluten-free flour)
  • 1 tsp baking soda
  • sea salt
  • 1 small head green cabbage
  • lemon-honey tahini sauce (recipe below)
  • quick spicy beet-and-turnip pickles (recipe below)
  1. Preheat the oven to 375°F. Place the mint and parsley leaves in a food processor and process for about 30 seconds. Add the pistachios, garlic, onion, and olive oil and process until all ingredients are well minced and combined, about 30-60 seconds. Add the chickpeas, cumin, flour, and baking soda and blend for about 15 seconds at a time, stopping to scrape the mixture down the sides of the processor as needed, until the mixture is fairly uniform but not smooth – you want the mixture to still have some chunks of chickpea and pistachio in it.
  2. Remove the mixture from the processor and season to taste with salt. Form the mixture into 24-30 small balls, about the size of a ping pong ball. Line a baking sheet with parchment paper and place the falafel balls on the sheet. Bake for 15-20 minutes, using tongs to turn the balls over every 5 minutes so that they brown evenly.
  3. Slice off the end of the cabbage with a sharp knife. Remove the large outer leaves and rinse them individually. Pat them dry, then fill with the baked falafel. Serve with lemon-honey tahini sauce and spicy beet-and-turnip pickles. Baked falafel balls are also delicious tossed with a green salad with some avocado and feta cheese.

Lemon-Honey Tahini Sauce

  • 3 TBS tahini
  • 1 TBS honey
  • juice from 1/2 a lemon
  • 1/4 c. water
  1. Stir all ingredients together in a small bowl until smooth. Refrigerate until ready to use.

Quick Spicy Beet and Turnip Pickles

Technique adapted from Eating Well and Cook for Good. Makes two 1-pint jars of pickles.

  • 1 medium turnip, peeled
  • 1 medium beet, peeled
  • sea salt
  • 1/2 medium red onion, peeled and very thinly sliced
  • 1 jalapeno, stem and seeds removed, thinly sliced
  • 1 c. white wine vinegar
  • 1 c. water
  • 1 TBS sugar
  • 1/2 tsp salt
  • 20 whole  black peppercorns
  1. Cut the turnip and the beet into quarters, then slice each quarter as thinly as you can (use a mandoline if you have one). Layer the slices in a colander, with a sprinkling of sea salt between each layer. Place over a bowl and let sit for 10-15 minutes, then toss and squeeze with your hands to remove some of the excess liquid. Repeat this process until the vegetable slices feel a bit limp, about 30-45 minutes. Rinse the slices under cold water to remove the salt and then drain.
  2. Toss the beet and turnip slices with the sliced red onion and sliced jalapeno. Divide the vegetable mixture between two clean glass pint jars.
  3. In a small pot, mix vinegar, water, sugar, 1/2 tsp salt, and peppercorns. Heat over medium-low heat, bringing just to a gentle simmer. Stir to dissolve sugar and salt, then remove from heat and pour through a funnel into the two veggie packed jars. Cover the jars with lids and shake a few times to distribute the brine. Put the pickles in the fridge and let sit for at least 3-4 hours. Will keep in the fridge for up to two weeks.

2 January 19, 2014 Breakfast

Apple Pie Oatmeal

Easy Apple Pie Oatmeal {Katie at the Kitchen Door}

Back in September, I did a little recipe development for the California Almond Board, after which I found myself with a lot of leftover almonds and a huge tub of almond butter sitting in my pantry. I’ve always been a faithful peanut butter lover, but I started playing around with the almond butter, adding a little bit to my various breakfast recipes to see how I liked it. I quickly stumbled upon a combination that I couldn’t get enough of – oatmeal flavored with thick pieces of cooked apple, a sprinkling of cinnamon and brown sugar, and a healthy tablespoon of almond butter swirled in at the end. It was sweet, it was creamy, it was filling, and it satisfied my autumnal cravings for a hot breakfast without the guilt of some of my other hot-breakfast staples. I dubbed it “Apple Pie Oatmeal,” and proceeded to make all my coworkers jealous of the warm, sweet-smelling breakfast I was enjoying every morning. Yes, my coworkers, because one of the best things about this recipe is that it’s portable – you can assemble all the ingredients for this in a tupperware before you leave for work, microwave it for 2 minutes once you’re there, and have a warm, delicious breakfast to savor at your desk. Believe me, it really brightens up a dreary morning. After four months of eating this for breakfast at least once a week, it has become a tried and true favorite, and I figured it was high time I shared it with you.

I want you to know: I’ve experimented a lot with this recipe. I’ve swapped out the apples for frozen blueberries and raspberries. I’ve used maple syrup instead of brown sugar. I’ve replaced the almond butter with peanut butter and tried omitting the cinnamon. However, nothing is as good as that initial combo: oats, milk, apples, brown sugar, cinnamon, almond butter. It’s perfect. That said, you should feel free to play around with it on your own! Just don’t be surprised if you find yourself coming back to the original, too.

Like what you just read? Subscribe to Katie at the Kitchen Door on Feedly or Bloglovin’, or follow along on Facebook, Twitter, Pinterest, and Instagram. Thanks for reading!

Easy Apple Pie Oatmeal {Katie at the Kitchen Door}

Apple Pie Oatmeal

Serves 1.

Note: I prefer making this in the microwave – it’s faster, less messy, and the apples get softer. However, it’s also good on the stovetop if you prefer to make it that way. I’ve included instructions for both, below.

  • 1/2 c. oats
  • 1 c. skim milk
  • 1 small apple, cored and cut into 1/2 inch cubes
  • 1/2 tsp cinnamon
  • 1 TBS almond butter
  • 1 TBS brown sugar
  • 1 TBS sliced almonds, toasted in a dry skillet (optional)
  1. If making in the microwave: combine all ingredients except the sliced almonds in a microwave-safe tupperware or bowl. Cover loosely with a lid or paper towel, and microwave on high for one minute. Remove, stir, and return to microwave. Microwave in 30 second intervals until oats and apples are cooked and slightly soft, stirring in between intervals in the microwave. It usually takes only two or three 30 second intervals to finish the oatmeal. Careful – if you cook it too long it might overflow from the bowl, so watch it closely! Sprinkle the toasted almonds over the top, and serve.
  2. If making on the stovetop: combine oats, milk, and apple in a small pot. Cook over medium-low heat, stirring frequently, until oats and apples are soft, about 5-8 minutes. Remove from heat, and stir in cinnamon, almond butter, and brown sugar until fully incorporated. Sprinkle with toasted almonds and serve.

0 January 15, 2014 Food

Winter Cleanse 2014: Week One

Winter Cleanse 2014 - 14 Healthy, Seasonal, and Delicious Recipes from Katie at the Kitchen Door

Welcome to the 2014 winter cleanse! This is the third year that I’ll be creating, following, and sharing a two-week plan for healthy, seasonal, “clean” eating here on the blog. The first year, I was inspired in part by the Bon Appetit Food Lover’s Cleanse and in part by my parents’ experience following the eating plan in the book Clean. I started out ambitious: no gluten, no dairy, no alcohol, no coffee. Mostly salad. All those changes at once sustained for two weeks proved to be a little bit too much for me, and I quickly gave in to dairy and gluten cravings.  I also learned that preparing 3 healthy meals and a healthy snack for 14 days in a row is a lot of work, and requires making a game plan ahead of time. Armed with this knowledge, I tackled last year’s cleanse a little differently, and had better results sticking with it. I’ve built in even more flexibility for myself this year, and there’s more on those adjustments below, but first, why do I call this non-scientific, not that diet-y, healthy meal plan a “cleanse”?

Every year, I write that I hesitate to call this two-week healthy eating plan a “cleanse.” And it really does make me a little bit uncomfortable. Especially at this time of year, the media is so full of cleanses and health tips and detoxes and diets that I find it super overwhelming. I read things like “I’m a really indulgent eater – I start every day with a green smoothie and an egg white omelette, and I eat an entire bowl of sorghum with my poached salmon and mustard greens at dinner. The 17 day juice cleanse that I do every other month really helps me press the reset button.” and I want to scream a little bit. Who eats like that?? Are you real people?? What do you you do when you want, say, an entire pint of New York Super Fudge Chunk? Just have a single dried fig and feel satisfied? I feel like these people must be lying, and are secretly eating an entire pizza every day at lunch. Am I the only person out there who has, oh, say, infinity less self control than these people? This introduction/loosely-disguised-rant is just to warn you that my “cleanse” is not based on re-balancing your acidity levels or drinking only fresh juices or raw foods for two weeks. It’s much, much less hard core than that. Really, it’s just a collection of common-sense healthy recipes – more veggies, less fat, whole grains, but still with the occasional sprinkling of cheese or piece of bacon. I like eating. I like flavor. And I like feeling good. But I don’t like denying myself. So that’s what these recipes aim to give you – a flavorful, satisfying, sustainable approach to healthy eating. Hopefully, you’ll find healthy recipes that might even make it into your all-year dinner rotation.

I’m approaching the cleanse a little bit differently this year. Instead of forcing myself to adhere to a strict schedule, I’m outlining the breakfasts, lunches, dinners, and snacks that are on the menu for the week, and then I pick and choose from these options based on what I feel like. This helps me look forward to each meal – instead of dreading going home to a salad on a 20° day, I can decide at lunchtime that I’m going to make a hot pot of soup and anticipate it for the rest of the day. It also allows me to be flexible with the excess of leftovers I find myself with when doing all this cooking – if my fridge is full, new recipes get put on hold and leftovers (pre-approved on the week’s menu) get put to good use. I do find it helpful to outline dinner, lunch, and an afternoon snack the night before, so that I have a plan of action for packing my bag in the morning. I’ve still included a daily plan in the document below for those of you who prefer a schedule, but you should feel free to mix it up. Also included in that little document is a shopping list, and some tips for how to plan ahead for the extra time in the kitchen.

So, without further ado, here’s the goods: in the body of this post, the 5 breakfasts, 7 lunches/dinners, and 4 snacks on week one of the cleanse menu, and in the attached word document, your shopping list, daily meal plan, and prep tips. Get cooking, friends!

Winter Cleanse 2014: Week One – Grocery List, Meal Plan, and Prep Tips

Breakfast/Brunch Recipes

Winter Cleanse 2014: Healthy Breakfast Recipes - Shakshuka {Katie at the Kitchen Door}

Shakshuka

Winter Cleanse 2014: Healthy Breakfast Recipes - Sweet Green Smoothie {Katie at the Kitchen Door}

Green Smoothie

Winter Cleanse 2014: Healthy Breakfast Recipes - Baked Blackberry Oatmeal {Katie at the Kitchen Door}

Baked Blackberry Oatmeal

Winter Cleanse 2014: Healthy Breakfast Recipes - Raspberry-Maple Breakfast Quinoa {Katie at the Kitchen Door}

Raspberry Maple Breakfast Quinoa

Winter Cleanse 2014: Healthy Breakfast Recipes - Brussels Sprout and Sweet Potato Hash {Katie at the Kitchen Door}

Brussels Sprout and Sweet Potato Hash

Lunch/Dinner Recipes

Winter Cleanse 2014: Healthy Dinner Recipes - Roasted Beet and Spinach Salad {Katie at the Kitchen Door}

Roasted Beet and Spinach Salad with Goat Cheese, Almonds, and Pomegranate

Winter Cleanse 2014: Healthy Dinner Recipes - Sesame Chicken Bowl {Katie at the Kitchen Door}

Sesame Chicken Bowl

Winter Cleanse 2014: Healthy Dinner Recipes - Mushroom and Olive Veggie Burgers {Katie at the Kitchen Door}

Mushroom and Olive Veggie Burgers (served with 1/2 roasted sweet potato)

Winter Cleanse 2014: Healthy Dinner Recipes - Roasted Brussels Sprouts and Bacon Salad {Katie at the Kitchen Door}

Roasted Brussels Sprout and Bacon Salad with Avocado Vinaigrette

Winter Cleanse 2014: Healthy Dinner Recipes - Roasted Poblano and Black Bean Soup {Katie at the Kitchen Door}

Roasted Poblano and Black Bean Soup

Winter Cleanse 2014: Healthy Dinner Recipes - Quinoa and Black Bean Stuffed Peppers {Katie at the Kitchen Door}

Quinoa and Black Bean Stuffed Peppers

Winter Cleanse 2014: Healthy Dinner Recipes - Soba Noodles with Kale and Slivered Brussels Sprouts {Katie at the Kitchen Door}

Soba Noodles with Kale and Slivered Brussels Sprouts

Snack Recipes

Winter Cleanse 2014: Healthy Snack Recipes - Gluten Free Corn Feta-and-Olive Muffins {Katie at the Kitchen Door}

Gluten-Free Corn Muffin with Feta and Olive

“Snack Bag” – 1/4 c. nuts, 2 TBS chocolate chips, 1/4 c. dried cherries

Avocado Tartine – 1/2 an avocado mashed on one piece whole wheat toast

Winter Cleanse 2014: Healthy Snack Recipes - Apple Quinoa Cake {Katie at the Kitchen Door}

Apple Quinoa Cake

One disclaimer: I am not a dietitian, nutritionist, doctor, or medical professional of any sort.  I simply wanted to share my personal menu and goals for healthy eating, so please realize that I have tapered this plan to what I feel my own nutritional needs are, and carefully consider your own health needs/consult your doctor before following any diet, cleanse, or detox plan!

  • « Go to Previous Page
  • Go to page 1
  • Interim pages omitted …
  • Go to page 22
  • Go to page 23
  • Go to page 24
  • Go to page 25
  • Go to page 26
  • Interim pages omitted …
  • Go to page 57
  • Go to Next Page »

Primary Sidebar

Subscribe!

Get creative recipes and menu ideas delivered straight to your inbox.

Most Popular

A House // Sweet Potato and Coconut Milk Soup with Brown Rice and Lentils

Monthly Fitness Goals: July // Homemade Spinach Wraps with Chopped Greek Salad

A New Job // Classic Seven-Layer Bars

Butternut Squash Carbonara with Fried Sage and Caramelized Onions

Happy Birthday, Trevor! // Peanut Butter Fudge

Cookbook Review and Giveaway: Home Made Winter

Drizly

Please note!

Full disclosure: if you purchase anything at Amazon using the above links or any other links to Amazon on this site, I will receive a small commission. Just so you know!

Copyright© 2026 · Cookd Pro Theme by Shay Bocks

This site uses cookies: Find out more.