• Skip to primary navigation
  • Skip to main content
  • Skip to primary sidebar
  • Home
  • Recipes
  • Features
    • Cookbook Reviews
    • Ingredient of the Week
    • Sunday Dinner
    • Fitness Goals
  • Travel
  • About
    • Privacy Policy
    • Cookie Policy
  • Work With Me

Katie at the Kitchen Door

Globally-inspired, seasonal recipes

Blog Page

5 November 6, 2011 Dessert

Apple and Honey Madeleines

I’ve been wanting to visit Vermont for a long time, but I tend to be the kind of person who procrastinates planning something because I want it to be perfect.  I want to pick the perfect date, when the weather will be just right, and I have the perfect trip itinerary planned.  This sometimes results in spectacular trips on a very tight budget – like the time I spent an entire semester planning a two week trip to France and it ended up being exactly what I wanted as well as totally manageable on a college budget.  More frequently, however, it ends up with me not actually taking the trip at all.  Every once in a while, however, I’ll get so frustrated with my own planning dependency that it will inspire a burst of spontaneity, like last week, when I saw, purchased, and booked a groupon trip to Stowe, VT in the span of an hour on Thursday afternoon, and we were in the car on the way a week later.  I’m a little bit proud of myself.  Another side-benefit of spontaneous travel – I have much lower expectations for how things will go when I have only a vague plan, and therefore tend to relax and enjoy myself a little bit more than when I’m stressed about fitting everything in.  And just relaxing is exactly what I did this weekend.  It was great.

I’ll have a full trip recap for you next week, as Trevor and I found a lot of great places, many of them food related, but I’m headed to Miami for work early tomorrow morning, and I’m not sure I’ll have time to gather my thoughts and go through my photos until I get back next weekend.  In the meantime, I have a few treats that I brought to Vermont with us, to help cut down on our food expenses – a quinoa and brussel sprout dish that I’ll post later this week, and these roasted apple, honey, and vanilla madeleines.

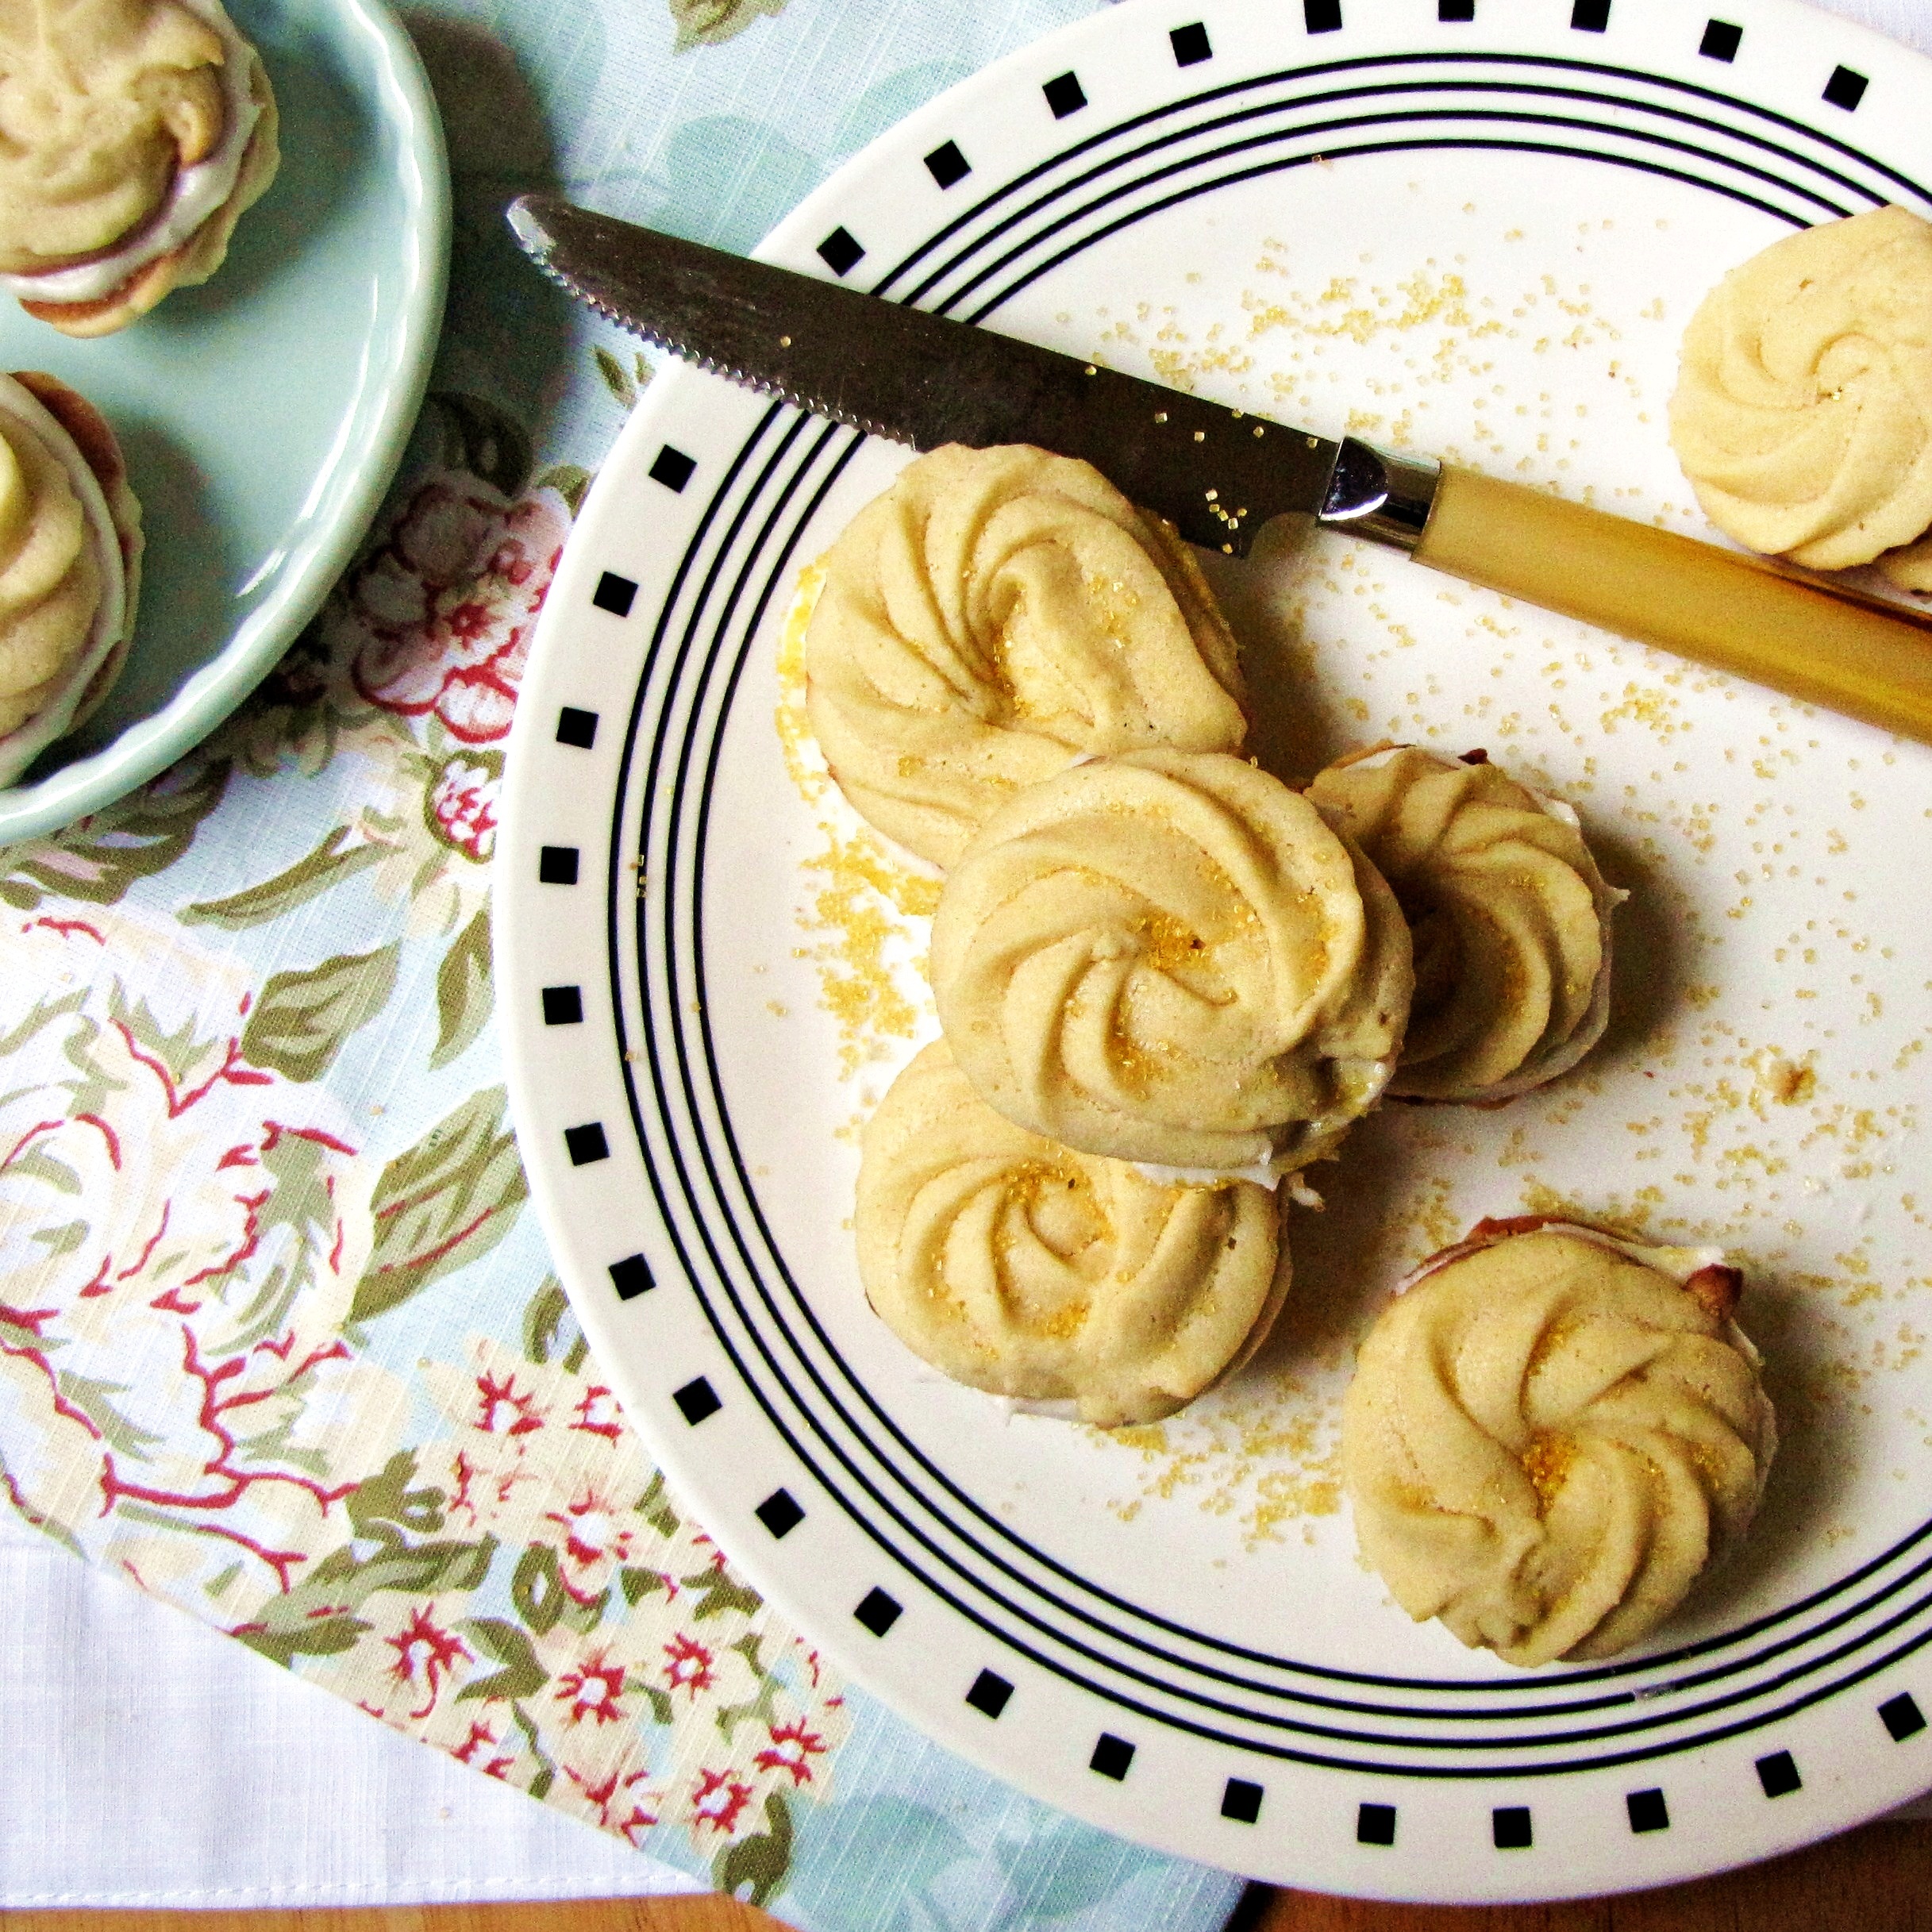
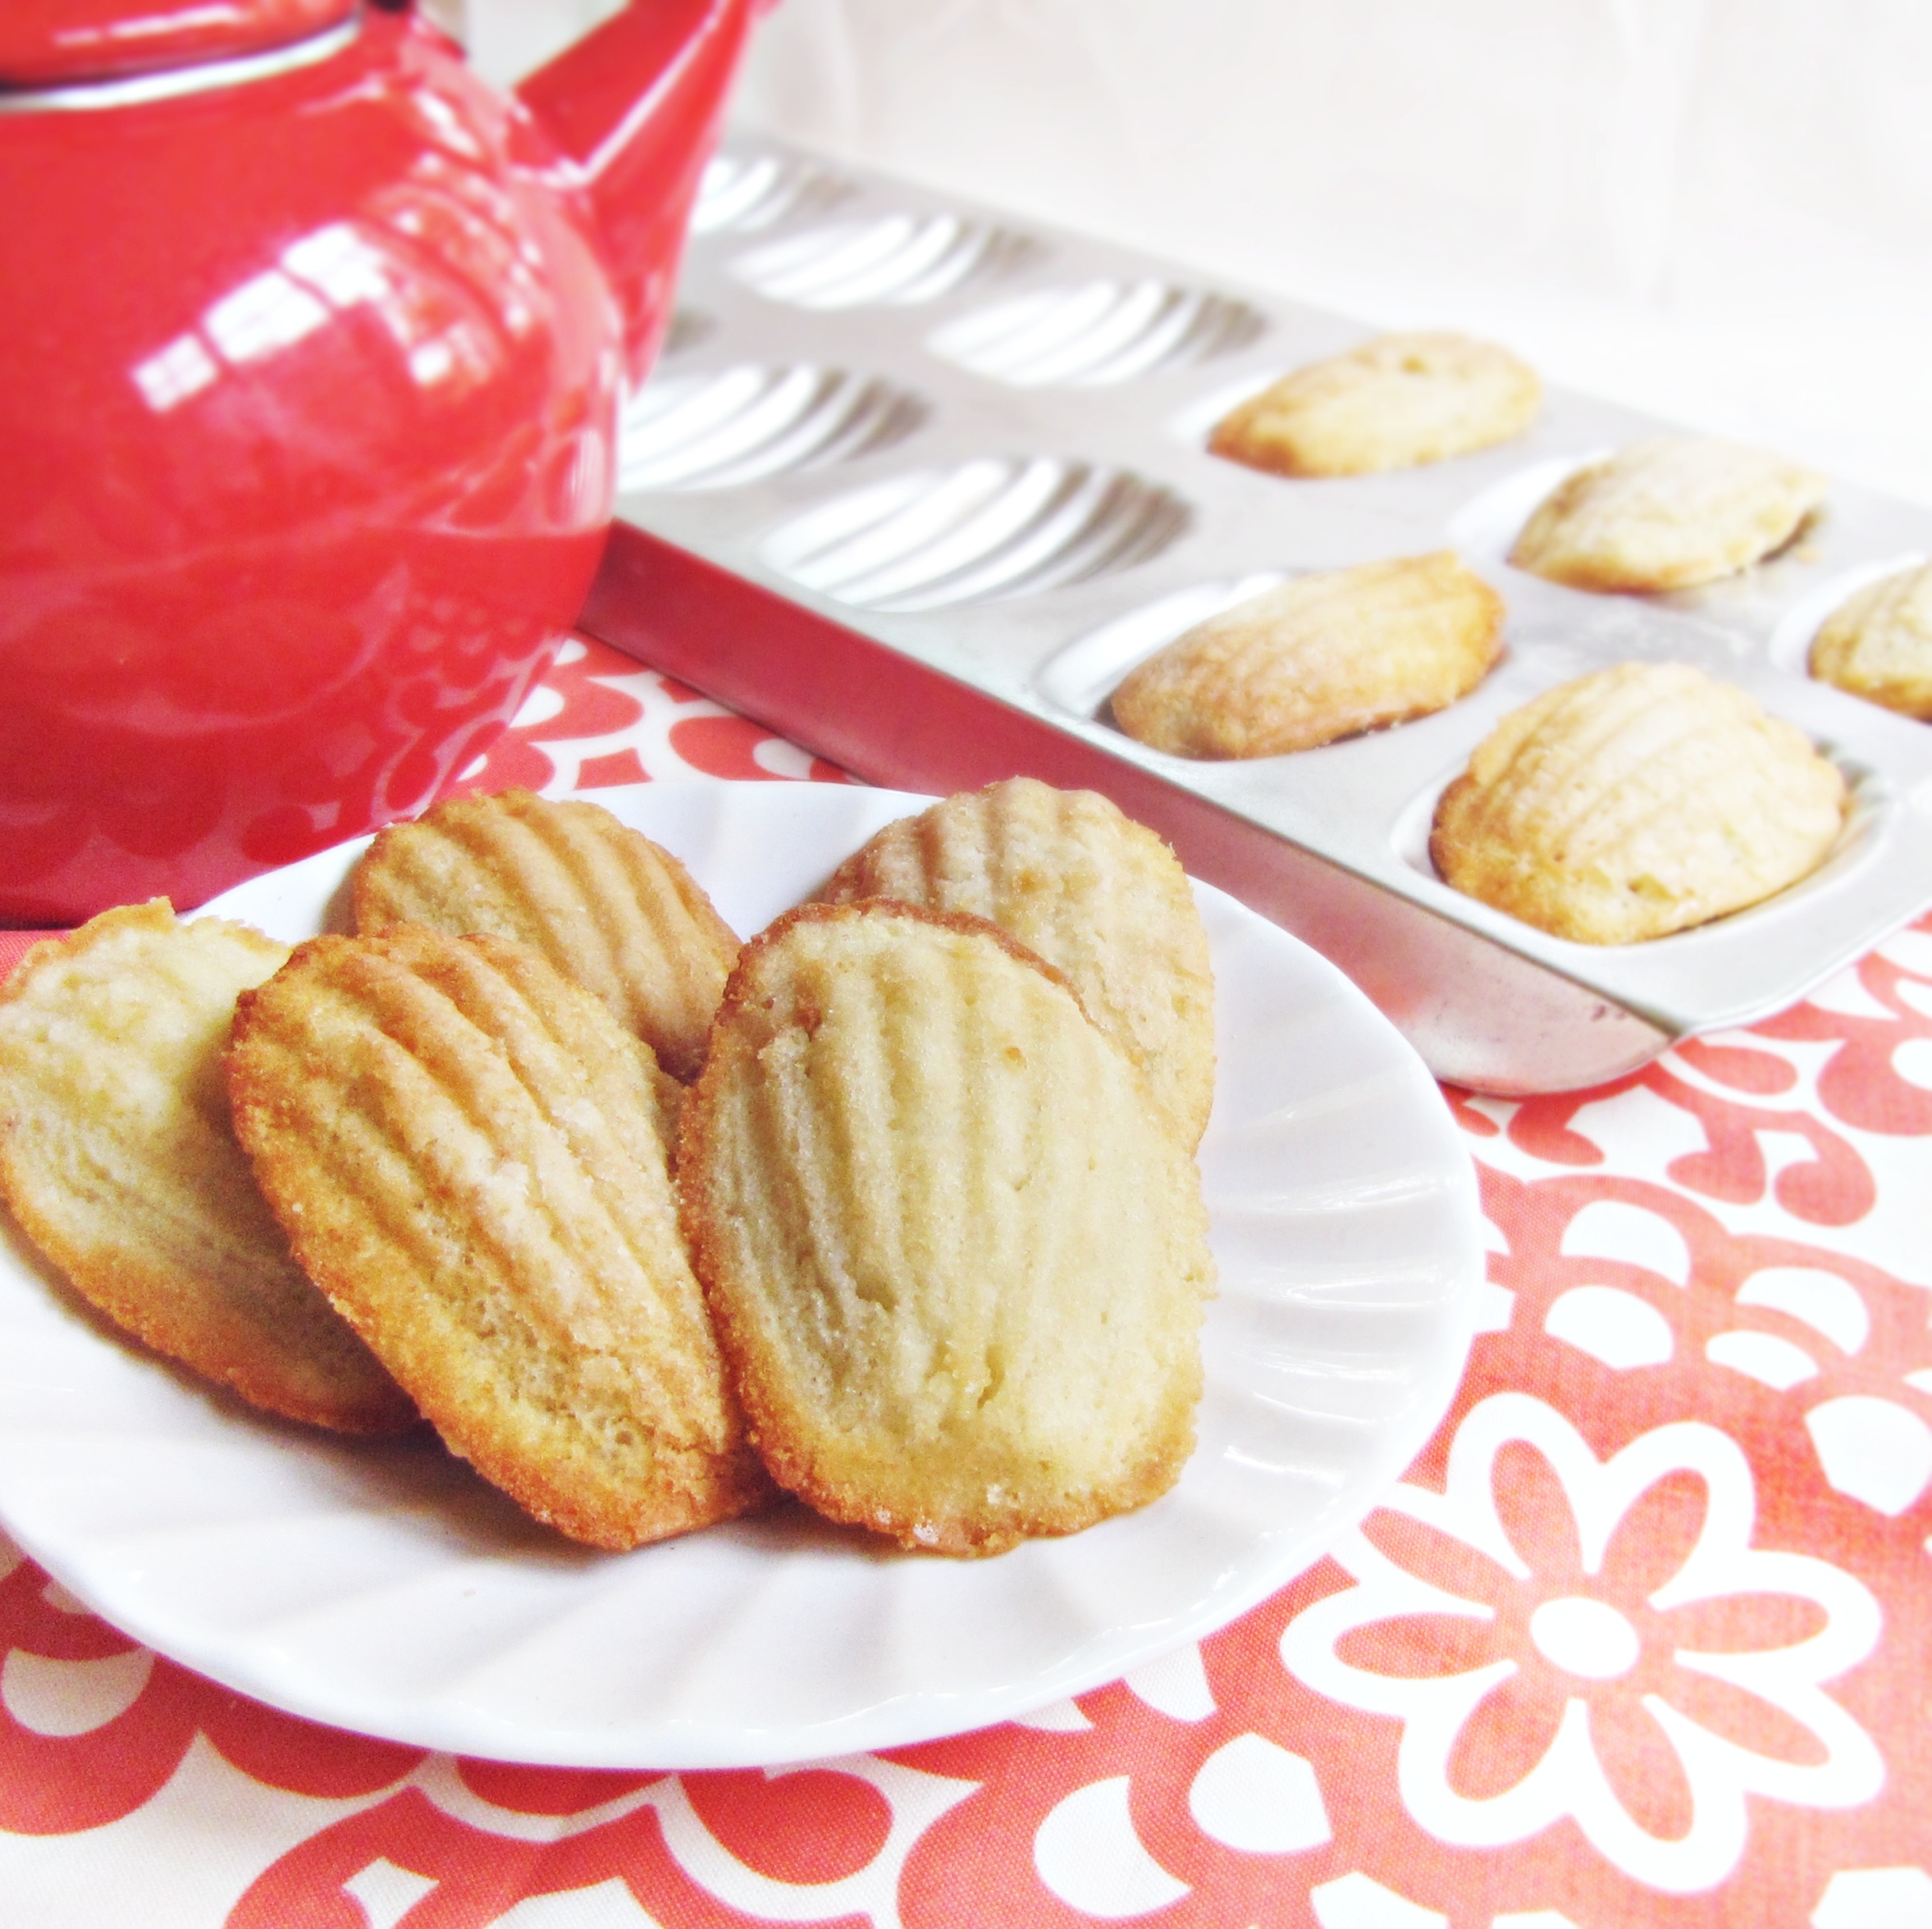
Trevor was the one to introduce me to madeleines a few years ago.  They’re one of his favorite treats, but I’ve been slow to agree.  I’ve made a few batches, but never really saw the appeal – not that I disliked them, I just didn’t love them.  This batch was different.  Maybe my tastes have changed, or I’ve become a better baker, but I think the most likely reason is that this is just a great recipe.  The flavor of these is complex, with the vanilla, honey, and apple flavors all shining through independently, but what’s really great about these is the perfect texture.  They’re moist and spongey, with just the right amount of give when you bite into them.  My only complaint about these is that they were quite sticky on the outside – every time I picked one up, I would end up with a large number of madeleine crumbs on my hands.  This seemed to be remedied by a day in the fridge – the interior was still moist and great, but the outside dried out a little bit and made them less sticky.  All in all, they were a great snack for after lunch, after dinner… and even Sunday morning breakfast in bed. :-)

Apple and Honey Madeleines

Recipe adapted from Cooking Melangery and Cannelle et Vanille.  Makes 24 madeleines.

  • 2 small apples
  • 1/2 tsp vanilla extract
  • 2 tsp turbinado/cane sugar
  • 8 TBS butter, divided
  • 3/4 c. flour
  • 1 tsp baking powder
  • 3 eggs
  • 1/2 c. sugar
  • 2 TBS honey
  1. Preheat oven to 400°F.  Peel, core, and dice apples, and place apple chunks in a baking dish with vanilla, cane sugar, and 1 TBS butter.  Roast in preheated oven for 20 minutes, until completely tender.  Puree in food processor.  Set aside 1/2 cup of puree for madeleines – remaining apple puree can be saved for another use.  Turn off oven.
  2. In a small saucepan, melt remaining 7 TBS of butter over low heat, then cook until it begins to brown and give off a nutty aroma.  Pour through fine-meshed sieve into small heatproof bowl and let cool slightly, discarding milk solids in the sieve.
  3. Sift together flour and baking powder in a small bowl.  In a separate, larger bowl, beat eggs vigorously until pale yellow and thick.  Add the sugar and honey and continue to beat vigorously until thick, for about 2-3 minutes.  Add the flour to the egg mixture and gently stir together.  Stir in 1/2 cup of roasted apple puree and 6 TBS of the melted butter.  Use the remaining 1 TBS of melted butter to grease the madeleine pans (set aside any extra for the next batch), being sure to brush butter in all the ridges.  Flour the madeleine pans and tap out any excess.  Set prepared pans aside, and refrigerate madeleine batter for half an hour.
  4. Preheat the oven to 375°F.  Spoon the chilled madeleine batter into the molds, filling almost to the top, then transfer to the oven and bake for 11-12 minutes.  Remove the madeleines from the oven, and let cool 1 minute, then remove from pans and set on cooling rack.  Rinse cooled madeleine pans, then re-butter and re-flour before adding more batter.  Continue until all madeleines are baked.

2 November 2, 2011 Dessert

Boozy Brownies for My Newly Old Brother

Last week my little brother turned 21.  So obviously, I had to send him alcohol related things.  Because 21 is your last important birthday.  And by important, I think I probably mean fun, as I imagine your 50th birthday feels pretty important but not necessarily that fun.  Or maybe it’s actually a blast.  I wouldn’t know – I’m just gearing up for 23.  But the point is, 21 is a big one.  And it’s a big one because of the boozing.  Although I don’t think I personally know anyone who didn’t drink before turning 21, it doesn’t make it any less exciting when it becomes official.  You can walk into a bar and order a beer, or a kamikaze, or a shot of tequila, and no one can stop you.  It’s kinda cool.  At least, it’s really cool at first, and then it just becomes a sorta nice extra freedom – like, I can buy a bottle of wine whenever I want, or order a beer with a hamburger, and it’s no big deal.  Really, I don’t know why the drinking age is so high to begin with, but I think I’ll avoid getting into that just now…

Anyway.  Back to Ryan.  Ryan and I are only a year and a half apart, and we’re buds.  Our buddiness goes through phases – we were totally buds at ages 1 and 3, when I slapped my mother for making him cry while changing his diapers.  We were OK buds from ages 4-9, when we shared a room with pink, flowery wallpaper and I drew imaginary lines to demarcate whose side was whose – mine was the side with the door, obviously.  We were not such good buds when I was trying to be cool in middle school and he was just a 5th grade baby, although I secretly loved playing pokemon with him once I got home.  No shame.   And we became really good buds once I got my license and I drove us to school every day – 20 minutes of uninhibited, unchaperoned conversation every day for 2 and 1/2 years can make people pretty close.   Now it’s harder to stay tight – he’s at Cornell, and busy playing frisbee and programming computers and being a little bit fratty, and I’m here, busy working and blogging and trying to stay balanced.  But I’m not worried that we’ll ever be those awkward, estranged siblings who never quite figure out how to interact as adults – we get along too well when we actually are together.

Although I haven’t actually heard how his birthday went, due to our extremely poor communication skills when we’re not in the same room (for which I’m giving you 70% of the blame, Ryan), I know he survived, I’m assuming he had a good time, and I know he got my package.  Which contained, among other things, Dark and Stormy brownies.  Lately I find myself drinking a lot of Dark and Stormies – a combination of Gosling’s dark rum, Gosling’s ginger beer, and lime juice.  They’re spicy, flavorful, and moody – they somehow seem very appropriate for this time of year (or maybe I just think that because of the name).  Either way, I have had a recipe from Ideas in Food for these brownies bookmarked for a long time.  If you’ve never checked out Ideas in Food, I’d definitely recommend it.  They are a husband and wife team that generates some of the most interesting and creative material on food I’ve seen, anywhere.  Sometimes I’m sort of turned off by some of their suggestions, as they really push the boundaries of traditional uses for ingredients, and sometimes I wonder how on earth no one else came up with some brilliant idea of theirs earlier, but I’m always totally intrigued by their work.  Part of the fascination for me is the techniques they use – a lot of them are high tech and inaccessible to the casual chef, but a handful of them are totally doable as well as great ideas.  They also have a cookbook, which I haven’t checked out yet but it’s high on my list.  Anyway, these brownies were the first actual recipe of theirs that I tried.  The flavor of the brownies was amazing.  Perfect.  So powerful.  However, the texture was decidedly weird.  They were moist and dense, both pluses, but also very crumbly.  They barely stayed together when I took them out of the pan, and they had a dense, cocoa-y mouthfeel.  Not totally unpleasant, but not very transportable, and not the brownie I was looking for.  The incredible flavor of the brownies came from simply pulsing fresh ginger and lime peel (they suggest lime oil, but I couldn’t find any) with the sugars in a food processor, and of course, adding a bit of rum.  Pretty transferrable techniques, so I decided to apply them to a brownie recipe with a better texture to get the flavor-texture combo I was looking for.  I bet you could even use these tricks to doctor up a batch of boxed brownies, sacrilegious as it may sound.  If you try it, definitely let me know the results.  And Ryan, I hope they stayed in one piece for you and that you enjoyed them – if not, I’ll make you some new ones when you get home.  Happy 21st!

Dark and Stormy Brownies

Inspired by Ideas in Food.  Brownie recipe adapted from Crustabakes.

  • 7 oz semisweet baking chocolate
  • 1 stick salted butter
  • 3 TBS cocoa
  • 3 eggs
  • 3/4 c. sugar
  • 1/2 c. brown sugar
  • zest/peel of 1 lime
  • 3 inches fresh ginger, peeled and cut into large chunks
  • 2 TBS Gosling’s dark rum
  • 1/2 tsp salt
  • 1 c. flour
  1. Preheat oven to 350°F.  Grease a 9×13 inch baking pan.  Set aside
  2. In a small saucepan, gently melt the chocolate and butter together over low heat, stirring all the while.  Alternatively, you can do this in a bain-marie or double boiler – the point is to keep the chocolate from burning or overheating while you melt it, but you can do this carefully without using a double boiler.  Whisk the cocoa powder into the melted chocolate and stir until smooth.  Remove from heat and set aside.
  3. Place sugars, peeled ginger, and lime peel/zest into a food processor, and pulse until the ginger and lime are cut very fine and evenly dispersed throughout the sugar.  In a large bowl, whisk together eggs, ginger-lime-sugar, rum, and salt until combined.  Whisk in warm chocolate mixture and stir to combine.  Finally, fold in flour, stirring gently until just incorporated.  Spoon the batter out over the prepared pan.  Bake for 25-30 minutes, then check for doneness – a toothpick inserted into the center should have a few moist crumbs attached to it.  PLEASE NOTE:  I previously made these brownies in an 8×8 pan and thought they were overdone at 37 minutes, as well as too thick.  I think they would be better in a 9×13 for a shorter cooking time, but 25-30 minutes is really my best guess at cooking time.  It may be worth it to start checking them at 20 minutes, although I doubt they’ll be done that quickly.

0 October 27, 2011 Cookbook

Cookbook of the Month: The New Portuguese Table

Hey, two months in a row!  Look at me, fulfilling promises and everything.  This month’s cookbook is David Leite’s “The New Portuguese Table,” a fairly recent compendium of traditional Portuguese recipes with a modern twist.  I’ve been really looking forward to cooking from this book, as it won a James Beard award in 2010 and has a solid 5 star review on Amazon, with only one negative review in the bunch.  I made three recipes from this book in the past few weeks – cilantro bread soup with poached eggs, white beans and sausage, and black olive risotto – and I hate to say it but I’m not as enthused about the recipes in this book as everyone else seems to be.  The white beans and sausage were good, but not that original – I thought it tasted like regular old chili.  (Full disclosure, I used kidney beans instead of cannellini beans, because I just couldn’t find dried cannellini beans.  I went to four stores looking for them.  So the bean substitution probably added to the chili effect.  However, kidney beans and cannellini beans are actually pretty close in flavor, and genetically related, so the major differences caused by the substitution were probably texture and appearance, and not so much flavor.  Also, did you know that kidney beans and cannellini beans are poisonous?  Thanks, wikipedia.  You are so full of knowledge.)  The cilantro soup I did not like at all – its only redeeming factor was the croutons made from Trevor’s delicious homemade bread – and I ended up dumping most of the recipe out, as well as not finishing the bowl I brought to lunch the next day.  And it takes a lot for me to throw out food that I really wanted to like.  Maybe I was expecting too much from such a simple recipe, but it was definitely a disappointment.  On the other hand, this black olive risotto – super awesome.  Like decadent grown-up mac’n’cheese with a twist.  I made it twice in one week, and taking the time to make two risottos in one week is big for me.

Let me elaborate: this recipe takes your standard risotto ingredients – arborio rice, chicken stock, onion, white wine, and parmesan – adds two special ingredients – black olives and mascarpone – and becomes something super comforting, super creamy, and super delicious.  Trevor’s one semi-negative comment on it was that it lacked depth of flavor, which I do sort of agree with – it hits you with creamy, cheesy, and olive-y pretty hard.  But I’m OK with that.  That’s kind of what I’m looking for in a comfort food.  And this is definitely comfort food.  So the risotto recipe is a keeper.  But the other recipes I tried?  I probably won’t go to the trouble of making them again.  That doesn’t mean I’ve completely given up on this cookbook – I still have a few recipes I’d like to try, like the green olive dip and the rosemary custard – but I will approach future recipes with a more critical eye.  The cookbook itself is very attractive and well laid out, and most of the recipes included sound interesting – many of them are totally new to me, which is always something I look for in an ethnic cookbook.  Overall, I’d give this book 3 and 1/2 stars, with room for improvement if the two not-so-good recipes I tried were just flukes.

Black Olive Risotto

Serves 3.  Adapted from David Leite’s “The New Portuguese Table”

  • 1 1/2 c. arborio rice
  • 1 TBS olive oil
  • 1 small yellow onion, diced
  • 5 c. chicken stock
  • 1/2 c. dry white wine
  • 2/3 c. freshly grated parmesan cheese
  • 1/3 c. mascarpone cheese
  • 1/2 c. pitted kalamata olives, sliced
  • 3 TBS minced fresh parsley
  1. In a large, wide saucepan, heat the olive oil over medium heat.  Add the onion and cook until translucent and beginning to brown.  In the meantime, heat stock over medium heat.  Add dry rice to pan with onions and cook for 1-2 minutes, until edges of rice are translucent.  Then add white wine all at once and cook, stirring constantly, until it is absorbed.
  2. Add  ladleful of hot stock to the rice and stir constantly until it has been completely absorbed, about 2 minutes.  Continue adding stock one ladleful at a time and stirring until completely absorbed until the rice is just tender – you should use most of the stock.  If you run out of stock before the rice is cooked, use hot water.  When rice is tender.  Add parmesan cheese, mascarpone cheese, and sliced olives, and stir until cheeses are melted and risotto is creamy.  Remove from heat and serve hot with fresh parsley sprinkled on top.

0 October 22, 2011 Fall

Curried Apple Couscous

Apple picking is a great activity.  It’s fun, it’s wholesome, it’s New Englandy, it’s outside, it promotes local food, and if you go with someone you secretly don’t like you can throw apples at them and write it off as “all in good fun.”  (I didn’t actually go with anyone I don’t like, but I can imagine doing this.  Especially to my brothers, who I actually like, but it’s always fun to throw things at your siblings.  Sorry, tangent.)  If you live somewhere where there are good apples, you should go – the flavor of a store-bought apple, even a local, organic store-bought apple, pales in comparison with the flavor of one fresh off a tree.  However, be prepared to make a lot of apple-y things afterwards.  Lately, it seems like everyone I know is trying to figure out what to do with all their apples.  The standard story is this: “we went apple picking and it was so much fun that we picked a whole bushel.  And now we have 78 apples for 2 people.”  Once they’ve had a few crisps, pies, and bowls of applesauce, they want to branch out.  So I thought I’d share one of my favorite non-pie apple recipes: curried apple couscous.

This is one of the first recipes I ever made, and I still make it all the time.  It comes from 101 cookbooks, which also happens to be the first food blog I ever read.  Couscous has always been one of my very favorite foods – I think it’s a combination of the texture and the ease of cooking which makes me like it so much.  I almost never go to the trouble of cooking couscous in a pot – the beauty of couscous is that all you need to cook it is boiling water.  So I heat up the tea kettle, pour the boiling water over a bowlful of dry couscous, eyeballing the amount I think I need, cover the bowl with a small plate to let it steam – and voila!  Delicious hot lunch with no dishes to wash.  I’m happy.  This recipes takes a touch more effort, but it’s still quick enough to throw together and get the dishes done in ten minutes, which is the time limit for me if I’m going to make something for lunch before work in the morning.  It’s also not unhealthy (although I won’t say it’s truly a health food because of the butter and processed grains), and the contrast of flavors and textures is perfect.  You can vary the ingredients based on what you have in the fridge, add cheese, change the nuts, and it will probably still be good.  Right now I’m imagining a curried pear version with goat cheese and walnuts.  But since everyone’s currently in “use up all your apples” mode, I’d try this version first.

Curried Apple Couscous

Adapted slightly from 101 Cookbooks.  Serves 1.

  • 1 apple, cut into 1/2 inch cubes
  • 2 TBS butter
  • 1 TBS curry powder
  • 2 scallions, sliced into rounds
  • 1/3 c. slivered almonds, toasted
  • handful of fresh mint, chopped
  • 3/4 c. couscous
  • about 1 1/4 c. boiling water
  • coarse sea salt
  1. Heat 1 1/2 TBS butter in medium pan over medium heat.  When melted, add curry powder and cook for one minute, stirring, until butter foams.  Turn down heat to medium-low and add apples.  Cook for about 5 minutes, stirring frequently, until apples are softened.  Remove apples from pan and set aside.  Add remaining 1/2 TBS butter to pan, along with scallions.  Cook for 2 minutes, then set aside with apples.
  2. Place the couscous and chopped mint in a heatproof bowl.  Pour boiling water over to cover by about 1/2 inch.  Place a plate or other cover on top of the bowl and allow couscous to steam for 5 minutes.  Remove the plate and fluff with a fork.  Test for tenderness.  If couscous is still hard, or there is too much water left in the bowl, microwave for 30 seconds to complete the cooking/evaporate some of the water.  Mix in curried apples, scallions, and toasted almonds.  Sprinkle with coarse sea salt to taste.  Serve warm or cold.

18 October 15, 2011 Asian and Indian

Beguni – Bengali Eggplant Fritters

I came home from Andover with a lot of produce on Tuesday night – besides a giant bag of apples, I also had an armful of eggplants, a bunch of kale, and fresh herbs, all scavenged from the Andover garden.  Now, free produce is free produce, and I was as excited about it as I always am about free food (or free anything, really), but I was a little perplexed by what to do with 8 eggplants.  My rate of eggplant consumption is generally about 1 per month, not because I don’t like it, but because I only have one or two ways of preparing it – the first being roasting it and tossing it with pasta and feta, the second being baba ghanoush.  These are both delicious, but I don’t like cooking or eating the same thing too frequently (except when it comes to breakfast, where my weekly repertoire of recipes never exceeds two), so I wanted to try something new with my bounty.

Turns out, I actually had several eggplant recipes already bookmarked (it’s hard to keep track of the recipes you have bookmarked when you have over 500 of them, and it can be so exciting to rediscover them), so I set about trying a few.  Eggplant cream sauce, vegetarian eggplant meatballs, baked eggplant chips, Turkish eggplant phyllo pies – where to start?  It was Saturday afternoon, I was extremely hungry after a 6 mile run, I wanted to blog and use up some of my produce, but I only had an hour before I had to leave to catch a train.  So, I decided to try these quick Indian eggplant snacks – called Beguni.  They’re just thin slices of eggplant, dredged in a gently spiced chickpea batter, and fried hot until the batter is golden brown and the eggplant is tender.  Having never been to India, I can’t personally attest to this, but from what I’ve read, they are an extremely popular street food item sold mainly during monsoon season.  (It rained a lot yesterday – does that count?)

They ended up being the perfect solution.  Super easy to both prepare and cook, I had a hot, tasty snack within 15 minutes of deciding to make these, and I even had time to snap a few photos, and make sticky figs (coming soon!).  This may not be the healthiest way to enjoy eggplant, but it’s definitely delicious, and certainly a departure from my standard eggplant recipes.  If you’re looking for a new way to prepare eggplant, a quick afternoon snack, or a tasty appetizer to an Indian themed dinner, these are definitely worth trying.  And be sure to fry up any extra batter as a treat for yourself rather than dumping it – it’s super yummy by itself, although not as good as with hot, creamy eggplant inside!

Beguni – Bengali Eggplant Fritters

Adapted slightly from Ecurry.  Serves 1.

  • 1 small Chinese eggplant, 6-8 inches long
  • coarse sea salt
  • 1/2 c. chickpea flour
  • 1/4 tsp turmeric
  • 1/4 tsp chili powder
  • 1/8 tsp baking powder
  • 1/2 c. water
  • canola oil
  • fresh mint leaves (optional)
  1. Slice the eggplant into rounds about 1/2 inch thick.  Lay out on a tray or plate and sprinkle with salt, and let sit ten minutes.  Rinse off salt and pat dry.
  2. In a medium bowl whisk together chickpea flour, turmeric, chili powder, and baking powder until thoroughly combined.  Add water and beat until batter is smooth.  Batter should be thick but still fluid, so that it stays in a thin layer on the eggplant when dipped in it.  Add more water or chickpea flour as necessary to get the right consistency (after frying a test fritter, I found that the batter needed a bit more water than the original recipe called for, which is reflected in the recipe above).
  3. Heat about 1/4 inch of oil in a large frying pan over medium heat.  When it is shimmering, dredge the eggplant slices in the chickpea batter and place in the pan, leaving space between the fritters.  Cook for about 2 minutes, then flip and cook another minute and a half.  Fritters should be golden brown on both side, and eggplant should be tender in the center.  Sprinkle with sea salt and serve hot.  I really enjoyed eating them with a fresh mint leaf pressed on top of each fritter, but I doubt that this is traditional.

1 October 12, 2011 Boston

Apple Pancakes and Playing Hookey

Because I spent most of last weekend at the office, I took Tuesday as a comp day to try and make up for the beautiful fall weather we had on Saturday and Sunday.  As soon as I had decided that, yes, I really was going to take my first day off of work, my mind immediately started buzzing with all the things I wanted to do to make the most of it.  Sometimes, this can be a bit of a mental trap for me, as I get so bogged down in the planning and the anticipation that I forget to enjoy the actual doing.  This time, though, it worked out great – I knew exactly what I wanted to do when I fell asleep Monday night, the weather was supposed to be beautiful, I hadn’t tried to pack too much into one day, and so Tuesday morning, I just got up and did it.  And it was great.

I knew that to be as awesome as I wanted it to be, my day off would have to involve several things: one, being outside as much as possible; two, delicious food, preferably homemade; three, Trevor, because how good can a day be without a little flirtation; and four, my family, because I really do think that a significant portion of my best memories are just of sitting around the kitchen table with my family, drinking red wine, eating hearty meals, and laughing hysterically.  The solution to all these requirements ended up coming in a single form: apples.  Apple pancakes in the morning, apple picking with Trevor in the afternoon, and apple crisp with my family at night.  Given how many apples I ate yesterday, the doctor should be away for quite some time.

Apple picking is one of my favorite fall activities.  It’s outside, it’s a quintessential New England thing, it’s wholesome, and it involves food.  I grew up going to Smolak Farms, and driving around the corner of the orchard and looking down the hill at the lake and the pumpkin patch and the farmhouse fills me with this great surge of childish excitement.  Trevor and I spent two hours picking almost every kind of apple they had – we must have eaten at least 6 just while walking around.  We decided that apples are truly best just off the tree because they’re at the perfect temperature – refrigerated apples are so cold they hurt your teeth, apples left in your backpack all day are kind of warm and mealy, but just off the tree they have just the right amount of cool crispness.  God, they were so good.  When our bag was packed so full that I may have had to sneak an extra apple into my purse (it would have just rotted on the ground otherwise!) and we had chased some wild turkeys and climbed a few trees, it was time for the real reason for our visit – eating cider donuts.  Because cider donuts are possibly my favorite food groups.  And I still have one left over for breakfast tomorrow.  Win.  After that we headed back to my house for spaghetti with pepper sauce, salad, red wine, and hot apple crisp.  The day was as perfect and fulfilling as I’d wanted it to be, and I fell asleep happy and refreshed.  And very full.

Now let’s get back to breakfast.  I’m really picky about my pancakes – I hardly ever like them at diners, I refuse to eat them if they’re made from a mix, and I think fake maple syrup is inedible.  It’s probably because I grew up with my dad making awesome pancakes fairly frequently – he has a recipe, and he has it down, and now I’m just used to the best.  I like my pancakes thick and a little bit tangy – buttermilk is a must – usually with some blueberries or other fruit in them.  I’ve tried a lot of different recipes, and so far only one has been up to my standards.  It uses buttermilk and a smidge of sour cream, and the result is super flavorful, super moist pancakes.  I adapted it here with some fall-ish spices and chunks of fresh apples, then served them with boiled apple cider syrup and apple slices cooked in caramel.  They.  Were.  Heavenly.  Exactly what I wanted, and then some.  If moist, tangy pancakes and apples and deliciousness are your thing, try these the next time you want to have an awesome day, or celebrate fall, or go to work late, or all of the above.

Apple Buttermilk Pancakes with Cider Syrup

Pancakes adapted from Brown-Eyed Baker.  Makes 6-8 pancakes.

  • 2 c. flour
  • 2 TBS sugar
  • 1 tsp baking powder
  • 1/2 tsp baking soda
  • 1/2 tsp salt
  • 1 tsp cinnamon
  • 1/2 tsp nutmeg
  • 1/4 tsp allspice
  • 2 c. buttermilk
  • 1/4 c. sour cream
  • 2 eggs
  • 4 TBS butter, melted and slightly cooled
  • 2 apples, peeled and cut into 1/2 in. chunks
  • 1/2 c. sugar
  • 1 tsp cornstarch
  • 1 tsp cinnamon
  • 1 c. apple cider
  1. Mix flour, sugar, baking powder, baking soda, salt, and spices together until thoroughly combined.  In a separate bowl, gently beat eggs, then add buttermilk, sour cream, and melted butter, and mix until just combined.  Do not overmix.  Add wet ingredients to dry, and mix gently until batter is evenly moist, but still slightly lumpy.  Do not beat or overmix, as that will toughen your pancakes.  Add apple chunks, stir to distribute throughout batter, then let batter sit, undisturbed, for 10-20 minutes.
  2. Heat a frying pan or on a griddle over medium-low heat.  Wait 3-5 minutes for pan to heat up – pan is ready when a drop of water flicked at the pan sizzles and evaporates within 2 seconds of being dropped on the pan.  Add 1/2 c. pancake batter to pan/griddle, and let cook for ~3 minutes – pancakes are usually ready to flip when the top side begins to have tiny air bubbles that burst.  Carefully flip, and cook until golden brown on both sides.  Repeat with remaining pancakes.  Serve hot, with syrup!
  3. Cider syrup:  mix cornstarch with a small amount of the cider until it is fully dissolved, then mix all remaining ingredients in a saucepan.  Heat over medium heat, stirring frequently, until syrup has thickened to the desired consistency.  If you like a thick syrup, use 2 tsp cornstarch.  Store leftover syrup in fridge.

0 October 9, 2011 Food

Sage Pesto, Apples, and Fall

Since starting work, my goal has been to get the cooking and photographs for two posts done each Sunday, so that I can post twice a week without having to worry about shooting after dark.  If you look at the number of posts in September (4) and so far in October (this one makes 2), you’ll notice that I haven’t exactly achieved this goal.  Last Sunday I finally managed to get two cooking-styling-shooting sessions done in one day, and I was pretty excited about this accomplishment, so it should tell you something about my week that I’m not getting to posting it until a full week later.  The beginning of the week went smoothly enough – I had a great dance class Tuesday, and Wednesday I went to my very first food blogger event, which was awesome, and which I will hopefully write more about soon.  After that, no good.  Thursday night I got home from work at 10:30.  Friday night at 11:30.  Saturday night at 10:00.  Who has to work all day and all night on a Saturday??  Me, apparently, but I think this is a pretty rare occurrence in my group, so I’m trying to let go of the immense frustration canceling all of my weekend plans to sit staring at a computer screen in a boring office caused me and move forward.  Huge sigh.

Moving on, welcome to fall!  It hasn’t quite been the fall I’ve been dreaming of, but it’s had its moments.  The wet, humid streak seems to have finally ended, and this weekend was warm, sunny, dry, and beautiful – and at least I got to have a nice brunch with Becky outside before being sucked back into a climate controlled environment on Saturday.  I’m hoping to get just one good fall day in to get me through to next fall – preferably a day with apple picking, pumpkin carving, leaf catching, earth toned sweaters, cider donuts and hot cider, stargazing, and snuggling by the fire.  Yes, I would like to live in an L.L. Bean catalog.  Here’s hoping.

While I wait for this perfect day, on which I’m going to play hooky from work to make up for the few miserable nights of this past week, I made this sage pesto, apple, and goat cheese flatbread to get in the fall spirit.  Fall is obviously the best season for apples in any form, and sage has always struck me as an autumnal thing.  Plus, I’m trying to use up my herbs before the first frost gets ’em.  The inspiration for this flatbread comes from these sage pesto, chicken, and apple sandwiches, but I didn’t feel like grilling chicken (grilling is still a missing culinary skill of mine), so I reinvented it.  I’ve had the sandwiches as they are before, and was able to make some tweaks to the pesto this time to make it … sagey-er.  I loved the pesto I ended up with – the dominant flavor was sweet and mild with that tiny medicinal hit sage has and twangy-salty undertones from the pecorino cheese.  The execution of the flatbread itself wasn’t perfect, but the flavors were great together.  I’m posting the pesto portion of the recipe as I made it, but the flatbread recipe here is improved in elegance over what I actually did, which was throw all the ingredients on top of a pre-existing foccacia bread and heat it up for 10 minutes (I know, I know, but I was racing the sunset… it was still tasty enough to eat for dinner and breakfast).  Even if the flatbread doesn’t appeal to you, I hope you try the pesto and use it elsewhere – it’s such a nice, autumn-y twist on regular basil pesto.

Sage Pesto, Apple, and Goat Cheese Flatbreads

Inspired by Bon Appetit.  Serves 2.

  • 1/2 c. lightly packed fresh sage leaves
  • 1/2 c. cashews
  • 3 oz. pecorino romano cheese
  • 1/3 c. olive oil
  • 1 foccacia bread or unbaked pizza crust
  • 1 apple, cored and sliced thinly
  • 1 TBS butter
  • 3 oz. goat cheese
  1. Make sage pesto: in a food processor, pulse cashews, pecorino, and half of olive oil, until smooth.  Add sage and pulse until fully blended.  Add remaining olive oil as needed (plus more if required) to get a smooth consistency.  Taste and adjust ingredients as desired, adding more of whatever flavor you think is missing.  Set aside.
  2. If using pizza crust, preheat oven to 400°F.  Melt butter in a large saucepan and place sliced apples in pan (you might even consider adding a touch of brown sugar at this stage if you’re not opposed to too much sweetness on a pizza).  Sautee, flipping once, until soft and slightly browned.  Smooth pesto over pizza crust (or foccacia) and top with sauteed apples.  Crumble goat cheese over top and bake for 10 minutes, until crust is golden and cheese is slightly browned.  If using a foccacia, spread pesto on foccacia, cover with apples, then sprinkle with goat cheese.  Broil on high for 2-4 minutes, until it is heated through and cheese is slightly golden.

0 October 2, 2011 Dessert

Lemon-Cream Sandwich Cookies

Most of you can probably imagine my excitement when, after only 5 weeks of work, one of my co-workers announced that there would be a company wide charity bake-off the following week.  Baking?  As a competition?  With the chance to win both admiration and a sizable donation to the charity of my choice?  Even if you just asked me to bake you something and there was no competitive aspect, chance for glory, or prize, I would probably say yes – I just like to bake without feeling pressured to eat it all myself.  So I was definitely going to participate in the bake-off.  I started brainstorming immediately.  I made a test batch of caramel-apple bars and brought them in to the office.  Reactions were good, but I didn’t love the presentation.  So I made some chocolate-mint cupcakes over the weekend.  Delicious, but might present difficulties in transportation on a crowded subway during rush hour.  Besides, some people expressed dislike for the chocolate-mint combination at lunch on Monday, and I wanted everyone to be happy.

Then, I had it.  Lemon-cream sandwich cookies.  A buttery, melt-in-your mouth cookie filled with sweet-tart lemon buttercream, rolled in sanding sugar.  Pretty, easy to transport, and delicious.  I went to buy lemon extract on my lunch break, sat down at my desk, and announced with satisfaction to my pod-mate that I had finally made a decision – I would be making lemon sandwich cookies.

“Ew, lemon.”  What?  Who doesn’t like lemon?  I thought lemon was number three for most common and agreeable dessert flavors, right after chocolate and vanilla, maybe tied with strawberry.  But some other people walking by overheard and nodded in agreement.  “Don’t make lemon.  I don’t really like lemon.”  What a weird group of people I work with.  But they’re awesome in most other ways, so I guess I’ll just look past the dessert preference thing.  Anyways, I was torn.  I was so excited about the cookies – I could almost taste them – but obviously pleasing the judges was my main concern.  I took a quick e-mail poll and lemon was soundly defeated by chocolate-mint cupcakes.  Frustrated, I went back to the grocery store, bought a set of mini-muffin pans and more butter, and got started making and carefully frosting 4 dozen mini-cupcakes.  They were adorable.  They were delicious.  They won first place for my department and $100 to the charity of my choice (although they were beaten out in the final round by some yummy-looking oreo truffles).  But I was still thinking about those lemon cookies.  With their perfect rosebud shape.  And I had the lemon extract… so I set a cookie-making date with myself for Sunday afternoon.

They turned out just as I had imagined them – buttery, ever-so slightly crumbly cookies, with the delicious sweet lemony tang in the filling.  They are the kind of cookies I would serve at tea, or a baby shower, if I wasn’t 22 and hosted things like teas and baby showers.  Piping the dough through a frosting tip presented a bit of a challenge, as the dough was too thick for my bootleg ziploc baggie frosting method and burst right through it.  But I really wanted them to be pretty, so I got dirty and used my hands to push the dough through the frosting tip one cookie at a time.  I was a mess.  It was worth it.  They would also be just as good just dolloped on the pan, if you weren’t inclined to strive for rosebud cookie glory.  Next time you want a subtle, elegant cookie to add to your cookie tray, I would definitely recommend trying these out.

Lemon-Cream Sandwich Cookies

Cookie recipe adapted from Canelle et Vanille.  Makes 10 sandwiches.

  • 1 stick salted butter, room temperature
  • 7 TBS sugar
  • 3 egg yolks
  • 1/2 tsp lemon extract
  • 1/4 tsp orange extract
  • 1 1/3 c. flour
  • 1/2 tsp salt
  • 1 stick salted butter, softened
  • 2-3 c. powdered sugar
  • 2-3 TBS lemon juice
  1. Preheat oven to 350°F.  In a large bowl, cream together 1 stick butter with sugar.  Add egg yolks one at a time, beating between additions.  Beat in extract.  Beat in flour and salt until fully incorporated.  Dough should be the consistency of a soft clay – workable with some stretch, but not runny.  Spoon dough by the tablespoon onto baking sheet, or pipe through a large frosting tip into a rosebud.  Cookies will spread a fair amount in the oven, so do not place too close together.  Bake for 8-10 minutes, until tops are just beginning to turn golden brown, then remove from oven and allow to cool completely before frosting.
  2. In a medium bowl, beat butter until creamy.  Add powdered sugar a half cup at a time, beating to fully incorporate between additions.  When frosting is stiff but workable.  Add lemon juice and beat until incorporated.  Test for flavor, adding more lemon juice if necessary.  Add more powdered sugar until frosting hold soft peaks.  Spread a spoonful of frosting on the bottom of a cookie, then press another cookie evenly against the center to create a sandwich.  Roll in sanding sugar if desired.  Serve at room temperature; refrigerate any leftovers.


0 September 30, 2011 Dessert

How ‘Bout … Cupcakes!

Have you seen this video?  I’m obsessed with it.  This girl has got it figured out.  Dinner time?  How about cupcakes!  Breakfast?  I know, cupcakes!  Every time she says it she is clearly thinking very hard about what the correct thing to eat is.  And every time she comes to the same conclusion: cupcakes.  Duh, mom.

I took a page from Julia’s book and made cupcakes for no reason other than that I felt like it.  And a little bit because I got a new frosting tip and wanted to see if it magically transformed my creations into something beautiful.  Which in my opinion it totally did.  Turns out they were good enough to be made again 3 days later and entered into my company’s charity bake-off where they won $100, but that’s another story.  This chocolate cake recipe is one that seems to be pretty prevalent around the internet, so I decided to give it a try, although I’m unsure of its original origin.  It’s definitely delicious – super moist and chocolatey, and it leaves you with slightly sticky, cakey fingers after each bite – but I think I would only use it for certain recipes.  It reminds me a lot of chocolate cakes from childhood birthday parties because of it’s simple flavor and almost gooey (but in a good, cakey way) texture, so it’s perfect with tiny, simply frosted cupcakes, but I wouldn’t use it for a more elegant recipe.  With the mint frosting these were almost refreshing in their mintiness, and, especially in their mini form, the perfect minty-chocolate bite of dessert.

Chocolate-Mint Cupcakes

Makes 12 regular cupcakes; 48 mini cupcakes.

For cupcakes:

  • 1 c. sugar
  • 7/8 c. flour (7/8 c. = 3/4 c. + 2 TBS)
  • 3/8 c. cocoa (3/8 c. = 6 TBS)
  • 3/4 tsp baking powder
  • 3/4 tsp baking soda
  • 1/2 tsp salt
  • 1 egg
  • 1/2 c. milk
  • 1/4 c. vegetable oil
  • 1/2 tsp vanilla extract
  • 1/2 tsp peppermint extract
  • 1/2 c. boiling water

For frosting

  • 1 1/2 sticks softened, salted butter
  • 3 c. powdered sugar
  • 1-2 TBS heavy cream
  • 1/2 tsp peppermint extract
  • 1 drop green food coloring
  1. Preheat oven to 350°F and line muffin tin with muffin liners.  In a large bowl, whisk together sugar, flour, cocoa, baking powder, baking soda, and salt, until well combined.  Add egg, milk, vegetable oil, and extracts, and whisk for about 2 minutes, until batter has no lumps.  Add 1/2 c. boiling water and incorporate.  Spoon batter into prepared muffin tin – 1 full TBS of batter each for mini cupckaes, 1/2 c. batter for regular cupcakes (which should be about 3/4 full).  Bake until a toothpick inserted in the center of a cupcake comes out clean – 18-20 minutes for regular cupcakes, and 10-12 minutes for mini cupcakes.  Allow to cool completely before frosting.
  2. In a medium bowl, beat the softened butter until smooth and creamy.  Add the powdered sugar a half cup at a time, beating to creamy stage between each addition.  If the buttercream gets too stiff to beat, add a splash of heavy cream and incorporate.  Once all the powdered sugar is added and the buttercream holds stiff peaks, add the peppermint extract and food coloring, and beat until fully combined.  Adjust for flavor and consistency – add more powdered sugar for a stiffer, sweeter frosting, and a splash of heavy cream for a thinner, richer frosting.  Store frosting and frosted cupcakes in fridge in airtight container.

6 September 22, 2011 Asian and Indian

Cookbook of the Month: Cooking with My Indian Mother-in-Law

I knew it was dangerous for me to name a post Cookbook of the Month, implying that I really, truly would be able to review at least 1 cookbook every single month.  It didn’t seem that hard – what’s one post a month? – but I guess I should have considered my initial hesitation more thoroughly before going ahead and making false implied promises.  In July there was a glorious debut, and then in August, even though I had a book planned and the post written, I left you hanging.  So sorry!  At least I’ve only missed 1 month so far!  (I’m feeling glass is half full tonight, so please, be kind, and don’t point out that missing 1 month is also missing 50% of what was planned).  And I’m here now!  With this delicious, delicious, completely different from anything else I’ve had before dish from September’s cookbook, “Cooking with My Indian Mother-in-Law,” by Simon Daley.

This book was one of the ones that caught my eye early in my cookbook-devouring days.  Actually, I think it was the first or second cookbook that I picked up in the library and literally read like a novel.  After seeing that the opening pages contain tricks to the fundamentals of Indian cooking – such as how to mix fresh spice blends, quick fry onions, and tell when a masala is ready by watching the oil – I was hooked.  Then, as I flipped through the recipes and saw that they included spices I’d never heard of before, like asafoetida and curry leaves, I was even more intrigued.  I love Indian food and I like to try and make it at home, but I’m usually disappointed by the lack of complexity in my dishes – I want that restaurant quality layer of flavor.  My theory being that perhaps there’s only so much you can expect from using just curry powder and turmeric, I went ahead and picked up the mysterious spices from Wholefoods and began trying the recipes out.  The first one I tried, chickpea flour dumplings with yogurt, is still one of my favorite recipes, especially when I want to impress friends at the last minute, as it’s quick to throw together and I almost always have the ingredients on hand.  I also tried a meatball curry which wasn’t as impressive in its originality (at least, its originality to me!) and flavor, but was still satisfying.

The recipe featured here, for rice with moong dal and spiced buttermilk, beats both the curry and the chickpea dumplings in terms of flavor, although it takes a little bit more time and effort to prepare.  The flavor of this is so unique and wonderful – its warm, savory, comforting, just a little spicy, and satisfying on every level.  Making the spiced buttermilk was like an experiment in chemistry, as you start with just yogurt, water, a minimal amount of spices, and some curry leaves, and you end with a spicy, yellow, thickened milk that you could use in a number of ways.  Paired with the complex yet gently spiced rice and lentils, its a completely satisfying eating experience, at least in my book.  I encourage you to check this book out, especially if you’re looking for recipes that will give your attempts at this complex cuisine that extra punch of authenticity.  Need further convincing?  Just give this rice a try, and then make your decision.

Rice with Moong Dal and Spiced Buttermilk

Adapted slightly from Cooking with My Indian Mother-in-Law by Simon Daley.  Serves 4 as a side.


For the rice:

  • 1 c. basmati rice
  • 1/2 c. moong dal (tiny green pulses, split)
  • 2 1/2 c. hot water
  • 1/2 stick butter
  • 3 in. cinnamon stick
  • seeds from 3 cardamom pods
  • 3 cloves
  • 12 black peppercorns
  • 1/2 tsp. cumin seeds
  • 1 small onion, diced
  • 1 clove garlic, minced
  • 2 small green chiles (Indian), sliced
  • 10 curry leaves
  • 1/2 tsp. turmeric
  • 1 tsp salt
  1. Rinse rice and dal, then soak in warm water for 20 minutes.  Melt butter over low heat.  When it foams, add all whole spices and cook for 1-2 mintues, stirring, until spices are fragrant, but not beginning to burn.  Add the onion, garlic, chiles, and curry leaves, and cook until onion has softened.  Add turmeric, cook for 30 seconds, then add 2 1/2 c. hot water, salt, rice, and dal.  Increase heat to bring to a boil, then reduce heat and simmer, covered, for 25 minutes, until rice has absorbed all water.  Set aside, removing any whole cloves you can see .

For the spiced buttermilk:

  • 1 clove garlic, peeled
  • 1/2 inch ginger, peeled and cut into chunks
  • 1 green chili, roughly chopped
  • 1/2 tsp salt
  • 1/2 tsp cumin seeds, divided
  • 6 oz. plain yogurt
  • 1 tsp chickpea flour
  • 1/4 tsp turmeric
  • 1/2 tsp brown sugar
  • 1 branch curry leaves (about 15-20 leaves)
  • 1 TBS canola or peanut oil
  • 1/4 tsp mustard seeds
  • pinch fenugreek
  • 2 cloves
  • 1/4 tsp asafoetida
  • cilantro (optional)
  1. Crush garlic, ginger, chiles, 1/4 tsp cumin seeds, and salt into a paste using a mortar and pestle.  Blend yogurt with 1 1/2 c. water on high speed.  Pour off 1/2 of the yogurt mixture, and add the chickpea flour to the remaining yogurt.  Blend, then add the reserved yogurt back in, along with the turmeric, brown sugar, and chili-garlic paste.  Blend until smooth.
  2. In a large saucepan, heat oil over low heat.  Add mustard seeds, 1/4 tsp cumin seeds, fenugreek, and cloves, and cook for 1 minutes.  Add asafoetida and cook for 30 seconds more.  Add yogurt mixture, cilantro and curry leaf branch, then cook, stirring frequently, for about 10 minutes.  Serve in a pitcher to be poured over rice and moong dal.
  • « Go to Previous Page
  • Go to page 1
  • Interim pages omitted …
  • Go to page 46
  • Go to page 47
  • Go to page 48
  • Go to page 49
  • Go to page 50
  • Interim pages omitted …
  • Go to page 57
  • Go to Next Page »

Primary Sidebar

Subscribe!

Get creative recipes and menu ideas delivered straight to your inbox.

Most Popular

A House // Sweet Potato and Coconut Milk Soup with Brown Rice and Lentils

Monthly Fitness Goals: July // Homemade Spinach Wraps with Chopped Greek Salad

A New Job // Classic Seven-Layer Bars

Butternut Squash Carbonara with Fried Sage and Caramelized Onions

Happy Birthday, Trevor! // Peanut Butter Fudge

Cookbook Review and Giveaway: Home Made Winter

Drizly

Please note!

Full disclosure: if you purchase anything at Amazon using the above links or any other links to Amazon on this site, I will receive a small commission. Just so you know!

Copyright© 2025 · Cookd Pro Theme by Shay Bocks

This site uses cookies: Find out more.