• Skip to primary navigation
  • Skip to main content
  • Skip to primary sidebar
  • Home
  • Recipes
  • Features
    • Cookbook Reviews
    • Ingredient of the Week
    • Sunday Dinner
    • Fitness Goals
  • Travel
  • About
    • Privacy Policy
    • Cookie Policy
  • Work With Me

Katie at the Kitchen Door

Globally-inspired, seasonal recipes

Blog Page

6 August 27, 2012 Cookbook

Cookbook of the Month: Sunday Suppers at Lucques

It’s been a while since I’ve managed to publish one of these things in the month that it’s supposed to be in, but I’m ready this time, and with a few days to spare before we move into September (September!  Already?).  Perhaps I’m more on top of things because this month’s book, Sunday Suppers at Lucques, is one of my absolute favorites, and cooking from it all month has been anything but boring.  It’s up there with Antojitos and In the Sweet Kitchen as a cookbook that I turn to again and again, always producing great results, always exciting and inspiring.  I get the feeling that I could cook every single recipe from this book and be amazed by the results every time.

Written by Suzanne Goin, owner of the prestigious California restaurant Lucques, Sunday Suppers at Lucques is the ultimate entertaining cookbook for an ambitious home cook.  Organized into seasonal menus with 4 dishes per menu, the recipes are not simple or quick, but they are certainly inspired.  The five or six recipes I’ve tried have all been jam-packed with flavor, color, and texture.  Each menu tends to have a lot of different elements in it, but as long as you’re not in a hurry and you go into it ready to enjoy the process, the techniques are simple and rewarding.  And even though this book was published almost 7 years ago, none of the menus are tired or overdone.  For example, one spring menu has you start with an Endive, Meyer Lemon, Fava Bean, and Olive Salad, followed by Hawaiian Snapper with Green Rice and Cucumbers, a Leg of Lamb with Chorizo Stuffing, and finished off with Vanilla Semifreddo and Rhubarb Compote.  In the winter, you may find yourself itching to try the menu that starts off with a Broccoli, Burrata, and Pine Nut Salad and ends with a Meyer Lemon and Chocolate Tart.

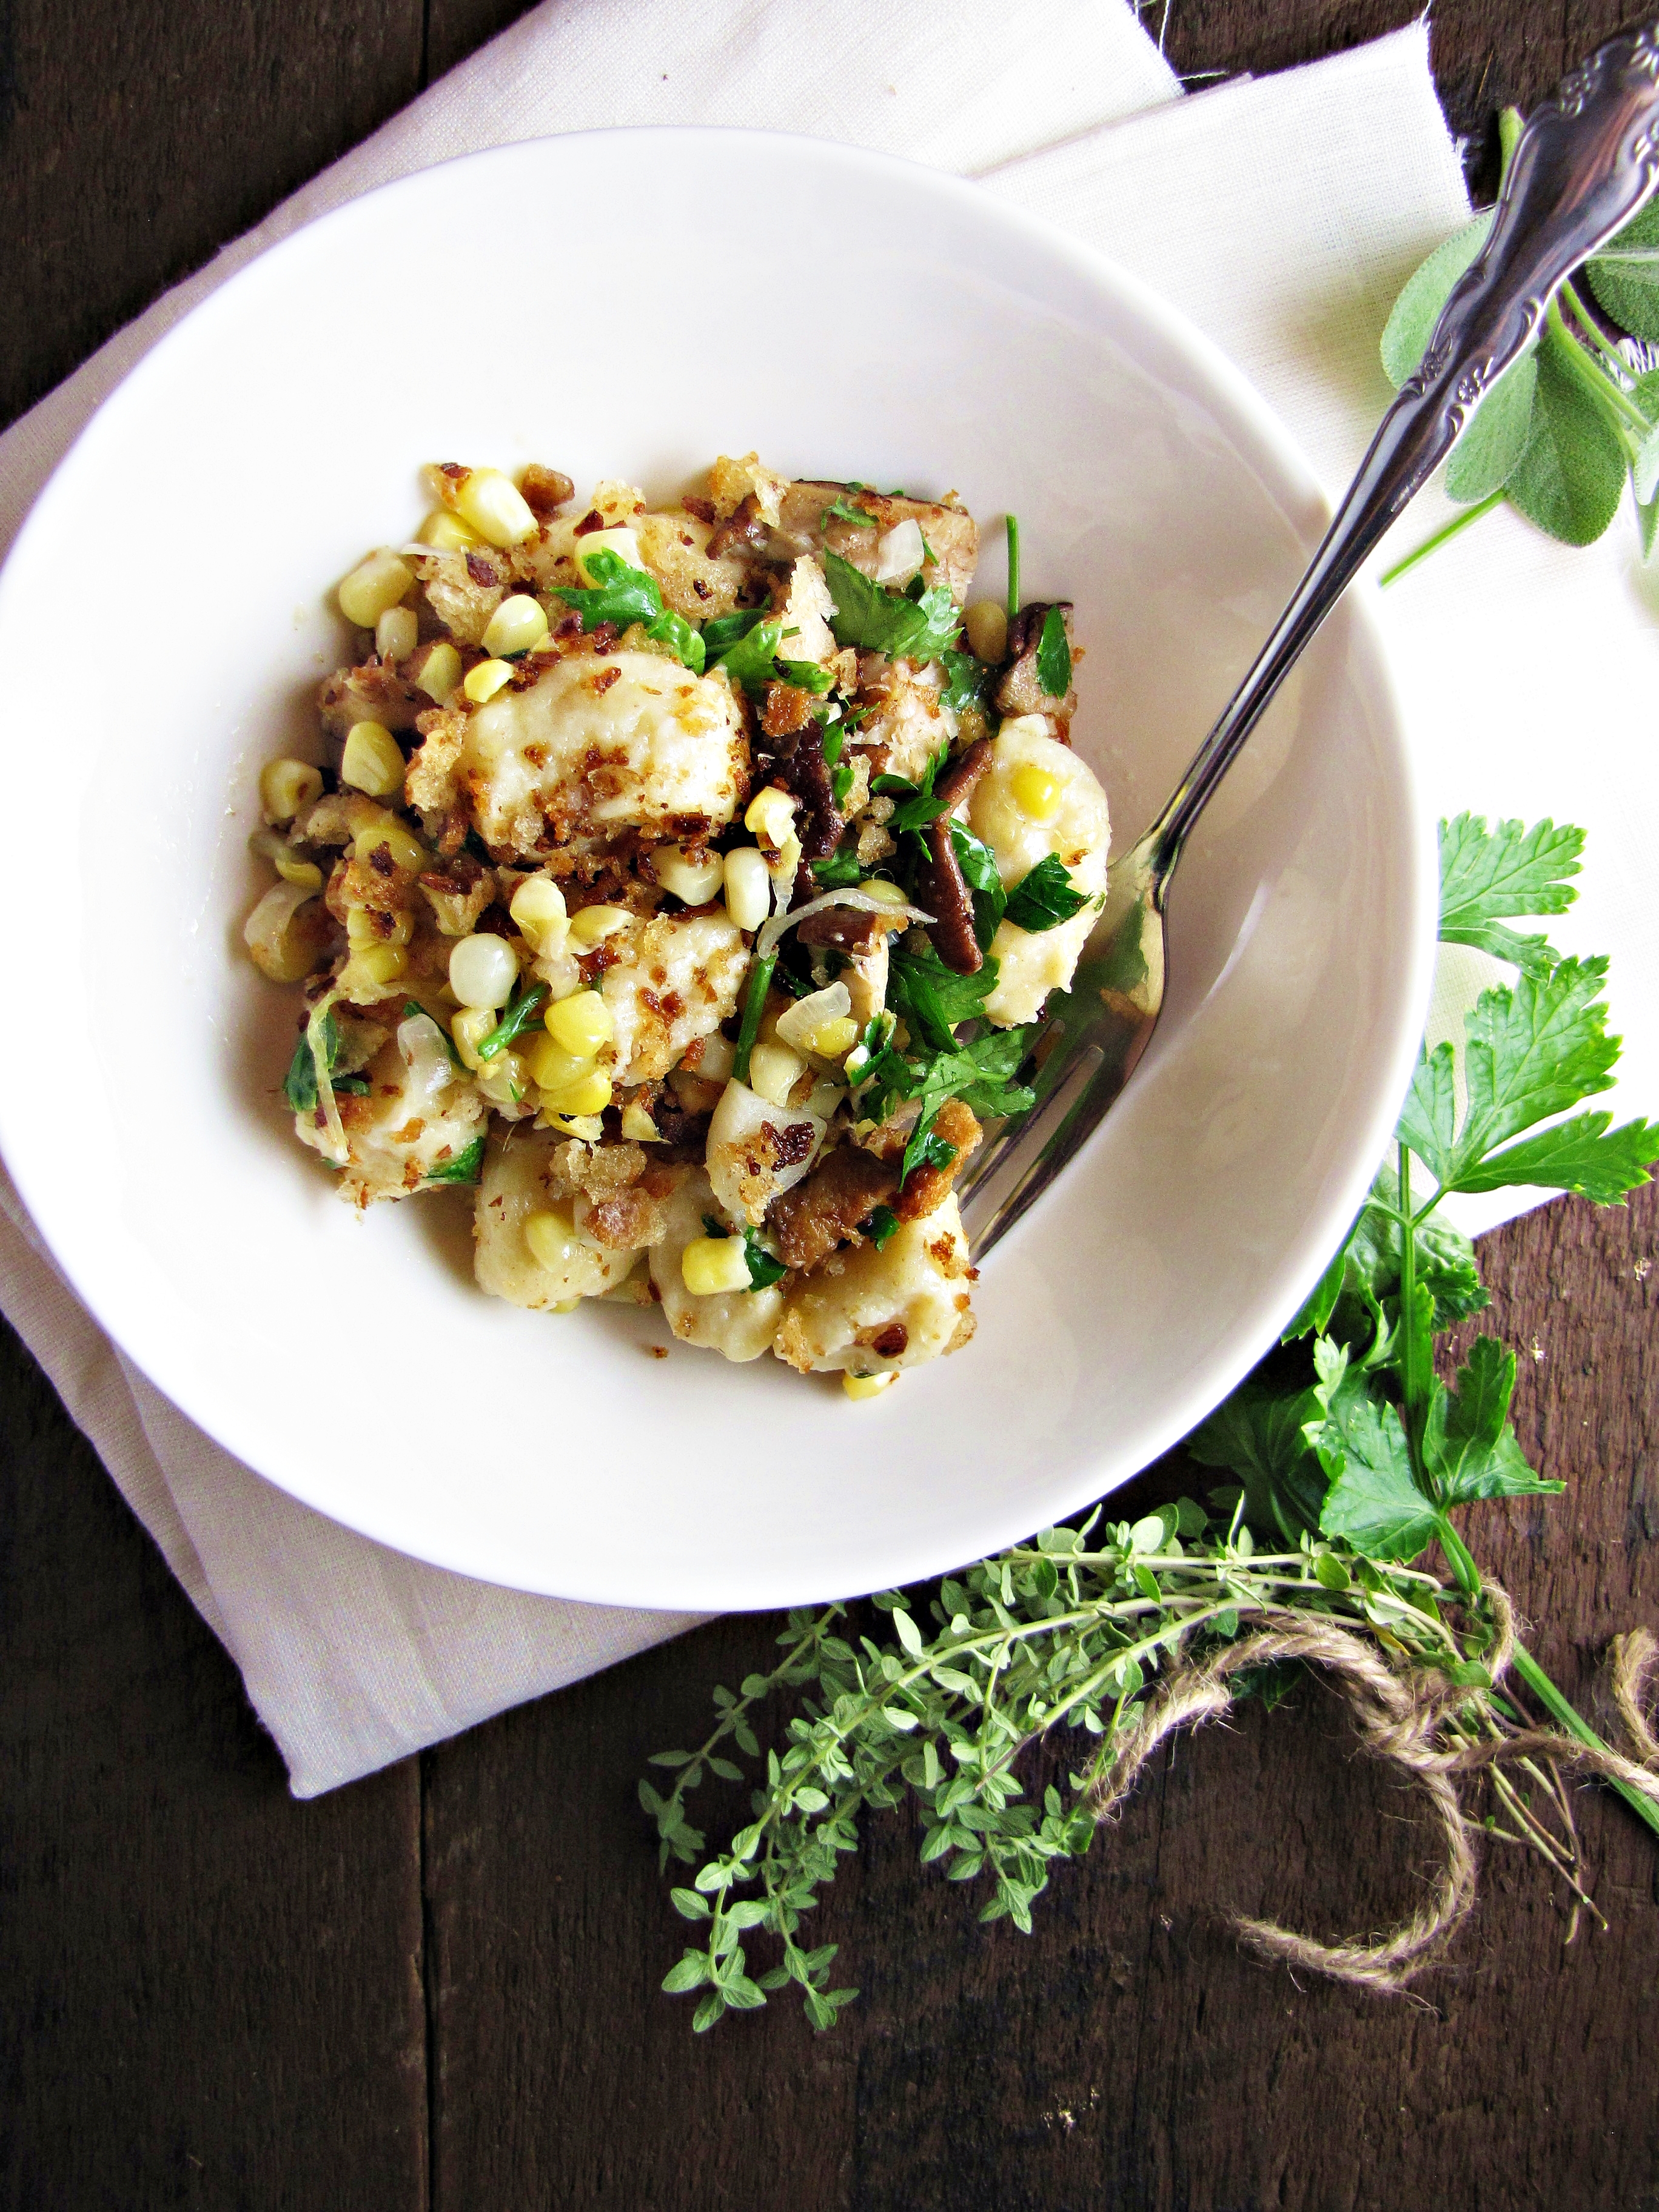
I thought it was only appropriate to share the first recipe I made from Sunday Suppers at Lucques, a dinner I made over two years ago when my aunt and cousins were visiting us in Maine.  Now, making homemade gnocchi for 8 is not necessarily something I would recommend unless you really like making gnocchi, but making this meal when you have a little bit of extra time on hand and someone to impress is definitely recommended.  If you’ve never tried them before, ricotta gnocchi will be a delightful change from traditional potato gnocchi – they are incredibly light and fluffy, a little bit sweet and rich from the cheese, and not too difficult to work with.  Sauteed with some mushrooms, sweet corn, and a bunch of summer herbs (as well as a copious amount of salty butter), they make the perfect late summer meal.

I’m far from done experimenting with this book.  In fact, I’m planning on putting together a full menu from the summer section of this book this weekend – if it’s successful, I’ll be back with more recipes.  Come fall, I’ve got a bunch more recipes flagged to try, including Tunisian Lamb-and-Eggplant Stew with Farro, Cranberry-Walnut Clafoutis with Bourbon Whipped Cream, and Grilled Duck Breasts with Roasted Grapes and Potato-Bacon Gratin.  Sounds luxurious, doesn’t it?  In the meantime, give this one a try, or check out some of the other ones I’ve shared in the past.

More from Sunday Suppers at Lucques:

  • Roasted Beet and Fried Chickpea Salad with Ricotta and Olives
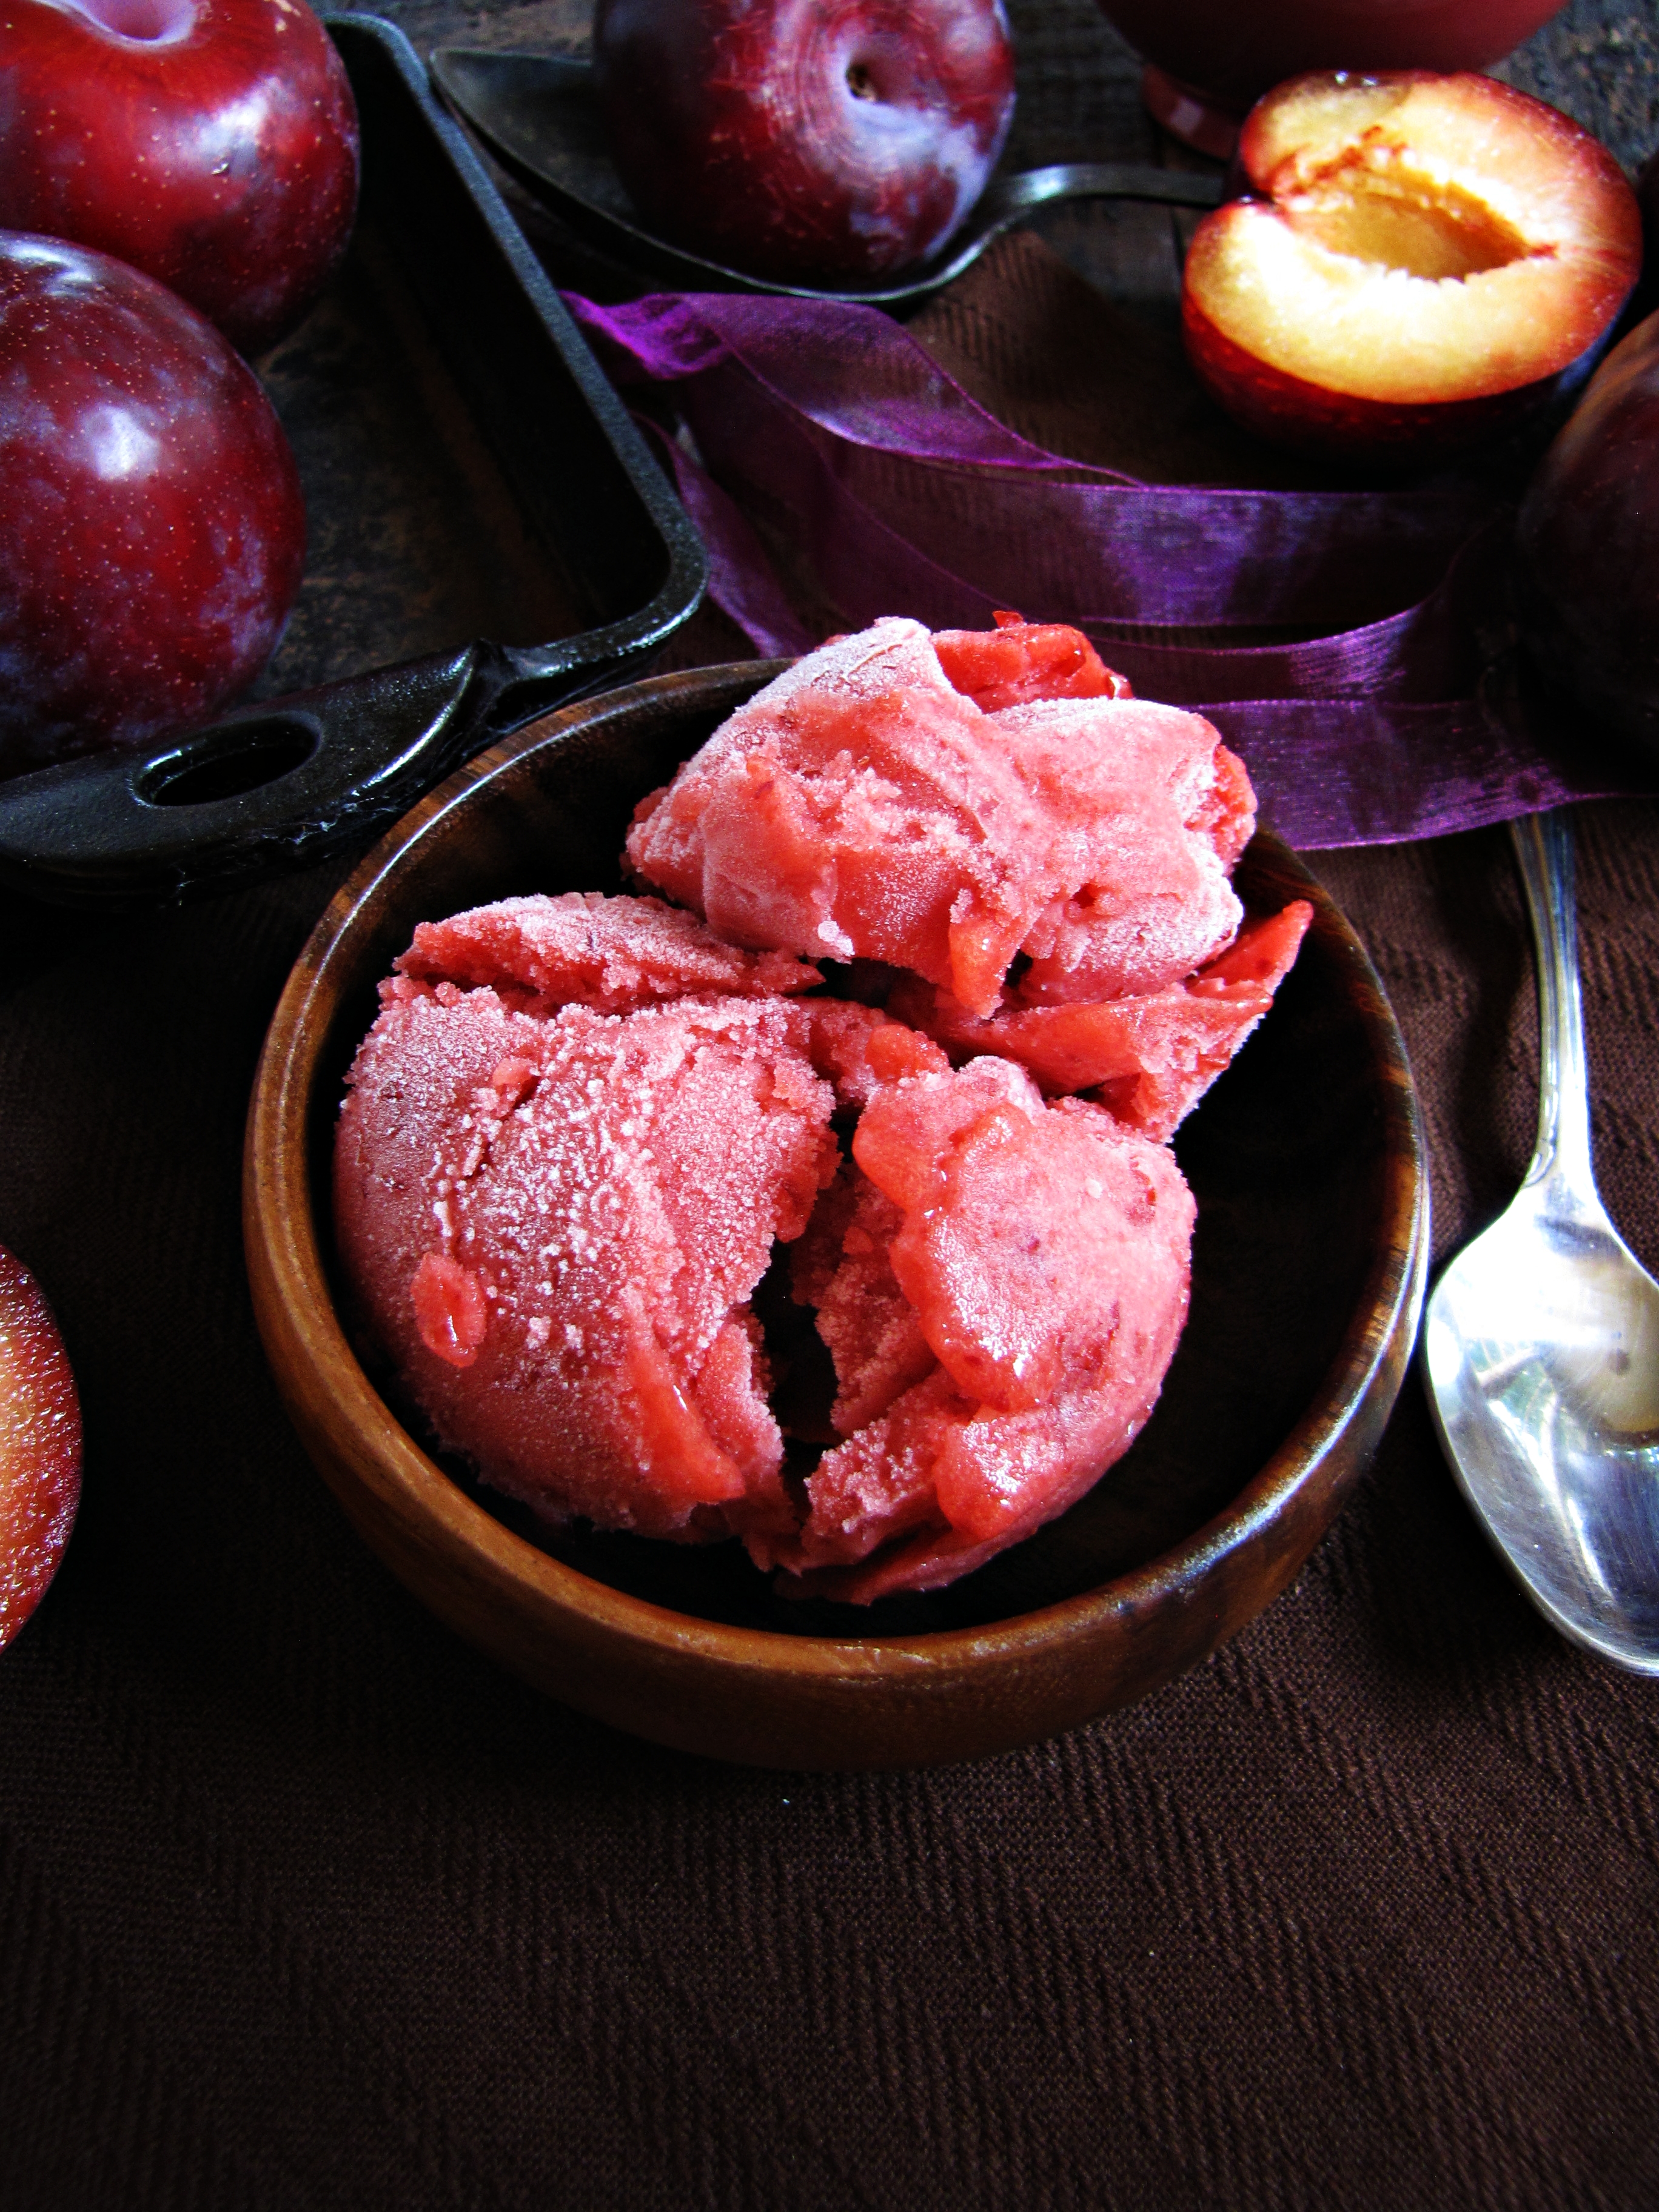
  • Molasses Chews and Plum Sorbet (for ice cream sandwiches)
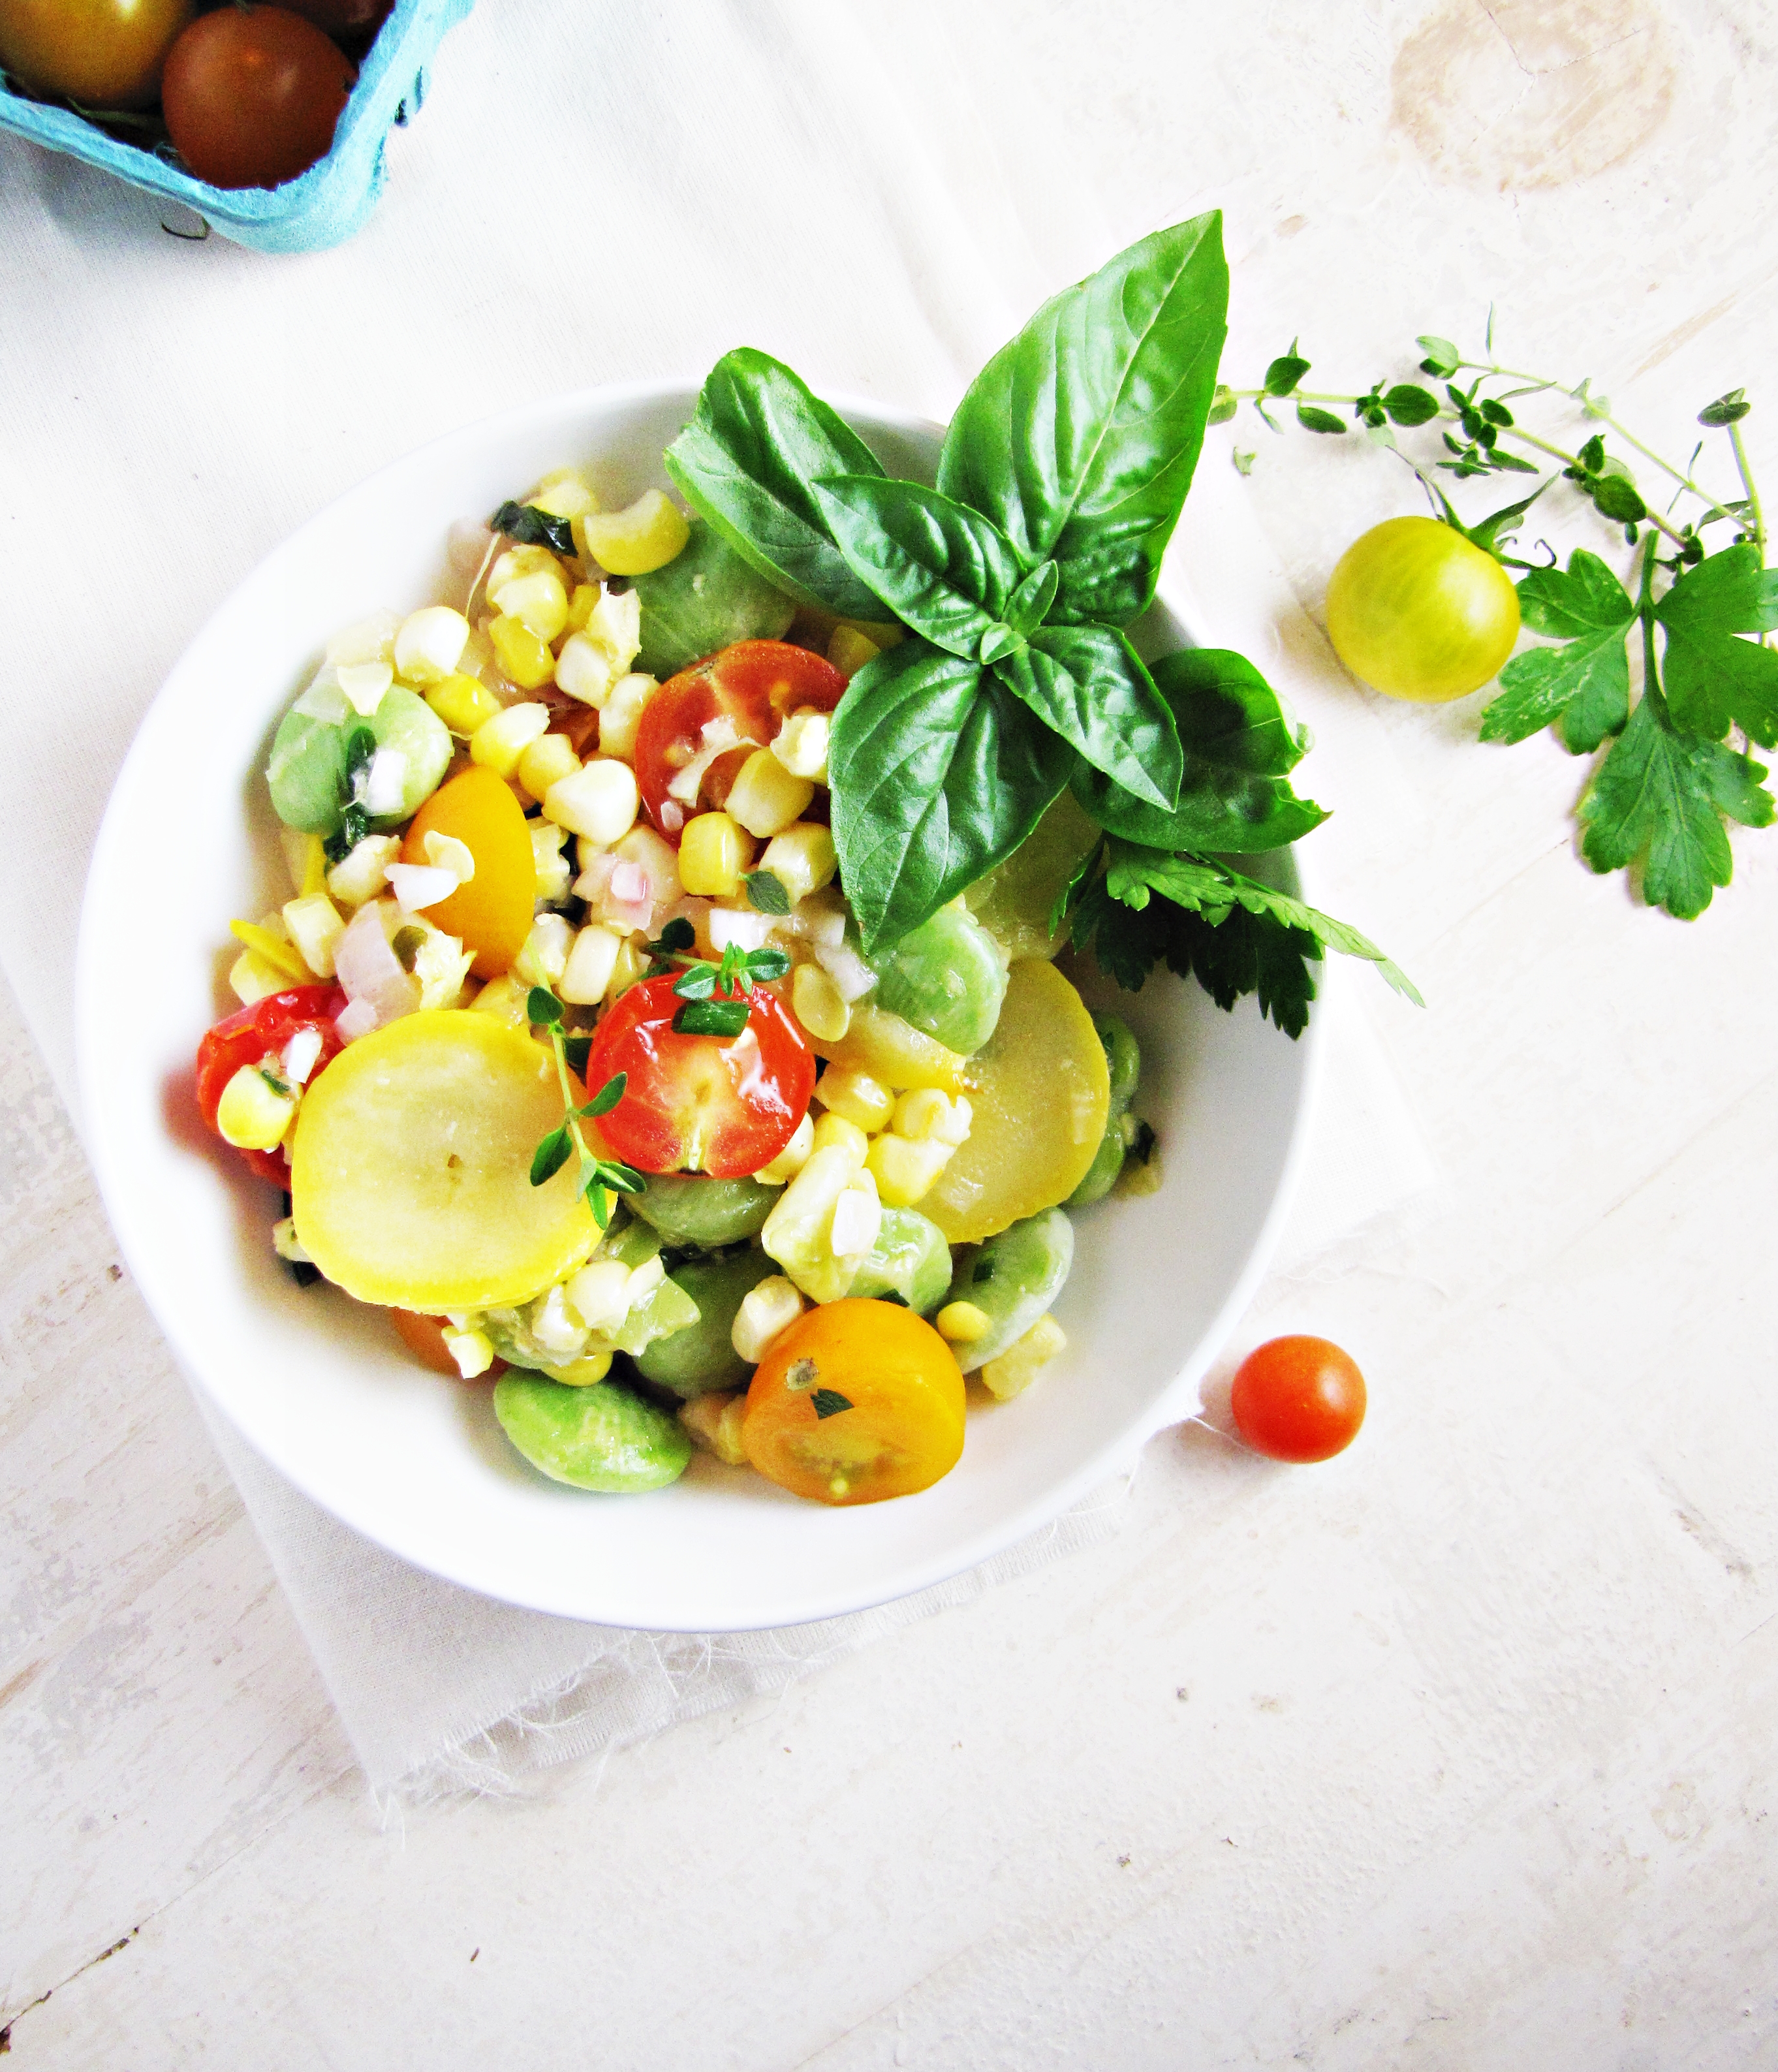
  • First-of-the-Season Summer Succotash

Ricotta Gnocchi with Mushrooms, Sweet Corn, and Sage Brown Butter

Recipe adapted slightly from Sunday Suppers at Lucques.  Serves 6.

For the gnocchi:

  • 2 eggs
  • 2 c. flour
  • 1 lb. whole milk ricotta, drained of excess liquid
  • 3 TBS olive oil
  • salt and pepper
  1. Beat the eggs together in a small bowl.
  2. Whisk together flour, 1 tsp salt, and 1/4 tsp pepper in large bowl.  Add the ricotta, and use two butter knives to cut the ricotta into the flour.  When they are evenly mixed, make a well in the middle of the bowl and add the eggs.  Use a fork to slowly incorporate the eggs into the flour/ricotta by dragging a small portion of the eggs out into the flour, mixing gently, then returning to the center.  Once eggs are fairly well mixed in, use your hands to briefly knead the dough, just until it comes together into a ball.  If it is too moist to work with, add a bit more flour (careful, too much flour or kneading will make it tough).  Turn dough out onto a lightly floured cutting board, cut into eight equally sized pieces, and cover with a kitchen towel.
  3. Bring a large pot of salted water to a boil.  One at a time, take dough pieces out from under towel and roll out into a 1-inch thick rope on a floured work surface.  Gently cut the rope into 1 inch slices and sprinkle with flour.  If you’re feeling fancy, roll the gnocchi over the tines of a fork, but this step is purely decorative.
  4. In batches, cook the gnocchi in the boiling water for a few minutes.  Once they rise to the surface, they need to cook for about 1 minute more before they are done.  The whole cooking time should be less than 5 minutes per batch.  Transfer the gnocchi to a large baking sheet and toss with olive oil.  You may make the gnocchi ahead of time and refrigerate or freeze if using later in the week.

For the sauce:

  • 1 recipe gnocchi, see above
  • 1 1/2 c. fresh breadcrumbs
  • 4 TBS olive oil
  • 7 TBS butter
  • 1 lb. mushrooms, preferably wild, cleaned and sliced into uniform pieces
  • 1 TBS thyme leaves
  • 1 TBS sliced sage leaves
  • kernels from 4 ears fresh corn
  • 2 large shallots, finely diced
  • 1.2 c. chopped flat-leaf parsley
  • salt and pepper
  1. Heat 2 TBS olive oil in a large saute pan over medium-high heat.  Add the breadcrumbs and stir to coat with oil.  Cook, stirring occasionally, until breadcrumbs are toasted and golden brown.  Remove from pan and set aside.
  2. Add remaining olive oil plus 1 TBS of the butter to the pan, and heat until the butter foams.  Add the mushrooms, thyme, 1/2 tsp salt, and pepper.  Saute the mushrooms about 5 minutes, until golden brown and beginning to crisp.  Don’t move them around in the pan too much – let them begin to caramelize on each side before turning.  Remove mushrooms from pan and set aside
  3. Add remaining 6 TBS of butter to the pan and cook until the butter begins to brown and smell nutty.  Scrape the brown bits from the bottom of the pan, then add sage, cook for 1 minute or until it sizzles, then add corn, shallots, 1 tsp salt, and pepper.  Saute quickly, stirring the whole time, until corn is tender, about 2-4 minutes.  Add prepared gnocchi to pan and toss to coat gnocchi with butter.  Add mushrooms, parsley, and breadcrumbs, and heat the whole dish through if necessary.
  4. Remove from heat and season to taste.  Serve hot.

18 August 22, 2012 Dessert

Homemade Cassis

Once upon a time, Trevor and I spent two weeks in France.  It was three entire years ago, which makes me think we must have barely known each other, but then again, we did a lot of flirting in high school – that had to count for something in the getting-to-know-you department.  We stayed in a little Ikea-furnished apartment on Rue Tiquetonne in Paris, where we mainly walked and ate baguettes and croissants and went to museums right when they became free for the evening and soaked it all in.  Then we headed South, to the town of Cassis, where we swam at deserted beaches and climbed through the calanques on hot dusty days.  We also discovered Cassis, the drink, early on in the trip, and didn’t stop drinking it once we’d started.  The sweet, musky liqueur came with us from Paris to Cassis and back again, upgrading our €4 bottles of white wine to elegant Kir cocktails.  Ever since, the drink has been a bit special for us – a memento of a time and a place.

[Before I move any further with this post, I would like to share that looking for pictures of that trip has had two unusual effects on me: 1) the immediate and unbidden singing of “Paris, paris combien, Paris tout ce que tu veux” which we used to sing ad nauseam with Dr. Odjo.  A surprisingly effective French-teaching method. And 2) browsing through a lot of memories from that year and kind of wishing I could do junior year again and move back to Prague.  Also wishing I was still that skinny.]

After returning to the U.S. and learning that it’s almost impossible to get fresh black currants in New England, I of course decided that I had to have some.  Specifically, I had to have some to make my own homemade cassis.  At the time when I decided that this was one of my goals, I think I was operating under the assumption that it would be cheaper than buying the store-bought kind, and also infinitely hipper.  Two and a half years later, I’m definitely sure that it’s not cheaper, and hipness has lost some of its importance to me, but the idea stayed with me and I was determined to accomplish it.  I was unsuccessful in locating black currants last year, so I added it to my summer bucket list this year, just to hold myself a little more accountable.

Enter Wilson Farms and my extremely amazing boyfriend.  Trevor took me to Wilson in early July, just when all the stone fruits were starting to get good.  We were there mostly just to wander around and debate buying more fruit trees, but while we were there, Trevor asked them if and when they might be getting some black currants.  They told him that they would be getting a shipment, and that it was likely to arrive in about a week.  This was both good news and bad news – good in that they would be there, bad, because I was just about to leave for a 10 day vacation in Maine.  Trevor immediately offered to check back for them every day on his way home from work.  I assured him that this was overkill and that I could live without black currants.  Still, about a week later, he called me at 5 in the afternoon, sounding urgent:

“Katie.  I’m at Wilson.  There are 8 boxes of black currants here and they’re only getting one shipment this year.  There’s several other people on their ‘call when black currants arrive list.’  They’re $7 per box.  How many do you need?”

And that, my friends, is the sign of a boyfriend you should hang on to.

With black currants acquired, I proceeded to wash, stem, and sugar them, before pouring them into pint jars filled with vodka and setting them on a sunny windowsill for a month.  A lot of anticipation for one drink, no?  But after opening and straining the jars this weekend and tasting the fruity, boozy, cinnamony liqueur, I’ve decided it was worth it.  Maybe next time I will use the much cheaper, frozen currants sold here, but I can definitely see there being a next time.

Of course, to be thorough in my consideration of how worthwhile this whole thing was, I had to do a little side-by-side taste test between my homemade version and a decent $25 bottle I got at the store.  I was actually expecting to like the store-bought version more, but to my surprise, I liked them both equally.  Both were sweet, slightly syrupy, and delicious on their own or in a Kir, but the tastes were quite different.  The homemade version was fruity, bright, and summery, while the store bought brand was much muskier, darker, and wine-y.  I would use them at different times, for different things.  Of course, by the time I had drawn all of these conclusions, I’ll admit I was a little drunk.  In fact, I was tispy enough that I decided spur of the moment to throw the leftover vodka-soaked currants in a saucepan with some of the cassis and fresh blueberries, and eat it over a bowlful of vanilla frozen custard – a perk of the homemade variety being the boozy leftover fruit.

So – the cassis experiment has been accomplished, and deemed a success!  Another item crossed off the bucket list, and another delicious ingredient added to my pantry.

Homemade Creme de Cassis

Recipe from Figs, Bay & Wine.  Makes a little less than 1 quart.

  • 1 1/2 lb. fresh or frozen (and thawed) black currants, washed and stemmed
  • 3 c. vodka
  • 2 1/4 c. sugar
  • 1 cinnamon stick, cracked in half
  1. In a large bowl, crush the black currants with your hands, the back of a spoon, or a pastry cutter, until most of the berries are releasing juice.  Add the sugar, cinnamon stick, and vodka and stir to combine.  Pour the mixture into clean mason jars and seal.
  2. Place the jars in a warm, sunny place and let sit for a month, gently shaking the jars once or twice a week.
  3. After the month has passed, strain the mixture through a fine mesh strainer.  If you want a really clean liqueur, line the strainer with a cheesecloth.  Catch the juice in a bowl, then pour into a bottle and enjoy!  Reserve the vodka-soaked fruit in your fridge or freezer and enjoy over ice cream, or in blueberry-cassis sauce.

0 August 15, 2012 Cookbook

Greatist Collaboration: Plum Sorbet

It’s been a hot summer.  Maybe it seems hotter because it’s my first full summer in the city, where I’m pretty much a sticky mess topped with a fine layer of dust by noon, but according to the news, there’s more to it than the heat island effect – it’s been unusually hot all over the country.  There’s even a wikipedia page about it, so it must be true.  But having a scorcher of a summer isn’t all bad – it means happy tomatoes, extra-refreshing dips in the pond, and an excuse to eat even more ice cream than I normally might.

Making at least three kinds of ice cream was on my summer bucket list this year (stay tuned for an update soon!), and this plum sorbet makes three.  Not that that means there won’t be one or two more batches before the weather turns :-).  I was surprised by the simplicity and wholesomeness of this recipe – all you do is toss some plum halves with a bit of sugar and honey, blend, then freeze, and you have a gorgeously purple, refreshing, smooth sorbet.  Actually, the texture of this sorbet is easily the best of any homemade ice cream I’ve made – it doesn’t melt on contact with your spoon, and it has just enough airy-smoothness for my taste.  It’s another winning recipe from Suzanne Goin’s Sunday Suppers at Lucques, a book in which not a single recipe I’ve tried has been disappointing.  Suzanne suggests pairing this sorbet with these molasses cookies to make ice cream sandwiches, something I didn’t try this time around but definitely will in the future.

Counting sorbet as a “health” recipe for Greatist may seem a little suspect, but everyone needs a little something sweet sometimes – why not satisfy your cravings with a relatively light treat packed with fresh fruit?  You could even reduce the sugar somewhat, although your sorbet will freeze harder and be less creamy if you do so, as the sugar is one of the main things that keeps ice cream from freezing (read more here).  Head on over to Greatist for the recipe, and while you’re over there, check out their fun ice cream infographic.  (See, I’m not the only one who thinks ice cream has a place on health websites!)

Other tasty ice cream recipes from here…

  • Lemon basil sorbet
  • Cherry-chocolate ice cream
  • Lemon buttermilk ice cream
  • Roasted cinnamon ice cream
  • Bailey’s fudge ripple ice cream

… and around the blogosphere

  • Chocolate pretzel frozen custard from A Spicy Perspective
  • Grapefruit and rosemary granita from In Sock Monkey Slippers
  • Blackberry-cabernet sorbet from Gimme Some Oven
  • Caramel brownie chunk nutella ice cream from Brave Tart
  • Goat cheese ice cream with roasted strawberries from Heather Homemade
  • Basil olive oil gelato from Cookie Talk

0 August 13, 2012 Dessert

Plum, Blackberry, and Cassis Galette

Trev and I had a little BBQ at my place this weekend – just a few good friends who all happened to be in town at the same time.  One is starting up at Harvard Law, another passing through between summer camp in Maine and hut-keeping on the AMC.  My roommate joined in as a study break, and a good friend from work stopped by as well.  It was the sort of crowd that caused minimal stress, and the sort of messy, hand-held food you should only eat with people you’re not trying to impress – ribs slathered in tangy sauce, Mexican-style grilled corn rolled in mayo and chili-flecked parmesan cheese, chocolate-stout cupcakes with a mess of espresso frosting, and this galette, sliced and served like pizza.

The galette was a bit of a last minute decision.  Initially I had planned to make a much fancier puff-pastry based tart, but the frozen puff pastry at Wholefoods was $10 a package.  Ten dollars!  I might as well just buy a pie for that price.  Anyway, with a bag of plums and a carton of blackberries I picked in Andover last week both languishing in the fridge, I went simple and rustic and it was just right for a casual Saturday afternoon.  A drizzle of creme de cassis in the filling added some depth.  I managed to snag a few pictures before I got distracted by good company and cold Blue Moon beer, so I thought I’d share it with you.

Anyway, just a quick hello.  Hope everyone’s week got off to a good start, and I’ll be back on Wednesday with a delicious frozen treat that’s also healthy enough to be featured on Greatist.

Plum, Blackberry, and Cassis Galette

A Katie at the Kitchen Door original.  Serves 6.

  • 1 1/4 c. flour
  • 1/4 tsp salt
  • 1 stick very cold butter
  • 6-8 TBS ice cold water
  • 1 1/2 lb ripe plums, pitted and thickly sliced
  • 1 c. fresh blackberries
  • 1/2 c. sugar
  • 2 TBS cornstarch
  • 1/2 tsp lemon juice
  • 1/3 c. creme de cassis
  1. Make the pie crust: whisk together the flour and the salt in a medium bowl.  Cut in the cold butter, and blend with a pastry cutter until the mixture is coarse with lumps no larger than a pea.  Add the water 1 TBS at a time, stirring with a fork between additions, until the dough comes loosely together.  Turn the dough out onto a piece of plastic wrap and wrap tightly.  Refrigerate for 1 hour.
  2. Preheat the oven to 425°F.  In a large bowl, mix the plums, blackberries, sugar, cornstarch, lemon juice, and creme de cassis.  Let sit 5 minutes.  Roll out the dough into a large oval on a well-floured surface, then transfer to a baking sheet.  Pile the plum filling into the middle of the galette, leaving at least an inch around the edges on all sides.  Fold the edges of the dough over the filling and press down.  Bake at 425 for 20 minutes, then lower the heat to 350°F and continue baking for 25-30 minutes longer, until filling is bubbly and crust is golden brown.  Don’t worry if the filling bubbles out somewhat – it’s that kind of dessert!

0 August 10, 2012 Cookbook

Summer Succotash

I’ve been dragging my feet on a lot of things lately, including, as you may have guessed, blogging.  It doesn’t really make sense to be having a burnt-out period now, as I don’t have that much going on to be burnt out from.  My current project is fairly boring, I don’t have any trips or major events planned for the next several weeks, and I’m just kind of doing the lazy summer thing.  Maybe that’s the problem – does inspiration beget more inspiration?  Or maybe it’s just a phase.  Or the heat.  In any case, I find myself mostly wanting to read and eat takeout and get 8 hours of sleep and stalk people on facebook, and not so much wanting to go to the grocery store and plan meals and turn on the oven.

I’m sure I’ll get my groove back in the next week or two, but in the meantime it would be a shame to not take advantage of summer’s best produce, so I did manage to throw together a few meals this week.  And while I may be a little uninspired, this recipe certainly isn’t – in fact, I’ve been excited to share it since I first tried it 2 years ago.  You really do need to wait to make this until that moment in August when all the ingredients are at their ripest – sweet sweet corn, tomatoes bursting with flavor, fresh beans that aren’t too starchy – and that time is right now, at least in Boston.  The corn, in particular, is the best I’ve had in years.  I bit into an ear as I was shucking, just to see how sweet it was, and proceeded to eat the entire thing raw in about 45 seconds.  I’m stopping by the farmer’s market today to get another 5 ears to devour – maybe I’ll even get a jolt of inspiration from them.

“First-of-the-Season” Succotash

Adapted slightly from Sunday Suppers at Lucques.  Serves 6-8.

  • 1 shallot, finely diced
  • 3 TBS lemon juice
  • 4-6 TBS olive oil
  • 1 small red onion, finely diced
  • 2 tsp thyme leaves
  • 2 c. sliced summer squash
  • kernels from 4 ears fresh corn
  • 1 pint cherry tomatoes, cut in half
  • 1 1/2 c. fresh or frozen lima beans, cooked
  • 1/4 c. basil, mix of green and purple
  • 2 TBS sliced parsley
  • 2 TBS minced chives
  • sea salt
  • black pepper
  1. Mix shallot, lemon juice, and 1/2 tsp salt in a small bowl.  Let sit.
  2. Heat 2 TBS olive oil in a large frying pan over medium-high heat.  Add red onion and thyme, and cook, stirring, for 2 minutes.  Add summer squash, season with 1/2 tsp salt, and cook 4-5 minutes, stirring, until the squash is tender and beginning to brown.
  3. Remove squash/onion to a large bowl and return frying pan to heat.  Add another 2 TBS olive oil to frying pan, and let heat up for 2 minutes.  Add corn, 1/2 tsp salt, and a sprinkle of black pepper.  Cook until corn is just tender, stirring frequently, about 3 minutes.  Add corn to bowl with squash.  If using frozen lima beans, and them to the hot pan and defrost over medium heat, then add to the succotash.  If using fresh lima beans, drain the cooked beans well and add to the succotash.
  4. Add shallot mixture, cherry tomatoes, basil, parsley, and chives to succotash and stir to combine.  Taste, and season with olive oil, salt, and pepper to your taste.  Serve at any temperature.

3 August 1, 2012 Food

Greatist Collaboration: Garlicky Eggplant Chips with Basil Yogurt Sauce

Last weekend was a busy one for me.  My cousin’s wedding (congratulations, Danny and Amanda!) was the big event, and I spent most of the weekend catching up with family, drinking margaritas, dancing till my feet hurt, and traveling to and fro.  By the time I got home Sunday afternoon, I was exhausted.  So exhausted, in fact, that the idea of putting together a blog post for my 5pm deadline for Greatist was pretty daunting.  Which is about the time Trevor came to the rescue.  As I sat at the kitchen table bemoaning the state of my creativity as well as the contents of my fridge, half-heartedly throwing out ideas, (“all I have is one eggplant.  I’m just going to cut it up and put it in the oven and call it a day.”), he became a man of action.  He grabbed the eggplant, sliced it, salted it, and began actually doing the things I was musing about (“maybe eggplant chips.  Maybe rub them with garlic like bruschetta.  No, maybe brush them with garlic oil.  And let’s have a sauce.  With basil.”)  By the time he was done saving the day, I was inspired, and these garlicky eggplant chips had just come out of the oven.  I snapped a few pics, and the blog-crisis was solved.

These chips, though, man were they a good spur of the moment creation!  Crispy, super-garlicky and flavorful, and hot out of the oven they were better than any potato chip I’ve had in a long time.  Plus, they’re made from eggplants, which are loaded with health benefits and low calorie, and they’re baked (always better than fried, even though eggplants do soak up quite a bit of olive oil as they bake).   All in all, a super delicious snack or appetizer.  I couldn’t stop talking about how much I liked them as we walked to dinner that night, although once I got to dinner I started talking about that… so maybe I just like food. :)

Head on over to Greatist for the recipe!

2 July 28, 2012 Food

Garden: Spaghetti with Summer Squash and Tomatoes

I’ve been waiting for this meal for a long time.  Since February, to be exact, from the moment I put the first seed in the first pot to sit in my bedroom window absorbing the weak winter sun.  And by this meal, I don’t mean this dish exactly – I just mean the first meal where all of the produce (well, except the garlic, we don’t get to plant that until September) could be fresh-picked from the garden, moments before preparing it.  Accomplishing this was just as satisfying (and delicious) as I thought it would be.

The garden has been far more successful than I expected.  Our random assortment of pots with store-bought dirt have turned into a lush array of greenery, and I’m so happy about it.  The highest tendrils of the watermelon are beyond arm’s reach, the cucumbers have climbed all the way up the porch and threaten to overrun the grapes, the tomatoes (started from seed!) are turning red one at a time, and the kale finally battled off the last of the cabbage moths and could provide at least 5 batches of my favorite kale soup.  Even the lemon tree has made a comeback and is covered in new leaves (!) after losing almost all of them this winter.  (This lemon tree seriously toys with my emotions.  After all my painstaking work nursing it back to health from the mealybugs, it rewarded me with over a hundred blossoms – not a single one of which managed to turn into a lemon larger than a quarter before shriveling up and falling off the tree.  No lemons this winter – any citrus experts out there have advice for me?)

This is less a recipe than a suggestion for how to use whatever’s good in your garden now.  The basic process is this: gently cook your vegetables until they’re crisp tender, then toss with pasta, or rice, or leave them by themselves.  Smother the veggies with herbs, heated only for a moment or two just to release their flavor.  Then dress the dish – I went the luxurious route, with cream and cheese, but a drizzle of good olive oil and a sprinkling of salt would have an equally wonderful effect.  Maybe pour yourself a glass of white wine, and, if it’s a nice night, take your dinner out to the garden and enjoy all the goodness summer has to offer.  It can’t be beat.

I can’t wait to share more garden-inspired recipes soon!  Especially when the watermelons (and the figs, and the grapes) are ready.  Stay tuned.  And enjoy your weekend!

Creamy Spaghetti with Summer Squash and Tomatoes

Serves 4-6

  • 1 lb. spaghetti
  • 3 TBS butter
  • 2 small summer squash, thinly sliced
  • 6 cloves garlic, minced
  • 20-30 cherry tomatoes, halved
  • 1/3 c. packed fresh parsley, thinly sliced
  • 1/3 c. packed fresh basil, thinly sliced
  • 1/2 c. heavy cream
  • 1/3 – 1/2 c. packed grated parmesan
  • 1 tsp lemon juice
  • sea salt
  • black pepper
  1. Bring a large pot of well-salted water to a boil.
  2. Heat the butter in a large saucepan over medium heat until melted.  Add the sliced squash and cook until tender and beginning to turn golden brown, about 7-10 minutes, flipping with a spatula once or twice over this time period.  Add the minced garlic and cook for 2 minutes longer, until garlic is very fragrant but not browned.  Add cherry tomatoes and cook for 2 minutes more, stirring.
  3. Add the spaghetti to boiling water at about this point.  Cook according to package directions.  In an ideal world, you want the sauce to be ready as the same time as the pasta, but life doesn’t always work out like that.  If your pasta is done first, rinse with cold water or drizzle with olive oil to prevent it from sticking.
  4. Lower the heat on the sauce and cook vegetables for 2-3 more minutes, stirring.  Add cream, parsley, and basil to vegetables, and cook, simmering gently, for 2 minutes.  Turn off heat, and stir in lemon juice and parmesan cheese.  Taste for seasoning and add salt and pepper as necessary.
  5. If your spaghetti is just finishing, add a few TBS of the pasta cooking water to the sauce, then drain the spaghetti and immediately toss with the sauce.  If your spaghetti has been finished for a while, add as much of the spaghetti as will fit to the saucepan and heat over low heat for 2 minutes, tossing spaghetti with sauce.  When spaghetti is just heated, add it all back to the pot to mix thoroughly.  (The goal here is to get the sauce to adhere to the spaghetti and both to be hot when served).
  6. Serve hot with additional grated parmesan.

27 July 24, 2012 Dessert

Red Currants, Two Ways

Three years ago, I didn’t know what currants were.  I guess this isn’t really that surprising, given that I also didn’t eat broccoli, brussels sprouts, cabbage, or other cruciferous vegetables, didn’t know how to pit an avocado, and certainly couldn’t tell you the difference between a lemon and a meyer lemon.  (Don’t totally write my three-years-ago-self off though – I did know how to prepare couscous in a dorm room without getting any dishes dirty, which I consider a feat up there with being able to completely change your clothes – underwear included – in the locker room without ever flashing anything).

Besides the fact that I didn’t really know much about food in 2009, currants haven’t really been a thing here for a long time.  You still don’t see them in grocery stores, and even at farmer’s markets, I hear a lot of people ask what they are.  Their lack of popularity is not because they’re an unlikeable fruit, although their tart-tart flavor can be off-putting at first, but rather because they’ve been banned as a crop in many parts of New England since the early 1900s due to the fact that they can carry White Pine Blister Rust.  Recently, bans have been lifted town by town as demand for the berries has begun to rise, and now, for a brief few weeks in July, you can actually get red currants, white currants, and gooseberries fairly consistently at Boston farmer’s markets.  Black currants are still a no-go, although rumor has it that there are wild bushes still around – if you know of any locations, I’ll trade you a pie for the deets.

Back to 2009.  That fall was the semester I spent in Prague, where I learned a lot of things, among them, how to cook for myself on a daily basis.  This is where I started to learn about foods I thought I didn’t like, like cabbage (a Czech staple), and goulash (which I would love a good bowl of right now).  Grocery stores were an adventure, and there were definitely recipes I made where I didn’t know what the ingredients were even after the dish was complete.  I also made a lot of pie and quiche in Prague, and have vivid memories of sitting at the kitchen table, slicing up frozen butter for a pie crust and being perfectly content.  But this is not about Prague, it’s about currants.  And Czech people eat quite a few of them.  I didn’t really actively notice them, as they’re usually mixed with other berries, but frozen fruit mixes contained them, cheesecakes were topped with them, and I liked them.  It wasn’t until I got back to the U.S. and went to buy some at the store that I learned you can’t get them here – which clearly set me on a mission to find them.  Long story short, 2 1/2 years later and I got my hands on some, which I quickly turned into two things – red currant and meringue pie, and red currant chutney.

I really enjoyed both these recipes.  The pie, well, it’s different, in the best sort of way.  Not what I typically think of when I hear “fruit pie,” the sweet, airy meringue is punctuated by bursts of tart red currant, with a buttery crust to ground the flavors.  It’s ethereal, surprising, and totally delicious.  It would be the perfect sort of thing to serve at a picnic, when you need something light to finish off the meal, or for a pretty, feminine treat at a bridal or baby shower.  Or for dinner on a Monday night, if that’s more your speed (hint: it’s definitely more mine).  I promised Trevor I would save him some for when he gets home from his business trip Friday, but given that I’ve already had three big slices, I’m not sure how good the chances of that are.

The chutney is also a real treat – with a flavor vaguely reminiscent of sweet and sour sauce and a smooth, jammy texture, it’s delicious on toast, as a condiment, or straight out of the jar.  The currant gets mellowed out a lot during the cooking process, so it’s less of a standout flavor, and the seeds are strained out as well.  Whereas when I’m eating the pie I’m thinking “currant! meringue! currant!” with every bite, with the chutney it’s just “mmm, chutney.”  I had the chutney spooned over toasted sourdough and melty fontina cheese alongside a cold glass of raspberry lambic for dinner on both Friday and Saturday nights last weekend – lazy summer cooking at it’s best.  (Can I take a moment to express how amazing raspberry lambic is?!  It’s like someone distilled raspberries – not sugary-sweet raspberry syrup, but fresh, sun-ripe, forest floor raspberries – into a bottle and then gave it the added bonus of giving you a buzz.  If it weren’t $10 a bottle, I’d be drinking a lot of it.  Tangent over.)  Since currants are newer to the American palate than many fruits, many people seem mystified by what to do with them beyond toss them into a berry mix.  If you happen to find yourself with some (maybe you bought a box at the market because they’re just so pretty and now can’t figure out how to use them) – I highly recommend both these recipes.

Red Currant Meringue Pie

Adapted slightly from Heather Homemade.  Serves 8.

  • 1 1/2 c. flour
  • 1 tsp baking powder
  • 1/2 c. butter, very soft
  • 1 c. white sugar, divided
  • 1 tsp lemon extract
  • 2 eggs, separated
  • 2 tsp cornstarch
  • pinch cream of tartar
  • 1 c. white and red currants, washed and stemmed
  1. In a large bowl, whisk together flour and baking powder.  Stir in butter, 1/2 c. of white sugar, lemon extract, and the 2 egg yolks until evenly moistened.   Knead with your hands several times to bring dough together, form into a smooth ball, wrap in plastic wrap, and refrigerate for 1/2 an hour.
  2. Preheat oven to 325°F.  Press chilled dough into a 9 inch tart pan, forming a crust a little less than an inch thick that also wraps up the sides of the pan.  Bake the crust for 25 minutes, until golden, then remove from oven and cool for 10 minutes.  Increase oven temp to 400°F.
  3. Whisk 2 egg whites until frothy, then sprinkle cream of tartar over, and whisk vigorously until egg whites are stiff.  Whisk in cornstarch, then gradually add remaining 1/2 c. of sugar to egg whites, whisking vigorously between additions.  Whisk until whites are stiff and shiny, then gently fold in currants.  Smooth currant filling out on top of the pre-baked pie crust, then bake for 12-18 minutes, until most of the meringue top is golden brown.  Remove from oven and let cool/set.  Serve at room temperature on same day.  Refrigerate leftovers (although this will make the meringue begin to “weep”).

Red Currant Chutney

Adapted slightly from Fresh Juice.  Makes about 1 1/2 c.

  • 2 c. red currants, washed and stemmed
  • 1/3 c. sugar
  • 3 TBS apple cider vinegar
  • 1/3 c. water
  • 1 TBS vegetable oil
  • 1 TBS whole mustard seeds
  • 10 whole black peppercorns
  • 10 whole cloves
  • 1 cinnamon stick
  • 1/2 tsp ground ginger
  • 1/4 tsp salt
  • 1 large onion, chopped into small pieces
  • 1/8 to 1/4 tsp cayenne pepper, depending on your heat tolerance
  1. In a small saucepan, bring currants, sugar, vinegar, and water to a boil.  Reduce heat to low, cover, and simmer until currants begin to fall apart, about 10-15 minutes.  Careful, this is a recipe that’s likely to boil over (and make a mess!), so leave your lid somewhat ajar or give it a stir frequently
  2. Strain red currant mixture through a fine sieve, catching the juice in a bowl.  Press down on the currant solids to extract as much juice as possible.  Discard the solids, reserve the juice.
  3. Rinse out the saucepan and return to stove.  Heat vegetable oil in saucepan over medium-low heat.  Add mustard seeds, peppercorns, cloves, cinnamon stick, ginger, and salt, and fry until mustard seeds begin to pop, about one minute.  Warning, the hot mustard seeds can pop quite forcefully and splatter oil, so work quickly and carefully, removing pot from heat if need be.
  4. Add the onion to the spices, and cook over medium low heat, stirring occasionally until onions are golden brown, about 10 minutes.  Add currant juice and cayenne pepper to pot, and stir.  Bring to a simmer, and simmer, uncovered, for about 15 minutes, until the sauce has reduced and thickened.  Let cool and refrigerate for up to two weeks.

Note: This wasn’t written as a canning recipe, so I’m not sure if it has enough sugar/acid/other preserving elements to work, but if that’s your thing and you can figure out the safe ratios, I think it could work really well!  If not, I’m sure you’ll be able to use this up pretty quickly.

20 July 18, 2012 Food

Greatist Collaboration: Stone Fruit Salad with Lemon-Lavender Syrup

How great is July?  Coming back to a garden that has doubled in size in a week, walking through the Copley Square farmer’s market that’s just bursting with produce, eating meals composed entirely of vegetables because they’re just that good – it’s definitely a season of plenty.  In fact it’s so plentiful that I’m torn between the natural inclination to eat smaller, lighter meals in this hot weather and the desire to eat as many eggplants, tomatoes, beans, cherries, peaches, plums, and berries as I can during their short season.

In particular, I can’t get enough of stone fruit.  Sweet cherries eaten ice cold from the fridge, plums so perfect that the juice dribbles down your chin with every bite, peaches baked until hot and bubbly under a buttery crumble – these fruits of summer are so fleeting that in my opinion, it’s worth eating as many of them as you can while they’re around.  There are many great single fruit recipes for each type of fruit, but they also marry well with one another, whether in a luscious cobbler or a simple but addictive fruit salad like this one.

I don’t know about you, but for me, the words “fruit salad” conjure up an image of a sad, not quite cold enough bowl of mushy bananas and unwanted cantaloupe, with a straggling strawberry or two that the pickers left behind.  You know, the kind of fruit salad you used to find at every picnic, bbq, and pool party; the one that played second fiddle to the hamburgers and dirt cake.  This salad is an entirely different story.  Elegant, colorful, and slightly floral, with no filler fruits that get left behind, everyone in my family had at least 3 servings at dinner, even after eating these turkey cobb sandwiches, which were easily the most delicious sandwiches I’ve ever made.  Inspired by the just-blossoming lavender plants in my mom’s Maine garden, I decided to drizzle the fruit with a lemon lavender syrup, which truly tied the whole dish together.  You can use whatever stone fruits you have lying around – just make sure the salad is served cold, and give it an hour or two to soak in the lavender flavor.

Head on over to Greatist for the full recipe!

Other stone fruit recipes to celebrate July:

Spiced plum butter

Cafe Sperl plum squares

Boozy cherry brownies

Cherry cream cheese danishes

Cherry chocolate ice cream

Spiced apricot couscous

1 July 16, 2012 Dessert

Bailey’s Fudge Ripple Ice Cream Sandwiches

Well, after 12 days of sunbathing, swimming, running, cooking, drinking, and catching up with family and friends, vacation is officially over.  This morning, at the very gray hour of 4:30am, we climbed into the car and made the long drive back to the hot and humid city.  I even had to go to work this afternoon.  Sigh.  But vacation ending isn’t all bad: I missed Trevor a teeny-tiny bit plus it’s good to be back in the garden – while I was gone the watermelon plant grew at least 3 feet, set out its blossoms, and is now covered in tiny watermelons.  The cherry tomatoes started ripening, there’s two baby figs on the tree, and we harvested our first summer squash this afternoon.  And it’s really nice to no longer be the whitest person in my office.  The bright side.

I’m not going to lie, I’m starting to nod off as I type (getting up that early is not really my jam), but I wanted to wrap up a wonderful vacation with a super summery treat – homemade ice cream sandwiches filled with Bailey’s Fudge Ripple ice cream.  Some ice cream recipes – like this one – are super simple, stir it together and throw it in the freezer types… this recipe does not fall into that category.  Making the ice cream itself is a bit time consuming, and when you throw in making the cookies and assembling the sandwiches it’s definitely only the sort of thing you’d do on vacation, or when you really felt like tackling a kitchen project.  However, the rich, slightly boozy, intensely coffee-flavored ice cream with a dense oreo ripple sandwiched between two soft chocolate cookies that is the result?  Worth the effort.  Even if that effort includes scraping off and reassembling your perfectly shaped ice cream sandwiches after not quite closing the freezer door overnight, not that I’m speaking from experience or anything…

Anyways, if you’re also getting back from a blissful vacation, I’d recommend looking at these and then buying a pint of Ben & Jerry’s to fill the void.  If you’re lucky enough to still be on your blissful vacation, enjoy every second of it, and take the time to make yourself a little treat.

P.S. 100% disclosure?  I think I enjoy the classic $1.00 ice cream sandwich a tiny bit more than these (although maybe I’m just a purist).  But the ice cream recipe itself is totally worth making – serve it over  a brownie with a little bit of boiled down Bailey’s syrup for a real treat.

Bailey’s Fudge Ripple Ice Cream

Adapted from The Red Spoon, with a little inspiration from Tasty Kitchen.  Makes about 1 quart, or enough for 6-8 ice cream sandwiches.

  • 1 1/4 c. Irish cream liquer, such as Bailey’s, divided
  • 1 1/2 c. whole milk
  • 3/4 c. sugar
  • 1 c. whole coffee beans
  • 1 tsp instant espresso
  • 1/8 tsp salt
  • 1 1/2 c. heavy cream
  • 5 egg yolks
  • 2 c. oreos or other chocolate cookie
  1.  Pour 1/2 c. of the Bailey’s into a medium, heavy bottomed saucepan.  Heat over medium heat until simmering gently.  Simmer for 10 minutes, stirring occasionally, until the Bailey’s is reduced by half.  Pour into a bowl and set aside.
  2. In a food processor, pulse the oreos until they are fine crumbs.  Add 1/2 c. of the Bailey’s and pulse until a thick paste is formed.  Scrape into a bowl and set aside.
  3. Add whole milk, sugar, coffee beans, instant espresso, salt, and 1/2 c. of heavy cream to the medium saucepan (no need to wash in between uses, just scrape that yummy Bailey’s syrup into the milk mixture).  Stir briefly to combine ingredients.  Heat over medium-low heat, stirring occasionally, just until the milk begins to simmer.  Remove from heat, cover, and set aside for 1 hour, to allow the coffee beans to steep.
  4. After the hour has passed, gently rewarm coffee-milk until hot to the touch, but not simmering.  In a medium bowl, thoroughly whisk together the egg yolks.  In a large bowl, pour remaining 1 c. of cream, set a large mesh sieve on top, and set aside.  Carefully pour the hot coffee-milk mixture over the eggs, whisking vigorously as you do so, to temper the eggs.  Still whisking, pour the egg and milk mixture back into the saucepan and cook for 5-10 minutes until the mixture has thickened enough to coat the back of a spoon, stirring constantly (a wooden spoon works better than a whisk here) to keep the eggs from scrambling and frequently scraping the bottom.
  5. When the custard has thickened, pour through the mesh sieve into the remaining cream, to strain out the coffee beans and any cooked egg bits.  Discard beans.  Stir the cream and coffee custard together, then add the remaining 1/4 c. of Bailey’s, as well as the 1/4 c. of reduced Bailey’s syrup, and stir to incorporate.  Cover the bowl with plastic wrap, and refrigerate until thoroughly chilled, at least 4 hours or overnight.
  6. Process the chilled custard according to ice cream maker instructions.  As the mixture churns, line a 9×13 glass pan with tinfoil.  Microwave the chocolate fudge ripple (Bailey’s and oreo mixture) for 30 seconds and stir, just to make it spreadable (don’t let it get too hot!)  When the ice cream is finished churning, spread it into the glass pan.  Dot the top with the fudge ripple mixture, then use a spatula to quickly but gently fold it in to the ice cream.  Cover with plastic wrap and freeze until firm, at least 1 hour.

Ice Cream Sandwich Cookies

Adapted from The Cookie Dough Lover’s Cookbook via Brown Eyed Baker.  Makes 24 cookies (12 sandwiches).  Note: although I pretty much always make baked goods by hand (I don’t own a stand mixer), this is one recipe where I’d recommend using a mixer if you have one – the dough is very stiff and hard to work with, and I ended up kneading it by hand to get the best results.

  • 1 stick (1/2 c.) salted butter, softened
  • 1 1/4 c. light brown sugar
  • 1/2 tsp baking powder
  • 1/2 tsp salt
  • 1/2 c. cocoa powder, sifted
  • 1/2 tsp instant espresso powder
  • 1/2 tsp vanilla extract
  • 2 c. flour
  • 4 TBS room temperature water
  1. Preheat oven to 350°F.
  2. In a large bowl, cream together softened butter and brown sugar until fluffy.  Add vanilla and stir in.  In a separate bowl, sift together cocoa powder, salt, baking powder, and instant espresso.  Add dry ingredients to wet ingredients and stir until fully incorporated.
  3. Add 1 c. of flour to the dough and mix until incorporated.  Add 2 TBS of water and stir until dough is even in color and moisture.  Repeat with the remaining 1 c. of flour and 2 TBS of water.  If necessary, knead by hand until dough is smooth and workable.
  4. Lightly flour a work surface and rolling pin.  Roll half of the dough out into a rectangle 1/8 to 1/4 inch thick, and use cookie cutter to cut out rectangles.  Transfer to a baking sheet and freeze for 10 minutes.  Repeat with remaining dough.  Bake cookies for 7 minutes until just done.  Don’t overbake!  Let cool for 3 minutes on pan, then transfer to a cooling rack and cool completely.  Freeze cookies for at least 1 hour before assembling.

Ice Cream Sandwich Assembly

  1. Remove the cookies from the freezer.  Tear out 6 medium-sized rectangles of plastic wrap, and lay two cookies side by side on each square.
  2. Working as quickly as possible, remove ice cream from freezer and use rectangular cookie cutter to cut through ice cream.   Slide a large spatula under ice cream rectangle, holding cookie cutter in place as you work, and transfer the ice cream to one of the cookies.  Immediately sandwich the cookie, pressing down gently, wrap in plastic wrap, and put in freezer.  Repeat with remaining cookies and ice cream.
  • « Go to Previous Page
  • Go to page 1
  • Interim pages omitted …
  • Go to page 39
  • Go to page 40
  • Go to page 41
  • Go to page 42
  • Go to page 43
  • Interim pages omitted …
  • Go to page 57
  • Go to Next Page »

Primary Sidebar

Subscribe!

Get creative recipes and menu ideas delivered straight to your inbox.

Most Popular

A House // Sweet Potato and Coconut Milk Soup with Brown Rice and Lentils

Monthly Fitness Goals: July // Homemade Spinach Wraps with Chopped Greek Salad

A New Job // Classic Seven-Layer Bars

Butternut Squash Carbonara with Fried Sage and Caramelized Onions

Happy Birthday, Trevor! // Peanut Butter Fudge

Cookbook Review and Giveaway: Home Made Winter

Drizly

Please note!

Full disclosure: if you purchase anything at Amazon using the above links or any other links to Amazon on this site, I will receive a small commission. Just so you know!

Copyright© 2025 · Cookd Pro Theme by Shay Bocks

This site uses cookies: Find out more.