• Skip to primary navigation
  • Skip to main content
  • Skip to primary sidebar
  • Home
  • Recipes
  • Features
    • Cookbook Reviews
    • Ingredient of the Week
    • Sunday Dinner
    • Fitness Goals
  • Travel
  • About
    • Privacy Policy
    • Cookie Policy
  • Work With Me

Katie at the Kitchen Door

Globally-inspired, seasonal recipes

Blog Page

0 September 19, 2014 Breakfast

Pumpkin Butter and Cream Cheese Danishes

Pumpkin Butter and Cream Cheese Danishes {Katie at the Kitchen Door}

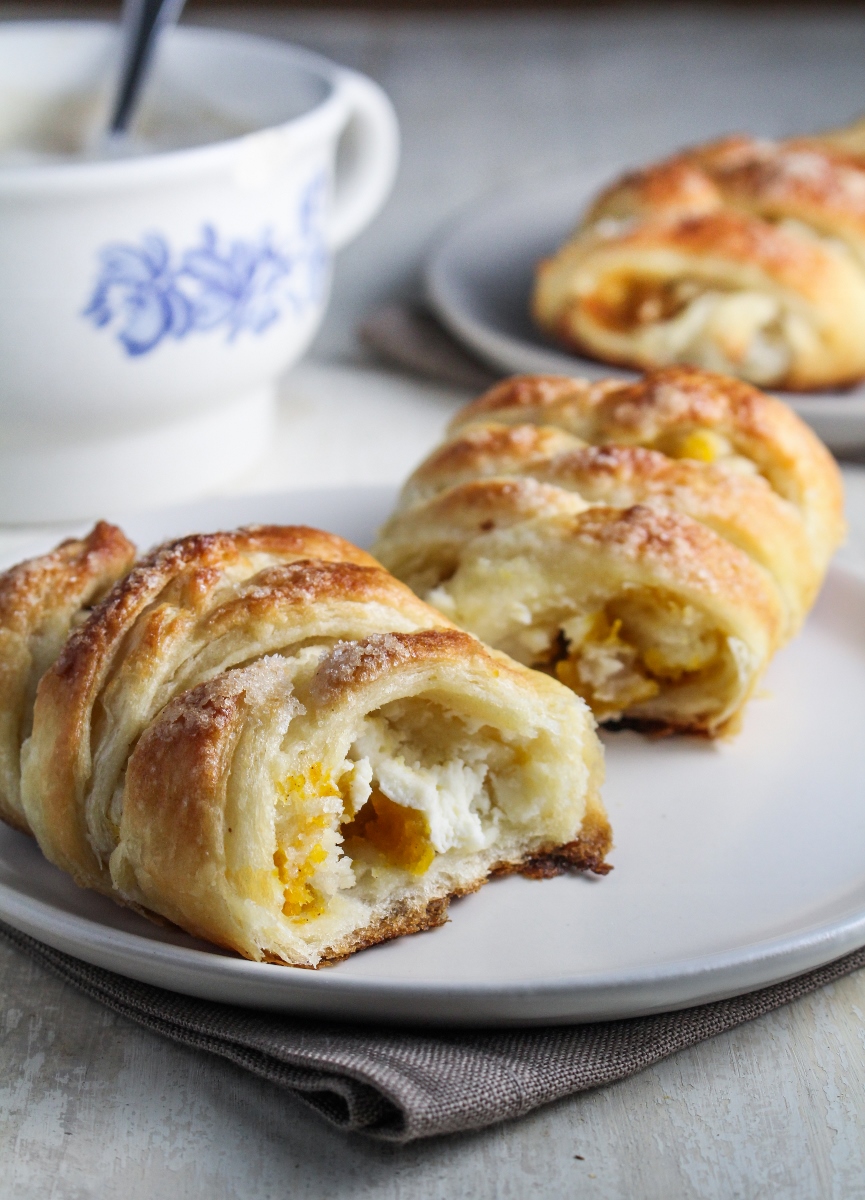
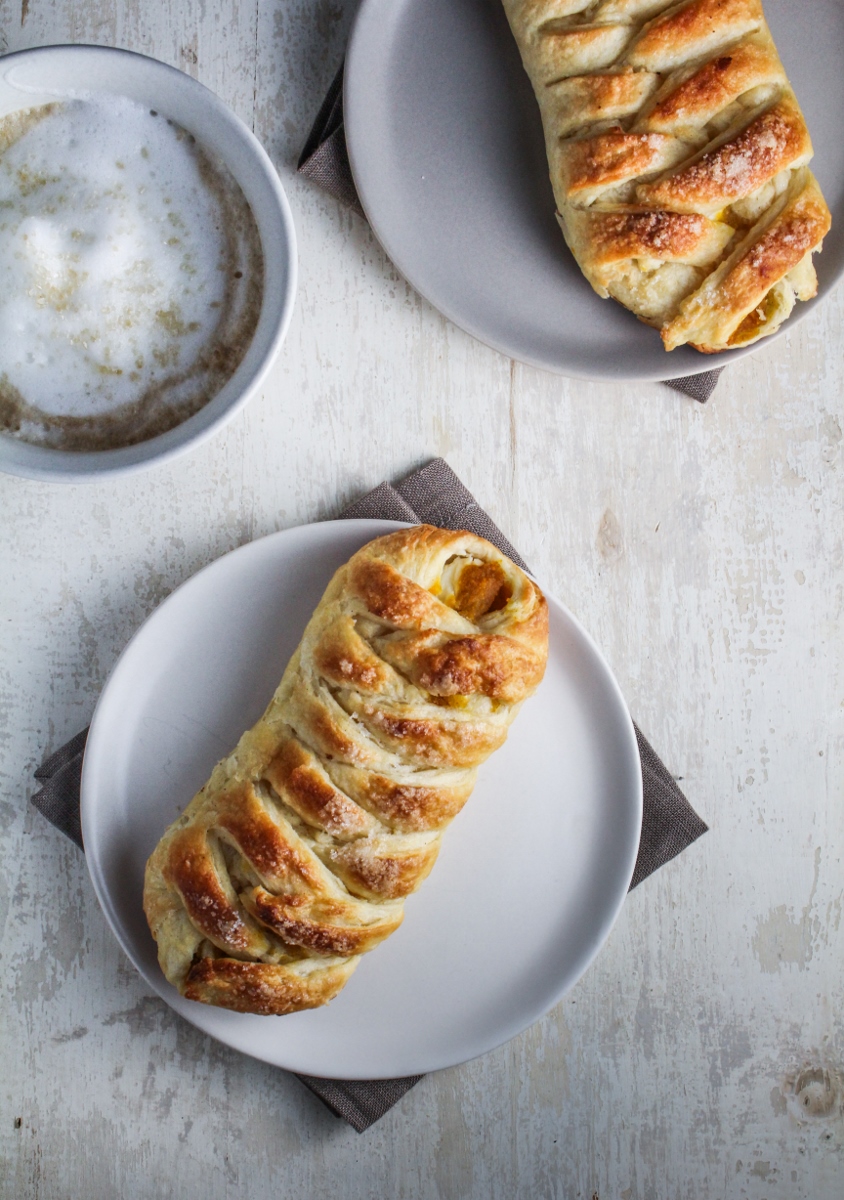
It’s your favorite guest poster! Trevor is here with his latest creation, pumpkin butter and cream cheese danishes, made from our very own home-grown pumpkins. These danishes are incredibly delicious, and I think they’re multiplying while I’m at work, as we seem to have an infinite supply that gets replenished every time I think I’ve polished off the last one. Raise your hand if you want one! Just kidding, I’m keeping these (and their baker!) all to myself. But you can definitely have the recipe.

Last summer, my greatest garden wish was to have a super wild, super productive squash patch in our garden. This year, we got exactly that, and we learned there is a lot of value in order. We spent a solid chunk of the summer in our new patch tracing out vines from the winter squash and melons as they wound around and underneath our mounds of summer squash and zucchini plants. Half the trick was trying to find all the zucchini before they became giant inedible monsters. We definitely owe Katie’s dad for sacrificing his wildflower field, which will hopefully regrow in it’s new location, and for tilling the whole 30’ x 50’ patch for us and our pumpkin dreams.

Pumpkin Butter and Cream Cheese Danishes {Katie at the Kitchen Door}

Despite the disorder, we ended up with a ton more squash than we’ve had in past years, and a huge jumble of vines of questionable origin. Somehow our New England Sugar Pie pumpkins managed to grow vines about 20 feet long extending in every direction, and setting fruit in literally every corner of the patch. After two big, promising, just-turning-orange pumpkins were completely demolished by our friendly neighborhood deer, we put up a hasty fence and secured a harvest of about 8 nice-sized pumpkins, with more still ripening on the vines. Now the only challenge that remains is figuring out what to do with it all.

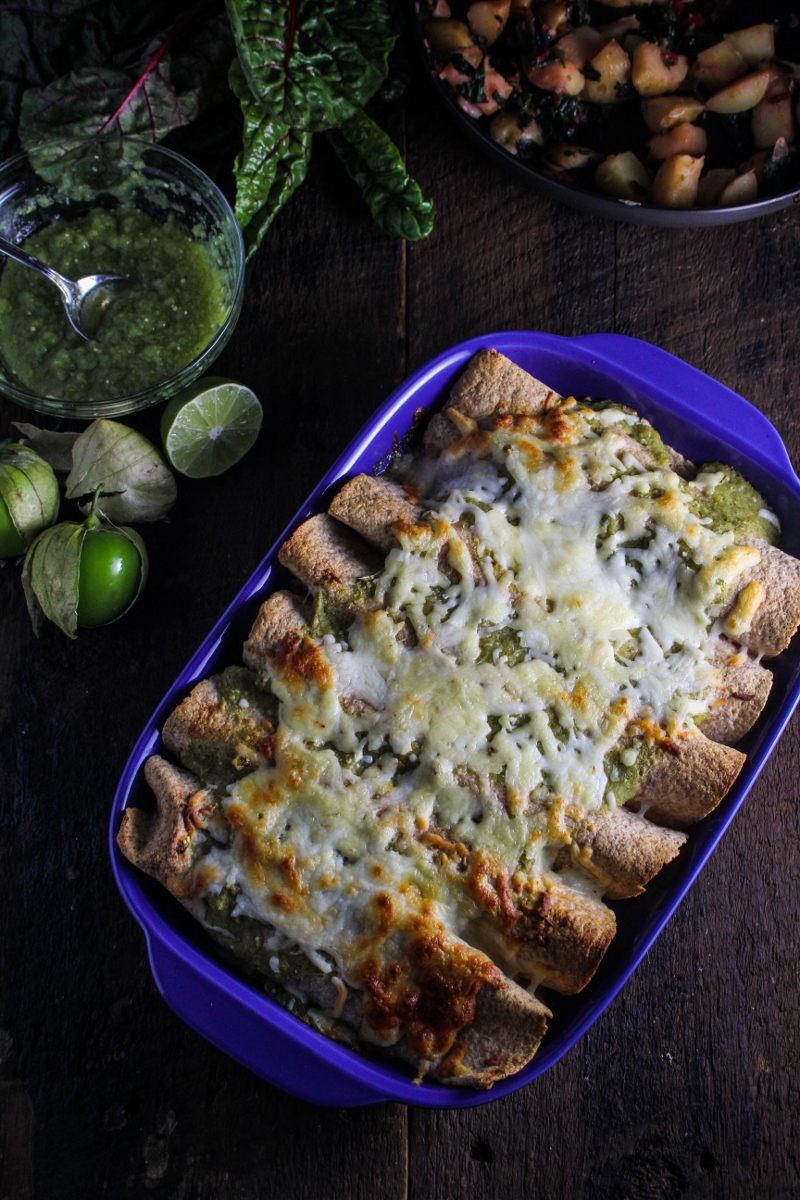
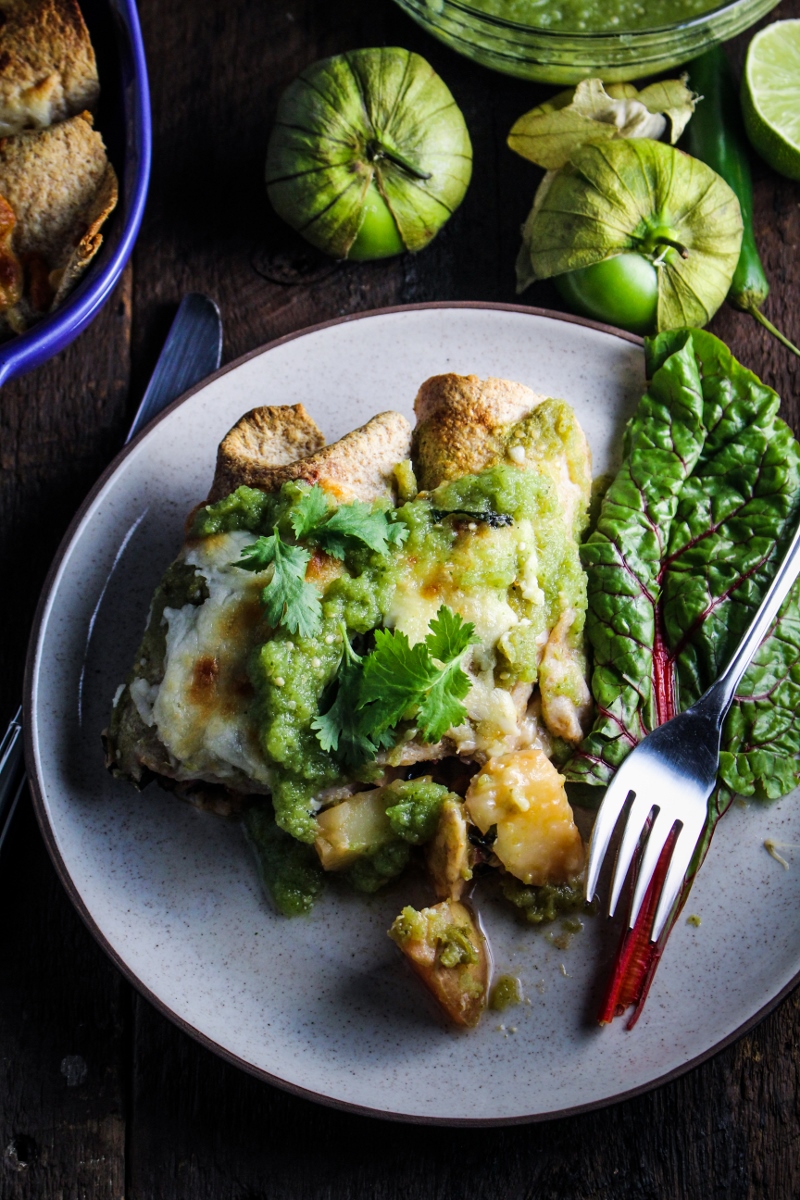
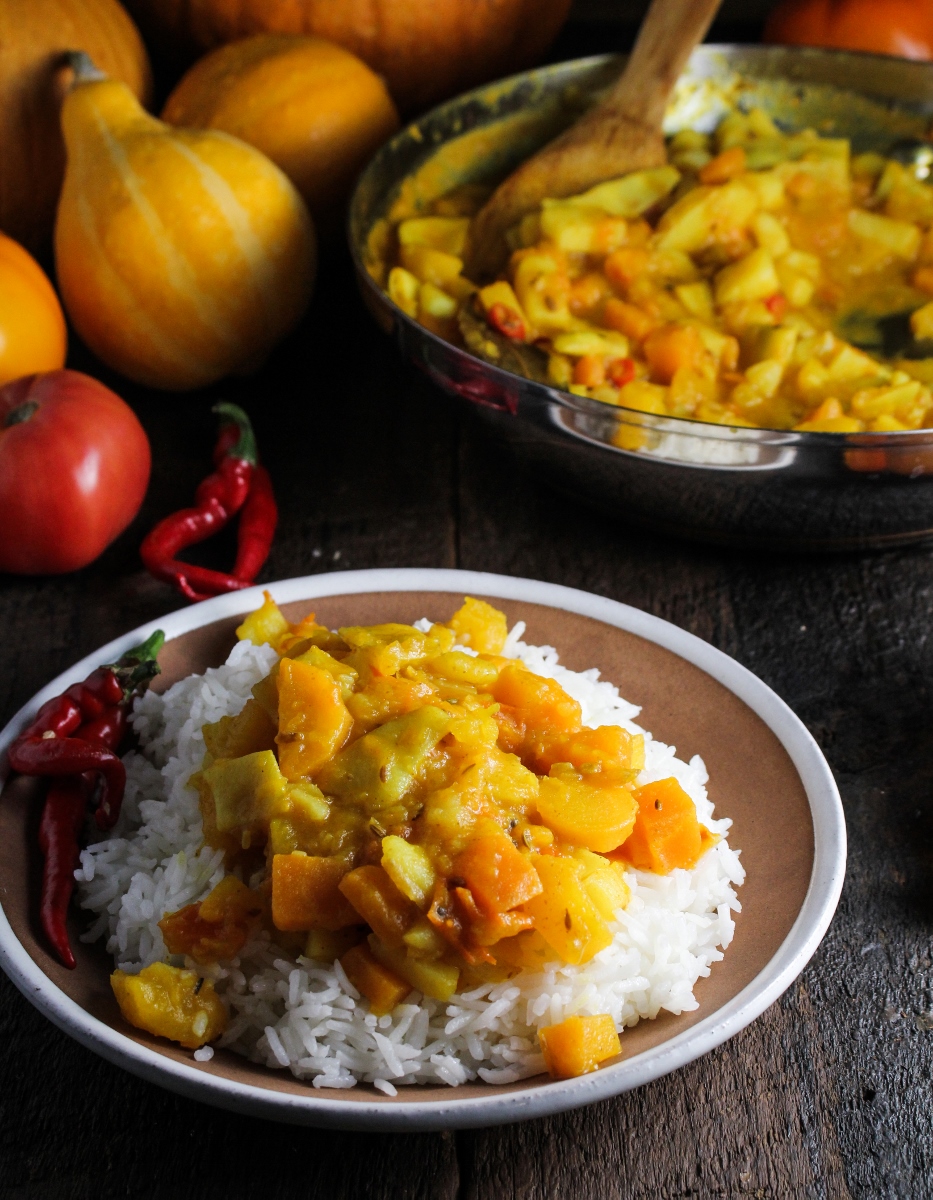
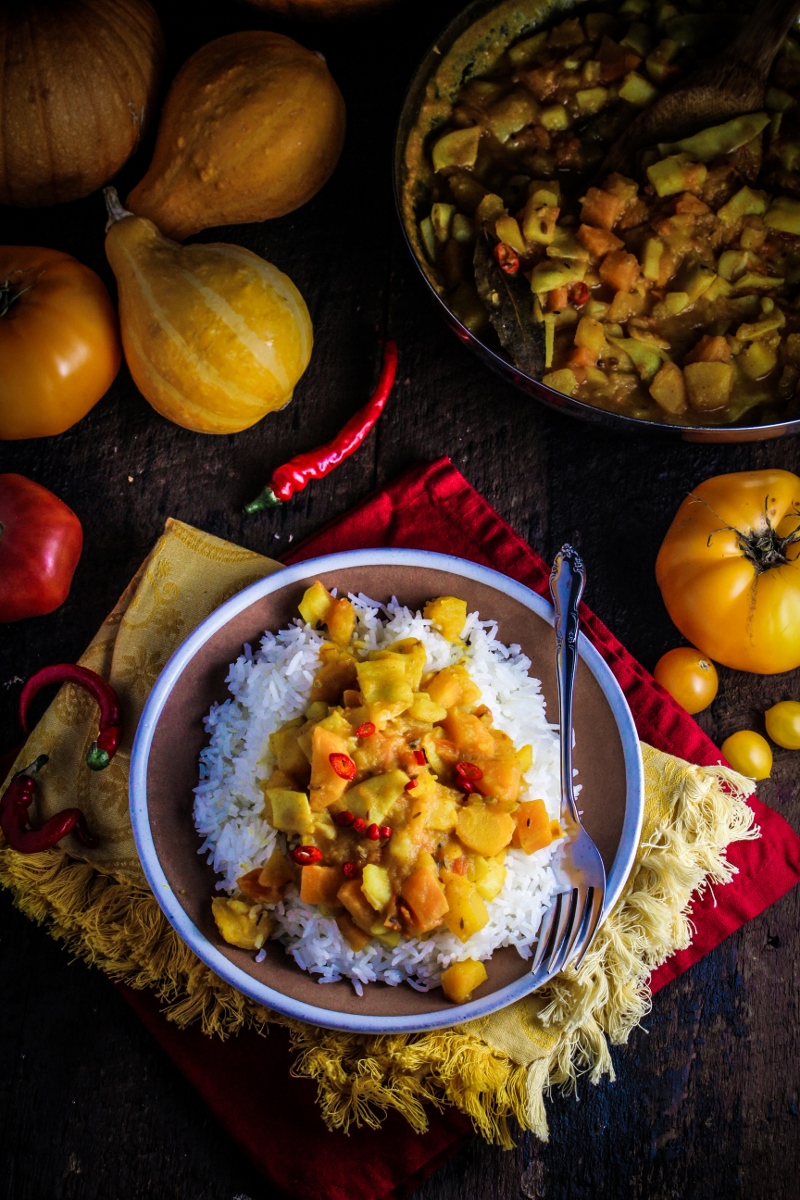
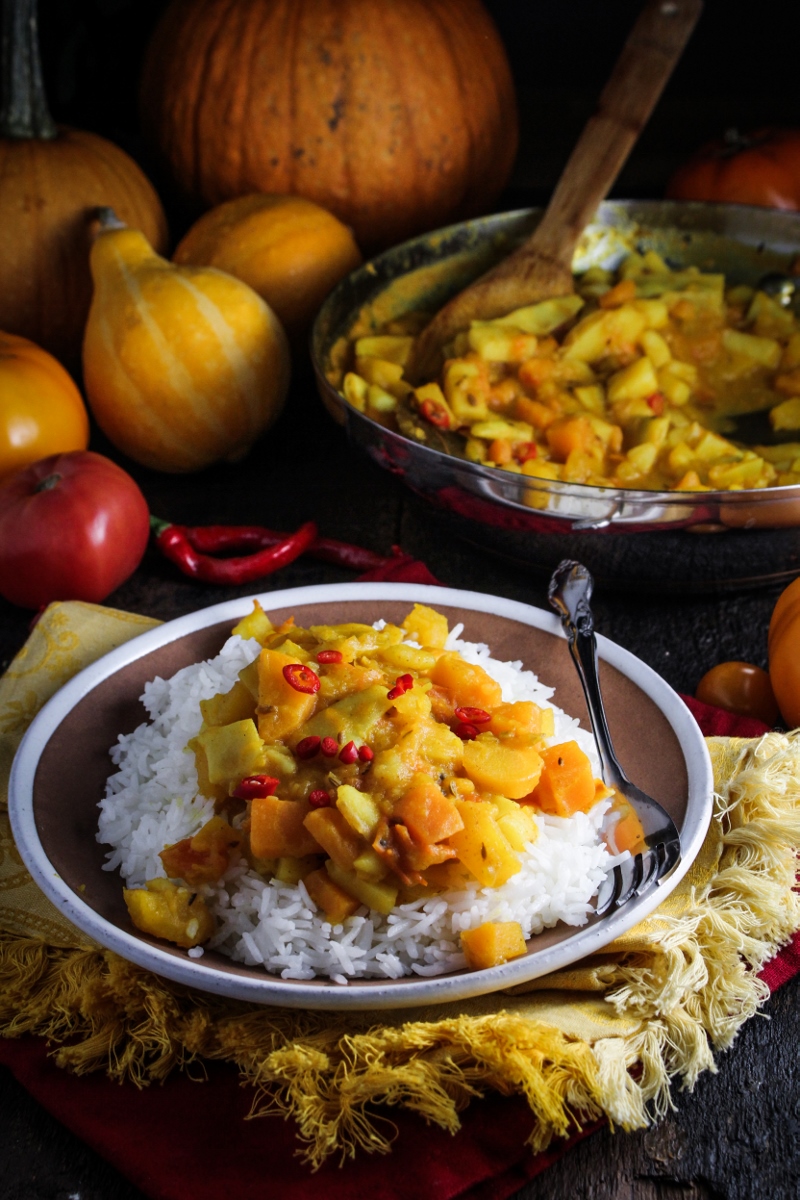
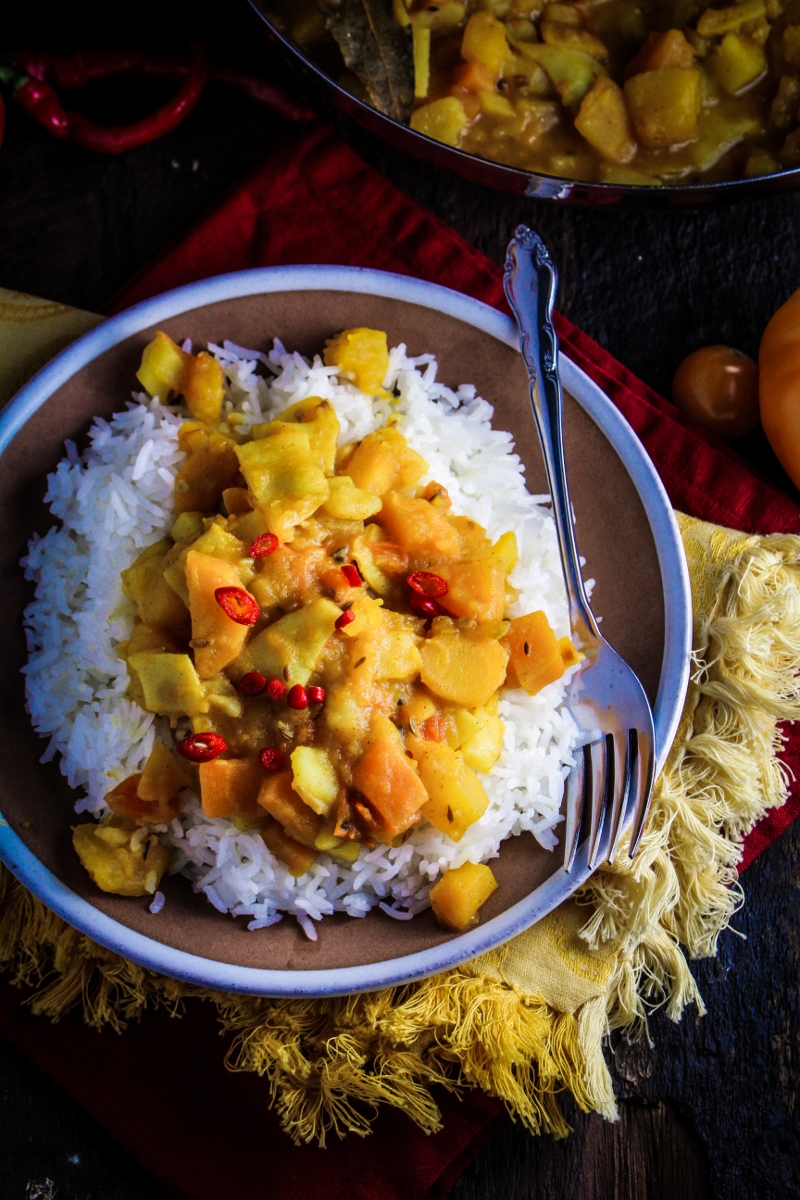
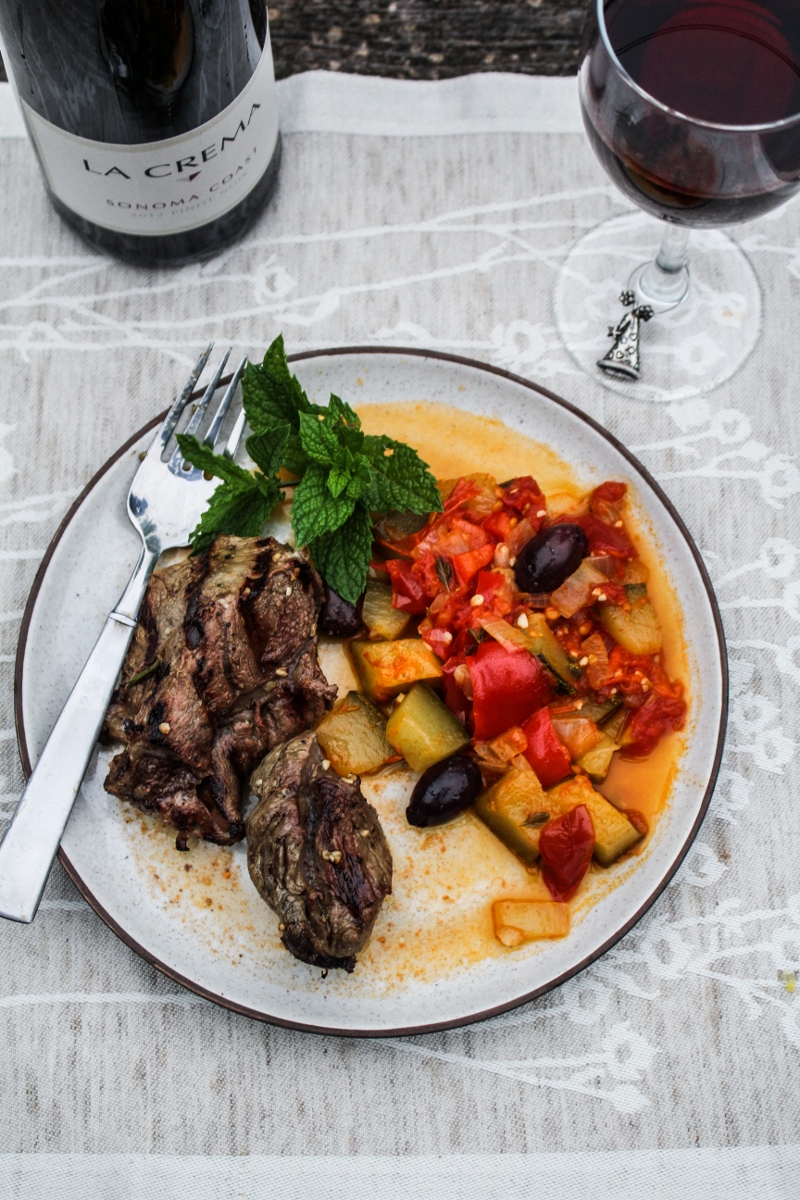
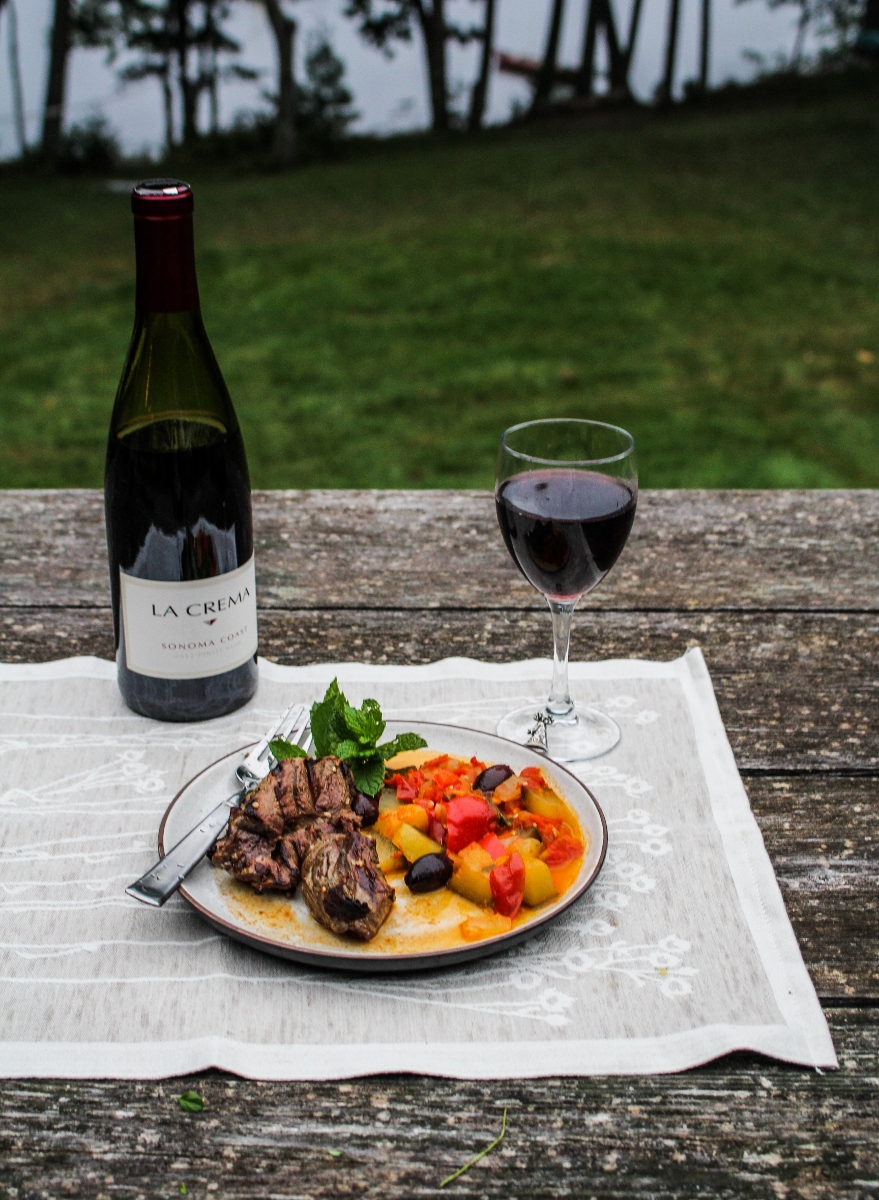
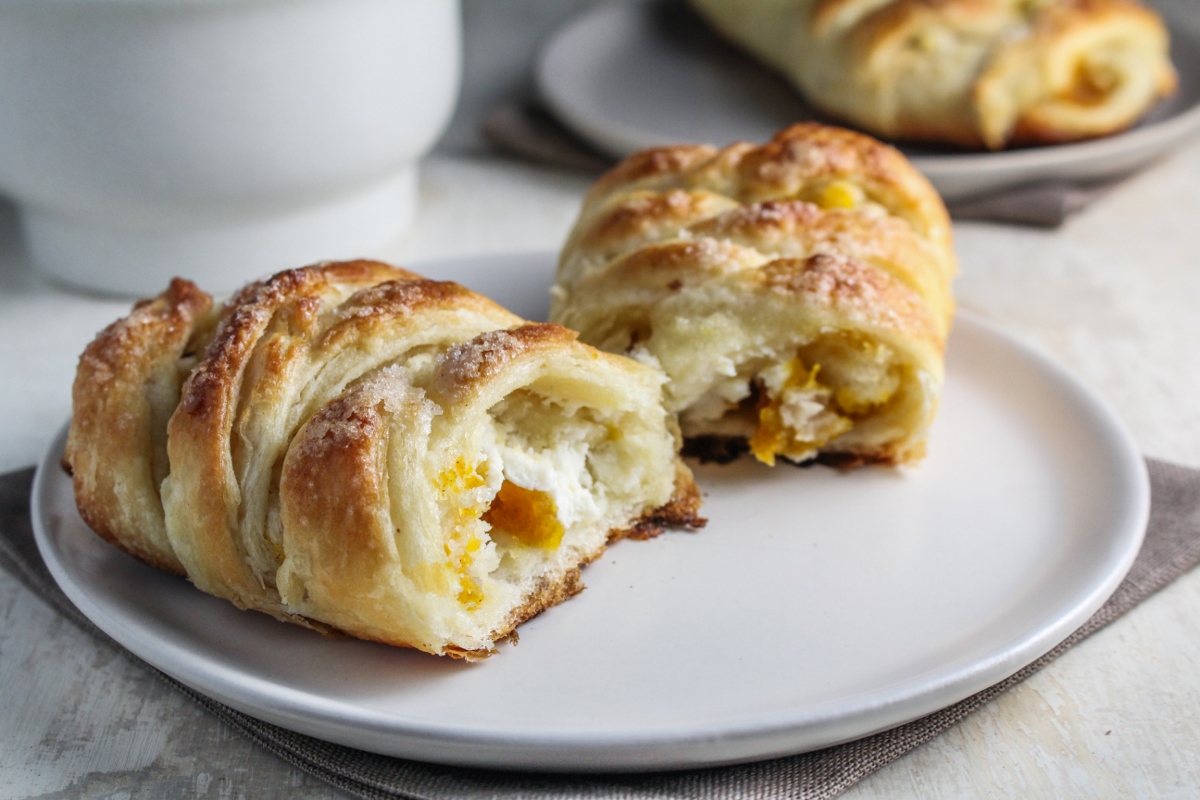
So far, I’ve made some apple-wood smoked pumpkin that we used in a risotto, Katie’s done that beautiful vegetable curry, and I made some pumpkin butter to go in these danishes. I’m a huge fan of raspberry cream cheese danishes, so that’s the route I chose to go with for the pumpkin ones. I make the pumpkin butter a little lemony to get some tartness to go with the cream cheese, and I think they came out really well. The dough recipe I used makes about twice as much dough as I needed for the first batch, so more pastries are definitely in order.

Like what you just read? Subscribe to Katie at the Kitchen Door on Feedly or Bloglovin‘, or follow along on Facebook, Twitter, Pinterest, Instagram, or Google+. Thanks for reading!

Pumpkin Butter and Cream Cheese Danishes {Katie at the Kitchen Door}

Pumpkin Butter and Cream Cheese Danishes

Pastry dough recipe adapted from Food.com. Makes 16 danishes.

For the pumpkin butter filling:

  • 4 c. pumpkin puree
  • ¾ c. water
  • 1 tsp cinnamon
  • 2 tsp lemon juice
  • ¼ tsp powdered ginger
  • 1 Tbsp honey
  • ¾ c. brown sugar

For the Cream Cheese Filling:

  • 8 oz. package of cream cheese
  • ½ c. Greek yogurt
  • ¼ tsp vanilla
  • ¼ c. sugar

For the Danish Pastry Dough:

  • 2 c. milk
  • 1 ½ tsp dry yeast
  • 2 large eggs
  • ½ tsp vanilla
  • 7 c. all-purpose flour
  • ⅓ c. granulated sugar
  • 1 ½ tsp salt
  • 1 lb unsalted butter
  • ½ tsp cardamom

For the pumpkin butter:

  1. If you are using whole pumpkins to begin with, follow these instructions to make your puree. If you are using canned pumpkin, skip to step two.
    1. Preheat oven to 300°F.
    2. Cut the pumpkin in half, and scoop out the seeds and fibers, discarding or reserving for another use.
    3. Place  pumpkins, cut side down, in a pyrex baking dish and fill the dish with ½ inch of water.
    4. Steam pumpkin in oven for about 45 minutes, until flesh is fork-tender all the way to the skin. Remove the pumpkins from the oven and let cool.
    5. Once the pumpkins are cool enough to handle, scoop out the flesh and blend until smooth
  2. Combine all pumpkin butter ingredients in a small sauce pan over medium heat. Cook, stirring constantly, until the ingredients are evenly blended and the mixture holds it’s shape.

For the cream cheese filling:

  1. Whip together all ingredients until the mixture is smooth and completely combined.

For the Danish dough:

  1. Warm milk to 110°F (in a small saucepan over low heat or in the microwave), then sprinkle yeast over the top of the warm milk without mixing. Allow to sit for five minutes, then beat in eggs and vanilla. Whisk until ingredients are thoroughly combined.
  2. Mix together dry ingredients in a large bowl until just combined. Cut in 3 Tbsp of butter, cut into small cubes, and use a pastry cutter to loosely combine.
  3. Add wet ingredients to dry ingredients and knead until combined. Refrigerate dough for 1 hour. Leave remaining butter to soften while dough chills. The butter should be stiff, but spreadable.
  4. On a lightly floured surface, roll out the dough into a 2’ x 1’ rectangle. Spread remaining butter over the bottom two thirds of the dough. Fold the top third of the dough down into the middle, then fold the bottom third up onto the top, and roll into a 2’ x 1’ rectangle again. Repeat the folds, and refrigerate for another hour.
  5. Repeat the folding and rolling process two more times to create layers of butter in the dough. This is what makes the final product light and flaky.

To assemble and bake:

  1. Preheat oven to 450°F.
  2. Roll out chilled dough to approximately ¼ inch thickness. Cut into 6”x8” squares.
  3. Orienting rectangles such that the long edge is horizontal, make seven 1 ½ inch slits on either side.
  4. Spread a line of cream cheese filling and a line of pumpkin butter vertically down the center of the rectangle, keeping approximately ½ inch away from the inner end of the slits on either side.
  5. Fold the top and bottom slits on either side vertically down, to create a cup shape at either end.
  6. Fold the remainder of the strips over the filling diagonally, starting from the top and alternating sides to create a crosshatch pattern. Pat down the ends of the strips as you go.
  7. Place danishes on a parchment-paper lined baking sheet and bake for 8 to 10 minutes, until the pastry is golden all over.

0 September 14, 2014 Food

Monthly Fitness Goals: September // Potato, Poblano, and Chard Enchiladas with Raw and Roasted Salsa Verde

Potato, Poblano, and Chard Enchiladas with Salsa Verde {Katie at the Kitchen Door}

Potato, Poblano, and Chard Enchilada Filling {Katie at the Kitchen Door}

It was nice to take August off from holding myself to, well, much of anything. I needed the break. Of course, I was still working, and work was actually quite hectic – the main reason for needing to let everything else slide a little. But things have slowed down, and I’m finally feeling caught up on all the other aspects of my life. A part of that, of course, is getting back into a healthy daily routine, and that means the monthly fitness goals are back on.

I’ve known that speed would be the focus of my September goal since July, really. Since I started running again in January (after the longest hiatus I’ve probably ever taken last fall), I’ve been pretty diligent about getting out there. Starting back up again is the worst part of running, so once I’ve got a little endurance I like to hang on to it. So far this year I’ve run over 300 miles, and from January through June I was getting faster every month, moving from an average pace of 9’22” in January all the way down to an 8’04” in June. But July and August were full of hot, slow slogs, so I promised myself that once the weather cooled down, I’d focus on getting my pace back up. I set a goal of getting down under an average pace of 8’10” again, and although the first few runs of the month were a struggle, my last three were all sub 8′, and my current average is exactly 8’10”. But that doesn’t mean I’m done! I’ve run 20 miles this month and I’d like to get in at least 20 miles more, maybe even getting down to my stretch goal of 7’59”. We’ll see. For now I’m just glad to feel a little faster and lighter (not to mention cooler!) out on the road.

Potato, Poblano, and Chard Enchiladas with Salsa Verde {Katie at the Kitchen Door}

Potato, Poblano, and Chard Enchiladas with Salsa Verde {Katie at the Kitchen Door}

On a different note, let’s talk about these enchiladas. On our way home from Maine after Labor Day we stopped in at a little restaurant in Belfast called Chase’s Daily. It’s an airy space, and in the back they sell the most gorgeous local vegetables and flowers. Belfast is a small town, but the line to buy fresh produce snaked all the way down the counter. We sat down for a late breakfast, and although Trevor looked somewhat crestfallen when I told him it was a vegetarian restaurant, we both very much enjoyed our meals. I ordered the potato and roasted poblano enchiladas, which were smothered in the tangiest salsa verde, and liked them so much I knew I wanted to recreate them at home ASAP. Since they use lots of vegetables and we’re moving into that time of year where we all need to figure out how to make warm, comforting food be good for you, I thought they would do nicely for this month’s healthy recipe.

As I researched salsa verde recipes I saw two basic variations, one using raw tomatillos and the other using roasted tomatillos. Beyond that, and perhaps the ratio of chiles to tomatillos to cilantro, most of the recipes were nearly identical. As I thought about how to make this recipe my own, I decided that with equal numbers of recipes for raw salsa verde and roasted salsa verde, they must both be good – why not build in an extra layer of flavor and make a raw and roasted version? That was a good starting point, and yielded a salsa verde that was both tangy and a little sweet. For the enchilada filling, I grabbed a few potatoes out of the large bag we harvested last week and boiled them, then cooked them briefly with garlic, swiss chard, and diced roasted poblano. The potato-poblano filling gets rolled up in tortillas, smothered with salsa verde, and sprinkled with grated pepper jack, before a brief stint in the oven that yields crispy tortilla edges, golden-brown cheese, and steaming hot filling. I ate way too much of this in one sitting, but managed to save a little bit of leftovers (that I’m very much looking forward to for lunch tomorrow). It’s perfect on a chilly night – warm and filling but full of veggies!

I hope all of your Septembers are off to an equally healthy and productive start. It’s a good time of year to take stock, get organized and energized and charge into a new season.

Potato, Poblano, and Chard Enchiladas with Salsa Verde {Katie at the Kitchen Door}

Past Fitness Challenges

January: 10 Visits to the YMCA; Recipe: Gluten-Free Olive-and-Feta Corn Muffins
February: One vegan meal every day; Recipe: Pakistani Chickpea Pulao with Sweet-Hot Date-Onion Chutney
March: Run 40  miles in 20 days; Recipe: Chocolate-Dipped Almond Butter Cookie Bites
April: Walk 8,000 steps a day; Recipe: Herb-Flecked Spring Couscous
May: 180 minutes of Nike Training Club; Recipe: Warm Arugula Salad with Maple Mustard Dressing
June: Fresh fruit/veggies at every meal; Recipe: Chickpea Crepes with Grilled Curried Chicken and Mango Salsa
July: 8 different types of exercise; Recipe: Homemade Spinach Wraps with Chopped Greek Salad Filling
August: Relax; Recipe: Green Tea and Zucchini Noodles with Honey Ginger Sauce

Like what you just read? Subscribe to Katie at the Kitchen Door on Feedly or Bloglovin‘, or follow along on Facebook, Twitter, Pinterest, Instagram, or Google+. Thanks for reading!

Potato, Poblano, and Chard Enchiladas with Salsa Verde {Katie at the Kitchen Door}

Potato, Poblano, and Chard Enchiladas with Salsa Verde

Inspired by breakfast at Chase’s Daily in Belfast, ME. Serves 4-5.

  • 2 poblano peppers
  • 1 1/2 lb. Yukon gold potatoes, cut into 1/2 inch cubes
  • sea salt
  • 2 TBS olive oil
  • 1/4 c. diced onion
  • 6 cloves garlic, peeled and thinly sliced
  • 1/4 tsp smoked paprika
  • 1/2 bunch of swiss chard (about 15-20 medium-sized leaves)
  • Eight 8-inch tortillas
  • 1 1/2 c. raw and roasted salsa verde, recipe below
  • 1 c. shredded pepper jack cheese
  • 1 c. shredded mozzarella cheese
  1. Preheat the broiler and line a baking sheet with foil. Place the poblano peppers on the baking sheet and broil for 10-15 minutes, turning with tongs every 5 minutes, until blistered and blackened all over. If you are making the salsa verde at the same time, do this while broiling the tomatillos. When the peppers are done, remove them from the oven and place in a bowl, then cover with plastic wrap and let steam for 20 minutes. After they have steamed, you will be able to easily peel and discard their skins. Do this, then cut into slices, discarding the stem and seeds. Chop roughly and taste for heat to get an idea of how much you should use in your filling.
  2. Add the diced potatoes to a large pot and fill with cold water. Add salt to water and bring to a boil. Boil the potatoes until just tender when poked with a fork, about 5 minutes once the water has reached a boil. Drain and set aside.
  3. Heat the olive oil in a large skillet over medium heat. Add the onion, sliced garlic, and smoked paprika and saute, stirring frequently, for 5 minutes. Roughly chop the stems of the swiss chard and add to the saute pan, then chop the leaves add add to the pan as well. Saute until wilted, about 3 minutes, then add the potatoes and chopped poblanos (start with one, add the second after tasting the mixture for heat). Saute for 2-3 minutes, then remove from the heat.
  4. Preheat the oven to 375°F. Spread half a cup of salsa verde on the bottom of an 11×13 inch roasting pan. Mix the two cheeses together in a bowl. Fill each of the tortillas with a few spoonfuls of the potato filling, and 2-3 TBS of cheese, then roll up and place seam-side down in the pan. Repeat with all tortillas, filling pan completely, then spoon another half cup of salsa verde over the top of the enchiladas. Sprinkle the remaining cheese over the top, then bake until cheese is bubbly and golden and edges of tortillas are crispy, about 25-30 minutes. Remove from oven and serve with leftover salsa verde.

Raw and Roasted Salsa Verde {Katie at the Kitchen Door}


Raw and Roasted Salsa Verde

Makes about 1 1/2 cups.

  • 1 lb. tomatillos
  • 1-2 serrano chiles
  • 1/2 c. chopped onion
  • 1 garlic clove, roughly chopped
  • 1/4 c. fresh cilantro leaves
  • 1/4 c. water
  • 1 TBS fresh lime juice
  • 1/2 tsp sea salt
  1. Preheat the broiler and line a baking sheet with foil. Remove the husks and stem from the tomatillos and wash the sticky residue off the fruit. Cut the tomatillos in half. Place half of the tomatillos cut side down on the baking sheet. Set the other half aside. If using two chiles, place one of the serranos on the baking sheet as well. Broil the tomatillos and chile for 8-10 minutes, flipping over with tongs once about halfway through. Remove from the oven.
  2. Add the roasted tomatillos and their juices to a blender, then add the raw tomatillos, onion, garlic, cilantro, water, lime juice, and salt. If you like your food spicy, remove the stem from the roasted serrano and add to the blender, then remove the stem from the raw serrano, roughly chop and add to the blender with the seeds. If you prefer a milder salsa, remove the seeds from the raw serrano, chop, and add to the blender. After blending, taste and decide whether to add the roasted serrano. Blend the tomatillos on high until a smooth puree forms. Taste, and add additional chile, lime, or salt if desired. Set aside.

5 September 11, 2014 Asian and Indian

Cooking from the Garden // Bangladeshi Yellow Pumpkin Curry

Bangladeshi Yellow Pumpkin Curry {Katie at the Kitchen Door}

Bangladeshi Yellow Pumpkin Curry {Katie at the Kitchen Door}

Lately we’ve been making meals where almost every ingredient has come out of our garden, and it’s incredibly satisfying. With the cooler weather, we’ve been able to turn on our oven and stovetop again, saving us from daunting tasks like eating 20 gorgeous heirloom tomatoes raw before they start to mold (a 3 day window) and finding ways to use up pumpkin without the help of a long, slow, caramelizing roast. The first meal where nearly everything was homegrown was a Mediterranean Shepherd’s Pie – we had grown the garlic, the onion, the tomatoes, the eggplant, the zucchini, and the potatoes. Really the only ingredients that we hadn’t grown or made were the cheese and the ground beef. And now, we have this gorgeous yellow curry, packed full of vegetables taken straight from the ground – we even grew the cayenne chilies that give it its kick!

Bangladeshi Yellow Pumpkin Curry {Katie at the Kitchen Door}

This yellow curry is relatively quick, easy, and deeply nourishing. It’s made from only vegetables, spices, and water, and I was skeptical about how much flavor I’d be able to coax out of such a limited number of ingredients. No rich and creamy coconut milk? No savory chunks of lamb? But the carrot and pumpkin deliver sweetness, the tomatoes acidity, and the potatoes break down into a thick, rich sauce that soaks up all the flavor of the toasted spices. It’s a lovely curry. Of course, I can’t take much credit for it, beyond, perhaps, the addition of the tomatoes, as it’s adapted from Mangoes and Curry Leaves, my Indian cooking bible. I love Indian food and have been attempting it at home since I first started cooking,  but it wasn’t until I took a step back and took time to learn the fundamentals that I started to turn out satisfying Indian dishes. Now my repertoire is slowly building – I love these potato and pea parathas and this chickea pulao, and now I can add this adaptable vegetarian curry to the list as well.

Bangladeshi Yellow Pumpkin Curry {Katie at the Kitchen Door}

Bangladeshi Yellow Pumpkin Curry

Adapted from Mangoes and Curry Leaves. Serves 4.

  • 3 TBS vegetable oil
  • 1/2 tsp turmeric
  • 1/4 tsp cayenne
  • 1 tsp ground coriander
  • 1/4 tsp mustard seeds
  • 1/4 tsp cumin seeds
  • 1/4 tsp fennel seeds
  • 1/4 tsp fenugreek
  • 2 bay leaves
  • 2 medium carrots, peeled and cut into 1/4 inch dice
  • 2 c. cubed (1/4 inch dice) Yukon gold potatoes
  • 2 c. cubed (1/2 inch dice) pumpkin
  • 1 large yellow tomato, cored and cut into 1/2 inch chunks
  • large handful of green beans, trimmed and cut into 1/2 inch lengths
  • 1 fresh cayenne chile, sliced into thin rings
  • 1 1/2 c. water
  • 1 tsp salt
  • 2 tsp sugar
  • juice from 1/2 fresh lime
  1. Heat the vegetable oil in a wok or large frying pan over medium-high heat. Add all of the spices and bay leaves at once, and stir-fry in the hot oil until the mustard seeds start to pop and sizzle. Add the vegetables in order listed, stir-frying for 1-2 minutes between each addition. If the vegetables begin to stick to the pan as you are cooking, add a few tablespoons of water to the bottom to deglaze any sticky parts of the pan. Add the fresh cayenne chile and cook for 1-2 minutes longer.
  2. Once you have added all the vegetables, pour the water into the pan and bring to a rapid simmer. Simmer until all vegetables are tender, potatoes and tomato have broken down, and the sauce is thick and spoonable. This should take about 15 minutes-20 minutes. Add the salt, sugar, and lime juice and taste for seasoning, adjusting as necessary. Remove from the heat and serve over rice.

1 September 5, 2014 Dessert

La Crema Wine Dinner // Corn Chowder with Paprika-Grilled Shrimp, Grilled Leg of Lamb with Ratatouille, Pear and Rosemary Crumb Bars

La Crema Wine Dinner {Katie at the Kitchen Door}

Corn Chowder with Paprika-Grilled Shrimp {Katie at the Kitchen Door}

We hosted our second wine dinner last weekend, this time with three lovely, very drinkable wines provided by La Crema Winery in California. It’s hard to believe that our first wine dinner was way back in February – I had originally planned to do them more frequently, but it’s actually very tricky to get wine shipped to Massachusetts. Starting in January, the legislation will loosen up – maybe then we can do more of these dinners – but until then, having the wine shipped to my family’s place in Maine is the best option. The hidden benefit of this is having a built-in guest list composed of people who love to drink wine: my family. So Trevor and I headed North for Labor Day weekend for one last summer visit during which we could cook some good food and drink some good wine.

Grilled Leg of Lamb with Ratatouille {Katie at the Kitchen Door}

La Crema Wine Dinner {Katie at the Kitchen Door}

The team at La Crema was kind enough to send us three bottles of wine for this dinner – a Chardonnay, a Pinot Noir, and a Pinot Gris. All three bottles retail in the $20-25 range, and are solid, straightforward table wines. None of them left a particularly lasting impression but all were easy to drink and true to their type, and no one turned down a second glass of any of the three varietals. Since all three wines were relatively light-bodied and good for patio-drinking, we designed a menu with an “end-of-summer in California” vibe to complement the wines and the season, and call to mind the wines’ terroir. Most of the menu was done on the grill, and it featured plenty of end-of-summer produce, but the dishes were a little heartier than mid-summer fare and everything was served warm. We started with a corn chowder topped with paprika-grilled shrimp, the main was a grilled leg of lamb with ratatouille, and the dessert was rosemary pear bars served with whipped cream. I was very happy with how all three dishes turned out – the product of days of brainstorming – and even happier with how quick the whole thing was to throw together. I don’t think I’ve ever served a meal that was such a snap to cook with such stellar results. Of course, I have to give a big heap of the credit to Trevor (and to my other sous-chef, Aunt Robin!) as both the shrimp and the lamp were perfectly grilled, a skill I certainly don’t have in my repertoire.

La Crema Wine Dinner {Katie at the Kitchen Door}

Grilled Leg of Lamb with Ratatouille {Katie at the Kitchen Door}

I knew ahead of time that the forecast was not good for Sunday, our planned dinner day, but the clouds cleared out early in the day and we ended up with plenty of sun all afternoon. Sadly, as dinnertime approached, the clouds rolled back in and I found myself racing to get the picnic table set before the rain began. Just as I ladled the chowder into bowls the first drops began to fall, so I snapped as many pictures as I could and we shuffled everything back inside. Although I’ll admit I was disappointed not to have the beautiful outdoor evening I had been imagining, the food and wine were perfect and the night still ended with tequila shots, a giant bag of peanut M&Ms, and my mom and Aunt Robin dancing in the rain – any night that ends that way is a success in my books.

Rosemary Pear Crumble Bars {Katie at the Kitchen Door}

La Crema Wine Dinner {Katie at the Kitchen Door}

My nutty family

La Crema Wine Dinner {Katie at the Kitchen Door}

The Details

First Course: La Crema 2012 Sonoma Coast Chardonnay with Corn Chowder with Paprika-Grilled Shrimp. La Crema produces seven different Chardonnays, and their Sonoma Coast line is one of the most affordable. The wine is quite tart, opening with a lot of acidity up front, but quickly mellowing into a buttery finish. You can certainly taste oakiness, but it’s subtle and not a dominant characteristic. I personally found it to be a bit more citrusy than I like in a Chardonnay, but my mother, who is not usually a Chardonnay person, really loved this one. We served this with a creamy, pureed corn and potato chowder, using super sweet end of summer corn. The chowder was topped with a few grilled shrimp which had been marinated in a mix of garlic, lemon, olive oil, and smoked paprika. Although I dislike most seafood, I loved these shrimp – they were perfect on top of the rich chowder, and the wine cut through the richness nicely.

Grilled Leg of Lamb with Ratatouille {Katie at the Kitchen Door}

Second Course: La Crema 2012 Sonoma Coast Pinot Noir with Grilled Leg of Lamb with Ratatouille. The Pinot Noir was my favorite wine of the night, another release from the more affordable Sonoma Coast line. It was fairly dark in color compared to some Pinots, but light-bodied. Smooth and fruity, it was very drinkable, without feeling overly sweet or boring. For this pairing, we went a little on the heavy-side, grilling a sizeable piece of butterflied leg of lamb as the main course. We balanced the gaminess of the lamb with a meyer lemon and rosemary marinade, and kept the plate bright and acidic by serving the lamb with a tomato and kalamata olive ratatouille. This was basic, Mediterranean-inspired food – simple but well-executed fare for a simple but well-executed wine.

Rosemary Pear Crumble Bars {Katie at the Kitchen Door}

Third Course: La Crema 2013 Monterey Pinot Gris with Pear and Rosemary Crumble Bars. To be honest, by the time we poured the Pinot Gris my note-taking was getting a little sloppy, but I’m going to count that as a good sign overall. I did note that the Pinot Gris had a fairly strong minerality, and was heavy on the citrus flavor. La Crema’s tasting notes also indicate that it has a subtle note of Asian pear, which is the pairing I chose to pursue for the dessert course. Of course, serving a wine that is not a dessert wine with a sweet dessert is tricky, but the whole table felt that the Pinot Gris and the rosemary and pear crumble bars went very well together. The bars were composed of three parts: a rosemary shortbread crust, ripe pears poached in a mixture of Pinot Gris and honey, and a simple butter-and-sugar crumble topping. After an hour in the oven, the pears turn into an intense, caramelly jam while the crumble and the crust stay a buttery golden brown. I had initially planned to serve these with a rosemary-vanilla whipped cream, but a few missteps left me with some very delicious rosemary-vanilla butter that could not be brought back from the brink. Whipped cream from the can was a fine substitute.

The Menu

Corn Chowder with Paprika-Grilled Shrimp served with La Crema 2012 SC Chardonnay– see recipe below
Grilled Leg of Lamb with Ratatouille
 served with La Crema 2012 SC Pinot Noir – see recipe below
Pear and Rosemary Crumble Bars
 served with La Crema 2013 Monterey Pinot Gris – see recipe below

Like what you just read? Subscribe to Katie at the Kitchen Door on Feedly or Bloglovin‘, or follow along on Facebook, Twitter, Pinterest, Instagram, or Google+. Thanks for reading!

Disclaimer: La Crema provided me with the wine for this post free of charge, but I was not otherwise compensated and all thoughts and opinions are my own.

Corn Chowder with Paprika-Grilled Shrimp {Katie at the Kitchen Door}

Corn Chowder with Paprika-Grilled Shrimp

Chowder recipe adapted loosely from Serious Eats. Serves 6.

Note: You will need wooden grilling skewers to prepare the shrimp.

  • 1 lb. 16-20 ct. shrimp, peeled and deveined
  • 1 1/2 tsp smoked paprika
  • 3 cloves garlic, finely minced
  • 3 TBS freshly squeezed lemon juice
  • 1/4 c. olive oil
  • 5 ears corn
  • 4 c. chicken or vegetable stock
  • 3 TBS butter
  • 1 medium onion, diced
  • 1 tsp whole cumin seeds
  • 1 1/2 c. diced Yukon gold potato (about 2-3 medium potatoes)
  • 1 c. heavy cream
  1. In a large bowl, whisk together the paprika, garlic, lemon juice, and olive oil. Add the preapred shrimp and toss to coat. Cover, refrigerate, and let marinate for 2 hours. Place your grilling skewers in a large container of water and let soak for 30 minutes.
  2. To make the chowder, cut the corn kernels from the ears using a serrated knife. Set corn kernels aside. Add the stock to a large pot, then break the corn cobs in half and add to the stock. Bring to a simmer over medium heat and simmer for 15 minutes to infuse the stock with the corn cob flavor. Remove from heat, remove and discard cobs, and set stock aside.
  3. In a large pot, melt the butter over medium heat. Add the diced onion and cumin seeds and saute until onions are translucent and cumin is fragrant, about 5 minutes. Add corn kernels and saute in the butter for 2 minutes, then add reserved stock. Add the diced potatoes and bring to a simmer, simmering until potatoes are tender, about 10 minutes. Remove from the heat and stir in the heavy cream.
  4. Blend the soup in batches in a blender, until each batch is smooth. Blend 3/4 of the soup in total, leaving 1/4 of the soup chunky. Season to taste with salt and pepper.
  5. Preheat the grill to medium-high, skewer shrimp on pre-soaked skewers. Grill shrimp until just cooked through, about 2 minutes per side. Serve the chowder with 2-3 grilled shrimp on top.

Grilled Leg of Lamb with Ratatouille

Serves 6.

For the lamb:

  • 4 lbs. of butterflied leg of lamb, cut into 6-8 pieces
  • 1/2 c. olive oil
  • juice from 2 Meyer lemons
  • 3 cloves garlic, peeled and minced
  • 3 sprigs of rosemary, needles removed and roughly chopped
  • 1 tsp salt

For the ratatouille:

  • 2 TBS olive oil
  • 1 medium onion, roughly chopped
  • 3 cloves garlic, peeled and minced
  • leaves from 4 sprigs of thyme
  • 1 large red bell pepper, seeded and roughly chopped into bite-sized pieces
  • 4 medium Heirloom tomatoes, cored and roughly chopped into bite-sized pieces
  • 1 medium zucchini, roughly chopped into bite-sized pieces
  • 3/4 c. pitted kalamata olives, roughly chopped
  • salt and pepper to taste
  1. Place the olive oil, Meyer lemon juice, garlic, rosemary, and salt in a large bowl and whisk to combine. Add the leg of lamb and massage the marinade into the lamb. Cover the bowl, refrigerate, and let marinate 3-4 hours.
  2. About 30 minutes before you intend to serve the lamb, heat 2 TBS of olive oil over medium heat in a large skillet. Add the onion, garlic, and thyme, and saute until onion is translucent, about 5 minutes. Add the bell pepper and cook until soft, 3-5 minutes. Add the tomato and zucchini and bring to a simmer. Simmer the sauce, stirring occasionally and using the back of a wooden spoon to crush the tomatoes, until tomatoes have released all their juices and zucchini is soft, about 10 minutes. Continue simmering over medium-low heat for another 10-15 minutes, until sauce has thickened slightly, then stir in olives and season to taste with salt and pepper.
  3. Preheat the grill to medium-high. Grill the lamb until medium rare, about 7-8 minutes per side. Set aside on a plate and let rest for 5-10 minutes. Serve lamb with the ratatouille sauce underneath.

Rosemary Pear Crumble Bars {Katie at the Kitchen Door}

Pear and Rosemary Crumble Bars

Serves 8-10.

  • 1 stick salted butter, at room temperature
  • 6 TBS salted butter, chilled
  • 1/3 c. light brown sugar
  • 1 1/2 c. flour, divided
  • 1 tsp chopped fresh rosemary
  • 1/3 c. white sugar
  • 4 ripe pears
  • 1 1/2 c. water
  • 1/2 c. Pinot Gris or other white wine
  • 6 TBS honey
  1. Preheat the oven to 350°F. In a large bowl, beat 1 stick of room temperature butter until smooth. Add 1/3 c. light brown sugar, 1 c. flour, and 1 tsp chopped rosemary to the butter and stir to create a thick crumbly paste. Lightly grease an 11×7 inch or 8×8 inch baking pan, and press the rosemary shortbread crust evenly into the bottom of the pan. Bake the crust until golden brown, about 18-20 minutes, then remove from the oven and set aside.
  2. To prepare the crumble topping, whisk the remaining 1/2 c. flour and the 1/3 c. white sugar together in a medium bowl. Cut in the 6 TBS of chilled butter, and use a pastry cutter or a fork to mash the butter into the flour until the butter is pea sized and thoroughly coated in flour. Refrigerate this mixture until ready to use.
  3. To prepare the poached pears, peel and core the pears, then thinly slice. In a large, wide-bottomed sauce pan or dutch oven, mix together the water, white wine, and honey. Bring to a simmer over medium heat, then gently add the pears to the simmering mixture. Simmer the pears until soft and fragrant but not falling apart about 5-8 minutes, then use a slotted spoon to remove. Layer the pears evenly over the rosemary crust and set aside. Continue to simmer the juices in the pan until they have reduced to a thick, caramel-colored syrup – this will take about 20 minutes. Once you have a syrup, pour it evenly over the pears.
  4. Take the crumble topping from the fridge and sprinkle it evenly over the pears. Bake the crumble bars for 45-55 minutes, until crumble topping is golden brown and pear filling is thick and bubbling. Remove from the oven and let cool to room temperature before slicing. Serve with whipped cream.

2 August 31, 2014 Dessert

Sunday Dinner // Ricotta and Cherry Tomato Crostini, Eggplant and Pesto Napoleons, and Blackberry Pie

Eggplant Napoleon - Pesto Marinated Eggplant, Baba Ghanoush, Tomato-Pesto Salad {Katie at the Kitchen Door}

Finding the time for these Sunday Dinner posts is harder than I would like it to be. Perhaps part of the problem is that I tend to choose rather elaborate menus that take all afternoon to prepare and shoot, but that’s also part of the fun. When we finally did another Sunday Dinner a few weeks back, its origins were mixed – it grew partly out of the feeling that it had been far too long, partly out of the need to use up the huge stacks of garden produce in our fridge, and partly out of a desire to celebrate that same summer produce at its very peak.

Maple-Roasted Cherry Tomato, Roasted Garlic and Ricotta Crostini {Katie at the Kitchen Door}

This Sunday Dinner is the first we’ve done that is entirely vegetarian, but with gorgeous stacks of Eggplant Napoleon as a centerpiece to the meal, meat was not missed in the slightest. I’ve been eyeing this particular eggplant recipe since early spring, when I reviewed Olives, Lemons, and Za’atar. Back in March, the bright stacks of fried eggplant layered with baba ghanoush and pesto seemed impossibly summery, products of a season that felt like it might never come. But come it has, and now the sun-soaked afternoons and baskets of tomatoes are too quickly fading into cool breezy evenings and the first ripe pumpkins. We do still have plenty of nice weeks ahead of us – it won’t do to get nostalgic prematurely – and we’re still cooking up a storm with the weekly haul from the garden. Our homegrown eggplant was the star of the show in this meal, and we rounded things out with piles of maple-roasted cherry tomatoes on ricotta-slathered crostini and a gorgeous pie made with the last of our blackberries.

Maple Mixed Berry Pie {Katie at the Kitchen Door}

Eggplant Napoleon - Pesto Marinated Eggplant, Baba Ghanoush, Tomato-Pesto Salad {Katie at the Kitchen Door}

Eggplant can be a little labor intensive to prepare well, and this recipe was no exception. A lengthy process of salting, drying, marinating, breading, and frying may feel a little like overkill, but results in an incredibly flavorful and tender eggplant. There are a number of other components to the recipe as well – the pesto marinade, the baba ghanoush, and a tomato and pesto salad that gets served on top of the final dish. The recipe calls for about seven lemons – we felt that using three was sufficient – and the acidity of the final dish is powerful, but works nicely with the savory crunch of the eggplant slices and the smokiness of the baba ghanoush. I’ve written the recipe here with a few shortcuts to save time and effort, but the end result should be equally flavorful and elegant as the original.

Maple-Roasted Cherry Tomato, Roasted Garlic and Ricotta Crostini {Katie at the Kitchen Door}

On the other end of the labor intensive spectrum are the super easy crostini we had as an appetizer. We make a big batch of maple-roasted cherry tomaotes pretty much every week during August and September, roasting them the day they’re picked then using them on top of pastas and meats and eggs throughout the week. Once the oven is on, I sometimes throw another vegetable or two in to avoid heating up the house more than once – the week I made these crostini, that other vegetable was a few heads of our freshly harvested garlic, roasted into a sweet paste. The roasted garlic got mixed into some good thick ricotta, slathered on hot baguette, and topped with the candy-sweet tomatoes. It was so good and so easy.

The final element of our dinner was a big slice of mixed berry and maple syrup pie, which I wrote about in detail a week or so ago. It was a pie that I had been dreaming about since the first blackberries ripened, and it exceeded all my expectations for it. A big slice of the juicy pie, supported with a flaky buttery crust and topped off with a melting scoop of vanilla bean ice cream was the perfect close to our late summer dinner feast.

Sunday Dinner: Cherry Tomato and Ricotta Crostini and Eggplant Napoleons {Katie at the Kitchen Door}

Maple Mixed Berry Pie {Katie at the Kitchen Door}

The Menu

Roasted Garlic, Ricotta, and Maple-Roasted Cherry Tomato Crostini – see recipe below
Eggplant and Pesto Napoleons – see recipe below (adapted from Olives, Lemons & Za’atar)
Maple Mixed-Berry Pie

Past Sunday Dinners:

May 26, 2013: Coffee-and-Chile Rubbed Strip Steaks with Chimichurri Sauce; Charred and Smoky Belgian Endives; Oven-Roasted Potatoes; Strawberry-Sour Cream Ice Cream

July 1, 2013: Strawberry-Lime Agua Fresca; Smashed Pea, Dill, and Feta Crostini; Chilled Asparagus Soup with Meyer Lemon Yogurt; Mustard Spaetzle with Mushrooms; Ricotta Bavarese with Red-Wine Poached Rhubarb

October 28, 2013: Braised Lamb Shanks with Gremolata; Creamy Polenta with Fresh Corn and Blue Cheese; Roasted Brussels Sprouts; Classic Apple Pie

March 31, 2014: Fried Halloumi with Spring Veggies and Strawberry-Basil Gastrique; French Gnocchi with Watercress Sauce; Strawberry-Rhubarb Meringue Pots

Like what you just read? Subscribe to Katie at the Kitchen Door on Feedly or Bloglovin‘, or follow along on Facebook, Twitter, Pinterest, Instagram, or Google+. Thanks for reading!

Maple-Roasted Cherry Tomato, Roasted Garlic and Ricotta Crostini {Katie at the Kitchen Door}

Roasted Garlic, Ricotta, and Maple-Roasted Cherry Tomato Crostini

Serves 6-8 as an appetizer.

  • 1 recipe of maple-roasted cherry tomatoes
  • 3 heads of garlic
  • 1 c. of ricotta
  • 1 baguette
  • olive oil
  • sea salt and pepper
  1. Prepare the maple-roasted cherry tomatoes. While they are roasting, roast the garlic as well: slice the tops off the garlic heads so the cloves are partially exposed. Place the heads in a piece of tinfoil and drizzle with olive oil, then sprinkle with sea salt. Close the foil into a pouch, and roast until soft, about 45-55 minutes at 350°F.
  2. Remove the garlic from the oven, and let cool until comfortable to handle. Squeeze the roasted garlic out of the papery shells into a bowl, and mash with a fork. Mix the roasted garlic with the ricotta, and season to taste with salt and pepper.
  3. Preheat the broiler. Slice the baguette into thin rounds, then place on a baking sheet. Brush the tops and bottoms lightly with olive oil. Broil the toasts until golden brown, about 5 minutes total, flipping once halfway through. Remove from the oven and let cool to room temperature. To serve, spread the ricotta mixture onto the toasts and top with a spoonful of roasted cherry tomatoes.

Eggplant Napoleon - Pesto Marinated Eggplant, Baba Ghanoush, Tomato-Pesto Salad {Katie at the Kitchen Door}

Eggplant Napoleon

Recipe adapted from Olives, Lemons, and Za’atar. Serves 4-6.

Note: This version of the recipe is slightly simplified. The full original recipe is available on Epicurious.

For the baba ghanoush:

  • 2 medium eggplants (2 lbs total)
  • 1/2 c. tahini paste
  • 1 clove garlic, minced
  • juice from 1/2 lemon
  • 2 TBS pomegranate molasses
  • 3 TBS olive oil

For the fried eggplant:

  • 2 medium eggplant, cut into rounds
  • sea salt to taste
  • 1/4 c. basil pesto
  • 1/2 c. olive oil
  • 6 cloves garlic, minced
  • juice from 2 lemons
  • 1/2 c. flour
  • 2 egg whites, lightly beaten
  • 2 c. panko
  • 2 TBS grated parmesan cheese
  • 2 TBS dried parsley
  • 1/2 tsp ground black pepper
  • vegetable oil for frying

For the tomato salad:

  • 4 plum tomatoes, cored and roughly chopped
  • 1/4 c. of finely chopped red onion
  • 1/2 c. basil pesto
  • juice from 1 lemon
  • 3 TBS olive oil
  • sea salt to taste
  1. Prepare the baba ghanoush: Preheat the oven to 450°F and line a baking sheet with aluminum foil. Pierce the eggplants all over with a fork and place on the baking sheet. Roast until skin is blackened all over, turning the eggplants with tongs every 5 minutes. Remove from the oven, slice in half lengthwise, and scoop the soft eggplant flesh out into a large strainer. Let drain for 20 minutes, then transfer to a bowl. Mash the eggplant with a fork, then stir in the tahini, garlic, lemon, pomegranate molasses, and olive oil. Adjust seasoning to your taste.
  2. Prepare the fried eggplant: Place the eggplant rounds on two large baking sheets and salt liberally. Set aside for 30 minutes, then pat the slices dry with a paper towel. In a large bowl, whisk together the pesto, olive oil, garlic, and lemon juice. Add the eggplant slices to the bowl, toss to coat, and let marinate for 1-2 hours at room temperature.
  3. To bread the eggplant, prepare your workspace: place the flour on a large plate, whisk the egg whites together with 1 cup of water in a shallow bowl, and mix the panko, grated parmesan, dried parsley, and black pepper together on a large plate. Set a piece of waxed paper to the side of your workspace. Working with one slice of eggplant at a time, dredge the marinated eggplant slices in the flour, gently shake off the excess, dip it in the egg mixture, then dredge in the panko on both sides. Set on the waxed paper and repeat with all of the eggplant slices.
  4. Heat a large frying pan filled with 1/4 inch of vegetable oil over medium heat. Fry the eggplant slices in batches, frying 2-3 minutes per side or until golden brown all over. Remove to a paper towel lined platter and repeat until all eggplant is fried.
  5. To prepare the tomato salad: mix together the chopped plum tomatoes, chopped red onion, pesto, lemon, and olive oil in a large bowl. Season to taste with salt.
  6. To serve, place one slice of the fried eggplant on a plate, then spread with a few tablespoons of baba ghanoush. Repeat twice more, building a layered stack of eggplant, then top with a few large spoonfuls of the tomato salad. Serve immediately.

0 August 23, 2014 Breakfast

Book Club: Revolutionary French Cooking // Cinnamon and Honey-Baked Figs with Sweet Ginger Slices

Revolutionary French Cooking

The Book: It’s been a while since I’ve done a new cookbook review, but with the height of cookbook season coming up in September and October, it’s time to dive back in. One book that I’ve been sitting on for most of the summer is Daniel Galmiche’s Revolutionary French Cooking. I’m a big fan of both the concept and execution of this cookbook, which has more novel and inspiring but not out-of-reach recipes than I’ve seen in a new cookbook for a while. The book is structured around three concepts that define modern cooking in chef Daniel Galmiche’s view: liberté, classics released from the constraints of tradition; égalité, humble ingredients elevated into starring roles; and fraternité, classic combinations of ingredients made new through innovative techniques and preparations.

Cinnamon and Honey-Baked Figs with Sweet Ginger Slices {Katie at the Kitchen Door}

Whether or not you buy into the national motto of France as a corollary for modern cooking styles, the recipes in each section are exactly what I’m looking to make these days: creative, ingredient-focused, but approachable dishes. They do maintain a very French feeling, but in a fresh sense – in a way, they aptly capture the “New American” vibe that many restaurants are going for these days, a recipe style that is very much anchored in French bistro cooking, but brings in spices and flavors from Latin and Asian cuisines. Some dishes in the book are remarkably simple, like the three-ingredient stuffed tomatoes, while others are more complex, but most fall solidly into a middle category of difficulty, the kind of dishes I would make for dinner on a night when I’m not in a hurry and feel like sitting down to something hearty and different. And I have to mention – the photographs are gorgeous, the kind of images that make me hungry, with lots of rich tones and a palpable juiciness in each picture.

Cinnamon and Honey-Baked Figs with Sweet Ginger Slices {Katie at the Kitchen Door}

The Food: The recipes in this Revolutionary French Cooking scream fall to me – wild mushrooms and cider-braised roasts and creamy gratins abound. If I hadn’t already delayed writing this review for as long as I have, I’d be tempted to wait another month just to feature one of the incredibly enticing autumnal recipes with you. There are a handful of savory summer recipes that struck me, like the Tomato Confit Tartlets and the Smoked Chicken and Zucchini, but where the summer recipes really shine is on the sweet side. Almost every dessert in the book features fresh fruit – peaches, plums, strawberries, raspberries, oranges, pineapple, mango – they all get a chance to play a starring role. So in a nod to the cooler weather we’ve been having but without diving full force into fall ingredients, I decided that Honey-Baked Figs with Sweet Ginger Slices was the recipe to try from this book. It’s a fairly straightforward recipe: drizzle a bit of honey and cinnamon on quartered fresh figs and roast for 10 minutes, then make a quick sabayon from egg yolks and the roasted fig juices, pour over the figs, and broil. For how elegant it seems, there’s relatively little time involved in preparing it. To be completely honest, I wasn’t head over heels for this recipe, but I think that’s a combination of the fact that we don’t get particularly sweet figs around here, and that I just don’t like figs as much as I want to. I’ve really tried to love figs, but in my book, they’re just OK. So I’m not letting it reflect poorly on the book, but I probably wouldn’t repeat this recipe.

Fresh Figs {Katie at the Kitchen Door}

Note: the recipe calls for serving the figs with a small piece of ginger or spice cake, which is sliced thinly and then baked at a low temperature until it is dried out. Since ginger cake is not something you can buy pre-made this time of year, and I didn’t feel like baking a cake just to dry it out, I decided to make a quick batch of ginger lace cookies instead. In my mind it’s the same idea – something thin and crispy with the flavors of gingerbread. I’ve included the recipe as written below, but know that I did make this change and that it’s an option if you also don’t have ready access to spice cakes.

Recipe Shortlist: Chicken Pot-Roasted in Cider and Paprika; Venison Bourguignon with Dark Chocolate and Star Anise; Pineapple Beignets with Mango Carpaccio; Lentil Bacon Soup with Mushrooms and Thyme Cream; Snail, Fennel, and Almond Casserole in Red Wine Sauce; Pan-Roasted Duck Breast with Spiced Peaches; Smoked Chicken, Zucchini, Garlic, and Rosemary Casserole; Early Grey Rice Pudding with Blackberry Marmalade

Like what you just read? Subscribe to Katie at the Kitchen Door on Feedly or Bloglovin‘, or follow along on Facebook, Twitter, Pinterest, Instagram, or Google+. Thanks for reading!

Disclaimer: I received a review copy of Revolutionary French Cooking from Duncan Baird Publishers, but I was not otherwise compensated and all thought and opinions are my own.

Cinnamon and Honey-Baked Figs with Sweet Ginger Slices {Katie at the Kitchen Door}

Cinnamon and Honey-Baked Figs with Sweet Ginger Slices

Serves 4. Recipe from Revolutionary French Cooking.

  • 3 1/2 inch piece of ginger cake or other spice cake, frozen until almost hard
  • 12 firm purple-black figs
  • 2 TBS honey
  • 1/2 tsp ground cinnamon
  • 5 TBS plain Greek yogurt
  • 2 egg yolks
  1. Preheat the oven to 275°F. Cut the cake into 8 thin slices, and lay on a baking sheet lined with parchment paper. Cover with a second sheet of parchment paper and a second baking sheet so the slices are held flat, then bake for 6-8 minutes. Carefully lift off the top baking sheet and paper, then return the cake to the oven and bake 3-4 minutes longer so the slices dry out. Remove from the oven and let the slices cool.
  2. Turn the oven up to 350°F. Slice the figs into quarters from the top down, slicing only about halfway down so the figs remain attached at the bottom. Place on a baking sheet, cut side up, and drizzle with the honey and 4 TBS of water. Sprinkle with the cinnamon, then bake for 12-15 minutes until they are soft. Remove the baking sheet from the oven and pour the roasting liquid into a bowl. Pour half of the liquid into the Greek yogurt and stir to combine.
  3. In a large heatproof bowl, beat the two egg yolks to combine, then beat in the other half of the fig liquid. Bring a pot of water to a simmer, then place the bowl with the egg yolks over the simmering water, being sure the bottom of the bowl is not touching the water. Beat the eggs vigorously as you hold the bowl over the simmering water, until the mixture becomes thick and pale yellow, and forms ribbonlike shapes when you lift the whisk out of the eggs. This should take about 5-8 minutes of vigorous whisking. Spoon the sabayon over the figs. Turn the oven up to broil, and broil the figs for 2-3 minutes, just until the sabayon is golden brown. Remove the figs from the oven and serve with the Greek yogurt and ginger slices.

4 August 16, 2014 Dessert

Maple Mixed Berry Pie

Maple Mixed Berry Pie {Katie at the Kitchen Door}

Blackberry Picking {Katie at the Kitchen Door}

Picking blackberries is not for the impatient or easily deterred. Our blackberry patch has grown into a monstrous tangle of canes, 10 foot stalks that shoot up then topple to the ground in early summer, heavy with juicy black fruit. This year in particular, the berries are gorgeous – fat and sweet from just the right combination of rain and sun. The berries on the edges of the patch are easy to get to – as long as you refrain from grabbing the canes you can pick plenty of berries scratch-free. But the berries that beckon from the center of the patch are too numerous to waste, so we go after them despite the maze of thorns between us and them. As we cut paths into the center of the bramble and carefully weave our way in, our focus increases, and I find myself thinking only two things. Get the berries. Don’t touch the thorns. At the peak of the season, it can take the two of us over an hour to fully pick the patch, but there’s something I love about the concentration and straightforwardness of the task, moving slowly and precisely through the canes. And the reward – buckets of delicious berries – is always worth the inevitable scrapes and mosquito bites.

Maple Mixed Berry Pie {Katie at the Kitchen Door}

Blackberry Picking {Katie at the Kitchen Door}

Our patch is generous: so far this year we’ve picked 11 pounds of fruit, and I have a feeling we’ll have a last, small batch to pick tomorrow. Like cherries, my favorite way to consume blackberries is fresh, preferably just-picked, when they’re still firm and warm from the sun. But when you have 11 pounds of berries, there’s plenty of room to experiment with recipes and still be able to eat your fill of fresh fruit. This summer I’ve made blackberry clafoutis, blackberry crumble, and a big batch of blackberry jam, all of which were good, but my favorite by a mile was this pie, an intense mix of blackberries, wild Maine blueberries, cherries, and maple syrup.

Blackberry Picking {Katie at the Kitchen Door}

Blackberry Picking {Katie at the Kitchen Door}

I love pie – in my book, it’s far superior to cake – and I have a particular weakness for berry pies. Juicy and summery, the berries break down to completely fill the space between the crusts, with no gaps like apple pies tend to have. And because I like berry pie so much, I have high standards for it, so I thought long and hard about exactly how to achieve the pie I was envisioning. I started with blackberry-maple, but thought the blackberries needed extra dimension, so cherries and blueberries got added to the mix. The ratio of cornstarch to fruit is just enough to have the pie hold it’s shape, but not so much that it loses its juiciness. And the crust utilizes a little extra butter and my new favorite pastry method, frozen butter grating, for extra flakiness. To top it all off (quite literally), I used a cute little leaf cookie cutter to decorate the top and make it all foresty and picturesque. Basically, I love this pie. I love it so much that I ate five slices in three days, bookending my Monday and Tuesday with pie: a slice with my morning latte, and a slice after dinner with ice cream. It’s probably good that there’s only a short window during which we get enough berries to make pie. Otherwise, I would be doing a lot more running.

Like what you just read? Subscribe to Katie at the Kitchen Door on Feedly or Bloglovin‘, or follow along on Facebook, Twitter, Pinterest, Instagram, or Google+. Thanks for reading!

Maple Mixed Berry Pie {Katie at the Kitchen Door}

Maple Mixed Berry Pie

Serves 8-12.

  • 2 c. flour
  • 1/2 tsp salt
  • 1 TBS sugar
  • 12 TBS salted butter, frozen
  • 6-8 TBS ice water
  • 1 1/2 c. wild Maine blueberries
  • 2 c. blackberries
  • 2 c. pitted sweet cherries, torn in half
  • 3/4 c. maple syrup
  • 4 TBS cornstarch
  • 1 tsp cinnamon
  • 2 TBS lemon juice
  1. Whisk together flour, salt, and sugar in a large bowl. Remove butter from the freezer and grate over the large holes on a box grater, working quickly to keep the butter from melting. Add the cold grated butter to the flour and toss with your fingers to coat the butter with flour. Add ice water to the mixture 1 TBS at a time, using a fork to swirl the ice water through the flour after each addition. Add ice water until the dough just comes together when pressed with your fingers. Form dough into a ball and wrap in plastic wrap. Refrigerate for at least 1 hour.
  2. Mix the blueberries, blackberries, and cherries together in a large bowl. Pour half of the fruit into a large saucepan, and add the maple syrup to the saucepan. Bring to a simmer over medium heat, and simmer for 15-20 minutes, or until berries have broken down and released their juices, and liquid has reduced by about half. Remove from heat. In a small bowl, whisk together the cornstarch and cinnamon. Whisk the lemon juice into the cornstarch. If it is still very thick, add a few tablespoons of the juices from the room temperature berries, whisking until you have a pourable mixture. At this stage, scrape the cornstarch mixture into the bowl with the chilled fruit and stir to combine, then add the cooked fruit and stir until thoroughly mixed. Set the filling aside.
  3. Preheat the oven to 350°F. Divide the pie dough into two pieces, one slightly larger than the other. On a lightly floured surface, roll the larger piece of dough out into a circle about 12 inches in diameter. Carefully lift and place into a pie plate, pressing dough gently down onto bottom. Trim the edges, leaving about 1/4 inch of overhang. Poke the bottom of the crust with a fork to allow air to vent, then bake the crust for 10 minutes in the oven, until just golden. Remove from the oven and add the prepared filling, then return the pie to the oven and bake for 15 minutes. Meanwhile, roll out the remaining piece of dough and use a cookie cutter to cut out a number of small shapes. After the pie has baked for 15 minutes, remove from the oven and cover the surface of the pie with overlapping pieces of the dough shapes (I used small leaves). Return the pie to the oven and bake until the filling is bubbly and the top crust is golden brown, another 25-35 minutes. Remove from the oven and let cool before cutting. Serve with vanilla ice cream.
Green Tea and Zucchini Noodles with Honey-Ginger Sauce {Katie at the Kitchen Door}

6 August 12, 2014 Food

Monthly Fitness Goals: August // Green Tea and Zucchini Noodles with Honey-Ginger Sauce

Green Tea and Zucchini Noodles with Honey-Ginger Sauce {Katie at the Kitchen Door}

August’s fitness goal isn’t a fitness-goal per-se – it’s less about exercise and weight loss than it is about overall health. Despite my concerns about backsliding in July, I managed to keep the scale slowly moving downwards, getting in a solid but not stellar 4 workouts a week. I stuck to my 8 different kinds of exercise commitment too: running, strength training, ballet, hiking, swimming, cardio kickboxing, jump rope, and rock climbing. It’s fun to use your body in so many different ways. What I have not been so good about in recent weeks is keeping my stress levels in check. Work has been busy and time has been short, and I found myself teetering on the edge of illness three times in July. I know what works for my body – sleep, hydration, and mental down-time – but sometimes I fail to prioritize those things. So for August, I’m focusing on taking care of myself and giving myself room to breathe. Partly this involves 10-minute morning yoga sessions at least once or twice a week, partly it involves stretching and turning all the electronics off before bed, and partly it involves toting around big thermoses of herbal tea. I’ve also been toying with the idea of learning to meditate – I’ve never tried it, but like the idea. All together, these things do not make a goal, just a focus area: relax. In a way I’m giving myself a month off from rules – and that’s part of the point.

Green Tea and Zucchini Noodles with Honey-Ginger Sauce {Katie at the Kitchen Door}


This same mentality explains the quietness around here in the past few weeks. I love blogging, but some weeks it’s just too much to cook, shoot, edit, and write on top of everything else going on. This month I’m actively cutting myself some slack on the blogging front: certainly not giving it up, but also not beating myself up for delaying a post 1 or 3 or even 5 days from when I had originally planned it (this post being a prime example). That said, we have a gorgeous haul of garden produce this week, and I’m really excited to crank things up in the kitchen again – I’m currently experiencing a refreshing burst of creativity, and I can’t stop writing down recipe ideas. Most of these ideas seem to center around zucchini and summer squash, which are practically rolling out of our fridge every time we open the door. Zucchini noodles are a popular way of using up the abundant vegetable, but I find a bowl of raw zucchini strings a bit unappetizing. Mixed half and half with green tea soba noodles, though, I could eat a whole lot of it. I tossed this easy combination with an Asian-inspired honey-ginger-soy sauce and a few handfuls of sliced herbs, and Trevor and I gobbled it up. You could get creative and add sliced carrot, bell pepper, and scallions for additional flavor and crunch, but I wanted to keep this version all green. However you decide to spin it, it’s a healthy and refreshing summer lunch.

Green Tea and Zucchini Noodles with Honey-Ginger Sauce {Katie at the Kitchen Door}

In September we’ll be back to regularly scheduled programming – both on the fitness goals and blogging frequency front. Despite the fact that I’ve been out of school for three years, September still feels most like the time for new beginnings, and so August feels like the ramp-up period for that. Alternatively you might think of August as the last month of sunshine and lazy summer weekends before diving back into the meat of the year – so take the time to stop, breathe, and enjoy it. That’s what I’m doing.

Past Fitness Challenges

January: 10 Visits to the YMCA; Recipe: Gluten-Free Olive-and-Feta Corn Muffins
February: One vegan meal every day; Recipe: Pakistani Chickpea Pulao with Sweet-Hot Date-Onion Chutney
March: Run 40  miles in 20 days; Recipe: Chocolate-Dipped Almond Butter Cookie Bites
April: Walk 8,000 steps a day; Recipe: Herb-Flecked Spring Couscous
May: 180 minutes of Nike Training Club; Recipe: Warm Arugula Salad with Maple Mustard Dressing
June: Fresh fruit/veggies at every meal; Recipe: Chickpea Crepes with Grilled Curried Chicken and Mango Salsa
July: 8 different types of exercise; Recipe: Homemade Spinach Wraps with Chopped Greek Salad Filling

Like what you just read? Subscribe to Katie at the Kitchen Door on Feedly or Bloglovin‘, or follow along on Facebook, Twitter, Pinterest, Instagram, or Google+. Thanks for reading!

Green Tea and Zucchini Noodles with Honey-Ginger Sauce {Katie at the Kitchen Door}

Print

Monthly Fitness Goals: August // Green Tea and Zucchini Noodles with Honey-Ginger Sauce

Zucchini noodles are a great way to eat lots of veg, but I can’t quite get over the feeling that I’m being tricked out of eating pasta, so I like to mix them 50/50 with other noodles. This quick recipes mixes zucchini noodles with green tea soba, honey-ginger sauce, and lots of basil and mint.

  • Author: Katie at the Kitchen Door
  • Prep Time: 15
  • Cook Time: 10
  • Total Time: 25 minutes
  • Yield: 2-3 1x

Ingredients

Scale
  • 8 oz. green tea soba noodles (or regular soba noodles)
  • 1 large or 2 medium zucchini
  • sea salt
  • 3 TBS olive oil
  • 1 TBS grated fresh ginger
  • 3 cloves garlic, peeled and grated
  • 2 tsp sesame oil
  • 2 TBS honey
  • 2 TBS soy sauce
  • juice from 1 Meyer lemon
  • 15–20 leaves fresh basil
  • 15–20 leaves fresh mint

Instructions

  1. Bring a large pot of salted water to a boil and cook the soba noodles according to package directions. Drain and set aside.
  2. Use a julienne peeler to cut the zucchini into long noodles. Place zucchini noodles in a colander and salt liberally. Place colander over a bowl and let drain for at least 15 minutes.
  3. Heat the olive oil in a small pan over medium heat. Add the grated ginger and grated garlic and fry until golden brown and fragrant, about 2-3 minutes, stirring constantly to prevent sticking. Remove from heat and stir in the sesame oil, honey, soy, and Meyer lemon juice until a smooth sauce is formed. Add the sauce to the soba noodles and toss to coat.

Did you make this recipe?

Share a photo and tag us — we can't wait to see what you've made!

19 August 1, 2014 Drink

Cherry-Chocolate Bourbon Soda

Cherry-Chocolate Bourbon Soda {Katie at the Kitchen Door}

Cherry-Chocolate Bourbon Soda {Katie at the Kitchen Door}

I think maybe I overdid it on cherries this year. For me, cherries are the epitome of the “get ’em while you can” mentality that comes over me every time some new type of produce comes into season. Cherries just seem so fleeting, and they’re really at their best eaten fresh, unadultered. They can be expensive, but usually there’s a week or two when stores are trying to clear out their supplies before they go bad when you can get better prices. Long story short, a few weeks back, when Wholefoods announced a one-day sale on cherries for $1.99 a pound, I went a little crazy and bought 7 pounds. On top of that, I still had 3 pounds in the fridge from a previous grocery store shopping spree. I can tell you from personal experience, 10 pounds is a lot of cherries, even for the most rabid cherry consumer.

Cherry-Chocolate Bourbon Soda {Katie at the Kitchen Door}

Cherry-Chocolate Bourbon Soda {Katie at the Kitchen Door}

So I got out my cherry pitter and went to work. Plenty of the cherries got put aside for eating fresh and several pounds got simmered in brandy and red wine and packed away in jars for holiday eating. After this, I had about 2 pounds of cherries left, all of them a little sadder and more bruised than their fresh-eating counterparts. I toyed with the idea of making more jam to add to the pile of newly-filled ball jars that has been slowly building on our shelves, but really, the thing I couldn’t get out of my mind was fresh cherry soda. So I turned to my copy of True Brews and quickly whipped up a batch of Cherry-Vanilla Soda. If you have cherries to spare, please make this soda – it is so sweet and fizzy and refreshing, and it’s a gorgeous clear cherry-red color. Just a little glass feels like a special treat. And it’s even more of a special treat if you add a dash of bourbon and chocolate extract, like we did for this cocktail. The mixture of cherries and bourbon and chocolate feels very Southern and indulgent, a drink for sipping slowly on your porch at twilight, when the heat finally begins to fade.

Cherry-Chocolate Bourbon Soda {Katie at the Kitchen Door}

Ingredient note: I’m not sure you can still buy the Taza Mexican chocolate extract we used for flavoring – I looked for a link to direct you all to, but learned that it was only produced from 2010-2013. You can read about it here, but I couldn’t find any online vendors selling it. It’s more similar to a chocolate baking extract than a chocolate bitters – something like this might work in its place.

Like what you just read? Subscribe to Katie at the Kitchen Door on Feedly or Bloglovin‘, or follow along on Facebook, Twitter, Pinterest, Instagram, or Google+. Thanks for reading!

Cherry-Chocolate Bourbon Soda {Katie at the Kitchen Door}

Cherry-Chocolate Bourbon Soda

Serves 1.

  • 3/4 c. homemade cherry-vanilla soda (recipe below) or other cherry soda
  • 15 drops Taza Mexican chocolate extract
  • 1 oz. Bourbon
  1. Add the soda, chocolate extract, and bourbon to a glass with several ice cubes in it. Stir gently, then serve immediately.

Homemade Cherry Vanilla Soda

Recipe adapted from True Brews. Makes 8 cups.

  • 2 lbs. of pitted fresh cherries
  • 4 limes
  • 1/2 tsp vanilla extract
  • 1 c. water, plus more to fill the bottles
  • 9 TBS sugar
  • 1/8 tsp salt
  • 1/8 tsp dry champagne yeast
  1. Place the cherries, lime juice, and vanilla in a large bowl. Bring the cup of water to a boil, then stir in the sugar and salt until dissolved. Pour the mixture over the cherries and let macerate for 10 minutes.
  2. Place the cherries and their liquid in a blender and blend until smooth. Strain the puree through a fine mesh strainer, catching the juice in a bowl. Pour the cherry juice through a funnel into a clean 2-liter soda bottle (do not use glass, as it may break under the pressure of the fermentation process). Add water to the bottle to fill almost to the top, leaving at least 1 inch of headspace between the top of the juice and the cap. Taste and add more lime juice, sugar, or vanilla as desired.
  3. Add the yeast to the bottle. Screw on the cap and shake to distribute the yeast. Let the bottle sit at room temperature out of direct sunlight until the bottle feels rock solid when you press against the sides. This carbonation process usually takes 12 to 48 hours: check the bottle periodically to avoid overcarbonation and a potentially bursted bottle. Once the soda is carbonated, place it in the fridge to slow the carbonation process. Open very slowly over a sink the first time you serve it, to avoid bubble-ups. Serve cold. Refrigerate for up to 2 weeks.

1 July 27, 2014 Fall

Foraging // Chanterelle and Corn Tacos with Chile Crema

Chanterelle and Corn Tacos with Chile Crema {Katie at the Kitchen Door}

Foraging for Chanterelles {Katie at the Kitchen Door}

Last weekend, Trevor and I went on a little adventure. We drove up the coast into Maine, trekked out into the woods, and began our search for forest gold: chanterelles.

The first time I had chanterelles in any quantity was last summer in St. Petersburg. There’s a much stronger foraging and preserving culture in Russia than here in the states, and when chanterelles come into season, the whole city explodes with лисички сезон (lisichki sezon) menus, featuring chanterelles in every form imaginable. Although prized and celebrated for their texture and flavor, they aren’t the commodity that wild mushrooms are here, and while you may pay a few dollars more to have your mushroom soup made from chanterelles, it won’t break the bank.

Chanterelle and Corn Tacos with Chile Crema {Katie at the Kitchen Door}

Foraging for Chanterelles {Katie at the Kitchen Door}

Foraging for Chanterelles {Katie at the Kitchen Door}

Around Boston, however, it’s rare to find specialty wild mushrooms like chanterelles in grocery stores, even the upscale ones. When you do, they’re usually exorbitantly priced – I’ve seen morels go for as much as $70 a pound. Morels are delicious, but there are a lot of other delicacies I could buy for 1/3 of the price – like filet mignon and wild-caught salmon. So when Trevor’s uncle called to let us know that chanterelles were abundant in Maine, and offered to take us on a foraging trip, we jumped at the chance. Trevor’s uncle is a foodie in the truest sense of the word, without any of the negative connotations that word sometimes carries. An author and editor who has lived in both France and Russia, he has a deep understanding of food and its history from multiple cultural perspectives. Many of his books revolve around food: From Here You Can’t See Paris chronicles a year in the life of a restaurant in a rural town in France, while his cookbook, Fresh From Maine, shares recipes and stories from Maine’s up-and-coming chefs. In short, a good person to go foraging with, and an even better person to get ideas from for what to do with your bounty of mushrooms.

Chanterelle and Corn Tacos with Chile Crema {Katie at the Kitchen Door}

Foraging for Chanterelles {Katie at the Kitchen Door}

I had no idea that chanterelles grew in such prolific quantities in New England. Michael led us to hillsides covered with the small golden mushrooms, poking up from the pine needle-blanketed forest floor. Once we had found a good spot, we set to work gathering: down on our hands and knees, slicing the mushrooms from their stems, brushing the dirt and pine needles from the caps, then adding the clean mushrooms to our quickly filling bags. It’s a lovely thing to do, foraging for mushrooms – it’s quiet and focused, with the exhilaration of discovery and the wonderment of nature’s creations. Find someone who knows the forest and knows mushrooms and is willing to teach you – it’s worth it.

Foraging for Chanterelles {Katie at the Kitchen Door}

Foraging for Chanterelles {Katie at the Kitchen Door}

Foraging for Chanterelles {Katie at the Kitchen Door}

After only an hour of picking Trevor and I had gathered 5 pounds – as much as we could dream of using – and Michael probably picked twice as much as the two of us combined during the same time period, so we packed up our mushrooms and hiked out of the woods. We enjoyed a quick but perfect lunch of mozzarella, tomato, and basil on fresh baguette, then Trevor and I were on our way back home, where the task of further cleaning and processing our mushrooms awaited us. Although the cleaning and processing is not a small amount of work, we now have enough bags of butter-sauteed chanterelles tucked away in our freezer to get us at least through the fall. We froze about 2/3 of our haul, but we kept enough fresh mushrooms in the fridge for a week of good eating. We started off with a Chanterelle Carbonara, then these Chanterelle and Corn Tacos, and finished up with Chanterelle Burgers. All three recipes were delicious, and perhaps I’ll share the other two with you later, but for now, let’s focus on these tacos. I had been toying with the idea of a summery, mushroom and corn vegetarian taco for a while, so it was the perfect thing to try when we found ourselves with a surplus of mushrooms. The mushroom filling is as savory and satisfying as any meat-based taco, and the creamy and slightly spicy chile sauce is a little bit addictive. The tacos don’t need much more than that, but I added some sliced avocado and a bit of crumbled cotija cheese to finish them off. A worthy use of our chanterelles, for sure.

Like what you just read? Subscribe to Katie at the Kitchen Door on Feedly or Bloglovin‘, or follow along on Facebook, Twitter, Pinterest, Instagram, or Google+. Thanks for reading!

Chanterelle and Corn Tacos with Chile Crema {Katie at the Kitchen Door}

Chanterelle and Corn Tacos with Chile Crema

Serves 2 as a main, 4 as an appetizer.

  • 1/4 c. sour cream
  • 2 TBS heavy cream
  • juice from 1/2 lime
  • 1/4 tsp coarse sea salt
  • 1/2 tsp chili powder
  • 1/8 tsp smoked paprika
  • 2 TBS butter
  • 3 c. chanterelles torn into large pieces
  • 1 ear raw corn, corn kernels cut from the cob
  • 1/2 small jalapeno, seeded and minced
  • 1 TBS minced fresh thyme leaves
  • salt and pepper, to taste
  • 1 avocado, halved, pitted and sliced
  • 4 small tortillas
  • 2 oz. crumbled cotija
  1. In a small bowl, stir together the sour cream, heavy cream, lime juice, sea salt, chili powder, and smoked paprika until smooth. Taste, and adjust flavorings to your taste. Set aside.
  2. In a large frying pan, melt the butter over medium heat. Add the chanterelles and cook until soft and deeply colored, about 8 minutes. Add the corn, jalapeno and thyme to the pan, and cook, stirring occasionally, until the corn and jalapeno have softened slightly, about 5 minutes. Remove from heat and season to taste with salt and pepper.
  3. To serve, line each tortilla with a few slices of avocado. Top with 1/4 of the mushroom and corn mixture, then drizzle some chile crema over the top. Sprinkle with the crumbled cotija, and serve immediately.
  • « Go to Previous Page
  • Go to page 1
  • Interim pages omitted …
  • Go to page 16
  • Go to page 17
  • Go to page 18
  • Go to page 19
  • Go to page 20
  • Interim pages omitted …
  • Go to page 57
  • Go to Next Page »

Primary Sidebar

Subscribe!

Get creative recipes and menu ideas delivered straight to your inbox.

Most Popular

A House // Sweet Potato and Coconut Milk Soup with Brown Rice and Lentils

Monthly Fitness Goals: July // Homemade Spinach Wraps with Chopped Greek Salad

A New Job // Classic Seven-Layer Bars

Butternut Squash Carbonara with Fried Sage and Caramelized Onions

Happy Birthday, Trevor! // Peanut Butter Fudge

Cookbook Review and Giveaway: Home Made Winter

Drizly

Please note!

Full disclosure: if you purchase anything at Amazon using the above links or any other links to Amazon on this site, I will receive a small commission. Just so you know!

Copyright© 2025 · Cookd Pro Theme by Shay Bocks

This site uses cookies: Find out more.