• Skip to primary navigation
  • Skip to main content
  • Skip to primary sidebar
  • Home
  • Recipes
  • Features
    • Cookbook Reviews
    • Ingredient of the Week
    • Sunday Dinner
    • Fitness Goals
  • Travel
  • About
    • Privacy Policy
    • Cookie Policy
  • Work With Me

Katie at the Kitchen Door

Globally-inspired, seasonal recipes

Blog Page

Ajiaco Bogotano - Colombian Chicken, Potato and Corn Soup with Avocado and Capers {Katie at the Kitchen Door}

5 March 8, 2015 Food

Ajiaco Bogotano – Chicken, Potato, and Corn Soup with Avocado and Capers

Ajiaco Bogotano - Colombian Chicken, Potato and Corn Soup with Avocado and Capers {Katie at the Kitchen Door}

I’ve been spending a good amount of time in Bogotá this year, and will continue to visit for work throughout the spring and summer. Unfortunately, my plans to take an extra day to explore the city on my last visit were thwarted by a combination of more snow (surprise!) and my plane catching on fire (don’t ask, but everything was fine), so I still haven’t seen too much beyond the area near my office. My initial impressions of the city are very positive – it’s fun and vibrant and I love the sunshine, the views of the mountains, and the vaguely German bungalow style architecture in the financial district. I also love the food, which is rich and hearty and full of avocados, plantains, beef, and potatoes. In particular, I’ve sort of fallen in love with ajiaco, a classic Bogotano chicken and potato soup that hits the spot every time.

Bogota, Colombia

Ajiaco Bogotano - Colombian Chicken, Potato and Corn Soup with Avocado and Capers {Katie at the Kitchen Door}

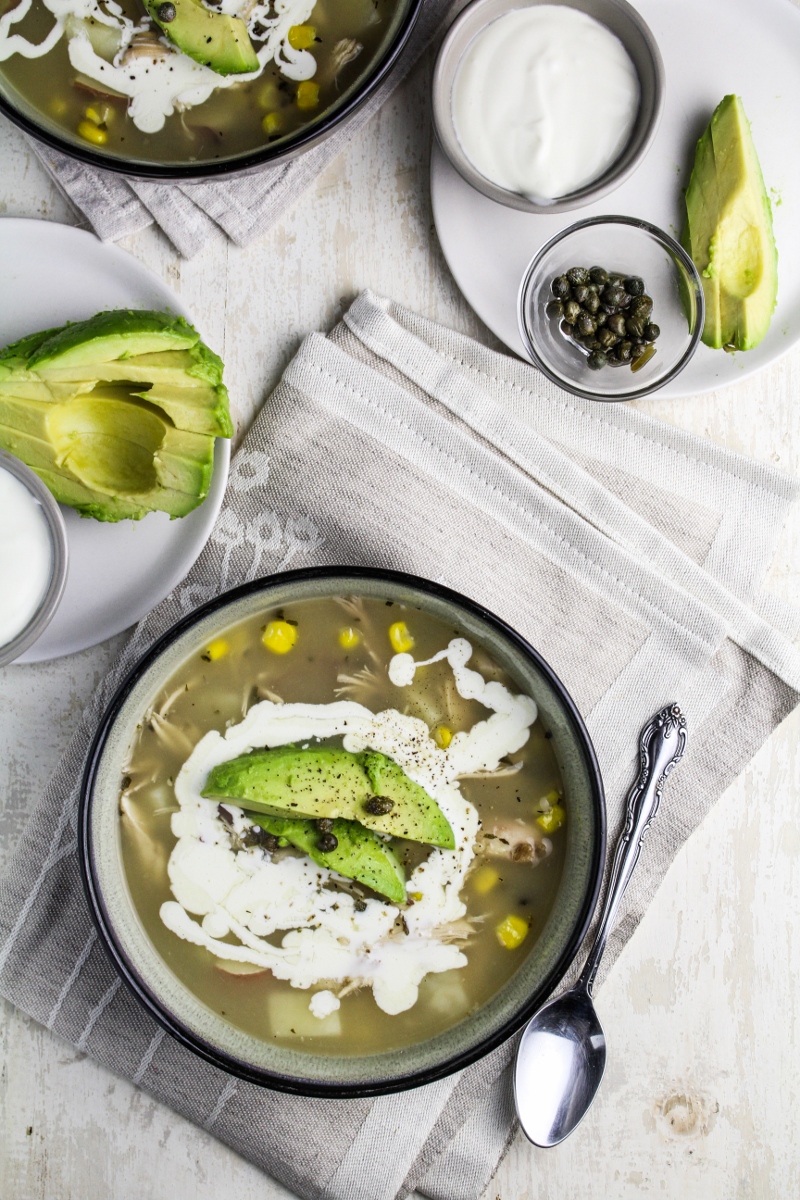
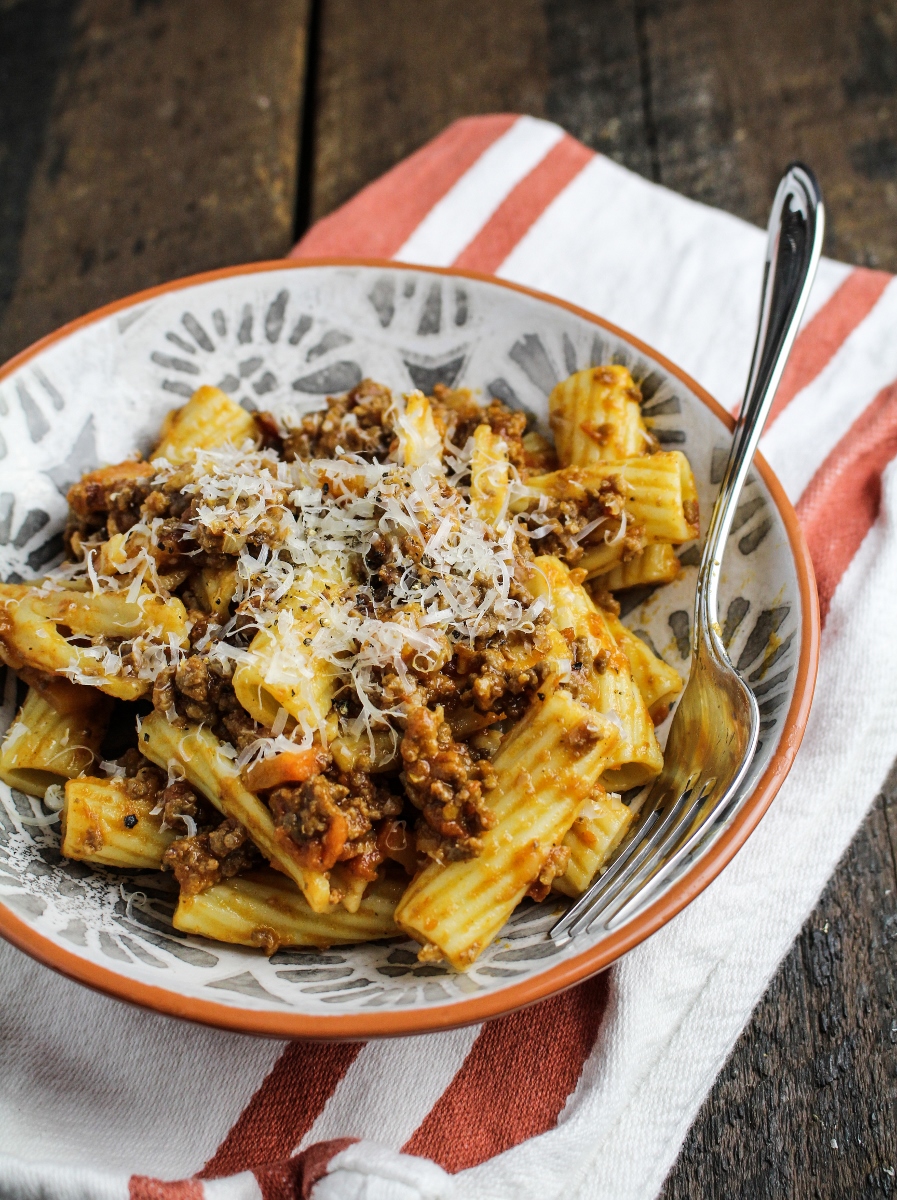
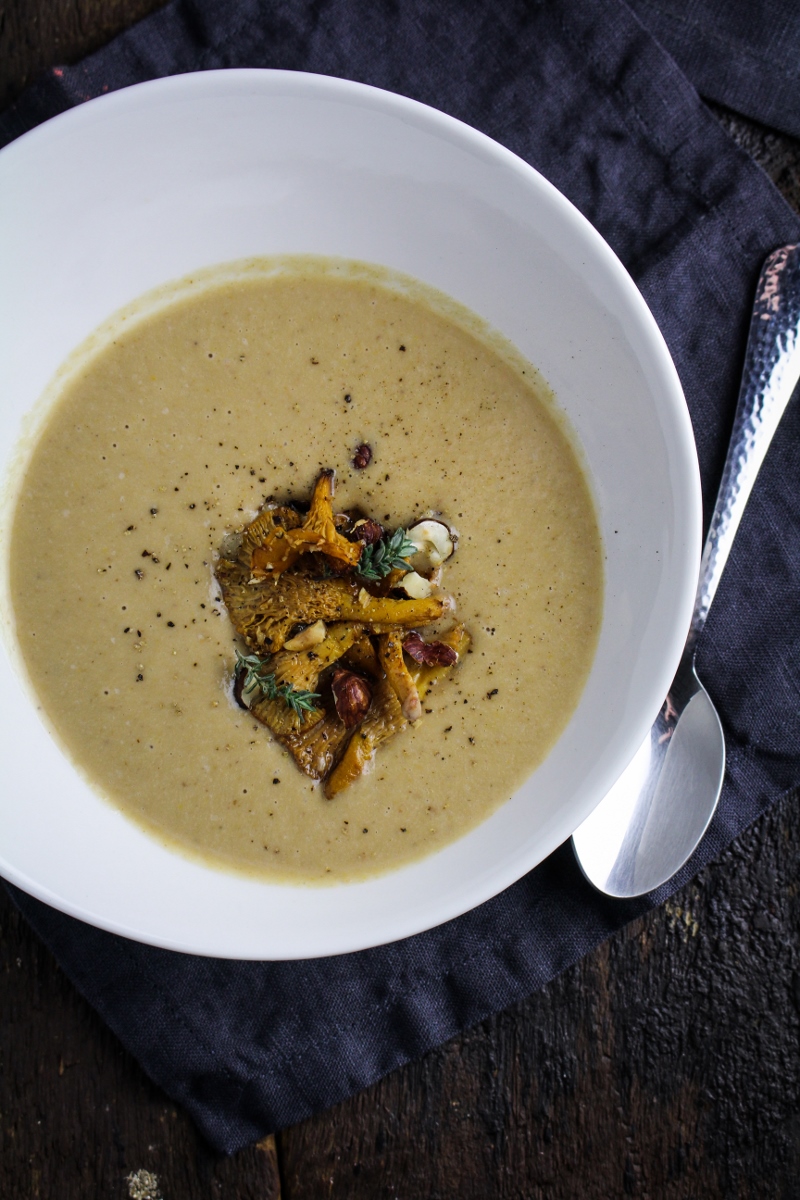
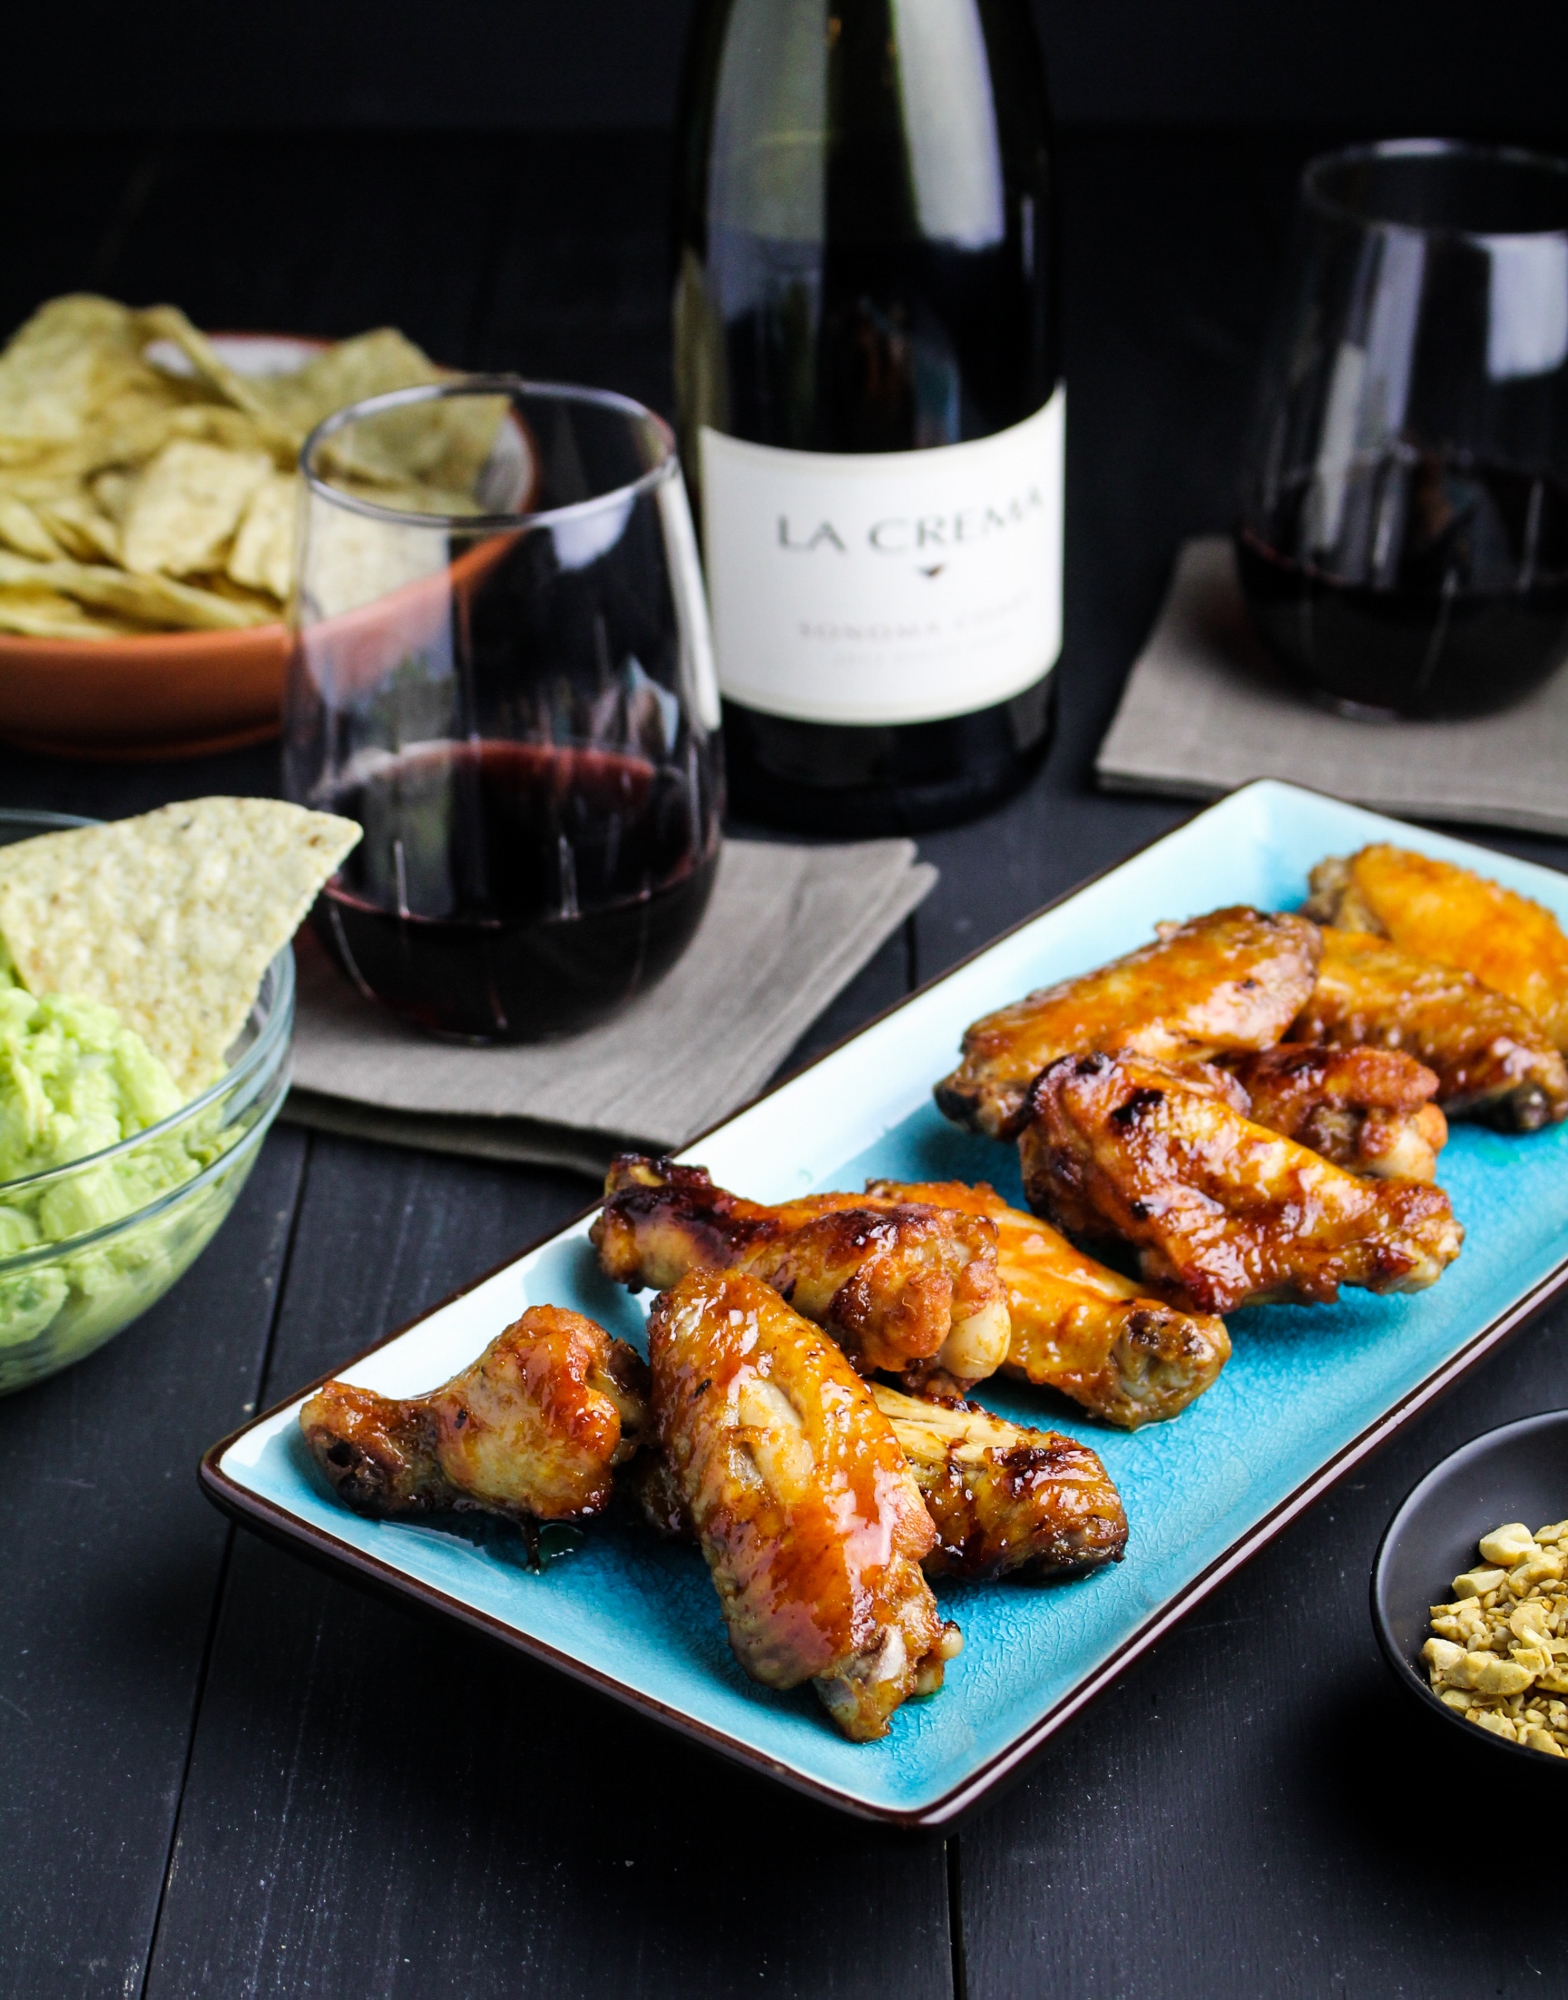
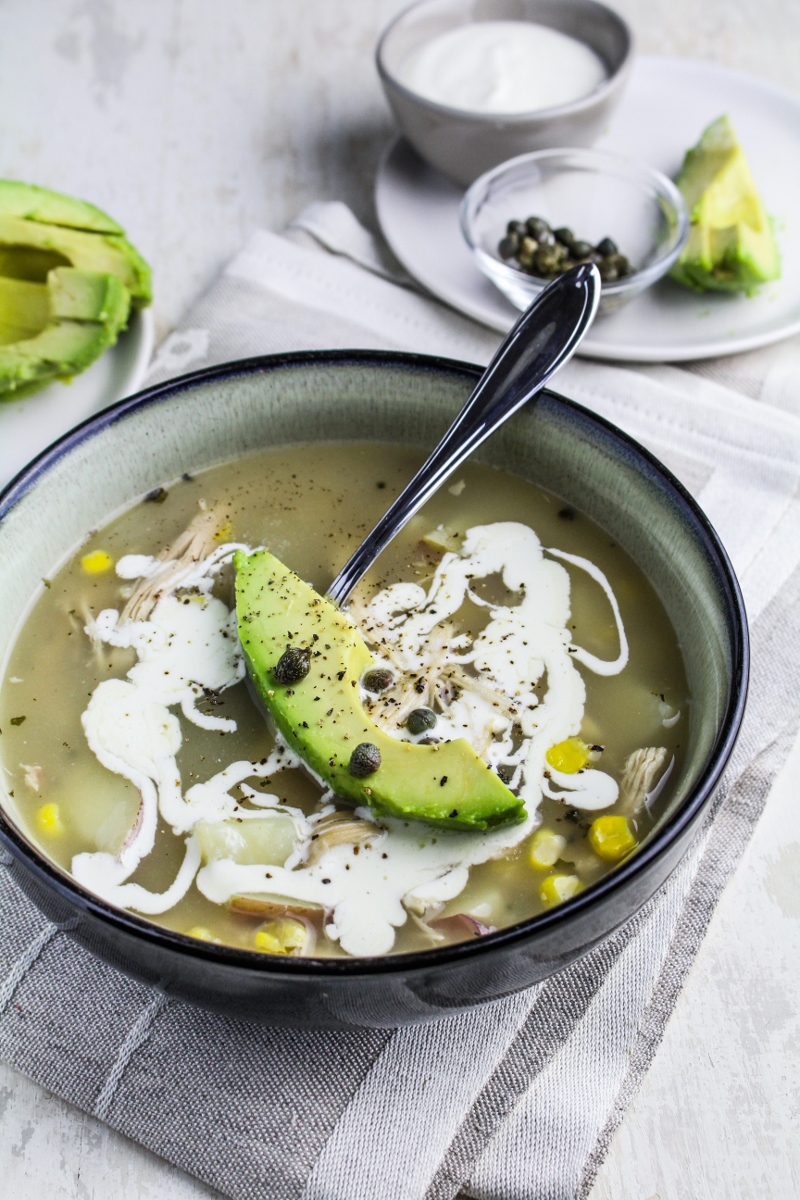
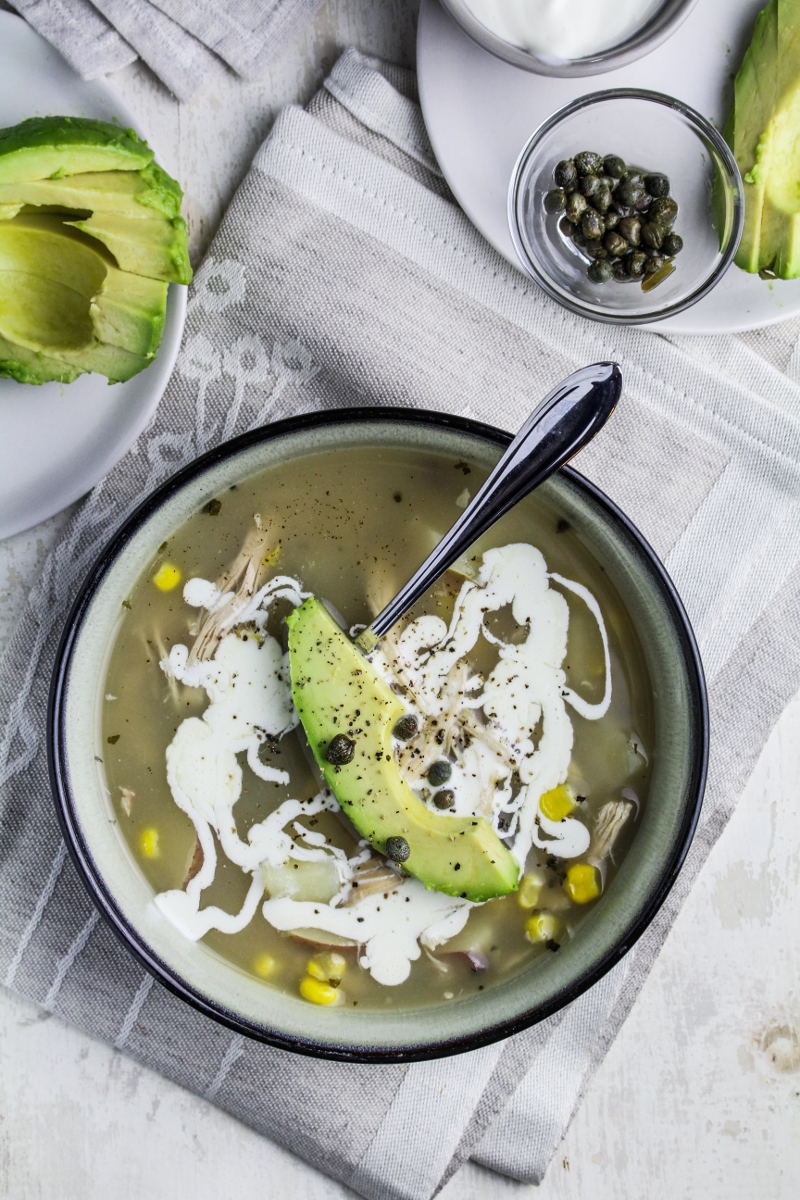
I’m headed down to Latin America again this week, this time with a few days in Chile in addition to Colombia, but before I left I wanted to make some ajiaco at home for Trevor to try. The soup broth is fairly thick, like a stew, but still somewhat translucent, and flecked with the herb guascas, which apparently gives the soup its distinctive flavor. Chicken, potatoes, and corn on the cob are served in the soup, and capers, avocado, rice, and cream are served on the side for you to top as you go. It’s this last aspect – spooning bits of perfectly ripe avocado and plump capers on top of the hot bowl of soup – that really makes the meal special for me. Each time you bite into a caper it’s such an unexpected pop of salty tang against the creamy and hearty background flavors, I just love it.

Ajiaco Bogotano - Colombian Chicken, Potato and Corn Soup with Avocado and Capers {Katie at the Kitchen Door}

Bogota, Colombia

Even a small amount of internet research will quickly reveal that making an authentic pot of ajiaco is basically a science, and one that doesn’t leave much room for experimentation. The thickness of the broth is typically created by the addition of papas criollas, a small Andean potato that dissolves into the broth. Since they’re hard to come by outside of Latin America, I used grated russets instead, and that worked well, although the soup wasn’t quite as thick as other versions I’ve had. From everything I read, using guascas is essential to the flavor of the soup, so I ordered some from Amazon in advance. For everything else I pretty much stuck to the traditional method, although I do prefer using frozen corn to serving the whole cob in the soup (I’ve had it both ways in Bogotá, so I think it’s fair to still call it traditional). It’s a bit time consuming to make the stock, but otherwise a very easy recipe, and the result was pretty close to, although not quite as good as, the Colombian version. I have a feeling this may be a new staple in our kitchen.

Like what you just read? Subscribe to Katie at the Kitchen Door in the box on the right, on Feedly or Bloglovin‘, or follow along on Facebook, Twitter, Pinterest, Instagram, or Google+. Thanks for reading!

Ajiaco Bogotano - Colombian Chicken, Potato and Corn Soup with Avocado and Capers {Katie at the Kitchen Door}

Print

Ajiaco Bogotano – Chicken, Potato, and Corn Soup with Avocado and Capers

Ajiaco Bogotano - Colombian Chicken, Potato and Corn Soup with Avocado and Capers {Katie at the Kitchen Door}

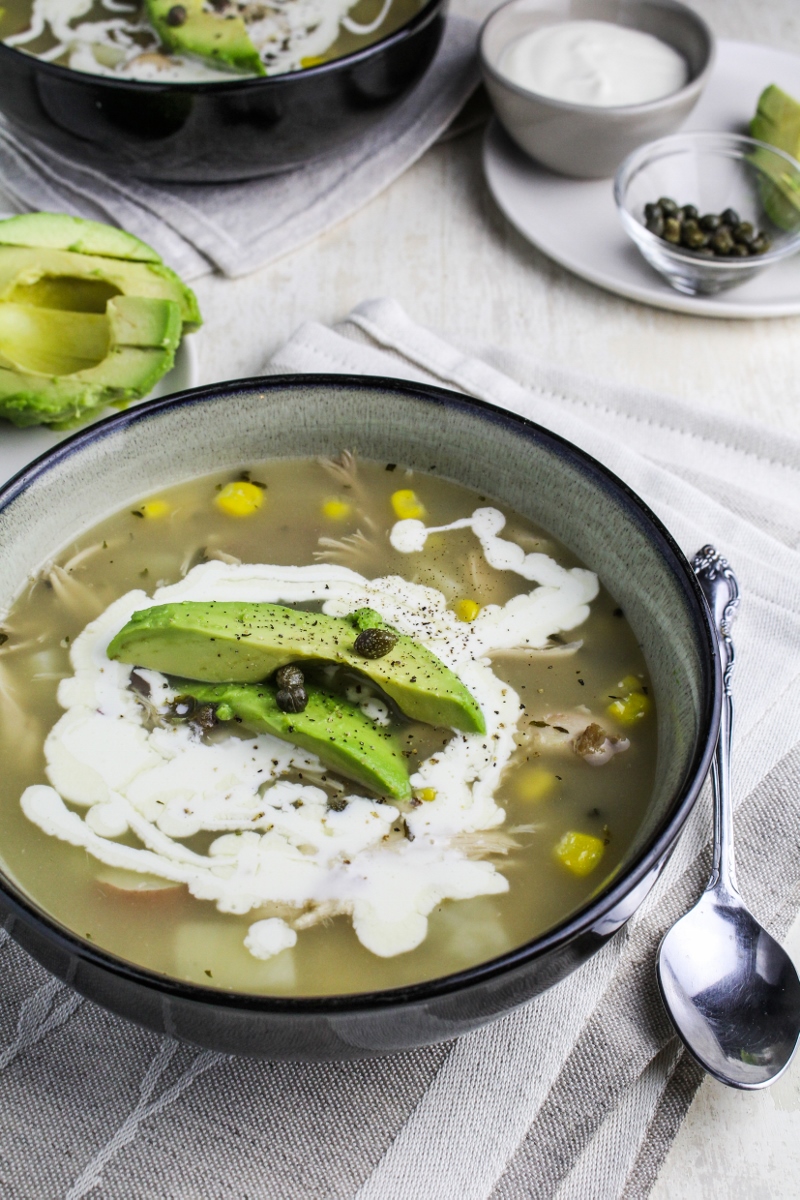
A classic Colombian chicken and potato soup. Thick and creamy, it’s served with capers, avocado, and crema on the side so you can add toppings as you eat. One of my favorite Colombian recipes!

Adapted from these sources:The Kitchn, My Colombian Recipes, and Serious Eats. 

  • Author: Katie at the Kitchen Door
  • Yield: 4-6 1x

Ingredients

Scale
  • 1 rotisserie chicken
  • 2 carrots
  • 1 onion
  • 5 cloves garlic
  • 20–30 parsley stems
  • 1 tsp salt
  • 1/2 tsp black pepper
  • 2 medium russet potatoes, peeled and coarsely grated
  • 3 medium red bliss potatoes, cut into 1/4 inch cubes
  • 2 TBS dried guascas
  • 3/4 c. frozen corn kernels
  • 1/4 c. Mexican crema, for serving
  • 2 avocados, pitted and sliced, for serving
  • 1/4 c. capers, rinsed, for serving

Instructions

  1. Use a fork to pull the meat from the chicken, setting aside in a large bowl. Place the chicken carcass, bones, and skin in a large stockpot. Cut the carrots and onions into rough chunks and add to the stockpot. Peel the garlic and cut in half, then add to the stockpot along with the parsley stems, salt, and black pepper. Cover the stock ingredients with water, using 3-4 quarts of cold water. Bring to a simmer over medium heat, then simmer until stock is rich and golden, about 3-4 hours.
  2. Ladle 8 cups of the stock through a fine-mesh strainer into a different stockpot, discarding the solids left behind and saving any extra stock for a different use. Add the grated potatoes, diced red potatoes, and guascas to the stock and bring to a simmer over medium heat. Simmer until the russets have completely dissolved and the soup has thickened, about 20-30 minutes. Add the reserved chicken meat, chopped into bite-sized pieces if necessary, to the soup and simmer for another 15 minutes. Add the corn and cook until warmed through, about 5 minutes. Season the soup to taste with salt and pepper, and serve immediately with the crema, avocados, and capers on the side.

Did you make this recipe?

Share a photo and tag us — we can't wait to see what you've made!

27 March 3, 2015 Dessert

Kittery Foreside // Apple Cider French Crullers


Nubble Lighthouse, York, Maine {photo by Katie Morris}

Apple Cider French Crullers {Katie at the Kitchen Door}

Driving through Maine in October

This past fall, Trevor and I were given our first magazine assignment – to eat and drink our way through Kittery Foreside, the newly rejuvenated downtown area of Kittery, ME. We spent a fantastic weekend in late October doing just that, in addition to exercising our journalism muscles. It was more challenging than I thought to make the switch from basic consumer to curious writer and photographer, but once we got into it, it was kind of a blast. It’s a pretty small area, so by the time we had been there for 24 hours, we had really gotten a feel for the pulse of the town and for the people who are bringing it back to life.

October Picnic at Fort McClary, Kittery, ME

Lil's Cafe, Kittery, ME

Apple Cider French Crullers {Katie at the Kitchen Door}

Lil's Cafe, Kittery, ME

Our article is now published in the winter issue of ZEST Maine, and we couldn’t be prouder to see our work in print. Of course, we owe our gratitude to Trevor’s uncle for the opportunity to contribute. The magazine’s owner has also kindly given us permission to share the full article here – take a look, and if you also happen to be a lover of Maine, hop on over to their website and consider subscribing.

ZEST Winter 2015 – Kittery Foreside Article

Crullers at Lil's Cafe, Kittery, ME
Apple Cider French Crullers {Katie at the Kitchen Door}

Pastries at Lil's Cafe, Kittery, ME

One of the culinary highlights of the trip were the incredible crullers we had at Lil’s Cafe. Impossibly eggy and airy, we could have eaten only crullers for the whole weekend and left happy – if you’re in or around Boston, it’s worth the drive up just to try them. When the article came out, we knew that crullers were the only way to celebrate. Trevor likes food projects, so he volunteered to take charge of recreating the crullers at home. I’ve never had truly homemade donuts before, and I have to say, they were pretty amazing. Part of the trick in making them look pretty is in freezing the donuts immediately after piping, then frying the donuts directly from the frozen state. He may not be a pastry chef but I’d drive pretty far for a box of Trevor’s homemade crullers, too.

Apple Cider French Crullers {Katie at the Kitchen Door}

Apple Cider French Crullers

Recipe adapted from the Food Network. Makes 16 crullers.

  • 3/4 c. apple cider
  • 1/2 c. water
  • 8 TBS salted butter
  • 1 tsp sugar
  • 1/2 tsp salt
  • 1 c. flour
  • 3-5 eggs
  • 2 c. powdered sugar
  • 1/4 c. milk
  • vegetable oil, for frying
  1. Combine the cider, water, butter, sugar, and salt in a large saucepan and bring to a rolling boil over medium-high heat. Remove from the heat and add the flour all at once, stirring hard with a wooden spoon until all the flour is incorporated. Return the pan to the heat and cook, stirring, for about 2 more minutes, to evaporate some of the moisture.
  2. Remove the dough from the heat. Beat in the eggs one at a time, pausing after 3 eggs to check the consistency. The dough should be smooth and glossy and run slowly off the spoon when you lift it. If you reach this stage after 3 or 4 eggs, do not continue adding eggs to the dough.
  3. Line a baking sheet with parchment paper. Fit a pastry/frosting bag with a large star tip, and spoon the dough into the bag. Pipe the dough into wreaths about 2-3 inches in diameter. Freeze the doughnuts on the tray for at least 15 minutes.
  4. Make the glaze by whisking together the powdered sugar and milk until smooth.
  5. To fry the doughnuts, heat the 1 1/2 inches of vegetable oil in a wide frying pan over medium heat. Heat the oil to 325°F. Working in batches, add the frozen doughnuts to the hot oil and fry until they float to the top and are golden brown all over, about 2-3 minutes. You may need to carefully flip the doughnuts over once while they are frying for even cooking. Use a slotted metal spoon or skimmer to remove the doughnuts from the oil and drain on a paper bag. Once cool enough to touch, dip the warm doughnuts into the glaze and let cool on a cooling rack. Serve immediately.
Rigatoni Bolognese

5 February 23, 2015 Beef

Rigatoni Bolognese

Rigatoni Bolognese {Katie at the Kitchen Door}

I’m on the road again this week, back in Bogotá for work. While I won’t deny that I’m really enjoying the sunshine, flowers, and complete absence of snow, I would be lying if I said that there isn’t a part of me that is always missing Trevor when I’m away. I tend to stock up the fridge and cook a bunch of big meals right before I leave – I think feeding him is my way of loving him even when I’m not there to do it in person. This week however I didn’t have the chance to do my usual stock-up. I did leave a batch of freshly baked chocolate chip cookies, but other than that the fridge situation was a little bleak. However, as I reminded him on the phone tonight, there is a generous amount of this bolognese sauce sitting in the freezer, and it’s about as comforting as comfort food can get.

Rigatoni Bolognese {Katie at the Kitchen Door}

This recipe is based on one I found in Franny’s: Simple Seasonal Italian. Franny’s is a book that came my way last summer, but was published almost two years ago (which somehow seems like forever in today’s cookbook-laden world). A publicist over at Artisan sent me a copy as a sort of bonus book when I was planning coverage of a current title, noting that although it wasn’t current, she thought I would like it and wanted to share a copy. I do try to keep my cookbook coverage focused on recently published books, so I didn’t plan to do much with Franny’s, but it slowly worked it’s way into my kitchen. First it was the meatballs, which were the most perfect meatballs I’d ever eaten. Then I tried a few hearty soups and pastas with equal success, and soon it had become my first point of research for any classic Italian cooking. So a few weeks back, in the middle of another snowstorm when nothing but a slow-simmering pot of meaty bolognese sauce would do, Franny’s was my first point of reference. I made a few significant changes to meet my tastes – doubling the amount of tomatoes and using a mixture of beef and pork – but the base recipe was just what I needed to make my own perfect pot of bolognese. And now it’s waiting at home to keep Trevor warm and well-fed when I can’t do it myself.Rigatoni Bolognese {Katie at the Kitchen Door}

Print

Rigatoni Bolognese

Rigatoni Bolognese

A slow-simmered bolognese sauce with beef, pork and bacon, delicious over pasta.

Recipe adapted from Franny’s Simple Seasonal Italian. 

  • Author: Katie at the Kitchen Door
  • Yield: 6-8 1x

Ingredients

Scale
  • 2 TBS butter
  • 2 TBS olive oil
  • 1 lb. ground pork
  • 1 lb. ground beef
  • 1/2 tsp chili flakes
  • 1/4 lb. bacon, sliced into 1 inch pieces
  • 6 large garlic cloves, minced
  • 1 large onion, peeled and finely diced
  • 3 carrots, peeled and finely diced
  • 2 TBS tomato paste
  • 2/3 c. dry red wine
  • One 28 oz. can of crushed tomatoes
  • 2 c. water
  • salt and pepper to taste
  • 2 lbs. rigatoni, cooked according to package directions

Instructions

  1. In a heavy stockpot, heat the butter and olive oil over medium heat. Add the ground beef and pork, season with salt and chili flakes, and cook until browned all the way through. Use a slotted spoon to remove the meat to a bowl and set aside. Add the sliced bacon and cook until crispy. Remove the cooked bacon to the bowl with the cooked beef and pork. Drain the fat from the pot, returning 3 TBS of the fat to the pot and discarding the rest.
  2. Lower heat to medium-low. Add the minced garlic, onion, and carrot to the pot and cook, stirring frequently, until onion is translucent and carrot is tender, about 10-15 minutes. Stir in the tomato paste and cook for 2 minutes, then add the red wine and bring to a simmer.
  3. Add the meat and bacon back to the pot, along with the tomatoes, water, and salt and pepper. Bring to a simmer then cover the pot with a lid and simmer for 40 minutes to 1 hour. Remove the lid and continue to simmer until ragu has reached desired consistency. Serve immediately on prepared rigatoni.

Did you make this recipe?

Share a photo and tag us — we can't wait to see what you've made!

0 February 20, 2015 Uncategorized

Book Club: North, The New Nordic Cuisine of Iceland // Bacalo Potatoes with Carrots and Fennel

North The New Nordic Cuisine of Iceland

The Book: Iceland is at the very top of my travel wishlist. The dramatic landscapes and vast, untouched wilderness have me aching to throw my hiking boots in a bag and hop on a plane across the Atlantic. In reality, I’ll be getting on planes to a lot of different places in the next few months – Colombia, Chile, and Charleston for starters – but none of them will be going to Iceland. I certainly can’t complain about the wonderful places I will be going, but that doesn’t mean I can’t daydream about Iceland at the same time. The book North: The New Nordic Cuisine of Iceland, is one way to amp up my daydreaming. It’s a cookbook, sure, but I have to say that it feels like more than a cookbook to me. The interviews with food producers and stories of life on the island are as important to the book as the recipes themselves. The book is organized not by meal or by region, but by producer – a chapter for the arctic char smoker, one for the salt maker, and for the birch and mushroom forager. It was truly fascinating to learn about rugbraud, the hearty rye bread that is baked in underground geyser ovens, and about Siggi Henningson, a fisherman who spends his afternoons rapelling over cliffs to collect seabird eggs, not for himself, but for the entire town. The structure of the book and the stories paint a clear picture of where Iceland’s food comes from, on both land and sea.

Bacalo Potatoes, Roasted Carrots, and Fennel on Toast - Hearty Icelandic Fare {Katie at the Kitchen Door}

I knew in advance that many of the recipes in North would be too esoteric to ever make at home, but was thoroughly intrigued anyway. The flavors throughout the book are consistent and coherent: smoke, salt, rich dairy, bright pickles, oily fish, and grassy herbs, the foods of a cold and isolated island. The fact that some ingredients may be hard (or impossible) to find outside of Iceland (seabird eggs, anyone?) is readily acknowledged, and many substitutions are offered – the authors have even provided an email you can reach out to with questions. The recipes also skew towards fine dining more than rustic eating – one of the authors is, after all, the chef at Dill. But although I know that I will never go to the trouble of making Lumpfish Roe with Smoked Mayonnaise, Beer Vinegar Jelly, and Horseradish Cream (smoke your own oil to make your own smoked mayonnaise, make your own beer vinegar and then turn it into jelly, you get the picture), other recipes can certainly be tweaked to fit into my repertoire – like Fennel Salad with Cottage Cheese and Spiced Nuts, or Poached Cod Cheeks in Roasted Cod Soup. Whether or not I find myself cooking from this book regularly, it’s so full of general inspiration that it deserves a place on my bookshelf, esoteric recipes or not.

Bacalo Potatoes, Roasted Carrots, and Fennel on Toast - Hearty Icelandic Fare {Katie at the Kitchen Door}

Bacalo / Salt Cod {Katie at the Kitchen Door}

The Food: One of the recipes that felt approachable enough to try was for Bacalo Potatoes with Fennel Ribbons and Sorrel Ash. I had to be a bit generous with my interpretation of this recipe, taking inspiration as much from the headnote and author Jody Eddy’s description of the ways they ate this throughout their trip, as from the recipe itself. The base of this recipe is creamy mashed potatoes mixed with bacalo, or salt cod, a combination sometimes called brandade. As written, the potatoes and cod are served topped with sorrel ash, roasted carrots, fennel ribbons, soft boiled eggs, and freshly grated horseradish. Since both sorrel and horseradish are hard to come by without planning ahead, I nixed them and decided to take a more rustic approach to the meal – serving the mash on hearty whole grain bread spread with mustard (a decent replacement for the pungent horseradish). I also skipped the eggs, as once you smear potatoes on toast you don’t feel like you need that many more things on top. Although I usually try to stick to the letter when testing recipes for cookbook reviews, here, I don’t feel bad about it. Eddy writes ” One night, Gunnar served it on toast; another, he substituted smoked haddock, an ideal replacement for the cod. The profusion of herbs he added was dictated by whatever we foraged that day.”  It’s a recipe that is more idea than science. I’ve written it here the way I made it, inspired by the instructions in North.

Bacalo Potatoes, Roasted Carrots, and Fennel on Toast - Hearty Icelandic Fare {Katie at the Kitchen Door}

Recipe Shortlist: Salted Cod Tartar, Dill Mayo, Dulse Powder; Parsnips Three Ways with Arctic Char Roe; Cauliflower, Seabird Eggs, Burned Butter; Roasted Lamb Shoulder, Braised Cabbage, and Pickled Onions; Smoked Lamb with Skyr and Nutmeg; Stone Bramble and Cottage Cheese with Whey Caramel and Whey Granita; Red Beet and Rosemary Sorbet, Almond Cake, and Sugared Almonds

Like what you just read? Subscribe to Katie at the Kitchen Door in the box on the right, on Feedly or Bloglovin‘, or follow along on Facebook, Twitter, Pinterest, Instagram, or Google+. Thanks for reading!

Disclaimer: I received a review copy of North: The New Nordic Cuisine of Iceland from Ten Speed Press, but I was not otherwise compensated and all thought and opinions are my own.

Bacalo Potatoes, Roasted Carrots, and Fennel on Toast - Hearty Icelandic Fare {Katie at the Kitchen Door}

Bacalo Potatoes with Carrots and Fennel

Recipe adapted from North: The New Nordic Cuisine of Iceland. Serves 4.

  • 1 lb. salt cod
  • 4 large carrots, peeled and cut into bite-sized pieces
  • 2 TBS olive oil, divided
  • sea salt and pepper to taste
  • 1 lb. waxy potatoes
  • 1/2 c. heavy cream
  • 4 slices whole grain bread
  • 2 TBS mustard
  • 2 fennel stalks, peeled into ribbons using a vegetable peeler
  1. Place the salt cod in a bowl and fill to cover with cold water. Soak in the water in the refrigerator for 24 hours, changing the water 2 to 3 times. When you are ready to prepare the meal, drain and rinse the soaked fish. If it has them, remove and discard the skin and bones. Set the fish aside.
  2. Preheat the oven to 400°F. Toss the carrot pieces with 1 TBS of the olive oil and sea salt and pepper, and spread on a rimmed baking sheet. Roast, stirring every 10 minutes, until tender all the way through, about 20-30 minutes depending on the size of your pieces. Transfer the roasted carrots to a bowl and set aside.
  3. Add the salt cod to the roasting pan and roast until warmed through, about 8-10 minutes. Break into flakes and keep warm.
  4. Peel the potatoes and cut into chunks. Add to a large pot and cover with cold water. Salt water generously. Bring to a boil over medium-high heat, and boil until potatoes are tender, about 5-8 minutes. Drain the potatoes and mash with a potato masher. Add the heavy cream and mash until incorporated, then stir in the warm salt cod pieces. Season to taste with pepper.
  5. Rinse and dry the roasting pan, then brush the bread slices with the remaining 1 TBS of olive oil. Reduce the oven temperature to 350°F and toast the bread until golden brown, about 5-7 minutes per side. Remove the bread from the oven and spread with the mustard. Top with a generous heap of the potatoes and cod, and several pieces of roasted carrot. Just before serving, shave the fennel stalks into thin ribbons using a vegetable peeler and place on top of the potatoes. Serve immediately.


1 February 15, 2015 Dessert

Sunday Dinner: Valentine’s Day Edition // Chanterelle and Chestnut Bisque, Coffee-Crusted Duck Breast, and Chocolate Espresso Layer Cake

Blood Orange Mimosas {Katie at the Kitchen Door} #valentines

Coffee-Crusted Duck with Balsamic-Brandy Sauce {Katie at the Kitchen Door} #valentines

Chocolate Espresso Layer Cake {Katie at the Kitchen Door} #valentines

This Sunday Dinner post is a big one – I’m not even entirely sure where to start. There’s the obvious, of course, that it was for our Valentine’s Day celebration, so it had to be special and a little bit decadent. There’s the fact that we prepared it during a blizzard, the third big storm in what feels like a never-ending chain of snow and white skies and freezing temperatures – a winter so beyond our imaginations that our city is stuck somewhere between awe, deep frustration, and total apathy. There’s the coffee-crusted duck, the centerpiece of the meal, that we lifted from the menu at Bouchard in Newport, where we spent a wonderful evening last weekend, dining in quiet elegance before slipping back to a room with a fireplace and a four-poster bed, where I wanted to stay forever. There’s the champagne we popped last night, the leftovers of which we unexpectedly took to a blizzard brunch around the corner – because day-drinking and eating waffles is a pretty good way to spend a blizzard. There’s the chocolate espresso layer cake, which we ate thick slices of in bed this morning with our morning coffee, our windows completed whited out by the snow whirling outside. There’s the chanterelle bisque, made from chanterelles we foraged in the middle of the summer, a time so green and warm and damp that it seems like it happened in another lifetime. These recipes have so many bits and pieces of memories tucked inside them it’s hard to sort out a clear thread between them – and now of course they will bring back to us the Valentine’s Day Blizzard of 2015, another weekend spent together grateful for a quiet and warm house in which to hide away and dream of spring.

Blood Orange, Endive, and Radicchio Salad {Katie at the Kitchen Door} #valentines

Chestnut and Chanterelle Bisque {Katie at the Kitchen Door} #valentines

The menu we made for this dinner is wintery, earthy, and elegant all at the same time, with rich flavors tied one to the next: blood orange, endive, chanterelle, chestnut, coffee, brandy, chocolate. Brilliantly colored blood orange mimosas spiked with Campari and honey. A salad of bitter endive and radicchio topped with blood orange slices, goat gouda, and toasted hazelnuts. A velvety bisque of roasted chestnuts and chanterelles. A gorgeous duck breast, coated in coffee and drizzled with rich brandy-balsamic sauce. And a cake – two fat layers of chocolate cake spread thickly with chocolate-espresso buttercream. Everything turned out beautifully, and although there are certainly a lot of components, it was doable to prepare everything in one afternoon, and still sit down with enough energy to enjoy the meal and each other’s company.

Chocolate Espresso Layer Cake {Katie at the Kitchen Door} #valentines

The Menu
Blood Orange Mimosa
Endive and Blood Orange Salad
Chanterelle and Chestnut Bisque
Coffee-Crusted Duck Breast with Brandy-Balsamic Sauce
Chocolate Espresso Layer Cake

Past Sunday Dinners:

May 26, 2013: Coffee-and-Chile Rubbed Strip Steaks with Chimichurri Sauce; Charred and Smoky Belgian Endives; Oven-Roasted Potatoes; Strawberry-Sour Cream Ice Cream

July 1, 2013: Strawberry-Lime Agua Fresca; Smashed Pea, Dill, and Feta Crostini; Chilled Asparagus Soup with Meyer Lemon Yogurt; Mustard Spaetzle with Mushrooms; Ricotta Bavarese with Red-Wine Poached Rhubarb

October 28, 2013: Braised Lamb Shanks with Gremolata; Creamy Polenta with Fresh Corn and Blue Cheese; Roasted Brussels Sprouts; Classic Apple Pie

March 31, 2014: Fried Halloumi with Spring Veggies and Strawberry-Basil Gastrique; French Gnocchi with Watercress Sauce; Strawberry-Rhubarb Meringue Pots

August 31, 2014: Roasted Garlic, Ricotta, and Maple-Roasted Cherry Tomato Crostini; Eggplant and Pesto Napoleons; Maple Mixed-Berry Pie

Like what you just read? Subscribe to Katie at the Kitchen Door on Feedly or Bloglovin‘, or follow along on Facebook, Twitter, Pinterest, Instagram, or Google+. Thanks for reading!

Blood Orange Mimosas {Katie at the Kitchen Door} #valentines

Blood Orange Mimosa

Serves 2.

  • 1/2 c. freshly squeezed blood orange juice (from about 2 oranges)
  • 1 1/2 oz. Campari
  • 1 TBS honey
  • chilled Prosecco or Champagne
  1. Whisk together blood orange juice, Campari, and honey until honey is dissolved. Divide between two champagne flutes and top with prosecco or champagne. Stir gently with a long handled spoon or small whisk. Serve immediately.

Blood Orange, Endive, and Radicchio Salad {Katie at the Kitchen Door} #valentines

Endive and Blood Orange Salad

Serves 4.

  • 1 small head of radicchio
  • 1 large Belgian endive
  • 3 blood oranges
  • 1/4 c. hazelnuts, chopped and lightly toasted in a dry pan
  • 2 oz. thinly sliced goat gouda or other goat cheese
  • 2 TBS champagne vinegar
  • 1/4 c. olive oil
  • sea salt and pepper to taste
  1. Remove and discard the outer leaves from the radicchio and cut out the thick core at the bottom. Roughly chop or shred the radicchio and place in a bowl. Remove the outer leaves from the endive. Slice into thin rounds and add to the bowl with the radicchio. Toss the two vegetables together to evenly combine.
  2. Peel the oranges. Juice one of the oranges so that you have 1/2 cup of juice. Slice or supreme the remaining 2 oranges and set aside.
  3. Assemble the salads by dividing the radicchio mixture between four plates. Top each with several pieces of blood orange, a spoonful of the toasted hazelnuts, and a few slices of the goat gouda. To make the dressing, whisk together the blood orange juice, champagne vinegar and olive oil until well combined. Season to taste with salt and pepper and drizzle over the salads. Serve immediately.

Chestnut and Chanterelle Bisque {Katie at the Kitchen Door} #valentines

Chanterelle and Chestnut Bisque

Serves 2-3.

  • 2 TBS butter
  • 1/3 c. finely diced onion
  • 2 c. fresh chanterelles, cleaned and torn into bite-sized pieces
  • sea salt and pepper to taste
  • 1 c. peeled, roasted chestnut pieces
  • 3 c. chicken stock
  • 3 sprigs fresh thyme
  • 1/2 c. heavy cream
  1. Melt the butter in a large frying pan over medium heat. Add the onion and saute until translucent, about 5 minutes. Add the chanterelles and saute until soft and browned on the edges, about 8-10 minutes, stirring frequently. Season to taste with salt and pepper. Set several spoonfuls of the cooked chanterelles aside (for garnishing the soup).
  2. Add the remaining chanterelles, chestnuts, chicken stock, and thyme to a soup pot and bring to a simmer over medium heat. Simmer for 10-15 minutes, then remove from the heat. Spoon out the thyme stems and discard. Transfer the soup to a blender and add the heavy cream. Blend on high until very smooth. Pour into bowls and garnish with the reserved chanterelles. Serve immediately.

Coffee-Crusted Duck with Balsamic-Brandy Sauce {Katie at the Kitchen Door} #valentines

Coffee-Crusted Duck with Brandy Balsamic Sauce

Inspired by dinner at Bouchard. Serves 2-3

  • 2 medium duck breasts, trimmed of fat
  • 4 TBS freshly ground coffee beans
  • 2 TBS dark brown sugar
  • 1 tsp sea salt
  • 1 tsp freshly ground black pepper
  • 3/4 tsp chili powder
  • 3 TBS butter, divided
  • 2 tsp flour
  • 1/4 c. brandy
  • 1 TBS balsamic vinegar
  • 1/2 c. stout or other dark beer
  1. Preheat the oven to 375°F. Mix the coffee, brown sugar, salt, pepper, and chili powder together in a small bowl. Rub the mixture all over the duck breasts so they are fully coated. Melt 2 TBS butter (or duck fat, if you’d like) in a dutch oven over medium-high heat. Place the duck breasts in the pan and sear for 1 minute on each side. Flip them a second time (to return to the original side) and transfer the pan to the preheated oven. Cook the breasts for 5-7 minutes, to at least an internal temperature of 130°F. Remove from the oven, transfer to a cutting board or plate and let rest for at least 5 minutes.
  2. Scrape as much of the coffee grounds as you can out of the dutch oven and discard. Melt the remaining 1 TBS of butter in the dutch oven over medium heat. Add the flour and stir to make a paste, cooking for 60 seconds. Add the brandy to the pan (don’t stand over the pan as you do this, as the alcohol will evaporate rapidly and can make you quite dizzy), followed by the balsamic and the stout. Stir to make a thick sauce and cook for 2-3 minutes, until thick and syrupy. Remove from the heat. Slice the duck on the bias and serve drizzled with the brandy-balsamic sauce.

Chocolate Espresso Layer Cake {Katie at the Kitchen Door} #valentines

Chocolate Espresso Layer Cake

  • 1 recipe of Add A Pinch’s “Best Chocolate Cake,” baked in three 6×2 inch pans for 35-40 minutes
  • 1 recipe Chocolate-Espresso Flour Buttercream, recipe below
  1. Once you have baked the three cake layers, turn out onto a cooling rack and let cool completely. Use a serrated knife to trim the dome from each cake so that you have flat layers. Frost the cooled cake with the buttercream, using a dot of buttercream on your cake plate to hold the cake steady. If the cake is crumbing too much as you frost, refrigerate the cake briefly before continuing to frost. Chill the frosted cake for at least 30 minutes before serving.

Chocolate-Espresso Flour Buttercream

Adapted from Serious Eats basic Flour Buttercream. Makes about 3 cups of frosting.

  • 4 TBS flour
  • 1 c. granulated sugar
  • 2 tsp espresso powder
  • 1 c. whole milk
  • 2 oz. unsweetened chocolate, chopped into bite-sized pieces
  • 2 sticks salted butter, softened to room temperature
  1. Whisk the flour, sugar, and espresso powder together in a medium saucepan until smooth. Whisk in the milk, and place over medium heat. Bring the mixture to a low boil, whisking the entire time. As the mixture begins to boil it will thicken to a custard like consistency – still whisking, cook the custard for one minute, then remove from the heat. Add the chopped chocolate and whisk until melted. Continue whisking the custard until it has cooled to body temperature, about 5 minutes. Set aside.
  2. In a large bowl, beat the softened butter until it is light and fluffy. If it is greasy, refrigerate for a few minutes to make it more firm. Add the cooled chocolate custard to the whipped butter one spoonful at a time, beating to thoroughly incorporate the custard into the butter between additions. If the frosting begins to break or separate, refrigerate for a few minutes before continuing to add the chocolate custard. Once all the custard has been incorporated into the butter, refrigerate the buttercream for 20-30 minutes before frosting your cake. If you refrigerate the buttercream for longer than 30 minutes, you will need to allow it to come back to slightly below room temperature before using.

0 February 11, 2015 Food

Albertsons “Cantry” // Chipotle and Black Bean Chilaquiles

Chipotle and Black Bean Chilaquiles with Grilled Pineapple {Katie at the Kitchen Door}

Chipotle and Black Bean Chilaquiles with Grilled Pineapple {Katie at the Kitchen Door}

Canned goods are a cheap and easy way to ensure that you always have the foundation of a good, homemade dinner on hand, especially in the winter when fresh produce is more expensive and has to travel much further to get to you (at least for those of us in Northern climes). Like many home cooks, they are an essential part of my pantry – I always keep canned tomatoes and a variety of canned beans on hand, a habit that I picked up in college and that has stuck with me. In my first year with a kitchen, one of my dinner-time staples was a can of black beans mixed with a can of tomatoes, frozen corn, and a variety of spices – an easy, cheap, and nutritious meal for a busy college student.

Chipotle and Black Bean Chilaquiles with Grilled Pineapple {Katie at the Kitchen Door}

This month, Albertsons and Shaw’s are celebrating “National Canned Food Month” by featuring tasty and easy recipes that make good use of canned goods. When they asked me to participate by coming up with a recipe using primarily canned goods, I quickly thought back to my tomatoes-and-beans days. While I’d like to think I’ve come a long way in terms of the quality and elegance of the meals that I make since then, I do still love that combination. I’ve elevated it here into Chipotle and Black Bean Chilaquiles, which are topped with cheese, avocado, and grilled pineapple. If you’re unfamiliar, chilaquiles are a Mexican dish of fried tortillas simmered in sauce, then served with a variety of toppings. It’s typically a breakfast or brunch dish, and I’ve seen it on quite a few trendy brunch menus recently, usually with a fried egg on top for good measure. My version makes use of canned tomatoes and canned chipotles in adobo for the sauce, and tops the tortilla chips with canned black beans and frozen corn to make a more filling, wholesome meal. The sauce has a mild heat, and the sweetness of the grilled pineapple topping makes a great match for it.

Chipotle and Black Bean Chilaquiles with Grilled Pineapple {Katie at the Kitchen Door}

You can find the recipe for these chilaquiles over on the Albertsons website. Also, be sure to head over to the Albertsons Cantry homepage and check out the other easy and affordable canned goods recipes they are featuring. By voting for your favorite recipe (chilaquiles! chilaquiles!) you can also enter to win a giftcard.

This is a sponsored conversation written by me on behalf of Albertsons. The opinions and text are all mine.

13 February 9, 2015 Drink

USVI Travelogue // Piña Sunrise Cocktail

Honeymoon Beach, St. John - USVI Travelogue {Katie at the Kitchen Door}

Pina Sunrise Cocktail {Katie at the Kitchen Door}

Sapphire Beach, St. Thomas - USVI Travelogue {Katie at the Kitchen Door}

Two weeks ago, Trevor and I got back from a gorgeous week spent in the US Virgin Islands. Since then, it has done nothing but snow in Boston. Snow on snow on snow. Record-breaking snow. Headed into the 5th snow day of the past two weeks tomorrow, I thought perhaps we all could take a moment and indulge in some pictures of white sandy beaches and aquamarine water. And when we’re done hating New England/February/cold/precipitation, let’s make an over-the-top tropical cocktail and pretend we’re all on an island together.

Pavilions and Pools, St. Thomas - USVI Travelogue {Katie at the Kitchen Door}

Pavilions and Pools, St. Thomas - USVI Travelogue {Katie at the Kitchen Door}

Where We Stayed

I booked this trip on a whim back in August, when I happened to see a great deal on flights to St. Thomas. It was originally booked as a Thursday night to Monday morning sort of trip, so we decided that the easiest thing to do would be to stay on St. Thomas and wander over to St. John for the day if we wanted. Of course, between numerous airline schedule changes and the blizzard, we actually ended up being away for a full week – not exactly the weekend getaway I planned, but I can’t say I mind the extra downtime too much. We booked a villa at Pavilions and Pools through AirBnB (the listing is here, if you’re interested – we would recommend it and it’s certainly a better deal than most hotels!). It was a great spot – a private plunge pool, a big private deck, a comfortable and bright bedroom and sitting room, an outdoor-ish shower, and a small kitchen. The privacy and extra space were great, as was spending each afternoon lying on the pool floaties with a glass of cold chardonnay and a book. We were able to walk to both Sapphire and Lindquist beaches, and the team at Pavilions provided us with snorkel gear and beach towels. The roads in St. Thomas are windy and hilly with no sidewalk or shoulder, so even the 1/2 mile walk into Red Hook was out of the question, but we could easily flag down the $1 open-air safari taxis at the entrance to the villa complex for a 3 minute ride into town. We chose not to rent a car and are glad – we didn’t want to spend all our time driving and the adventure of driving on those crazy roads (and on the left!) was not high on our list – but if we had wanted to explore more of the island we would have spent a fortune on taxis (taxis charge per person and rates are not really standard). As it was, we were happy with our two beaches, the dining options in Red Hook, and the easy ferry to St. John.

Hiking on St. John - USVI Travelogue {Katie at the Kitchen Door}

Sapphire Beach, St. Thomas - USVI Travelogue {Katie at the Kitchen Door}

What We Did

This trip was booked with the explicit purpose of not doing much, so I had to continually remind myself that it was OK to do just that. Trevor had a miserable sinus infection for most of the trip, but he let me drag him around a little bit anyways. Sapphire Beach was the easiest option – just a short walk down a dirt road from Pavilions and Pools. It is gorgeous, but a bit crowded with cruise traffic. Lindquist was a semi-treacherous 5 minute walk down the busy road, and charged a $2 per person fee, but was much quieter and longer, and the lack of amenities gave it more of that remote, desert-island feel (this may have been enhanced by the commercial they were shooting of white horses running along the beach). We snorkeled at both beaches and it was really awesome – I don’t think I’ve been snorkeling since I was 8 or 9 and it really is so cool. We must have seen over 30 different types of fish, and the reef at Lindquist was intact with purple fans and brain coral and many other formations. I probably spent 10 minutes floating and watching a huge school of “Dorie fish” (I mostly only know about tropical fish because of Finding Nemo, sorry) nibble at the coral.

Sunset in Red Hook, St. Thomas - USVI Travelogue {Katie at the Kitchen Door}

Iguana, Hiking on St. John - USVI Travelogue {Katie at the Kitchen Door}

On our second day we took the ferry from Red Hook over to St. John, about a 20 minute ride. Cruz Bay seemed like a much cuter town than Red Hook, although we didn’t walk around and explore at all. Instead, we hit the trails of the USVI National Park – starting right behind the visitor center in Cruz Bay, we took the Lind Trail down to Honeymoon Beach and then connected back to the Caneel Hill Trail, which took us up and over two major hills and down to Caneel Bay Resort. I had thought there was a separate beach at Caneel Bay, but the public beach access signs led us probably another mile back to Honeymoon Beach, so we ended up just hiking back to Cruz Bay instead of taking a taxi from Caneel Bay as planned. If I did it again, I would do a loop, starting on Caneel Hill to begin with and then taking Lind Trail back from the beach on the way back. Caneel Hill is not the most popular trail in the park, but it was convenient that we did not have to take a cab to a trailhead and back again, and it was a challenging and well-maintained trail with great views of the islands from the top of Caneel Hill. On our last afternoon we took a safari into Charlotte Amalie, the major town on St. Thomas – since it was Sunday, I knew that some places would be closed, but literally, everything in the whole town was closed! All the shops, restaurants, bars… it didn’t seem like a town that I would love spending time in (just a bit touristy and shopping-oriented), but if you do go, definitely don’t go on Sunday.

BBQ Food Truck, St. Thomas - USVI Travelogue {Katie at the Kitchen Door}

What We Ate

The USVI are not really reknowned for their culinary offerings, and overall we found the food on the island a bit boring and overpriced. Of course, we’re spoiled by the wealth of interesting and affordable restaurants all over Cambridge and Boston, so we have high standards. That said, a few places we ate at are worth mentioning here. Off The Grid, a BBQ food truck located at the top of the hill down to Sapphire Beach was a great stop – they had delicious ribs, pulled pork, wings, sausages, and brisket all sizzling away on a big outdoor grill, plus a sweet and tangy “painkiller” BBQ sauce made with rum and pineapple juice, and good veggie sides like grilled sweet potatoes and rice and beans. They served beer and sangria and we enjoyed our meal at their picnic tables, looking out over the islands.

Lunch with a View, St. Thomas - USVI Travelogue {Katie at the Kitchen Door}

Our one fancy dinner was at Caribbean Fish Market, one of the few restaurants on the islands that is open on Sundays. The ambiance was nice – it’s part of a resort complex but right on the beach, and we ate outside with live piano music. My chicken was actually quite good, somewhat surprising at a fish restaurant – it was stuffed with bacon and spinach and served with a mango chutney and sweet plantains – but Trevor’s tuna was very bland, certainly not worth $38. I’m not sure where I’d come down on the restaurant in the end – although it seemed overpriced, it was on par with every other nice restaurant on the island, and I think the same is probably true for the food quality. In Red Hook itself we only really partook in liquid dining, but we did have quite a fun time at Melt killing time before dinner. The bar has a younger vibe, and we loved that they have games available – a table behind us was playing Connect 4, there was skee ball and some sort-of skinny air hockey, and Trevor and I spent a solid hour playing Texas Hold ‘Em. The sandwiches there looked good – we were tempted to call off our nice dinner and stick with grilled cheese and tater tots, but we didn’t in the end. Next time. It’s worth mentioning that we were there in the late afternoon so it was a quiet crowd – I’m not sure what it would be like later at night, but likely a lot livelier and less conducive to board games.

Pina Sunrise Cocktail {Katie at the Kitchen Door}

This Cocktail

Neither Trevor nor I actually had any froofy tropical drinks while we were away – we mostly drank $4 rum and cokes served in plastic cups, and I don’t recall there being any drink umbrellas (something to improve upon during our next vacation, surely). But rum and coke in a plastic cup doesn’t exactly have that “transport me out of the snow and onto the beach” effect, so I’ve come up with something a lot more exciting. I’m calling it Piña Sunrise, as it’s somewhere between a piña colada and a tequila sunrise. It has three layers – a grenadine and pineapple layer, a pineapple and pineapple layer, and a coconut sorbet layer. Each layer is laced with rum and coconut rum, and it’s all frothy and cold and sweet and exactly the sort of thing you should drink on the beach. I special-ordered drink umbrellas to top it off, just to complete the vibe. So drink up! Winter will be over soon.

Pina Sunrise Cocktail {Katie at the Kitchen Door}

Piña Sunrise Cocktail

Serves 2.

  • 1 scoop coconut sorbet
  • 1/4 c. whole milk
  • 3 ice cubes
  • 3 oz. coconut rum, divided
  • 1.5 oz. white rum
  • 3/4 c. frozen pineapple cubes
  • 3/4 c. pineapple juice
  • 1/2 tsp grenadine plus a dash for glasses
  1. Add the coconut sorbet, milk, ice cubes, and 1.5 oz (one shot) of the coconut rum to a blender, and blend until smooth. Pour into a container and set aside.
  2. Add the remaining 1.5 oz of coconut rum and 1.5 oz of white rum to the blender along with the pineapple cubes and pineapple juice. Blend on high until smooth. Pour half the mixture into a container and set aside. Add the grenadine to the mixture still in the blender and pulse a few times to mix.
  3. Place a dash of grenadine in the bottom of two glasses. Divide the pink pineapple-grenadine mixture between the two glasses. Carefully pour the yellow pineapple mixture on top of the pink layer, then carefully pour the coconut sorbet mixture on top of the yellow layer. The layers may mix slightly, but you should see a gradient going from pink at the bottom to white at the top. Serve immediately (with a cocktail umbrella!)

0 February 6, 2015 Food

Movie Night with Cambria Wines: Chicken-Broccoli Alfredo Pizza and Maple-Chili Popcorn

Movie Night: Chicken-Broccoli Alfredo Pizza {Katie at the Kitchen Door} #cambriawines #sponsored

We’ve made it to Friday! I thought it might never get here. The first week back after vacation is always daunting, and kicking the week off with a snowstorm and finishing it with sub-zero temperatures doesn’t exactly make it go any faster. But we made it through the week, we’re currently experiencing a brief but welcome bout of sunshine, and it’s just about time to pop open a bottle of wine for the weekend.

Movie Night: Maple-Chili-Butter Popcorn {Katie at the Kitchen Door} #cambriawines #sponsored

Movie Night: Chicken-Broccoli Alfredo Pizza {Katie at the Kitchen Door} #cambriawines #sponsored

When I was little, Friday nights were always movie night in my family. My mom would make do-it-yourself calzones – everyone got a rolled out pizza dough, and we’d stuff and roll them up to our heart’s content. Mine was usually just a tiny spoonful of sauce covered by huge handfuls of cheese, and maybe a few olives (mostly because I liked eating them off the ends of my fingertips). If we were lucky, my mom would haul out the giant air-popper, too, and we’d watch the kernels whirl around inside until they popped out the chute at the top. There was a little metal tray on top of the popper that melted the butter as it worked, and we always used an entire stick of butter – a decadent amount, really, but the popcorn tasted amazing. Then we’d all pile into the den and tune into the latest Disney Channel Original Movie, snacking on popcorn and pausing only to pull our calzones from the oven.

Movie Night: Chicken-Broccoli Alfredo Pizza {Katie at the Kitchen Door} #cambriawines #sponsored

Although I still occasionally participate in movie night when I’m at home (there are still calzones, but no more air popper), movie night as an adult is a little bit different. For starters, there’s wine. Specifically, a bottle of Cambria Pinot Noir. And because I have to live up to your expectations of me as a fancy-food-blogger, there’s fancy pizza and fancy popcorn to go with said wine. Most recently, the pizza took the form of Chicken-Broccoli Alfredo Pizza – a favorite childhood combination, comforting and creamy and mild. The homemade alfredo sauce utilizes a roux as a base, allowing you to use milk instead of cream and still achieve a thick and creamy texture (and after lunch today, I can also confirm that the leftover alfredo sauce on pasta tastes exactly like Annie’s mac’n’cheese. Nostalgia overload). The chicken is simply shredded rotisserie chicken (easy is king on Friday nights!), and the broccoli is roasted before going on top of the pizza for additional flavor and crispiness. For the popcorn, I went the maple-chili-butter route – it was Trevor’s idea and it was a great one. It hits all the sweet-salty-spicy notes I crave in snack food, making it almost impossible to stop eating it. And with those three elements – pinot, pizza, and popcorn, plus a great movie, a cozy blanket, and ideally a good snuggling partner – you’re ready for the weekend.

Find the recipes for this pizza and the popcorn over on the Cambria Wines blog!

Disclaimer: This post is sponsored by Cambria Wines. All opinions are honest and my own.

Like what you just read? Subscribe to Katie at the Kitchen Door on Feedly or Bloglovin‘, or follow along on Facebook, Twitter, Pinterest, Instagram, or Google+. Thanks for reading!

0 February 2, 2015 Breakfast

Clean Eating: Buckwheat Porridge

Buckwheat Porridge with Berries and Skyr {Katie at the Kitchen Door}

Since here in Boston we’re kicking off the week with another snowstorm, I thought now might be a good time to share this warming, filling, buckwheat porridge – just the sort of thing you need on Monday morning before trekking out into the snow. Buckwheat is becoming a bit of a health darling, and I can totally see why. Of the gluten-free grains/seeds available, it’s one of my favorites – it cooks up soft, nutty, and slightly sweet, almost like a tiny pasta. I actually ate buckwheat for the first time in Russia, where it’s commonly served as a side dish with lunch or dinner. Never having seen or eaten it in the States, it took me quite a while to figure out what it was called in English. I enjoyed it so much that I brought home a few bags with me – not realizing it’s easily purchased here, as well.

Buckwheat Porridge with Berries and Skyr {Katie at the Kitchen Door}

Buckwheat Porridge with Berries and Skyr {Katie at the Kitchen Door}

Cooked with a bit of milk and cinnamon, buckwheat turns into a lovely breakfast porridge, softer than other grains and less sticky than oatmeal. When I first made this porridge, I had asked Trevor to pick up “some berries,” and he brought home four boxes of gorgeous blackberries, raspberries, and currants – hard enough to find in the summertime, the tiny, jewel-like currants were like a small miracle in the middle of winter. Feeling a bit Nordic because of the snow and the currants and the buckwheat, and because, let’s face it, Nordic is trendy these days, I topped the porridge with the berries, a dollop of Skyr, and a drizzle of honey for the loveliest winter breakfast.

Like what you just read? Subscribe to Katie at the Kitchen Door in the box on the right or on Feedly or Bloglovin‘, or follow along on Facebook, Twitter, Pinterest, Instagram, or Google+. Thanks for reading!

Buckwheat Porridge with Berries and Skyr {Katie at the Kitchen Door}

Buckwheat Porridge

Serves 1.

  • 1/2 c. buckwheat groats
  • 1/2 c. water
  • 3/4 c. milk
  • 1/2 tsp. cinnamon
  • 1 TBS maple syrup
  • 1 c. mixed berries
  • spoonful Skyr or Greek yogurt, for topping (optional)
  • honey, for topping (optional)
  1. Add the buckwheat and water to a small saucepan. Bring to a simmer, then add the milk. Cook at a low simmer until most of the liquid is absorbed and the buckwheat is tender, about 10-15 minutes. Stir in the cinnamon and maple syrup. Pour into a bowl and top with the berries, Skyr, and a drizzle of honey. Serve immediately.

0 January 27, 2015 Asian and Indian

La Crema Game Day: Korean Gochujang Wings

Korean Gochujang Wings {Katie at the Kitchen Door} #LaCremaStyle

Korean Gochujang Wings {Katie at the Kitchen Door} #LaCremaStyle

Another post brought to you from on the road, although this time it’s not exactly planned. Trevor and I spent the last 5 days on vacation in the USVI, for some much needed sun and unplugged time. I’m pretty sure it was not particularly high on Trevor’s all-time-best vacation list, given that he’s been battling a sinus/ear infection pretty much since we landed on the island, but it was still great to be outside and soak in the views, even if we took it a little slower than we might have otherwise. However, since we were supposed to fly back into Boston Monday night and Blizzard Juno (man, I really hate that they name snowstorms now) had other ideas, we are now on an unplanned, extended layover in Miami. It’s a little bit of a pricey layover… but things could be a lot worse. A) We aren’t stuck in Boston pining for a missed vacation and B) we’re on a beach while everyone at home is just listening to the wind howl and watching the snow pile up.

Korean Gochujang Wings {Katie at the Kitchen Door} #LaCremaStyle

So I’m still mostly in vacation mode, but I am starting to think ahead to what needs to be taken care of when I get home, and what’s coming up in the next couple of weeks. And one of those things is the big game this weekend. I’m not really much of a sports fan, but over the past 5 or 6 years, I’ve watched my baby brother turn my parents into diehard Patriots fans, to the point where I’ll show up in the house on game day to find everyone dressed in jerseys and cheering loudly for individual players. It’s a bit incongruous with my memories of growing up – my dad always loved soccer, but baseball, football, and basketball were things we played outside, not watched on TV. I’m OK with it, though, because if there’s one thing I can appreciate about watching football, it’s the food that comes with it. Nachos, chili, wings, guacamole, and pizza – it’s like junk food heaven. Of course when my family is cooking, junk food tends to be not that junky – homemade pizza and chili with cornbread are a far cry from the greasy fryolator food we associate with huge crowds and stadiums.

Korean Gochujang Wings {Katie at the Kitchen Door} #LaCremaStyle

Korean Gochujang Wings {Katie at the Kitchen Door} #LaCremaStyle

These wings are another example of classic stadium finger food given a healthier and more refined twist. Marinated in an exciting, Korean-inspired sauce, then baked instead of fried, they’re a bit more gourmet than buffalo wings but equally delicious. The sauce is primarily a mixture of gochujang – a spicy Korean red pepper paste – and pomegranate molasses, which adds tang and depth of flavor in addition to sticky sweetness. A few other strong flavors: fresh ginger, honey, and umeboshi plum vinegar round out the intense sauce for a balanced, spicy-sweet chicken wing. Tossing the sticky wings in toasted sesame seeds and chopped cashews after baking gives them a bit more crunch, and adds another element of flavor. While beer is the obvious choice for football-watching, it’s not the only one. I’m personally much more of a wine-lover, and these wings go just as well (if not better) with a glass of light red as with a cold beer. If you’re also a wine-lover, the La Crema Sonoma Coast Pinot Noir is a great pairing for these. The pomegranate notes in both the wine and the wing sauce will complement one another, and the Pinot Noir’s relatively light body makes it a good choice for serving with spicy food.

Find the recipe for these wings over on the La Crema blog!

Disclaimer: This post is sponsored by La Crema. All opinions are honest and my own.

Like what you just read? Subscribe to Katie at the Kitchen Door on Feedly or Bloglovin‘, or follow along on Facebook, Twitter, Pinterest, Instagram, or Google+. Thanks for reading!


  • « Go to Previous Page
  • Go to page 1
  • Interim pages omitted …
  • Go to page 12
  • Go to page 13
  • Go to page 14
  • Go to page 15
  • Go to page 16
  • Interim pages omitted …
  • Go to page 57
  • Go to Next Page »

Primary Sidebar

Subscribe!

Get creative recipes and menu ideas delivered straight to your inbox.

Most Popular

A House // Sweet Potato and Coconut Milk Soup with Brown Rice and Lentils

Monthly Fitness Goals: July // Homemade Spinach Wraps with Chopped Greek Salad

A New Job // Classic Seven-Layer Bars

Butternut Squash Carbonara with Fried Sage and Caramelized Onions

Happy Birthday, Trevor! // Peanut Butter Fudge

Cookbook Review and Giveaway: Home Made Winter

Drizly

Please note!

Full disclosure: if you purchase anything at Amazon using the above links or any other links to Amazon on this site, I will receive a small commission. Just so you know!

Copyright© 2025 · Cookd Pro Theme by Shay Bocks

This site uses cookies: Find out more.