• Skip to primary navigation
  • Skip to main content
  • Skip to primary sidebar
  • Home
  • Recipes
  • Features
    • Cookbook Reviews
    • Ingredient of the Week
    • Sunday Dinner
    • Fitness Goals
  • Travel
  • About
    • Privacy Policy
    • Cookie Policy
  • Work With Me

Katie at the Kitchen Door

Globally-inspired, seasonal recipes

Blog Page

0 December 6, 2013 Dessert

Food Lover’s Gift Guide 2013 // Chocolate Peppermint Bark Chip Cookies

Chocolate Peppermint Bark Chip Cookies {Katie at the Kitchen Door} #christmas #cookies

It’s that time of year again. Time for decorating and cookie-baking and holiday parties and racking your brains for inspiration for the perfect present. I know some people find gift-giving overly stressful and materialistic, but I actually love trying to find something that will be well loved by the people I love the most, something that will make them smile. So even though everyone and their mother seems to be writing a gift guide (or 6) this week, I’m throwing my picks into the ring, too. All of the items I’ve included here are related in some way to food, because this is, after all, a food blog. And really, do you know anyone who doesn’t like food? I mean, I actually do know a couple of those people, but I certainly don’t understand them, so I can’t really tell you what they want for Christmas. Also, all my gift suggestions are themed, because I like themes. And organizing things. Anyways, I hope you find some inspiration below, and if not, check out last year’s gift guide, or these ones from Ashley, Joanna, and The Every Girl.

Homemade Peppermint Bark {Katie at the Kitchen Door} #christmas

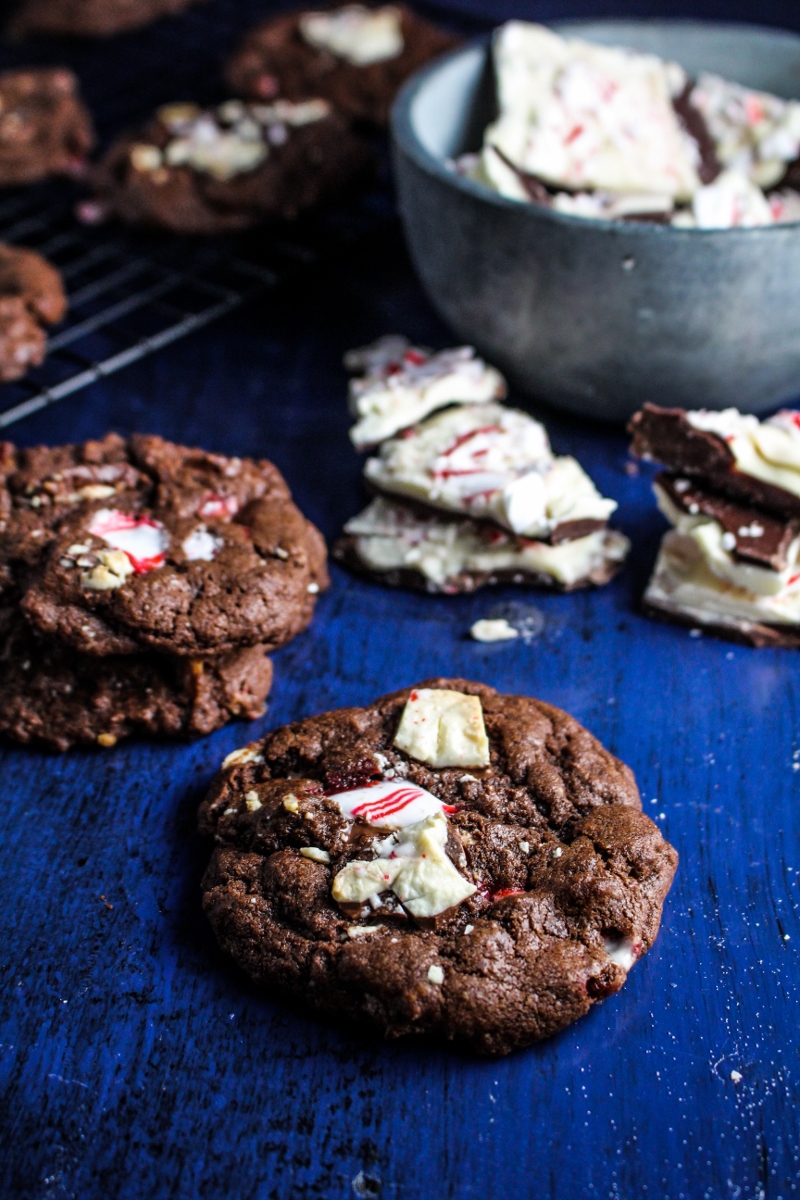
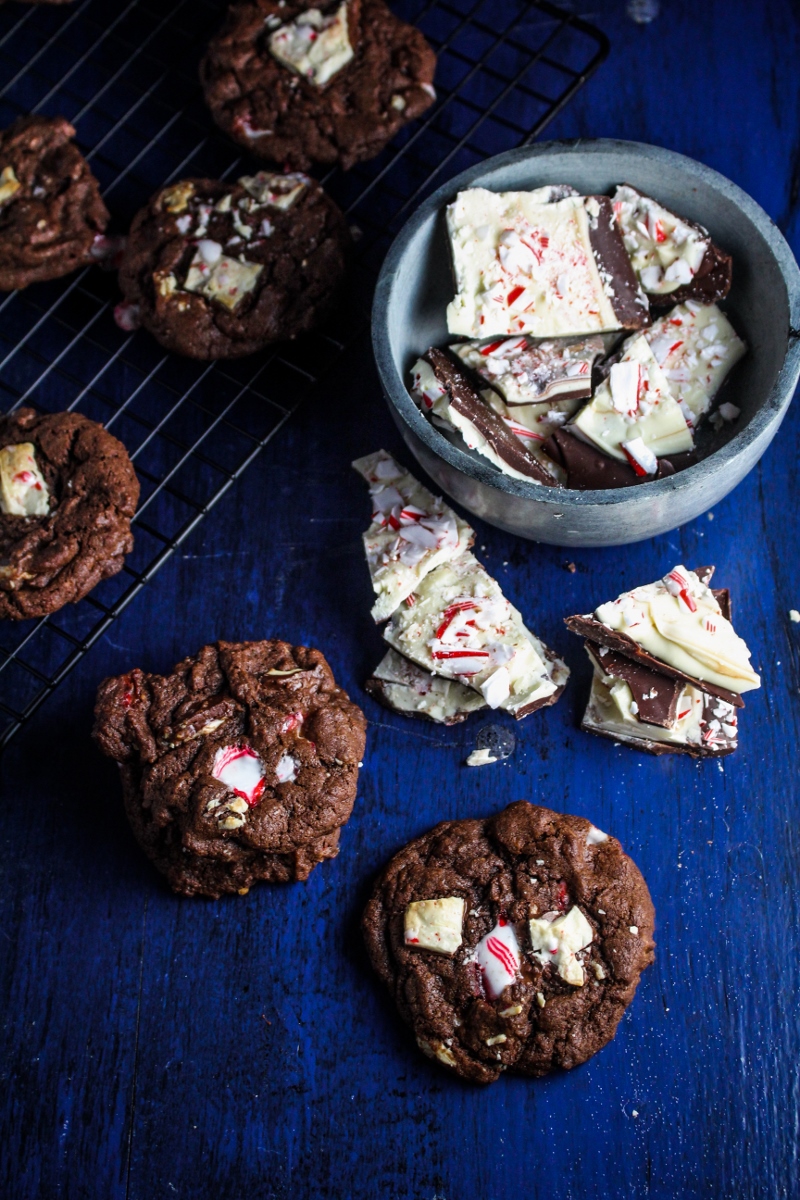
Shopping doesn’t get you into the holiday spirit? How about baking? Yeah? OK, good. Because I just made my first batch of Christmas cookies and I think you’ll like them. I thought I was being really creative when I thought of chopping up homemade peppermint bark and putting it in cookies, but, as with most recipes, a quick google search revealed that lots of people had this great idea well before me. Heidi made plain and chocolate versions of these way back in 2003, and hers were based on an apparently famous Neiman Marcus recipe. Still, the thought of these was too tempting to ignore, so I forged ahead and made my own version. They’re fudgey in the middle and just minty-sweet enough, and if you temper the chocolate correctly while making the peppermint bark, it should taste really smooth even when baked into the cookies. Scroll down for the recipe!

1) For the brewer

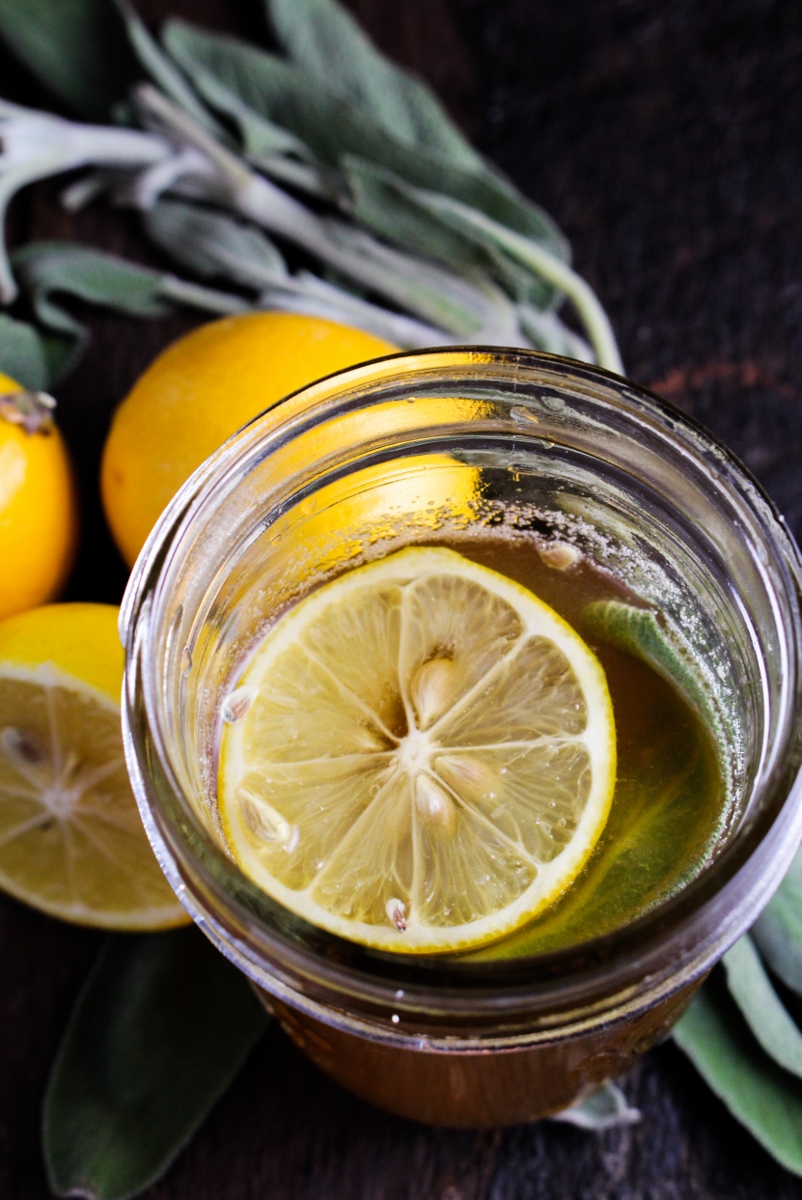
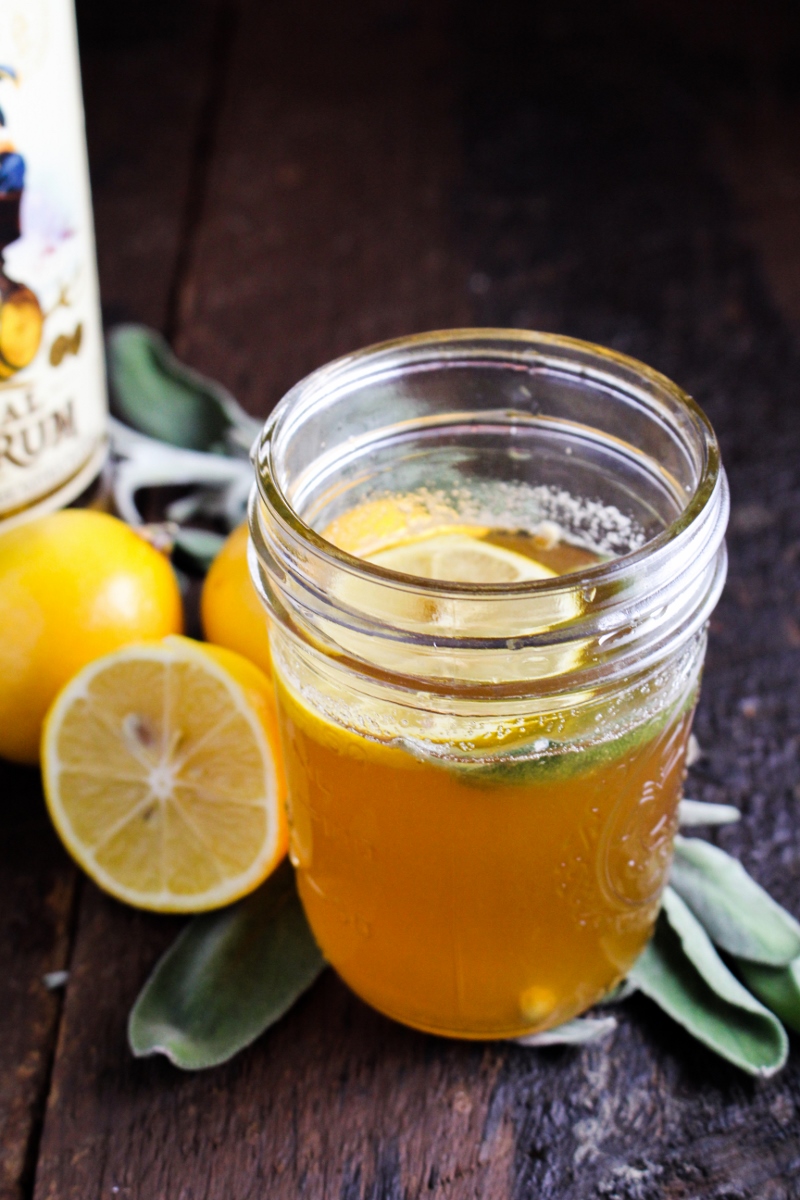
This has been a big food DIY experimenting year for us, and for many other food-focused Americans. (I don’t really want to self-identify as a hipster, but I’m worried that that’s kinda what that last sentence means…). Home-brewing has been our most successful form of experimentation, and our interest was kickstarted by Emma’s book, True Brews. Once we realized that home brewing is actually pretty easy and very rewarding, we were on a roll, with watermelon soda, blackberry wine, homemade sake, and cranberry mead all gracing our cabinets. Anyone with a back-to-basics ethos and an abundance of fresh fruit will appreciate being able to turn it all into booze.

Holiday Gift Guide: For the Home Brewer {Katie at the Kitchen Door} #christmas #giftguide

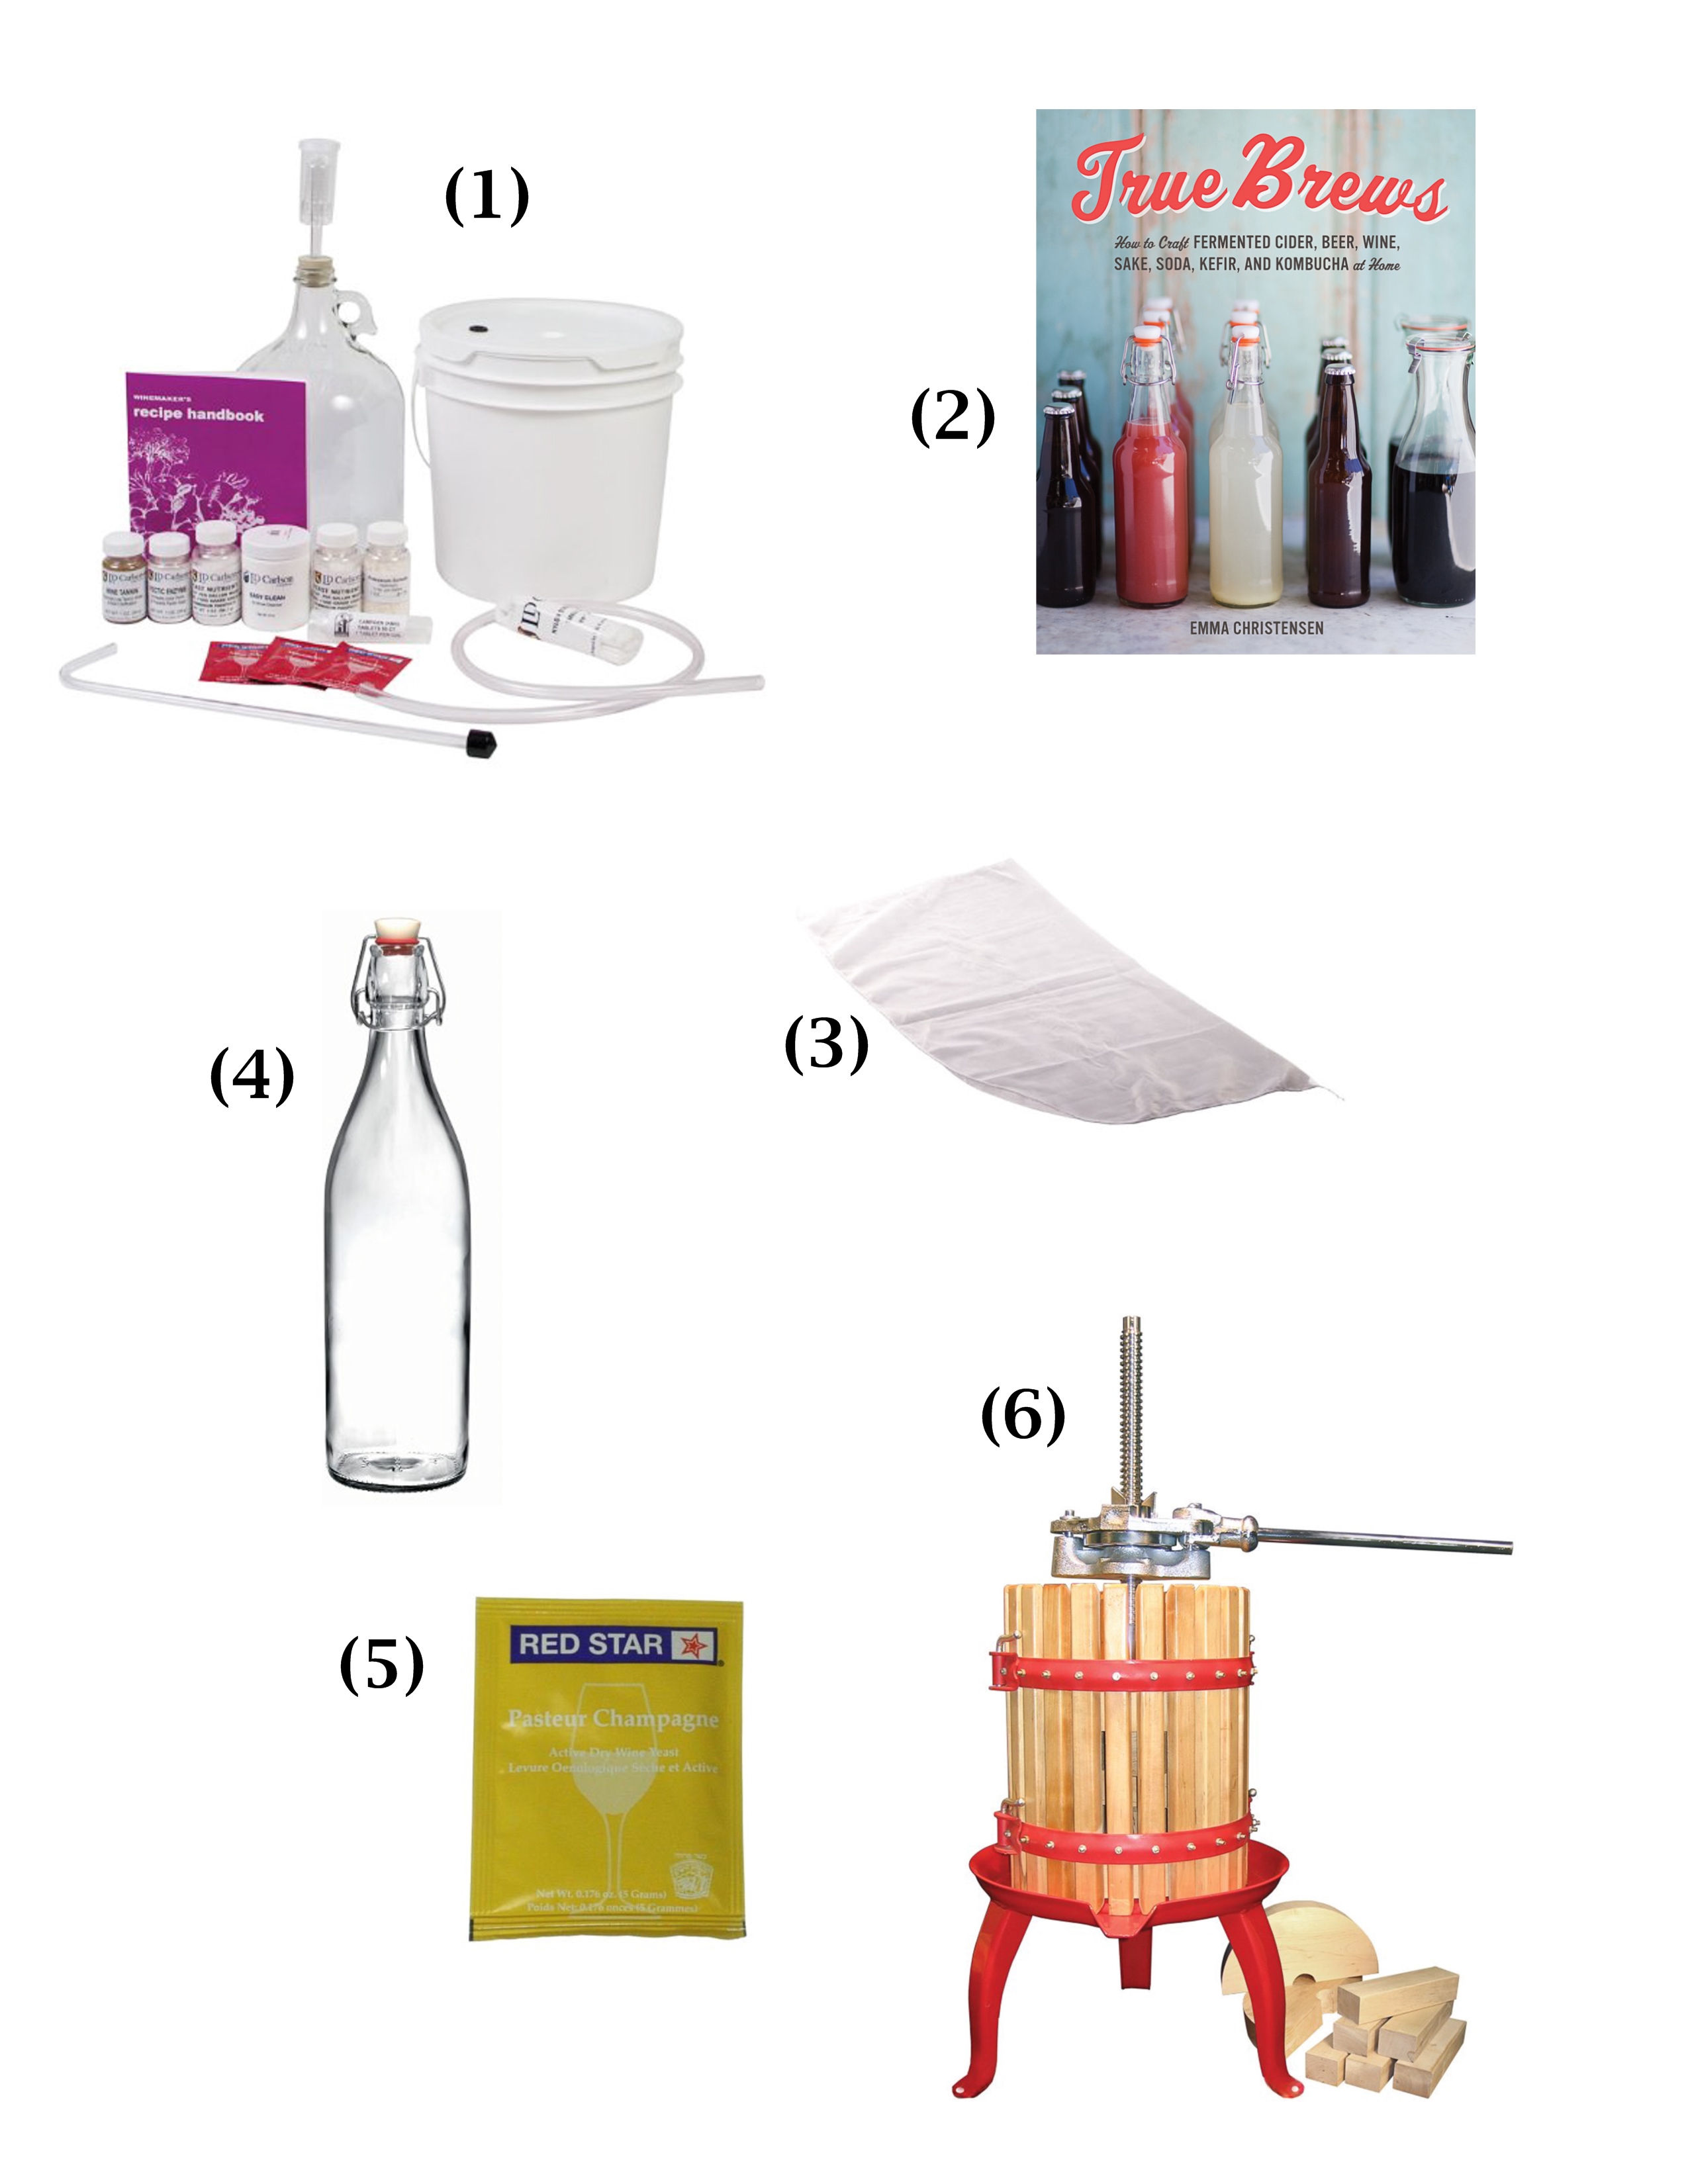
1) Fruit Wine Brewing Kit; 2) Cookbook: True Brews; 3) Fruit Straining Bag; 4) Bottles for Serving; 5) Champagne Yeast (for Sodas, some Ciders, some Meads); 6) Fruit and Wine Press

2) For the grillmaster

Personally, I like the idea of grilling more than I actually like grilling, but maybe all I need are some cool gadgets (like a smoking box!) to motivate me. There were a lot of great grilling cookbooks released this year, and the concept of cooking with live fire seems to be getting more popular in the food world. Bonus: if you get any of the below for someone you see frequently, you might even get treated to some really excellent hickory-smoked burgers.

Holiday Gift Guide: For the Grill Master {Katie at the Kitchen Door} #christmas #giftguide

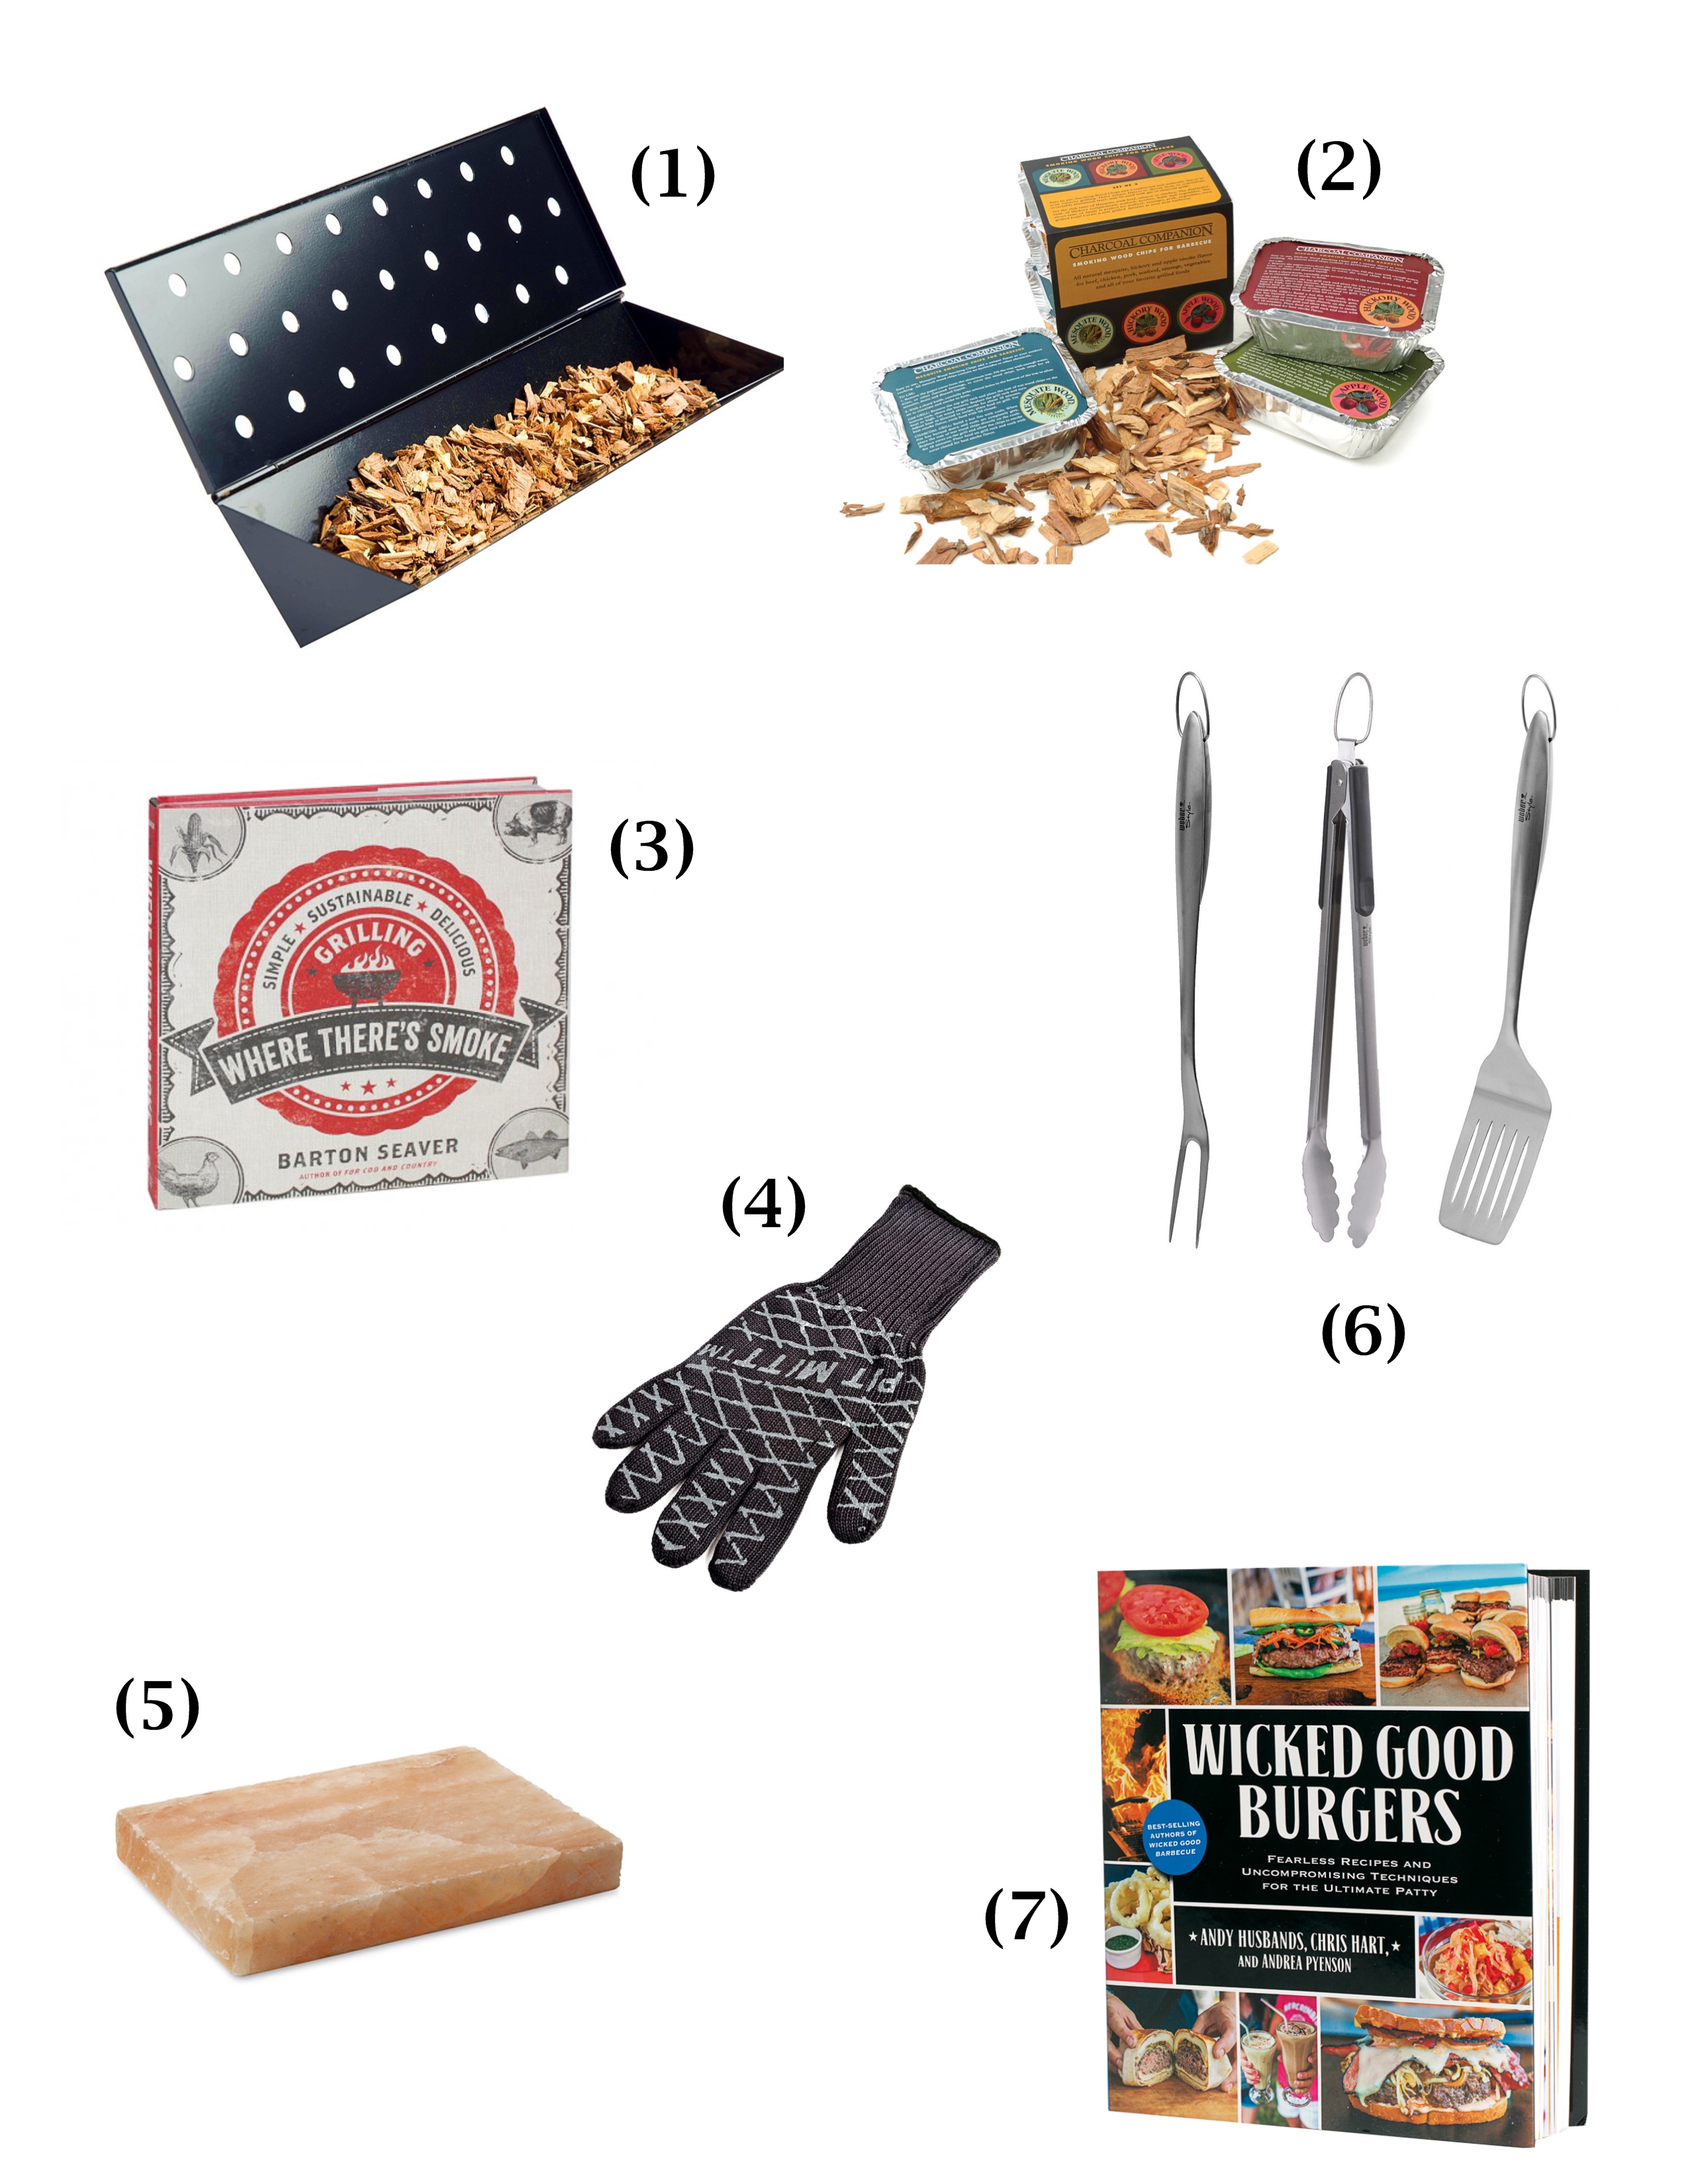
1) Smoker box; 2) Apple, Mesquite, and Hickory Smoking Chips; 3) Cookbook: Where There’s Smoke; 4) Barbecue Pit Gloves; 5) Himalayan Salt Block; 6) Grill Tools Set; 7) Cookbook: Wicked Good Burgers

3) For the ice cream fanatic

A few years ago for my birthday, my parents got me a cute red ice cream maker, and I love, love, love being able to make ice cream that’s ten times better than store-bought (well, not than Ben & Jerry’s, but that would be impossible) whenever I want. I use it all year, for treats like Pumpkin-Maple Ice Cream in the fall, Peppermint Stick in the winter, Strawberry-Sour Cream in the spring, and Cherry-Chocolate in the summer.

Holiday Gift Guide: For the Ice Cream Lover {Katie at the Kitchen Door} #christmas #giftguide

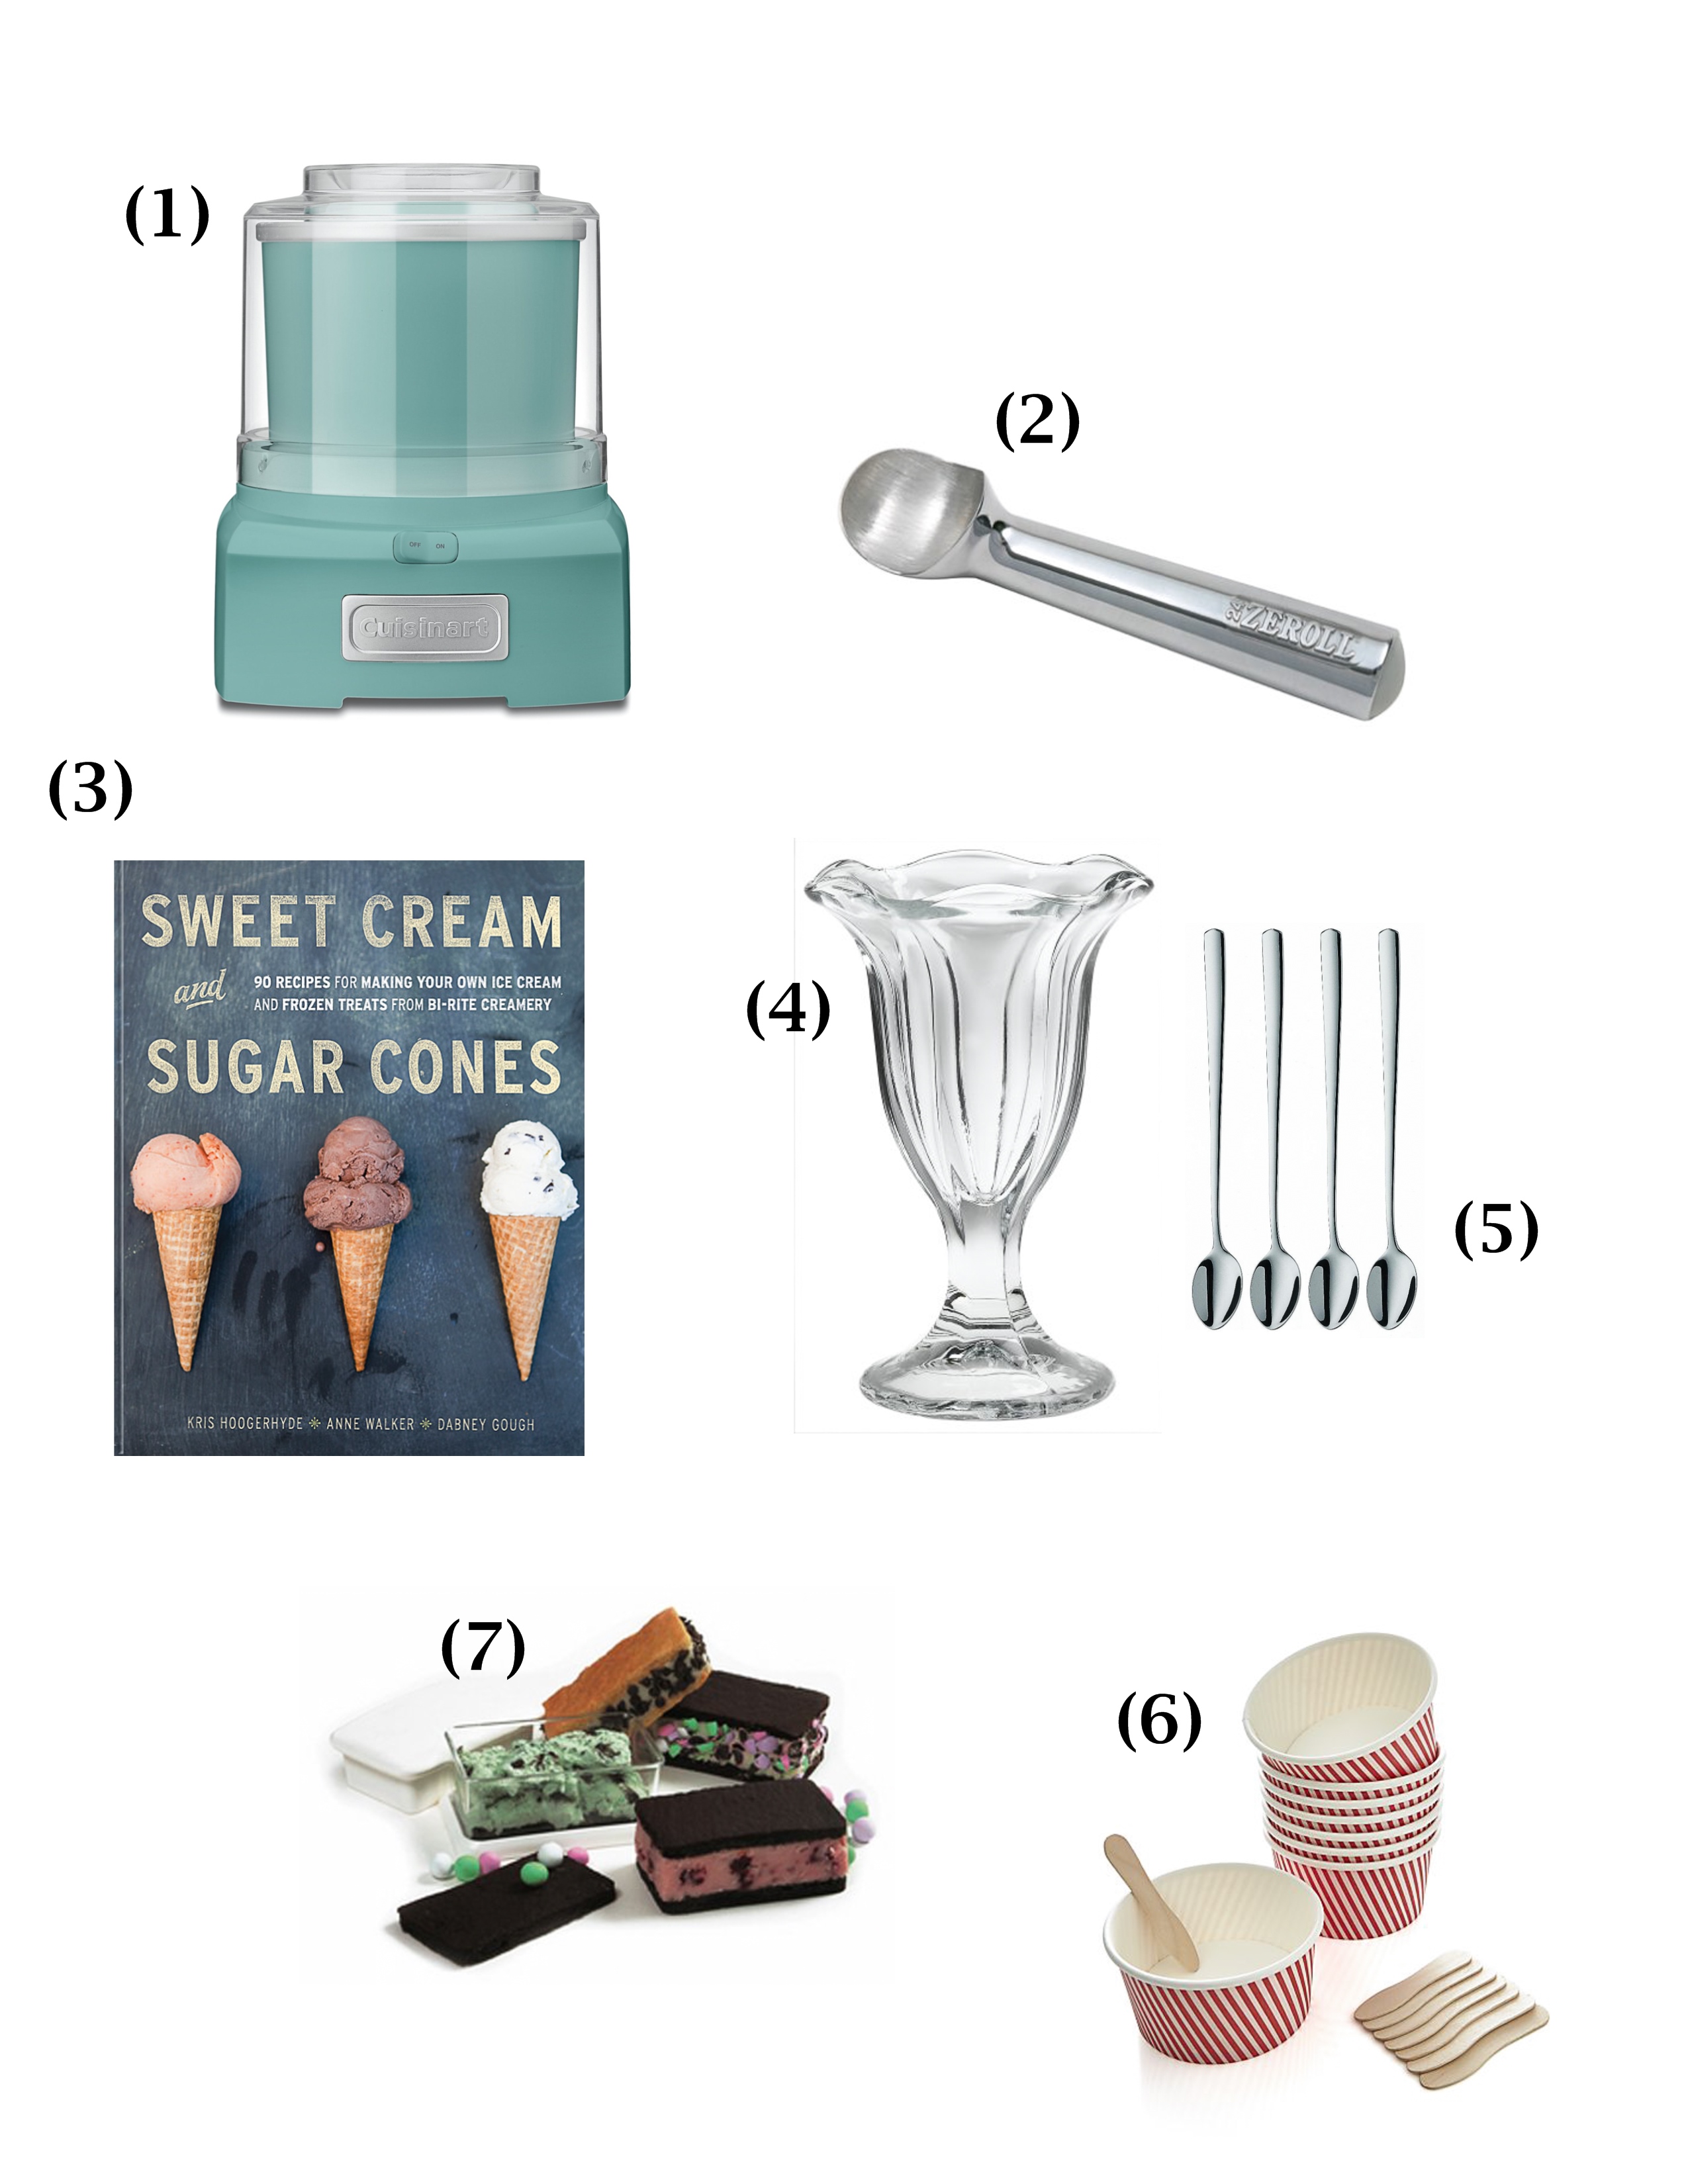
1) Cuisinart Ice Cream Maker; 2) Zeroll Ice Cream Scoop; 3) Cookbook: Sweet Cream and Sugar Cones; 4) Sundae Glasses; 5) Sundae Spoons; 6) Paper Cups; 7) Sandwich Maker

4) For the healthy food lover

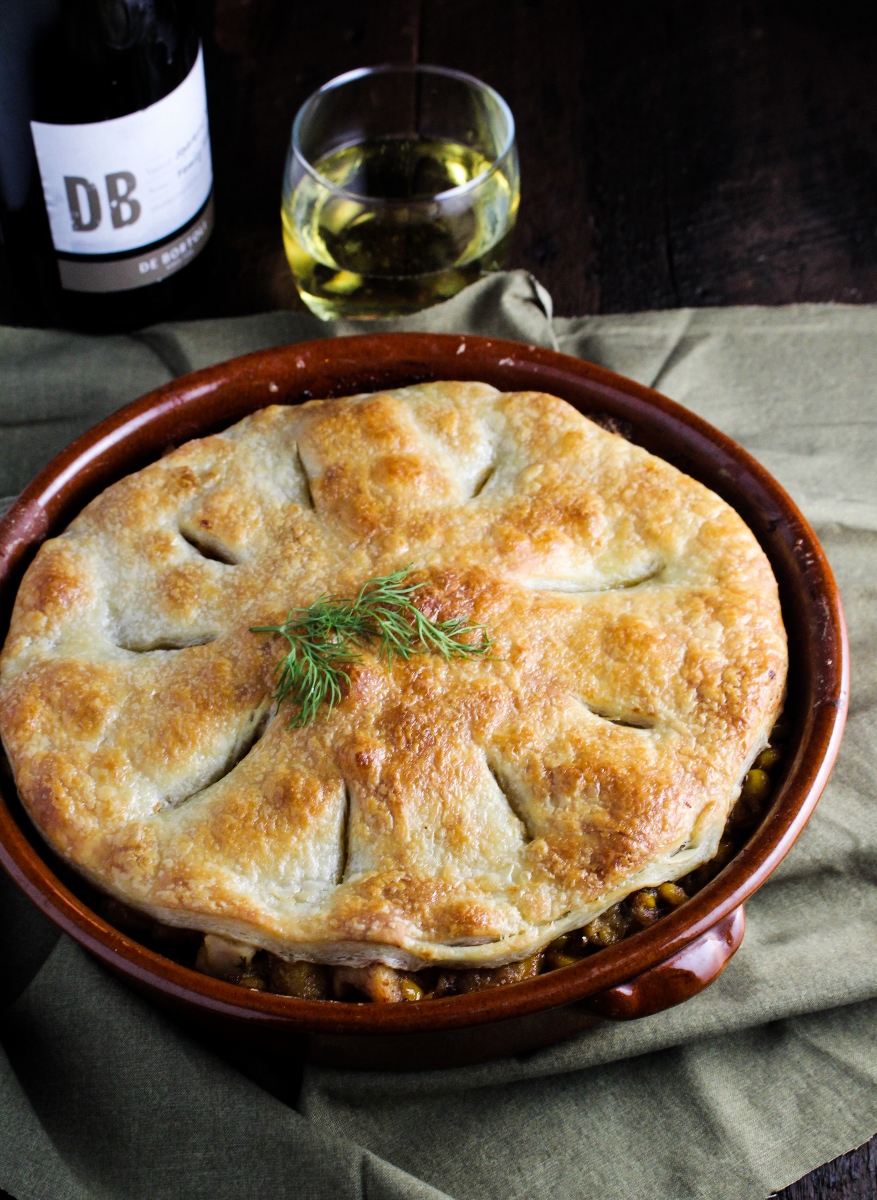
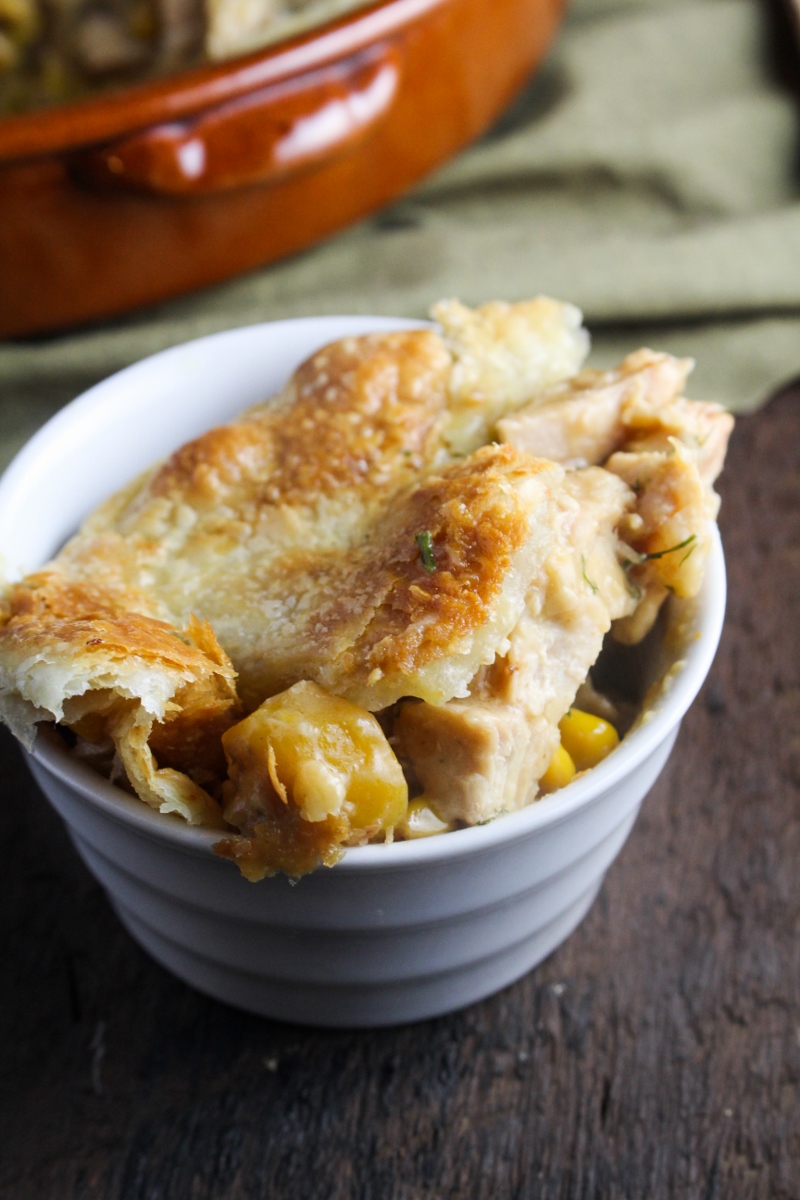
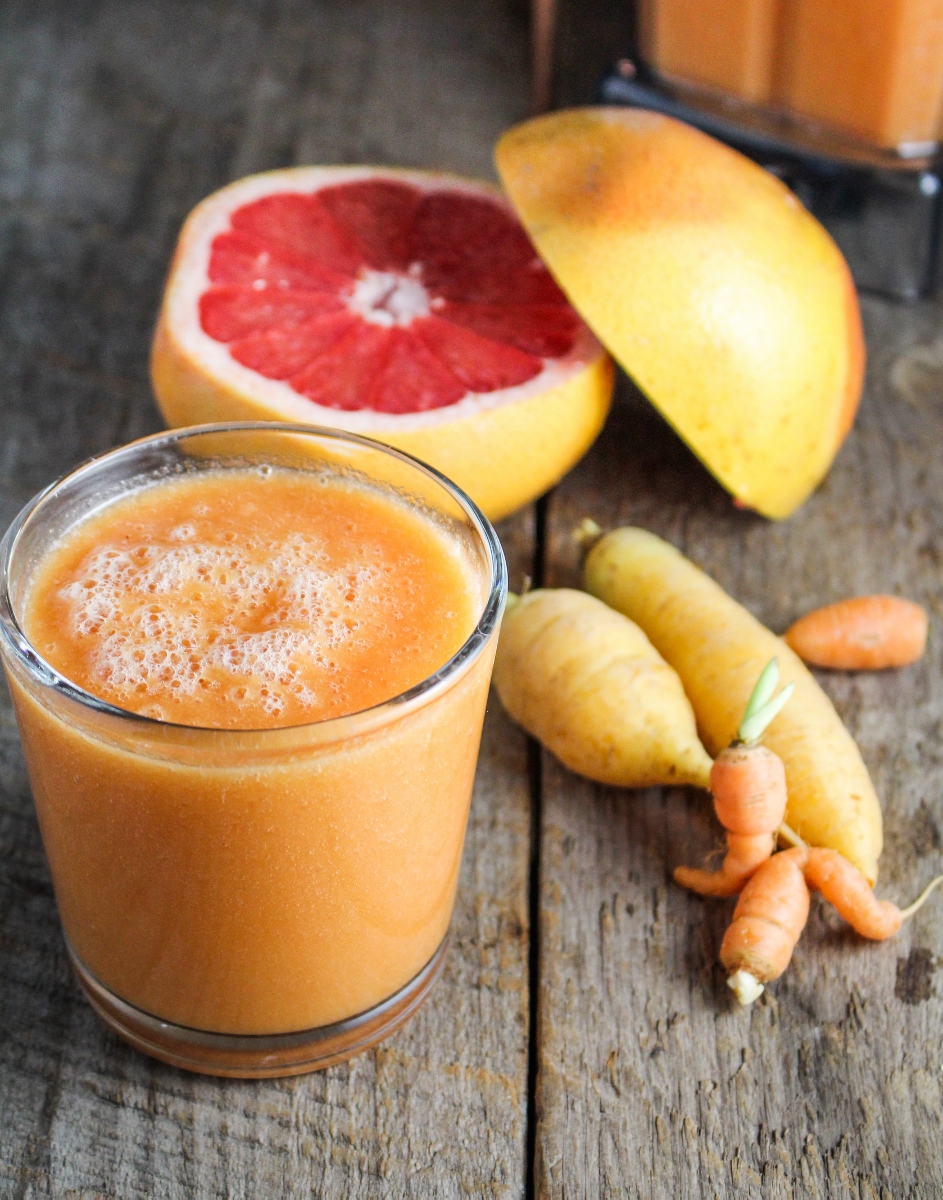
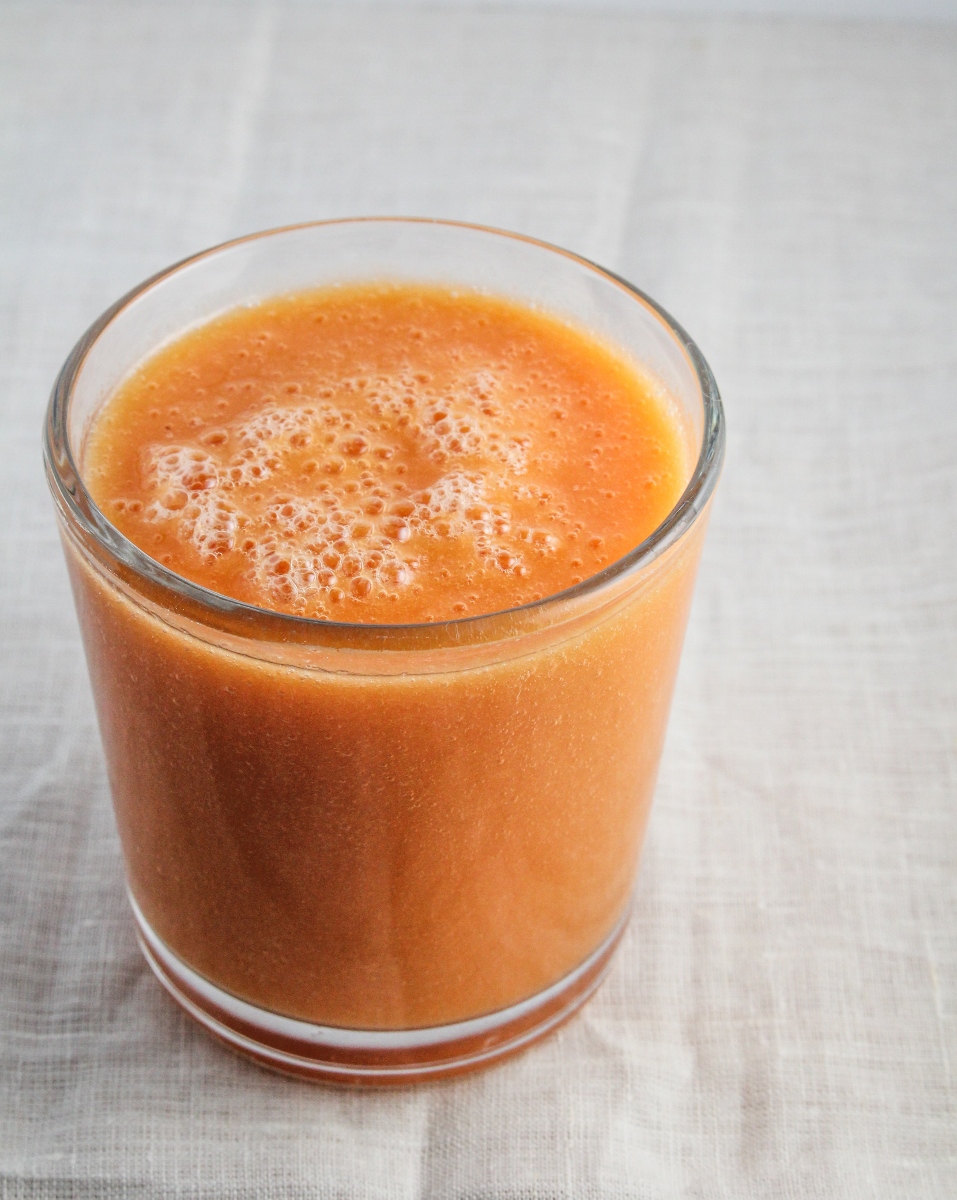
To make up for the times when I’m indulging in Creamy Chicken Pot Pie, Braised Lamb Shanks with Blue Cheese Polenta, and other blog treats, I try to stick to the lighter side of the food world when I’m not blogging. Green smoothies are a favorite of mine (and I really love that smoothie water bottle pictured below), and just generally eating more vegetables and farmer’s market produce is a huge step in the right direction. Make that easier for someone you love with some healthy cookbooks, a cute market tote, or a CSA subscription!

Holiday Gift Guide: For the Healthy Food Lover {Katie at the Kitchen Door} #christmas #giftguide

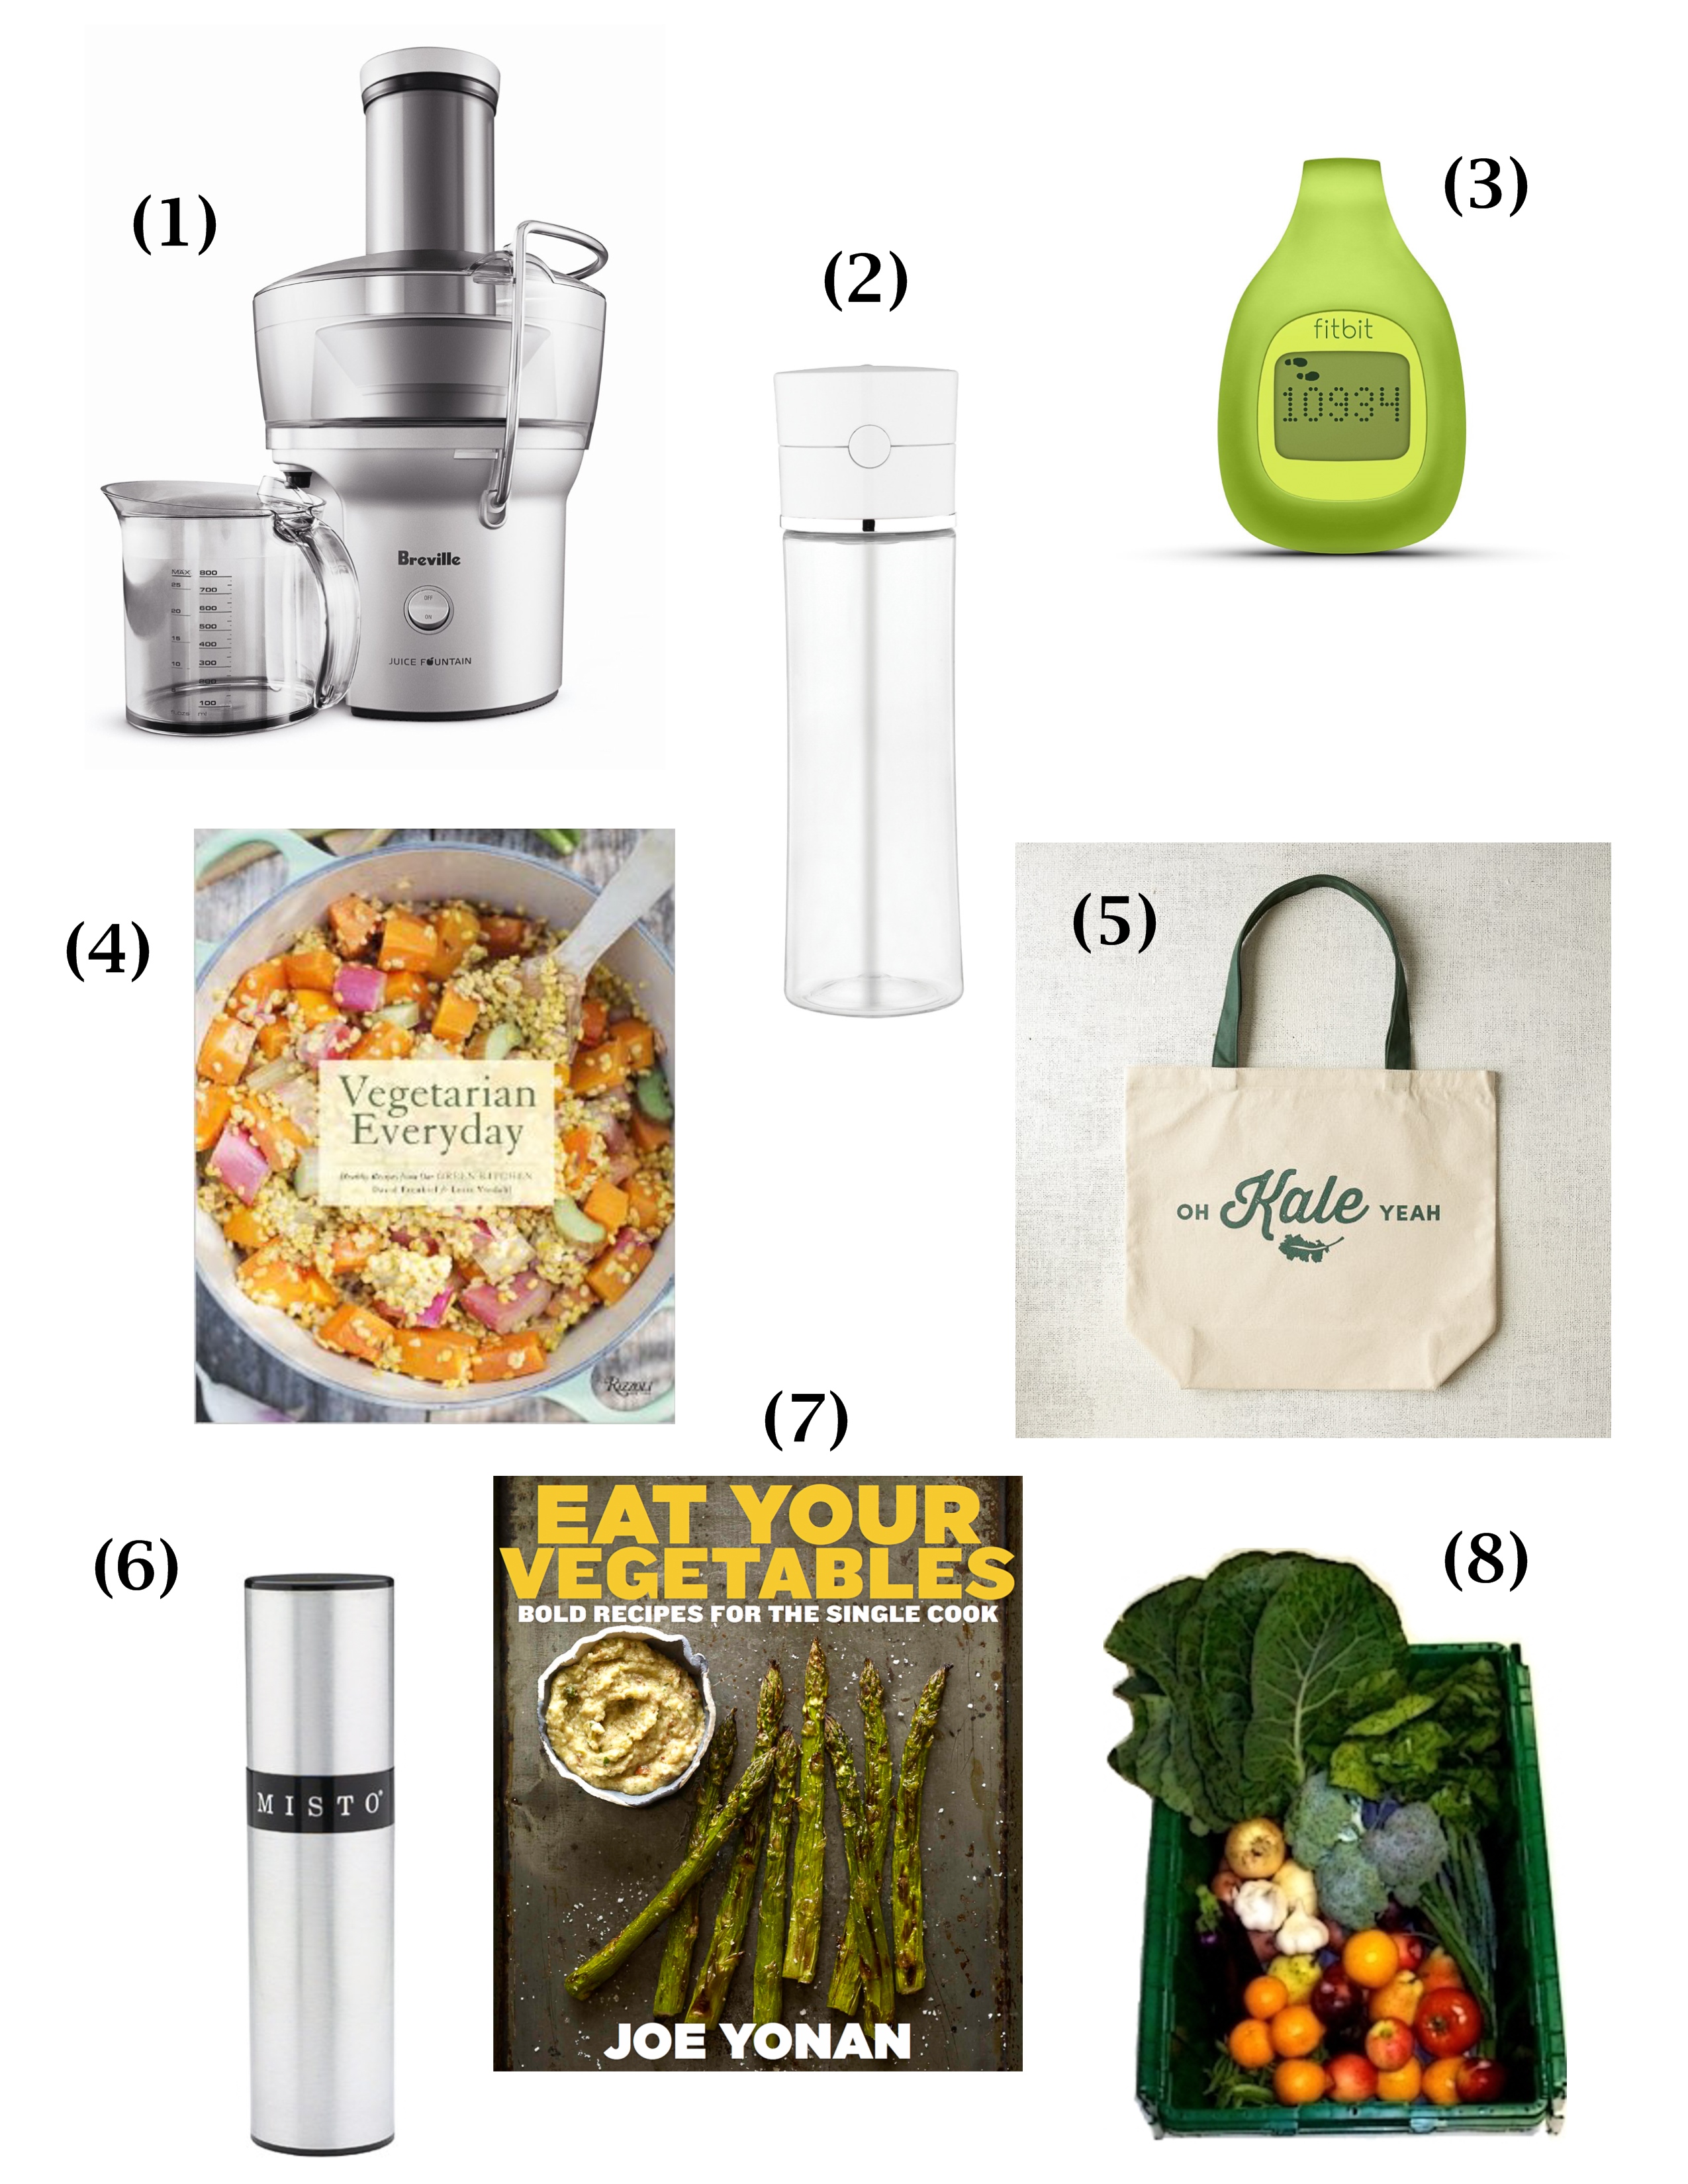
1) Compact Juicer; 2) Great Water/Smoothie Bottle; 3) FitBit; 4) Cookbook: Vegetarian Everyday; 5) “Oh Kale Yeah” Market Tote; 6) Olive Oil Mister; 7) Cookbook: Eat Your Vegetables; 8) Local CSA Subscription

So now that we’ve promised ourselves we’ll be healthy when we’re not indulging… let’s indulge. Christmas cookies!

Chocolate Peppermint Bark Chip Cookies {Katie at the Kitchen Door} #christmas #cookies

Chocolate Peppermint Bark Chip Cookies

Base recipe adapted from In the Sweet Kitchen. Makes 18 cookies.

  • 1 c. plus 2 TBS AP flour
  • 1/4 c. cocoa powder
  • 1/2 tsp baking soda
  • 1/8 tsp salt
  • 1 stick (1/2 c.) salted butter, at room temperature
  • 1/2 c. packed dark brown sugar
  • 6 TBS sugar
  • 1 large egg
  • 1/2 tsp vanilla extract
  • 1/4 tsp peppermint extract
  • 1 1/4 c. (about 8 oz.) peppermint bark bits, recipe below
  1. Preheat the oven to 350°F. Sift together the flour, cocoa powder, baking soda, and salt in a medium bowl, then whisk together until evenly combined. Set aside.
  2. In a medium bowl, beat the butter with the brown sugar and regular sugar until light and fluffy. Add the egg and beat until thoroughly combined. Beat in the vanilla and peppermint extracts.
  3. Add the flour mixture to the butter mixture in two additions, stirring to fully moisten the flour between additions. Stir batter until fully moistened, but don’t overmix. Stir in 1 c. of the peppermint bark bits until evenly combined.
  4. Line a large baking sheet with parchment paper, and place rounded spoonfuls of batter on the cookie sheet placed at least 2 inches apart. Place one or two pieces of the remaining 1/4 c. of peppermint bark bits on top of each cookie. Bake the cookies for 10-12 minutes, until the outside edges have begun to crack slightly and the center is set. Cookies will still be very fudgy in the middle when you take them out of the oven, but will firm up as they cool. Let cool for 3-5 minutes on the cookie sheet before transferring to a cooling rack.
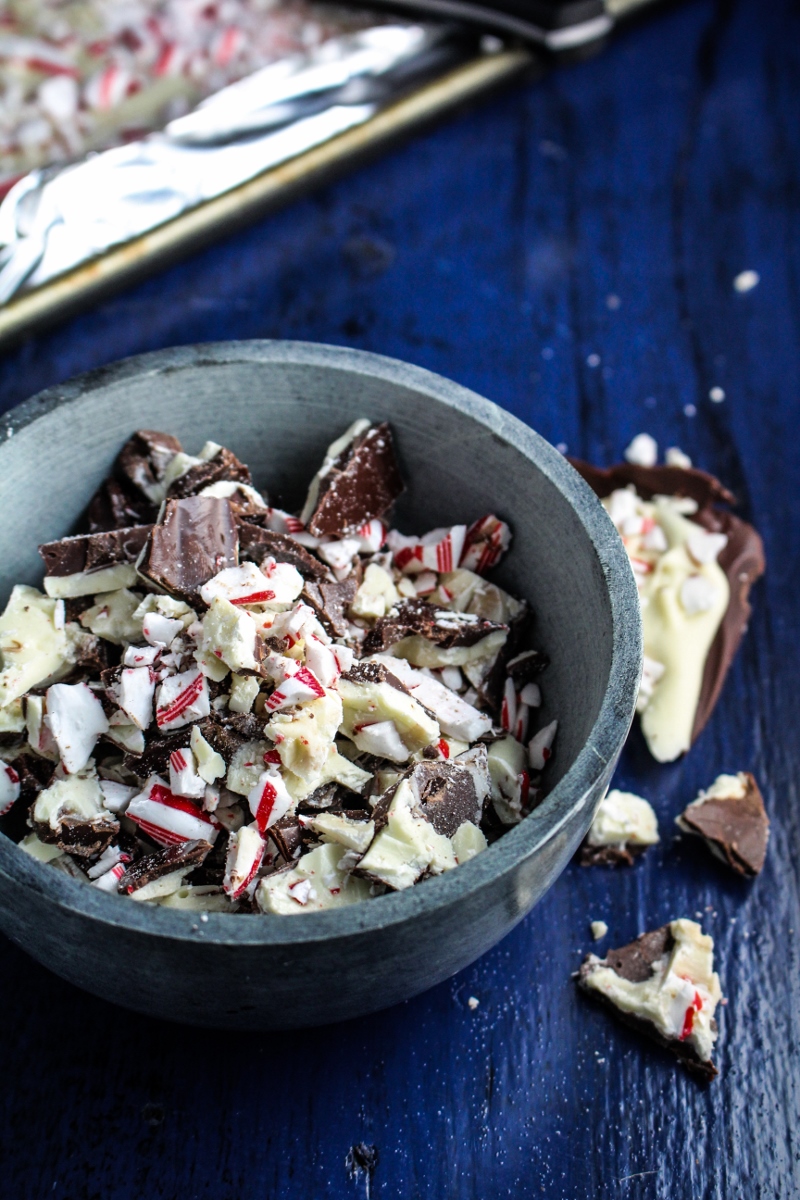
Homemade Peppermint Bark {Katie at the Kitchen Door}

Peppermint Bark

Recipe adapted slightly from Sara Moulton. Makes 2 lbs.

  • 12 oz. semisweet chocolate chips
  • 12 oz. white chocolate chips
  • 1/2 tsp peppermint extract
  • 12 candy canes, crushed (about 1 c. of crushed pieces)
  1. Bring a large pot of water to a simmer. Line a baking sheet with tinfoil, making it as smooth as possible on the bottom. Place the semisweet chocolate chips in a metal bowl, and set the bowl over the simmering water. Stir the chocolate chips until they are all just barely melted and the chocolate is thick and shiny, then use a spatula to scrape onto the lined baking sheet. Use the spatula to smooth the chocolate into an even layer of about 1/4 inch thickness – the chocolate will probably not fill up an entire baking sheet, which is fine. Place the baking sheet in the fridge until the chocolate has just started to set and is no longer shiny, about 10 minutes. You don’t want to let the chocolate get too cold, or it will not adhere to the white chocolate. On the other hand, if it’s still too warm when you add the white chocolate, you will not get clean layers but the two will marble.
  2. Clean out and dry your metal bowl, then add the white chocolate chips to it. Melt over the double boiler in the same manner as the semisweet chips. Once melted, stir in the peppermint extract. Remove from the heat. If your semisweet chocolate layer is not cool enough yet, alternate keeping the white chocolate over the double boiler and off to the side every 60-90 seconds to keep it about the right temperature. Once the semisweet chocolate is ready, pour the white chocolate on top and smooth out into an even layer. Sprinkle the candy canes on top of the white chocolate, pressing them in lightly with your fingers. Place the baking sheet in the fridge until the chocolate is fully set, at least 30 minutes. Stick a sharp knife into the chocolate in several areas to break up into smaller chunks. If it gets difficult to break up, put it back in the fridge until it becomes brittle again. Store in the fridge.

2 December 1, 2013 Cookbook

Book Club: Bountiful // Creamed Dill Chicken Potpie with Puff Pastry

Bountiful: Recipes Inspired by Our Garden

Bountiful: Recipes Inspired by Our Garden

The Book: Bountiful is the first cookbook from Todd Porter and Diane Cu, the couple behind the beautiful blog White on Rice Couple. Having followed their blog for some time, and feeling a little like I already know them, I found myself completely immersed in the stories of their childhoods, journeys, and lives together that they share throughout their book. The book, like their blog, is heavily inspired by their gorgeous garden (you can take a peak at it in this video), one of the main reasons I started following their blog in the first place (especially to drool over those citrus trees!). I loved reading their introduction to garden design, and I can only hope that our garden gives us enough fruits and veggies to try many of their recipes next summer. I also identify with the way they cook and eat – primarily vegetarian, but naturally so, with meat appearing here and there to bulk up a dish or add extra flavor – and the recipes they’ve included in Bountiful are simple and accessible, with easy-to-find ingredients and a focus on fresh produce. Organized by vegetable/fruit type, this book would be a good choice for anyone just learning to incorporate more fresh fruits and vegetables into their meals. Many of the recipes are for things I already make – rosemary lemonade, cream of tomato soup, kale and avocado salad – but even as an experienced cook I can see myself turning to this for inspiration for quick weeknight dinners and healthy homemade lunches. And I can’t forget to mention that their photography, like their writing style, is warm and peaceful, making you feel like you’ve been invited over for a casual afternoon garden party at their house. In short, Todd and Diane are just good, likeable people who make good, likeable food – if you don’t already know them, I think you’ll be pleased to meet them.

Creamed Dill Chicken Pot Pie with Puff Pastry {Katie at the Kitchen Door}

The Food: I’ve been wanting a good chicken pot pie recently, so when I saw the Creamed Dill Chicken Pot Pie with Puff Pastry recipe in Bountiful I knew it was the one I wanted to test, especially since I already had all of the ingredients in the fridge/freezer (which is a perfect example of the accessibility of this book). I love my mom’s chicken pot pie recipe, which is very traditional, so I was curious about how I’d like the different elements in this one – the brandy, the wine, the heavy cream, the corn, and the dill. All together, it was rich, creamy, and slightly sweet from the brandy and the corn, a very satisfying cold-weather dinner. Using ready made puff pastry for the crust made it pretty quick to put together (actually, if I’m being honest, Trevor did 95% of this one, so maybe it just seemed quick to me). And it smelled amazing, really, one of those recipes that will have you drooling at the oven door. Definitely a contender for a new winter dinner standby.

Recipe Shortlist: Homemade Barbecue Sauce; Creamed Haricot Verts with Toasted Almonds; Roasted Asparagus Spring Rolls with Bacon; Roasted Broccoli and Grilled Cheese Melt; Truffled Butternut Squash Crumble; Miso-Sesame Cucumber Salad; Blackberry Cabernet Crisp with Honeyed Whipped Cream; Cherry Bourbon Delight Cocktail

Disclaimer: I received a review copy of Bountiful free of charge from Abrams, but was not otherwise compensated for writing this review.

Creamed Dill Chicken Pot Pie with Puff Pastry {Katie at the Kitchen Door}

Creamed Dill Chicken Potpie with Puff Pastry

Recipe from Bountiful. Serves 6 to 8.

  • 2 lbs. boneless, skinless, chicken breasts or thighs
  • salt and freshly cracked black pepper
  • 4 TBS butter, divided
  • 4 medium shallots, peeled and sliced
  • 4 medium cloves garlic, peeled and finely minced
  • 1/2 pound carrots, peeled and cut into 1/2-inch chunks
  • 2 c. fresh or frozen corn kernels
  • 1/2 c. dry white wine
  • 2 TBS brandy
  • 1/4 c. flour
  • 1 c. heavy cream, plus more for brushing the pastry
  • 1 c. chicken stock
  • 1 TBS grainy mustard
  • 1/4 c. minced fresh dill
  • 1 lb. frozen puff pastry dough, thawed according to package directions
  1. Preheat the oven to 400°F. If the chicken pieces are thick, pound them flat between two sheets of wax paper (or carefully slice in half lengthwise). Season the chicken pieces with salt and pepper.
  2. Heat 2 TBS of the butter in a large saute pan over medium-high heat. Add the chicken pieces and cook until lightly browned, about 4 minutes per side. Remove the chicken from the pan and set aside.
  3. To the same pan, add another 1 TBS of butter, the shallots, garlic, carrots, and corn. Cook over medium heat, stirring occasionally, until the shallots begin to soften, about 5 minutes. Add the wine and brandy to the pan and simmer until the pan is almost dry, about 12 to 15 minutes. Add the remaining 1 TBS of butter to the pan and let melt, then stir in the flour. Cook, stirring, for 1 minute, then add the cream and stock. Simmer, stirring occasionally, until the sauce is thickened, about 5 minutes.
  4. Cut the browned chicken into 1/2-inch chunks and add them to the cream sauce. Stir in the mustard and the dill, then season to taste with salt and pepper.
  5. Fill a 2-quart baking dish with the dill chicken mixture. Lightly dust a work surface with flour and roll out the puff pastry into a sheet large enough to cover the top of your baking dish. Trim the pastry to the size of the baking dish, then place on top of the filling. Cut a few small slits in the top of the pastry to allow steam to vent. Brush the top of the pastry with heavy cream. Bake for 30 minutes, or until the pastry is deep golden. Serve hot.

13 November 28, 2013 Dessert

Captain’s Table Thanksgiving // Sweet Potato Souffles with Rum Raisin Sauce + Cranberry-Ginger Sparkling Rum Cider

Cranberry-Ginger Sparkling Rum Cider #CaptainsTable #Thanksgiving {Katie at the Kitchen Door}

Happy Thanksgiving everyone! I hope that none of you have had any major kitchen or travel mishaps, and that you’re all getting ready/happily in the midst of/recovering from a relaxing day of family, friends, and delicious eating. We’re in the car on our way up to Maine to see Trevor’s family, but before we sit down to overindulge, I wanted to share our Thanksgiving submission to the Captain’s Table Challenge.

Sweet Potato Souffles with Rum Raisin Sauce #CaptainsTable #Thanksgiving {Katie at the Kitchen Door}

As I mentioned Monday, we’re part of a group of 15 bloggers that are teaming up with Captain Morgan to create delicious rum-based food and drink recipes for the holiday season. There’s a bit of a contest aspect to it as well, so I’m extra motivated to make these recipes top notch (there’s nothing like a little competition to get me going). For the Thanksgiving edition of the challenge, we decided to work with two classic November ingredients, sweet potatoes and cranberries, turning each into a rum-infused masterpiece. After a bit of group brainstorming at the wedding we were at last weekend, we decided that the only thing for the sweet potatoes was a souffle, and not just any souffle, but a light, fluffy, rum-scented souffle drizzled with a rum-raisin caramel sauce. There are a surprising number of sweet potato souffle recipes out there, but you’ll quickly notice that most of them are not actually souffles, but instead just mashed sweet potatoes buried under some form of sweet goo (I so enjoyed Sommer’s rant on this topic). What we were going for was a real souffle, with a classic roux-base, a bit of rum, and a hint of sweet potato flavor.

Sweet Potato Souffles with Rum Raisin Sauce #CaptainsTable #Thanksgiving {Katie at the Kitchen Door}

Creating our own recipe for souffles was a bit of a risky move, and it was a tense 30 minutes in the kitchen as we waited to take them out of the oven. We’ve made souffles before, but tweaking any baking recipe can be hit or miss, plus souffles are notoriously challenging and we did significantly more than tweak a base recipe. We did our research, though, and what came out of the oven was far more perfect than we expected – puffed up gracefully over the top of the ramekins, cooked through yet still creamy, light and sweet and everything you want a souffle to be. With the thick, syrupy-sweet rum raisin caramel drizzled on top, I am not ashamed to admit that we each had two of these, one after the other. And then we skipped dinner.

Cranberry-Ginger Sparkling Rum Cider #CaptainsTable #Thanksgiving {Katie at the Kitchen Door}

Cranberry-Ginger Sparkling Rum Cider #CaptainsTable #Thanksgiving {Katie at the Kitchen Door}

As for the cranberries, I knew I wanted to do a festive riff on Dark and Stormy’s, the classic ginger and dark rum cocktail that’s pretty much perfect any time of year. I wanted to incorporate cranberries, but I didn’t want the drink to be too sweet or cloying, so instead of using cranberry juice, I made a thick, almost jam-like cranberry-ginger syrup for the base of the drink. After reading an article in Bon Appetit about how we should be celebrating Thanksgiving with the new crop of artisanal hard ciders that wouldn’t have been out of place at early colonial celebrations, I decided to replace the traditional ginger beer with one of my favorite sparkling ciders, Bantam’s Wunderkind. The resulting drink was strong and slightly sweet, with hints of spice, cranberry and apple.

So, if you’re looking for something to do with your leftover mashed sweet potatoes or that bag of cranberries you didn’t end up using? Try a souffle, or a cranberry-ginger cocktail, or maybe even both. And let me know what you think! Also, if there’s any flavor combinations or recipe types you’d like to see for our Christmas Captain Morgan challenge, leave a note in the comments – we’re looking for inspiration anywhere we can get it. Have a wonderful holiday!

Disclaimer: This post is sponsored by Captain Morgan, who provided me with product samples and monetary compensation in exchange for my participation in this program. All opinions are honest and my own, as always.

Sweet Potato Souffles with Rum Raisin Sauce #CaptainsTable #Thanksgiving {Katie at the Kitchen Door}

Sweet Potato Souffles with Rum Raisin Sauce

Serves 5.

For the souffles:

  • 2 medium sweet potatoes, peeled and cut into 1/2 inch cubes
  • 2 TBS olive oil
  • 3 TBS butter plus extra for greasing the ramekins
  • 3 TBS flour
  • 3/4 c. warm milk
  • 1/4 c. Captain Morgan Original Spiced Rum
  • 3 egg yolks
  • 1/4 c. sugar plus extra for preparing the ramekins
  • 6 egg whites
  • pinch cream of tartar
  1. Preheat the oven to 375F. Toss the sweet potato cubes with the olive oil and place in a single layer on a baking sheet. Bake for 30-40 minutes, until very tender and almost falling apart. Stir the sweet potatoes once after 20 minutes. While still warm, add the sweet potato cubes to a blender and puree until smooth. Scrape the puree out of the blender and set aside.
  2. Adjust the oven temperature to 350F. Butter five 6-oz. souffle dishes or ramekins, then sprinkle a bit of sugar into each. Tap the sugar around the edges of the dish, tapping out any excess. Set the prepared dishes aside.
  3. In a wide frying pan, melt the butter over medium heat. Whisk in the flour, and cook for 2-3 minutes, until the mixture is a pale yellow and smells nutty. Add 1/4 c. of the warm milk to the roux and whisk until smooth, then slowly whisk in the remaining warm milk. Cook over medium-low heat until thick and smooth, about 1-2 minutes, then remove from the heat. Whisk in the rum, and let cool slightly.
  4. Beat the egg yolks and the sugar together until thick and pale yellow. Quickly whisk into the roux, taking care that the roux is not hot enough to scramble the eggs. Then, whisk in 3/4 c. of the sweet potato puree, adding 1/4 c. at a time. When the mixture is smooth and evenly colored, set aside.
  5. In a large, clean bowl, beat the egg whites until frothy. Sprinkle the cream of tartar over the top, and then beat until the egg whites are shiny and hold a stiff peak. Fold the sweet potato mixture gently into the egg whites until they are just combined. Spoon the souffle mixture carefully into the prepared dishes, filling them just shy of the brim. Place the ramekins in a larger baking dish, and fill the baking dish with hot water so that it reaches halfway up the sides of the souffle dishes. Bake for 25-30 minutes, until souffles are puffed up and set in the middle. Remove and serve immediately with the warm rum raisin sauce.

For the sauce:

  • 1/2 c. Captain Morgan Black Spiced Rum
  • 1/2 c. raisins
  • 1/2 c. sugar
  • 1/2 c. cream
  1. Place the rum and the raisins in a small saucepan. Heat over low heat until the rum just begins to steam, then immediately remove from heat and set aside. Let sit for at least 10 minutes to allow the raisins to plump up.
  2. Pour the sugar into the bottom of a heavy-bottomed saucepan in an even layer. Place over medium heat, and melt sugar, whisking frequently. As you whisk, the sugar will clump up, but once melted, all the clumps should dissolve. As soon as all the sugar is melted, stop whisking but swirl slightly. Watch the sugar closely as it begins to darken. As soon as it reaches a golden caramel color, add the heavy cream all at once. Be careful, the caramel will bubble violently when you do this. Whisk until the mixture is even. Now add the rum and raisins all at once, again, being careful to avoid the bubbling up, and whisking until the mixture is even. As soon as the mixture is smooth and consistent. Remove from the heat and let cool slightly. Sauce should be served warm.

Cranberry-Ginger Sparkling Rum Cider #CaptainsTable #Thanksgiving {Katie at the Kitchen Door}

Cranberry-Ginger Sparkling Rum Cider

Serves 4.

  • 3/4 c. sugar
  • 3/4 c. water
  • 1 1/2 c. fresh cranberries, rinsed (remove any squished/deflated berries)
  • 1-inch piece of ginger, peeled and sliced thinly
  • 6 oz. Captain Morgan Black Spiced rum
  • ice cubes
  • 2 c. sparkling cider (alcoholic)
  • sugared cranberries, for garnish
  1. Add the sugar and water to a medium saucepan and place over medium heat. Stir until the sugar dissolves, then add the cranberries and ginger. Simmer the mixture until thick and syrupy, about 15 minutes. Stir occasionally to prevent the cranberries from foaming up, pressing the cranberries against the side of the pan to pop them.
  2. Pour the cranberry mixture through a fine-mesh sieve and strain the liquid into a medium bowl. Press gently on the cranberries to extract more juice, but be warned that if you press too hard you may end up with more of a jelly than a syrup (still delicious!). Refrigerate the syrup until cold; save the berries for another use.
  3. Add 1 to 2 TBS of the cranberry syrup to each of 4 glasses, then add 1 1/2 oz. (1 shot) of rum to each glass. Stir vigorously to mix. Add a few ice cubes to each glass, then top off with 1/2 c. of sparkling cider. Garnish with sugared cranberries and serve immediately.

3 November 25, 2013 Drink

Captain’s Table Challenge with Captain Morgan // Meyer Lemon and Sage Hot Toddy

Meyer Lemon and Sage Hot Toddy #CaptainsTable {Katie at the Kitchen Door}

I’m excited to announce that for the next few months, I’ll be participating in the Captain’s Table Challenge that Captain Morgan is running this holiday season. Along with 14 other food bloggers, I’ll be creating six recipes – three cocktails and three sweet or savory dishes – using Captain Morgan. The first official recipes will be coming at you later this week, just in time for Thanksgiving, and then later on there will be some Christmas treats, and something snacky and craveable for the Superbowl. Hugh Acheson, of Georgian restaurant and F&W Best New Chef fame, will be judging the challenge, picking a winner for each holiday, and an overall winner at the end of the program. I’m looking forward to getting creative with rum, and also taste-testing everything –  because a little extra rum in the cold winter months never hurt anyone.

Meyer Lemon and Sage Hot Toddy #CaptainsTable {Katie at the Kitchen Door}

Besides free rum for me and a lot of rum-based recipes for you, there’s another great aspect to this program – every time the #CaptainsTable hashtag is used on social media this season, Captain Morgan will donate $1 to Why Hunger. So break out your rum, get cooking/mixing, and share your recipes and entertaining tips using the hashtag, because drinking is even better when you’re drinking for a cause.

Since I know you guys mostly come here for the food, I didn’t want to leave you hanging with no recipe today, so I have a bit of a bonus recipe for you. Trevor and I were both feeling a little rundown this weekend, although we did manage to put in a respectable showing on the dance floor at our coworkers’ wedding Saturday night. Come Sunday, all I wanted to do was lie on the couch and avoid going out into the “feels like 4°F” weather.  While I was laying there, bundled up and half-asleep at 4 in the afternoon, Trevor sat down next to me with a steaming cup of sweet, herbal rum. He’d been toying with the idea of a sage-based rum cocktail all weekend, and I’d been kind of a hard sell, but one sip of the drink changed my mind. Hot, soothing, sweet from the honey and rum, but balanced by the meyer lemon and sage, it really did make me feel better. This is probably completely a placebo effect, but my mom was always a proponent of hot toddies (just a teeny splash of whiskey) when we were sick, and who am I to argue with my mother’s wisdom? Side note: is Trevor not the best boyfriend of all time? I’m pretty sure he is.

Disclaimer: This post is sponsored by Captain Morgan, who provided me with product samples and monetary compensation in exchange for my participation in this program. All opinions are honest and my own, as always.

Meyer Lemon and Sage Hot Toddy #CaptainsTable {Katie at the Kitchen Door}

Meyer Lemon and Sage Hot Toddy

Serves 1.

  • 1 TBS honey
  • 1/2 c. water
  • 4 sage leaves, washed
  • 1 small meyer lemon
  • 1 1/2 oz. Captain Morgan Original Spiced Rum
  1. Add the honey, water, and sage leaves to a small saucepan. Heat over medium-low heat until sage is fragrant and honey is dissolved, about 4-5 minutes. Stir occasionally to prevent the syrup from foaming up, and do not let it come above a gentle simmer. Remove from the heat, remove and discard the sage leaves, and pour the syrup into a pre-warmed glass.
  2. Cut the lemon in half, and squeeze 1-2 tsp of juice into the glass. Cut a slice of the remaining lemon for garnish. Add the rum and stir to combine. Serve immediately.

0 November 22, 2013 Food

Ingredient of the Week: Carrots // Moroccan Carrot Panini with Olive Tapenade

Moroccan Carrot Panini with Olive Tapenade {Katie at the Kitchen Door}

I’ve recently had a change of heart about sandwiches. See, I used to firmly believe that there was no way a vegan sandwich could ever taste good. Sandwiches are for cheese, and deli meat, and mayo, and bacon. Not for vegan things. Then I tried a bite of Trevor’s “Vegan Pressed” sandwich from our local bakery, The Biscuit, and now I’m obsessed. It’s got roasted sweet potatoes, portobello mushrooms, caramelized onions, and some kind of amazing tahini spread, that almost tastes better than cheese when it’s all warmed up, if you can believe that. It may even have topped Finale’s California Turkey (bacon, turkey, avocado, chipotle mayo), and Diesel’s Pilgrim (thick slices of turkey, hot stuffing, cranberry sauce, and cream cheese) on my list of all-time favorite sandwiches. OK, not the Pilgrim. But still! It’s really good.

Garden Carrots {Katie at the Kitchen Door}

All of this is just to prime you for the fact that I’m sharing a non-traditional sandwich here, and I want you to keep an open mind about it. Ever since I saw this on Ranjani’s blog, over a year ago, I’ve been intrigued. No, I probably wouldn’t order the “carrot panini” at a deli either, but hear me out. The carrots are thinly sliced, then marinated in a sweet, Moroccan-spiced dressing. You quickly blend up a fresh olive tapenade, layer it on bread with a few thin slices of feta cheese, stuff the middle with the carrot strips, and pan-grill it until it’s hot and melty. It’s a satisfying mix of sweet, salty, and carby, like any good sandwich, but with no bacon in sight. Take a chance on it. I don’t think you’ll be disappointed.

Moroccan Carrot Panini with Olive Tapenade {Katie at the Kitchen Door}

Moroccan Carrot Panini with Olive Tapenade

Adapted from Gourmet via 4 Seasons of Food. Serves 4.

  • 6 medium carrots
  • 2 TBS sugar
  • 2 TBS lemon juice, divided
  • 2 tsp sweet paprika
  • 1 tsp ground cumin
  • 1/2 tsp ground cinnamon
  • 1/4 tsp chile powder
  • 1 tsp sea salt
  • 1/4 c. + 2 TBS olive oil, divided, plus more for the pan
  • 3/4 c. pitted kalamata olives
  • 2 TBS capers, drained
  • 1 anchovy fillet
  • 1/4 tsp freshly ground black pepper
  • 8 slices bread
  • 4 oz. of feta cheese, thinly sliced
  1. Bring a medium pot of salted water to a boil. Peel the carrots and discard the peel. Use the peeler to create thin, wide slices of the carrots. Drop the carrot slices in the boiling water and blanch for one minute – they should be crisp-tender. Drain immediately.
  2. Whisk together the sugar, 1 TBS of the lemon juice, the paprika, cumin, cinnamon, chile powder, and sea salt in a medium bowl. Add 1/4 c. of the olive oil and whisk until smooth. Add the blanched carrots and toss to coat in the dressing. Refrigerate for at least 4 hours, and up to 2 days.
  3. To make the tapenade, add the olives, capers, and anchovy to a food processor and pulse until finely chopped. Add the remaining 2 TBS of olive oil and pulse a few more times.
  4. Assemble the sandwiches: Place 1 oz. of feta cheese on each of four slices of bread. Spread a tablespoon of the tapenade on the remaining 4 slices of bread. Divide the carrots in to four portions and layer on top of the cheese. Top with the tapenade-covered bread. Heat a thin layer of olive oil on a griddle or in a frying pan. Place the sandwiches in the pan, and cook until golden brown on each side and cheese is melty, flipping after about 3-4 minutes. Serve immediately.

1 November 21, 2013 Drink

Ingredient of the Week: Carrots // Carrot-Grapefruit-Mango Smoothie

Carrot-Grapefruit-Mango Smoothie {Katie at the Kitchen Door}

I was planning to post this last night, but for some reason when I got home from my run in the 35° weather, I just didn’t feel like a cold veggie smoothie. I felt a lot more like this pumpkin, black bean, and chorizo soup (delicious, we added half a jar of tomato jam for sweetness and it was perfect). But this morning when I woke up, carrot-grapefruit-mango smoothies were the first order of business.

Some of you who follow me on twitter or instagram may have heard that I recently became the owner of a Vitamix. And a pretty fancy one at that. It was a bonus of sorts from my real job (I love the thing, but I can’t ever see paying $600 for a blender), and perhaps it’s just because it’s new, but I’ve been blending up a storm. Green smoothies (or orange ones as it may be), have become a daily treat, and I love starting my day with them – they’re so immediately energizing, I feel like I should make a video game powering-up noise when I drink them. I know a lot of people who think drinking green smoothies is a completely frou-frou thing to do, but I’ve been trying to convert them one sip at a time. Seriously, green smoothies taste like mangoes or bananas or apples, not spinach. The spinach is just a bonus.

Carrot-Grapefruit-Mango Smoothie {Katie at the Kitchen Door}

Since I made drinks for both rhubarb week and pea week, I figured it was only logical to whip up a carrot based drink as well. Carrot juice and booze did not strike me as a stellar combination (although I think this could change my mind), so I decided to go the healthy route and turn my stubby little garden carrots into a frothy smoothie. The trick to making a smooth drink from whole, raw carrots is to peel and grate them first – a little time consuming, but worth it for the creamy texture you’ll get (and much cheaper than buying carrot juice!). The Vitamix could probably handle them just cut up into chunks, but I’m still getting the hang of the correct ratios for using it, so I grated them this time around as well. The result was a thick, vibrant, tangy breakfast full of beta-carotene, vitamin A, vitamin C, and fiber. Drink your vegetables!

Carrot-Grapefruit-Mango Smoothie {Katie at the Kitchen Door}

Carrot-Grapefruit-Mango Smoothie

Serves 1. Inspired in part by this and the Carrot-Grapefruit Juice in Vegetarian Everyday.

Note: This can be made in any blender, but if you’re using a weaker one, you’ll want to chop up your grapefruit and blend on high. If you’re using a Vitamix, you could probably get away with not grating the carrots, but I like the extra smooth texture that grating them gives.

  • 1 c. water
  • 2 small carrots, peeled and finely grated
  • 1 ruby red grapefruit, peeled and cut into quarters
  • 1 c. frozen mango
  • 2-3 ice cubes (only if using Vitamix)
  • maple syrup or agave to taste (optional)
  1. Place ingredients in blender in order listed. Blend on high until thick and smooth. Serve immediately.

4 November 19, 2013 Dessert

Ingredient of the Week: Carrots // Carrot Cake Crepe Cake

Carrot Cake Crepe Cake with Whipped Cream Cheese Frosting {Katie at the Kitchen Door}

Carrot Cake Crepe Cake with Whipped Cream Cheese Frosting {Katie at the Kitchen Door}

This is how I thought I should start this blog post: “To kick off carrot week, we took a typically sweet dessert, baklava, added carrots, feta cheese, and caramelized onions, and made it savory. Today, we’re taking the opposite approach and reinterpreting a classic carrot-based dessert: carrot cake.”

Trevor read this, gave me his best “could-you-be-any-duller” grimace and began dictating: “My boyfriend is allergic to carrots. I’m making these recipes this week in an attempt to kill him. Living with him these past few months has been unbearable, so unbearable that I’ve been forced to stay out late drinking too much on Monday nights with my friends, which in turn leads to me being behind in my blogging schedule forcing me (and him) to make carrot crepes way past my bedtime. If the act of making these not-very-well-recipe-tested crepes doesn’t get him, hopefully eating them well.”

Carrot Cake Crepe Cake with Whipped Cream Cheese Frosting {Katie at the Kitchen Door}

Carrot Cake Crepe Cake with Whipped Cream Cheese Frosting {Katie at the Kitchen Door}

I think I might just stop trying.

Anyway, we made carrot cake crepes, and assembled them into a huge cake with layers of whipped cream cheese frosting. It’s a good concept, although to be fair, it’s not really my concept – I was going to make Deb’s carrot cake pancakes, until I saw one of her readers comment about making a crepe cake version, and I wanted to try. I googled “carrot crepes” a lot of times, but I couldn’t find a recipe that incorporated raw carrots. In hindsight, there might have been a reason for that. The first few attempts to cook these came out kind of raw and mushy, but with a bit of tinkering, we got these to work out nicely. If you have your own adjustments, please, share – they definitely aren’t perfect yet. The frosting, on the other hand, is amazing – you could always just make that and eat it off a spoon.

I will do my best to begin writing before 9PM tomorrow, for all our sakes.

Carrot Cake Crepe Cake with Whipped Cream Cheese Frosting {Katie at the Kitchen Door}

Carrot Cake Crepe Cake with Whipped Cream Cheese Frosting

Inspired by Lili’s comment on Smitten Kitchen. Makes 1 cake.

  • 1 c. whole milk
  • 1/2 c. buttermilk
  • 1/2 lb. carrots, peeled and sliced into 1-inch chunks
  • 3 eggs
  • 1 c. flour
  • 1 tsp cinnamon
  • 1/2 tsp nutmeg
  • 1/4 tsp baking powder
  • 1/4 tsp salt
  • 4 TBS brown sugar
  • 1 TBS canola oil
  • 1 (8-oz.) package of cream cheese, softened
  •  1 1/2 c. heavy cream
  • 1 lb. powdered sugar
  • 2 tsp lemon juice
  • 1 tsp vanilla
  • butter, for greasing the pan
  1. Add the whole milk and the buttermilk to a blender. Add 1/2 of the sliced carrots, and pulse the blender a few times to break them into chunks. Once they are broken up, slowly increase pulsing speed until the mixture is smooth. Add the remaining carrots and repeat to make a thick, smooth mixture. Add the eggs and pulse the blender a few times to combine, then pour the batter into a large bowl.
  2. In a separate bowl, mix together the flour, cinnamon, nutmeg, baking powder, and salt until evenly combined. Whisk in the brown sugar. Add the flour mixture to the liquid in batches, stirring to combine between additions. Stir in the canola oil until fully combined. Let the batter rest for 30 minutes.
  3. While the batter is resting, make the frosting. In a large bowl, beat the cream cheese until it is smooth and easy to stir. Add the heavy cream 1/2 cup at a time, beating thoroughly between additions to lighten the cream cheese. At the last addition of heavy cream, use a whisk to thoroughly beat and aerate the frosting. Whisk in the powdered sugar until smooth and lump free, then whisk in the lemon juice and vanilla. Taste and add more sugar or lemon if desired. Set aside.
  4. Heat a small pat of butter over medium-low heat in a medium frying pan. Add about 1/4 of the crepe batter in the center of the pan, and swirl to make a large, thin circle. Cook the crepe until golden brown on each side, about 3-4 minutes per side (this is much longer than your average crepe recipe, but don’t be tempted to flip them too early or they’ll tear). Once fully cooked, remove and let cool fully on a cookie rack before transferring to a plate.
  5. To assemble the crepe cake, place one crepe on a cake stand or plate, and place a small dollop of frosting in the center of the crepe. Use a spatula to gently spread the frosting out in a circle to make a thin layer covering the entire crepe, up to about 1/4 inch from the edge. Place a second crepe on top. Repeat until you have used all the crepes and frosting. Top with a final dollop of frosting, and garnish with grated carrot and crumbled walnuts if desired.

1 November 18, 2013 Food

Ingredient of the Week: Carrots // Savory Carrot, Feta, and Almond Baklava

Carrot, Almond, and Feta Baklava {Katie at the Kitchen Door}

I started an “Ingredient of the Week” feature earlier this year, challenging myself to make the most of a particular in-season ingredient by posting a creative recipe starring that ingredient for 5 days in a row. I managed to feature rhubarb and green peas, and had grand plans for doing blackberries and peaches and zucchini and tomatoes by the end of the summer, but the summer sort of got away from me. Still, just because home grown produce isn’t as bountiful now as it was in August doesn’t mean that there aren’t seasonal ingredients worth celebrating. This week, I’m celebrating one of the last vegetables we were able to harvest from our garden – the carrot.

Carrot, Almond, and Feta Baklava {Katie at the Kitchen Door}

While not as popular as another sweet, orange fall vegetable (although I do feel like the pumpkin mayhem is a little more under control this year), the carrot is a humble, under-utilized little root. Usually, when I think of carrots I think of them as part and parcel with onions and celery for starting out a soup, or as stubby little dippers for hummus. But they’re so much more versatile than that! Cakes, sauces, juices, roasts – if you take a minute to think about it, you’ll realize that carrots add sweetness and depth to many different meals.

Carrot, Almond, and Feta Baklava {Katie at the Kitchen Door}

Whenever I kick off an ingredient of the week feature, I first spend an evening sitting on the floor, surrounded by piles of cookbooks, searching for the most interesting recipes I can find. Once I have a big list compiled, I choose the four or five recipes that I think are the most unique and delicious-sounding. The most interesting recipe from this weekend’s cookbook research comes from a new member of my collection, Maria Elia’s Full of Flavor. In her “roots” chapter, amidst more typical presentations like carrot and herb salad and spiced carrot puree, I found this recipe for a savory carrot, feta, and almond baklava. I’d never had a savory baklava before, and loved the idea. The carrots are thinly sliced and stewed with cinnamon, lemon, caramelized onions, and dill, before a portion of them are pureed. Layered with feta and crushed almonds between butter-soaked sheets of filo dough, they are then baked to crusty perfection and drizzled with honey. I loved the sweet and salty play of the honey and feta cheese, and think these would be a great (if a little messy) vegetarian party appetizer at any time of the year. A good start to carrot week, if you ask me.

Carrot, Almond, and Feta Baklava {Katie at the Kitchen Door}

Carrot, Almond, and Feta Baklava

Recipe adapted slightly from Full of Flavor. Serves 8-10.

  • 3 TBS olive oil
  • 1 large onion, peeled, halved, and thinly sliced
  • 2 garlic cloves, peeled and finely minced
  • 2 lb carrots, peeled and thinly sliced
  • 1 small bunch fresh dill, including roots, finely chopped (about 1 1/2 c. chopped dill)
  • 1 TBS ground cinnamon
  • finely grated zest of 1 lemon
  • juice of 1/2 lemon
  • sea salt
  • 9 sheets filo pastry (about 3/4 of a package)
  • 6 TBS butter, melted
  • 2/3 c. whole almonds
  • 1 2/3 c. crumbled feta cheese
  • 4 TBS honey
  1. Preheat the oven to 350°F. Heat the olive oil in a large saucepan, then add the sliced onions. Caramelize the onions over medium heat until dark and sticky, stirring frequently to prevent burning. This should take 15-20 minutes.
  2. Stir in the garlic, carrots, dill, cinnamon, lemon zest, and lemon juice, and season with sea salt. Cook for another 6-8 minutes, stirring frequently. Add 3 cups of water, and bring to a gentle simmer. Cook over medium heat until most of the liquid has been absorbed and the carrots are tender, about 30 minutes.
  3. Process the almonds in a food processor until they are the consistency of a coarse breadcrumb, then set aside in a bowl. Mix the feta cheese with the ground almonds. Add 1/3 of the carrot mixture to the food processor and process until smooth, then stir back into the whole carrots.
  4. Unfold the filo dough, and cut to the size of the baking sheet you will be using (ideally around 9×13. Save the extra dough. Cover the sheets you will be using with a damp paper towel to keep them from drying out as you work.
  5. Brush the baking sheet lightly with melted butter, then lay one sheet of filo dough on it. Brush the filo with melted butter, and top with another sheet of filo. Repeat to have three sheets of filo in the first layer. Spread half the carrot mixture gently on top of the filo, pushing it out to the corners. Sprinkle half the feta-almond mixture on top of this, pressing down lightly to smooth. Repeat the filo-butter process with three sheets of filo, then spread the remaining carrot and feta mixture on top. Finish the baklava with another three sheets of butter-brushed filo. Before brushing the top sheet, score gently with a sharp knife to cut the pastry into diamonds. Then brush with the remaining butter and sprinkle with cold water. Bake for 35-40 minutes, until golden. Remove from the oven and let cool to room temperature before drizzling with the honey.

1 November 16, 2013 Cookbook

Book Club: Le Pigeon + Pickles, Pigs & Whiskey

Le Pigeon

Cookbook Review: Le Pigeon

The Book: There have been a lot of big-name chef and restaurant cookbooks published this fall. I find that restaurant cookbooks can be hit or miss – not all delicious restaurant food translates well to home kitchens, and sometimes scaling restaurant quantities down results in more recipe errors. However, I took a chance on one of this season’s restaurant books, Le Pigeon, since I couldn’t get over the intriguing table of contents (tongue, fat liver, little birds, pork, horns and antlers, lamb, etc.). I’m glad I did – this book is a winner. While it’s not for vegetarians or timid cooks, adventurous eaters will find dozens of recipes that stretch the way they think about food – this is outside-of-the-box cooking. Every dish is creative and company-worthy, but there’s a broad range of accessibility: a newer cook might try the simple radicchio and pear salad with an addictive-sounding blue cheese dressing or the slow-roasted lamb served over risotto (featured here!). On the other end of the spectrum, even the most ambitious chef will probably be challenged by the 7-component banana cream pie with pineapple and macadamia nuts, or the 5-component calf’s head terrine with gribiche, sweetbreads, and bruleed eggs. Some of the recipes go a little too far for my taste – I get a little squeamish about offal and other infrequently used meats, so recipes like eel dumplings and foie gras served in eel consomme are not something I’m going to cook – but for some people these unique recipes could be the highlight of the book. One note of warning: as you might have gleaned already, some of the ingredients used in this book will be really hard for the average joe to find, especially given seasonality. The book itself is one of the heftier ones on my shelves, with over 340 pages, and plenty of big, full-page photos – of the food, the city, customers, and the chefs just goofing around. I’ve never been to Portland (the Oregon one) or eaten at Le Pigeon, but my gut tells me that this book, full of stories, notes from the chef, and lots of meat and offal, is true to the experience you might have at the restaurant.

5-Hour Lamb, Pecorino and Radish Risotto, Curry-Pickled Fennel {Katie at the Kitchen Door}

The Food: There were only a handful of recipes from Le Pigeon that were approved to be shared for promotional purposes, but they all sounded delicious. We were initially going to make the Maple-Lacquered Squab with Duck Confit Hash, but squab proved very difficult to find (actually, we bought cornish game hens as a potential substitute, but it turns out that they are not game at all, they’re just tiny, expensive chickens). So we pushed this review back a week and took the time to roast the 5-hour lamb for the Lamb with Green Garlic Risotto. The name of this dish does not do it justice – it’s incredible. Although relatively simple to put together, the three components of this dish – a lamb shoulder that’s roasted until falling apart, sliced, then quickly pan-fried before serving; a creamy pecorino and radish risotto; and a mind-blowing curry-pickled fennel and parsley salad – come together in an amazing burst of flavor. The lamb is intensely gamey, the risotto rich and cheesy, and the fennel bright and crunchy and exotic. I couldn’t get enough of the fennel, until I took a few bites without risotto and realized that it was the combination of the two that I was liking so much. Really, a showstopper. If you plan ahead and roast the lamb the night before, this is actually easy enough for a weeknight dinner. It is one of the simpler recipes in the book, so I hope we find the other recipes have the same great time to flavor payoff. Scroll down for the recipe.

Recipe Shortlist: Cedar-Planked Zucchini, Chevre, Almonds; Fig and Fois Gras Terrine with Fermented Black Bean Muffins; Pheasant Gnocchi, Sake Pears; Duck Nuggets; Smoked Rabbit Pie, Cheddar, Mustard Ice Cream; Creamed Rabbit, Polenta, Black Truffles; Potato and Nettle Soup, Crispy Pork; Lamb Shepherd’s Pie, Curry Mash; Honey-Bacon Apricot Cornbread, Maple Ice Cream

Pickles, Pigs, & Whiskey

Cookbook Review: Pickles, Pigs & Whiskey

The Book: Pickles, Pigs & Whiskey is a different sort of cookbook. With the strongly-felt influence of its chef-author, John Currence of City Grocery, it meanders through the foods that have influenced his culinary journey. You will find more than just dinner and dessert here, with whole chapters dedicated to condiments, canning, cocktails, and meat curing. Mostly rooted in Southern cooking (deep Southern and Creole cooking to be more specific), it occasionally veers into the culinary traditions of Latin America, Italy, and France. Between the different cooking techniques and different regional influences, all together this book is a bit of a hodge podge, but in a good way. It has personality. Most of the recipes manage to be both fancy and rustic at the same time – comforting stews and roasts and braises, but always with an elegant spin. Like Le Pigeon, many of these dishes are fairly meat-heavy – again, probably not the best choice for vegetarians or for those trying to eat lightly, but great for creating intense flavors. I’m not the biggest fan of the design of the book – the multiple photo layouts are a little bit too yearbook-like for me – but that’s obviously a matter of personal taste. What I do like is the inclusion of music to listen to while you’re cooking each dish; I think it’s such a fun and original idea to include playlists in a cookbook.

Rabbit Cacciatore with Black Pepper Pappardelle {Katie at the Kitchen Door}

The Food: Perhaps we were being foolish, but the recipes we chose to test from this book didn’t contain any of the three title ingredients. In fact, they aren’t even that Southern, but Rabbit Cacciatore with Black Pepper Pappardelle was what sounded good to us on a freezing November night, so that’s what we made. I’m a big fan of rabbit, but I thought this recipe didn’t really showcase it – it actually ended up tasting kind of like chicken, where chicken was the protein it was intended to replace. Plus, it was a bit tricky to eat with the rabbit pieces left whole; next time, I would pull the rabbit meat off the bones before serving. The mushroom and tomato sauce was good, a little one dimensional perhaps, but with an unexpected smoky kick to it that I liked, and it had gained complexity by lunchtime the next day. I can’t really fairly review the pappardelle, since I accidentally used bread flour, thought I didn’t have enough, and added some semolina flour to make up for it – but it did end up coming out really well after some thorough kneading, and I loved the black pepper bite to it. All told, this was a solid recipe, but not particularly special, especially given the price of rabbit. I’m certainly not giving up on the book, but next time I think I’ll choose something a bit more Southern. Scroll down for the recipe.

Recipe Shortlist: Bourbon Milk Punch; Gumbo Z’Herbes; Pickled Sweet Potatoes; Top-Shelf Chicken and Dumplings; Chicken-Fried Duck with Caramelized Onion Gravy; Grillade and Grits Casserole; Pecan-Smoked Duck with Molasses Lacquer; Pork Fat Beignets with Bourbon Caramel

Recipes

5-Hour Lamb, Pecorino and Radish Risotto, Curry-Pickled Fennel {Katie at the Kitchen Door}

Lamb, Green Garlic Risotto

Recipe from Le Pigeon. Serves 4.

For the lamb:

  • 1/2 tsp garlic powder
  • 1/4 tsp onion powder
  • 1/2 tsp ground fennel seeds
  • 2 TBS kosher salt
  • 1 tsp freshly ground black pepper
  • 1 boneless lamb shoulder, about 3 lbs.
  • 1 c. dry white wine
  • 1 head green garlic, halved (use regular garlic + 2 shallots of green garlic is unavailable)
  • neutral oil, for frying
  1. Preheat the oven to 350°F. Stir together the garlic powder, onion powder, fennel seeds, salt, and pepper in a small bowl, then rub the lamb all over with the spice mixture. Place in a roasting pan with the wine and garlic. Cover with aluminum foil and roast for 5 hours. Remove from the oven and let cool. Refrigerate until cold.
  2. When ready to serve, remove the lamb from the fridge and cut into 6 equal round slices. Heat 1/4 inch of oil over medium-high heat, and fry the lamb slices in batches until heated through and crispy, about 3 minutes per side. Transfer to a plate line with paper towels. Serve on a bed of risotto with a spoonful of pickled fennel salad on top.

For the risotto:

  • 1/4 c. butter, divided
  • 1/2 yellow onion, peeled and finely diced
  • 2 cloves garlic, peeled and thinly sliced
  • 1 1/2 c. Arborio rice
  • kosher salt
  • 3/4 c. dry white wine
  • 4 c. chicken stock, heated until steaming
  • 1/2 c. grated pecorino cheese
  • 1/2 c. thinly sliced radish
  1. In a heavy pot over medium heat, melt 2 TBS of the butter. Add the onion and the garlic and saute until translucent, about 4 minutes. Add the rice and season with salt. Cook for 3 minutes or until rice is translucent around the edges, stirring the whole time. Add the wine and cook, stirring, until the wine has evaporated, about 4-5 minutes. Ladle the hot stock into the risotto 1 cup at a time, stirring the risotto constantly. Let each cup absorb into the rice fully before adding more stock. Once you have used all the liquid and the rice is al dente, stir in the pecorino, the radish, and the remaining 2 TBS of butter. Season to taste, remove from the heat, and serve immediately.

For the pickled fennel salad:

  • 1 c. champagne vinegar
  • 1 TBS curry powder
  • 1/2 c. water
  • 2 TBS sugar
  • 2 TBS kosher salt
  • 1 TBS ground fennel seeds
  • 1 small fennel bulb, cored and thinly sliced
  • 1/2 small yellow onion, peeled and thinly sliced
  • 1/2 c. fresh flat leaf parsley leaves
  • 1 c. halved cherry tomatoes
  • 2 TBS good quality olive oil
  • a squeeze of fresh lemon juice
  1. Heat the champagne vinegar, curry powder, water, sugar, salt, and ground fennel over medium heat in a small saucepan. Bring just to a boil, then remove from the heat and pour it over the sliced fennel and onion in a heatproof bowl. Let cool, cover, and refrigerate until chilled. (Can be made up to 1 week in advance)
  2. Toss the pickled fennel with the parsley, tomatoes, olive oil, and lemon juice. Season to taste with salt.

Reprinted with permission from Le Pigeon by Gabriel Rucker & Meredith Erickson, copyright 2013. Published by Ten Speed Press, a division of Random House, Inc.

Rabbit Cacciatore with Black Pepper Pappardelle {Katie at the Kitchen Door}

Rabbit Cacciatore with Black Pepper Pappardelle

Recipe adapted slightly from Pickles, Pigs & Whiskey. Serves 6-8.

For the rabbit:

  • 8 rabbit hindquarters
  • 4 tsp + 3/4 tsp salt, divided
  • 4 tsp + 3/4 tsp freshly ground black pepper, divided
  • garlic-infused olive oil (we used regular olive oil plus two cloves halved garlic)
  • 1/4 c. chopped fresh oregano, divided
  • 1 c. flour
  • 3/4 tsp smoked paprika
  • 1/2 tsp garlic powder
  • 1/2 tsp onion powder
  • 1/4 tsp cayenne
  • 5 TBS olive oil
  • 1 c. diced yellow onions
  • 1 green bell pepper, seeded, stemmed, and diced
  • 3 TBS thinly sliced garlic
  • 4 c. sliced cremini mushrooms
  • 2 1/2 c. chopped fresh tomatoes
  • 2 TBS fresh thyme leaves
  • 1 TBS chopped fresh rosemary leaves
  • 3 c. crushed, canned tomatoes
  • 1 1/2 c. chicken stock, plus more if needed
  • 1/2 c. Marsala
  • Parmesan cheese
  • fresh flat-leaf parsley, chopped, for serving
  • fresh pappardelle noodles with 4 tsp of freshly ground black pepper added to the flour before starting, cooked for 3 minutes in boiling water
  1. Season the rabbit pieces with 4 tsp of the salt and 4 tsp of the pepper, 3 TBS of the oregano, and some garlic oil. In a small bowl, mix together the flour, smoked paprika, garlic powder, onion powder, cayenne, and remaining 3/4 tsp of salt and pepper. Dredge the rabbit pieces in this seasoned flour, shaking off any excess.
  2. In a large Dutch oven or pot, heat the olive oil over medium heat. Brown the rabbit pieces in batches, cooking for about 2 minutes per side, then reserve them on a paper towel lined plate. Add the onions, bell peppers, and garlic to the pan and saute until they begin to sweat, about 5 minutes. Add the mushrooms and chopped fresh tomatoes and saute for an additional 5-7 minutes. Stir in the remaining 1 TBS oregano, the thyme, and the rosemary.
  3. Return the rabbit legs to the pan, add the crushed tomatoes, stock, and Marsala. Bring to a low simmer, then lower the heat, cover, and simmer for 45 minutes. Check the sauce every 15 minutes or so – if the sauce appears to be drying out, add more stock 1 cup at a time as needed. After 45 minutes, uncover the sauce, season to taste, and simmer for an additional 15 minutes uncovered. Serve over the fresh pappardelle noodles with parmesan and fresh parsley.

Disclaimer: I received a review copy of both these cookbooks from Ten Speed Press and Andrews McMeel free of charge, but was not otherwise compensated for writing this review.

0 November 14, 2013 Beef

Marx Foods Grass-Fed Strip Steaks + Onion Rings + Duck-Fat Yorkshire Pudding

So here’s something new… I’m handing the blogging reins over to Trevor today. Yes, my silent, handsome, boyfriend is starting to get the blogging bug, and I think it’s awesome. The only thing I want to add to his review: I usually will only eat my steak cooked medium-well, because any fatty texture really kind of grosses me out. These steaks though? I devoured them cooked medium-rare, because the steaks held together so well even when only minimally cooked and had a great, chewable texture. It was a great discovery that if the beef is grass-fed, I can stop horrifying chefs by ordering everything medium-well. And now, to Trevor.

Grass-Fed Strip Steaks with Porcini and Rosemary Rub {Katie at the Kitchen Door}

It was a super nice surprise last week to be asked by Marx Foods to sample some grass-fed Beef Strip Steaks from New Zealand. I could definitely get used to receiving last-minute steak deliveries from the friendly folks over there, and it’s sure nice to have an excuse to cook a big steak dinner with my best gal. Don’t be fooled though! This was a research-heavy endeavor. When I spring for meat, it’s either as a part of one of Katie’s gourmet super-projects (i.e. rabbit pie, venison ragout, stuffed quail,) or it’s the supermarket-special 5-pound pork loin (serves ten), which I proceed to eat solo while Katie jets around Europe for work. So I hit the books, nearly exhausting the meat-related content of Katie’s cookbook reference library.

Grass-Fed Strip Steaks with Porcini and Rosemary Rub {Katie at the Kitchen Door}

What I found was pretty consistent; to earn the “grass-fed” moniker, the animal has to be raised on grasses, hay, silage or legumes, not finished on a high volume of corn and the low dose of antibiotics typical of commodity beef, and it must spend most of its time in a pasture. The result of these practices is a healthier animal with a lower fat content, with the added benefit of not promoting the evolution of antibiotic-resistant bacteria. What this all means when it comes to cooking grass-fed beef is pretty straightforward:

  • It doesn’t hurt to tenderize: The leaner meat is not as thickly marbleized. Bruce Aidells’ The Great Meat Cookbook suggests using a Jaccard.
  • Aidells and The American Grassfed Association (AGA) agree that leaner cuts can benefit from a marinade.
  • Cooking rare to medium-rare yields the best results, but grassfed beef cooks more quickly than non-grass-fed.

The perfect preparation was definitely Aidells’ marinade-dry rub combo. The steaks sat in a mushroom-flavored dark soy with some smashed garlic, then they got a beautiful porcini-rosemary dry rub which ended up really emphasizing the natural earthy, beefy flavor of the grass-fed beef. Overall, the slight tang from the soy and garlic along with the dark, aromatic, meaty flavor of the beef, made this preparation totally killer. The marinade yielded a nice, tender texture without any sort of unpleasant mealiness. My one regret for this recipe was our current lack of grill. Though a little trickier in terms of temp control, I think doing the initial searing-off on the grill could have added some awesome flavor. Although a little pricey at $13 for each 12 oz. steak, the combination of the gamier flavor and firmer texture makes these steaks worth the occasional splurge.

Vidalia Onion Rings with Beer Mustard Aioli {Katie at the Kitchen Door}

Duck-Fat Yorkshire Pudding {Katie at the Kitchen Door}

As a meal, the steak could certainly stands alone, or with any steakhouse sides. For this meal though, Katie set her yorkshire pudding with creamed spinach against my beer-battered onion rings with mustard aioli in what turned out to be a delightfully diverse night of overeating. Both side dishes came from Richard Blais’ Try This At Home, and while the duck-fat coated yorkshire puddings puffed up beautifully in the oven, the onion rings and the sweet, tangy mustard dip were the clear victor [edit: Katie agrees].

Disclaimer: Marx Foods sent us these steaks free of charge in exchange for our honest review. 10 bloggers received steak samples, and the blogger with the most thorough review will win a credit to the Marx Foods store.

Grass-Fed Strip Steaks with Porcini and Rosemary Rub {Katie at the Kitchen Door}

Pan-Seared Grass-Fed Strip Steaks with Porcini and Rosemary Rub

Recipe adapted from The Great Meat Cookbook. Serves 2.

  • Two 12-oz grass-fed strip steaks
  • 4 garlic cloves, smashed
  • 1/2 c. dark mushroom-flavored soy sauce (available at Chinese groceries)
  • 1/2 c. dried porcini mushrooms OR 2 TBS porcini powder
  • 1 TBS finely chopped fresh rosemary
  • 2 tsp coarsely ground black pepper
  • 1 TBS olive oil
  1. Place the steaks in a ziploc bag. Combine the smashed garlic and the dark soy sauce and pour over the steaks. Seal the bag and shake to thoroughly coat the steaks with the marinade. Let the steaks marinate at room temperature for 2 hours, flipping them over occasionally to distribute the marinade.
  2. Grind the dried porcini mushrooms in a coffee grinder until they are a fine powder. Combine 2 TBS of the porcini powder with the chopped rosemary and black pepper in a small bowl.
  3. Remove the steaks from the marinade, letting the excess drip off. Scrape off any garlic, and pat the steaks dry with a paper towel. Generously sprinkle the porcini mixture over the steaks so that both sides are completely coated.
  4. Preheat the oven to 275°F. Heat the olive oil in a large cast-iron skillet over medium-high heat. Swirl to coat the bottom of the pan with oil. Add one of the steaks and cook for 2 minutes on each side, or until it has a deep brown exterior. Transfer the steak to a baking sheet, and repeat with the second steak.
  5. Place the seared steaks in the oven. After 10 minutes, check the internal temperature – when the temperature reaches 125°F to 130°F they are medium-rare. When they are medium rare, let rest 5 minutes covered loosely with aluminum foil, then serve.

Vidalia Onion Rings with Beer Mustard Aioli

Recipe adapted from Try This At Home. Serves 4.

  • 2 large Vidalia onions
  • 2 c. low-fat buttermilk
  • 1/4 c. + 2 c. AP flour, divided
  • 1/4 c. rice flour
  • 1 c. soda water
  • 4 oz. beer (drink the rest!)
  • 1/2 tsp honey
  • kosher salt
  • vegetable oil
  • beer mustard aioli, recipe below
  1. Peel onions without cutting through them, then slice each onion crosswise into 1/4 inch thick slices. Separate the slices into individual rings. Place the onion rings in a shallow pan and cover with the buttermilk.
  2. In a large bowl, whisk together the 1/4 c. AP flour, rice flour, soda water, beer, and honey until smooth. Place the remaining 2 c. flour in a shallow pan and season with kosher salt.
  3. Fill a large heavy pot with at least 3 inches of vegetable oil, and heat over medium-high heat to about 350°F. Working in batches, lift the onion rings from the buttermilk and shake off the excess. Dredge them in the flour and toss until coated, then dip them one by one into the batter, shake off the excess, and carefully add to the hot oil. Fry, turning often with heat-proof tongs, until golden brown, about 3 or 4 minutes. Remove from oil and drain on paper towels, then sprinkle with salt while they are still warm. Serve warm with beer mustard aioli.

Beer Mustard Aioli

Recipe from Try This At Home. Makes 1 1/2 cups.

  • 1 c. high quality mayonnaise
  • 1/2 c. Dijon mustard
  • 2 TBS molasses
  • 1 tsp ground cinnamon
  • 1/2 tsp beer extract OR an additional 1 TBS molasses
  • pinch of cayenne
  1. Whisk all ingredients together in a small bowl until well combined. Store in an airtight container in the fridge for up to 1 month.

New Yorkshire Pudding with Licorice-Creamed Spinach {Katie at the Kitchen Door}

New Yorkshire Pudding with Licorice-Spiced Creamed Spinach

Recipe adapted from Try This At Home. Serves 4.

  • 1 TBS olive oil, plus more for greasing the pan
  • 1 small garlic clove, minced
  • 1 small shallot, minced
  • 2 whole star anise
  • 1 1/2 lbs. fresh spinach, trimmed, washed, and sliced into thin ribbons
  • 1/2 c. heavy cream
  • 3 large eggs, divided
  • kosher salt and freshly ground black pepper to taste
  • 1/4 c. + 2 TBS whole milk
  • 2/3 c. flour
  • 3/4 tsp pastrami spices, recipe below
  • 1 TBS duck fat or bacon grease
  • 1 TBS cold water
  1. Preheat the oven to 325°F. Grease a small baking dish with olive oil, and set aside.
  2. Heat the 1 TBS olive oil over medium heat in a large saute pan. Add the garlic, shallot, and whole star anise and saute until the garlic and shallot are softened, about 3-5 minutes. Add the spinach and cook, using tongs to continuously toss the spinach so that all sides are exposed to the heat, just until spinach is wilted, about 2-3 minutes. Immediately place the spinach in a colander and let drain. Discard the star anise.
  3. Whisk together the cream, 1 of the eggs, and salt and pepper to taste in a small bowl. Squeeze the spinach to rid it of any excess water, then add the spinach to the prepared baking dish. Pour the cream mixture over the spinach and stir to combine. Bake for about 30 minutes, until center of spinach is set, then remove from oven and cover with tinfoil to keep warm.
  4. Increase the oven temperature to 400°F. In a large bowl, whisk together the flour, pastrami spices, and salt to taste. Add the remaining 2 eggs and the milk, and stir to combine. Divide the duck fat between 4 cups of a jumbo muffin pan or 8 cups of a regular muffin pan and place the pan in the oven until the fat begins to sizzle and smoke, about 5-8 minutes. Remove from the oven, quickly whisk the cold water into the pudding batter, then fill each muffin cup about 1/3 of the way full with the batter (the yorkshire puddings should puff up dramatically while they bake). Return the pan to the oven. Bake until puffed and golden brown – if using a jumbo muffin pan, about 30-35 minutes, or 15-20 minutes for a regular muffin pan.
  5. Remove the puddings from the oven, cut a slit in the top, and stuff with a spoonful of the creamed spinach. Serve hot.

Pastrami Spices

Recipe from Try This At Home. Makes about 1/4 cup.

  • 2 TBS whole coriander seeds
  • 1 TBS whole yellow mustard seeds
  • 1 TBS whole black peppercorns
  • 1 1/2 tsp paprika
  1. Toast the coriander seeds, mustard seeds, and peppercorns in a dry skillet over medium heat, shaking the pan frequently to prevent them from burning. Toast until fragrant, about 3-4 minutes. Cool completely, then grind coarsely in a spice or coffee grinder. Stir in the paprika. Store in an airtight container at room temperature for up to 6 months.
  • « Go to Previous Page
  • Go to page 1
  • Interim pages omitted …
  • Go to page 24
  • Go to page 25
  • Go to page 26
  • Go to page 27
  • Go to page 28
  • Interim pages omitted …
  • Go to page 57
  • Go to Next Page »

Primary Sidebar

Subscribe!

Get creative recipes and menu ideas delivered straight to your inbox.

Most Popular

A House // Sweet Potato and Coconut Milk Soup with Brown Rice and Lentils

Monthly Fitness Goals: July // Homemade Spinach Wraps with Chopped Greek Salad

A New Job // Classic Seven-Layer Bars

Butternut Squash Carbonara with Fried Sage and Caramelized Onions

Happy Birthday, Trevor! // Peanut Butter Fudge

Cookbook Review and Giveaway: Home Made Winter

Drizly

Please note!

Full disclosure: if you purchase anything at Amazon using the above links or any other links to Amazon on this site, I will receive a small commission. Just so you know!

Copyright© 2026 · Cookd Pro Theme by Shay Bocks

This site uses cookies: Find out more.