• Skip to primary navigation
  • Skip to main content
  • Skip to primary sidebar
  • Home
  • Recipes
  • Features
    • Cookbook Reviews
    • Ingredient of the Week
    • Sunday Dinner
    • Fitness Goals
  • Travel
  • About
    • Privacy Policy
    • Cookie Policy
  • Work With Me

Katie at the Kitchen Door

Globally-inspired, seasonal recipes

Blog Page

14 June 28, 2011 Dessert

Lemon-Basil Sorbet

Or “U-box, the saga.”

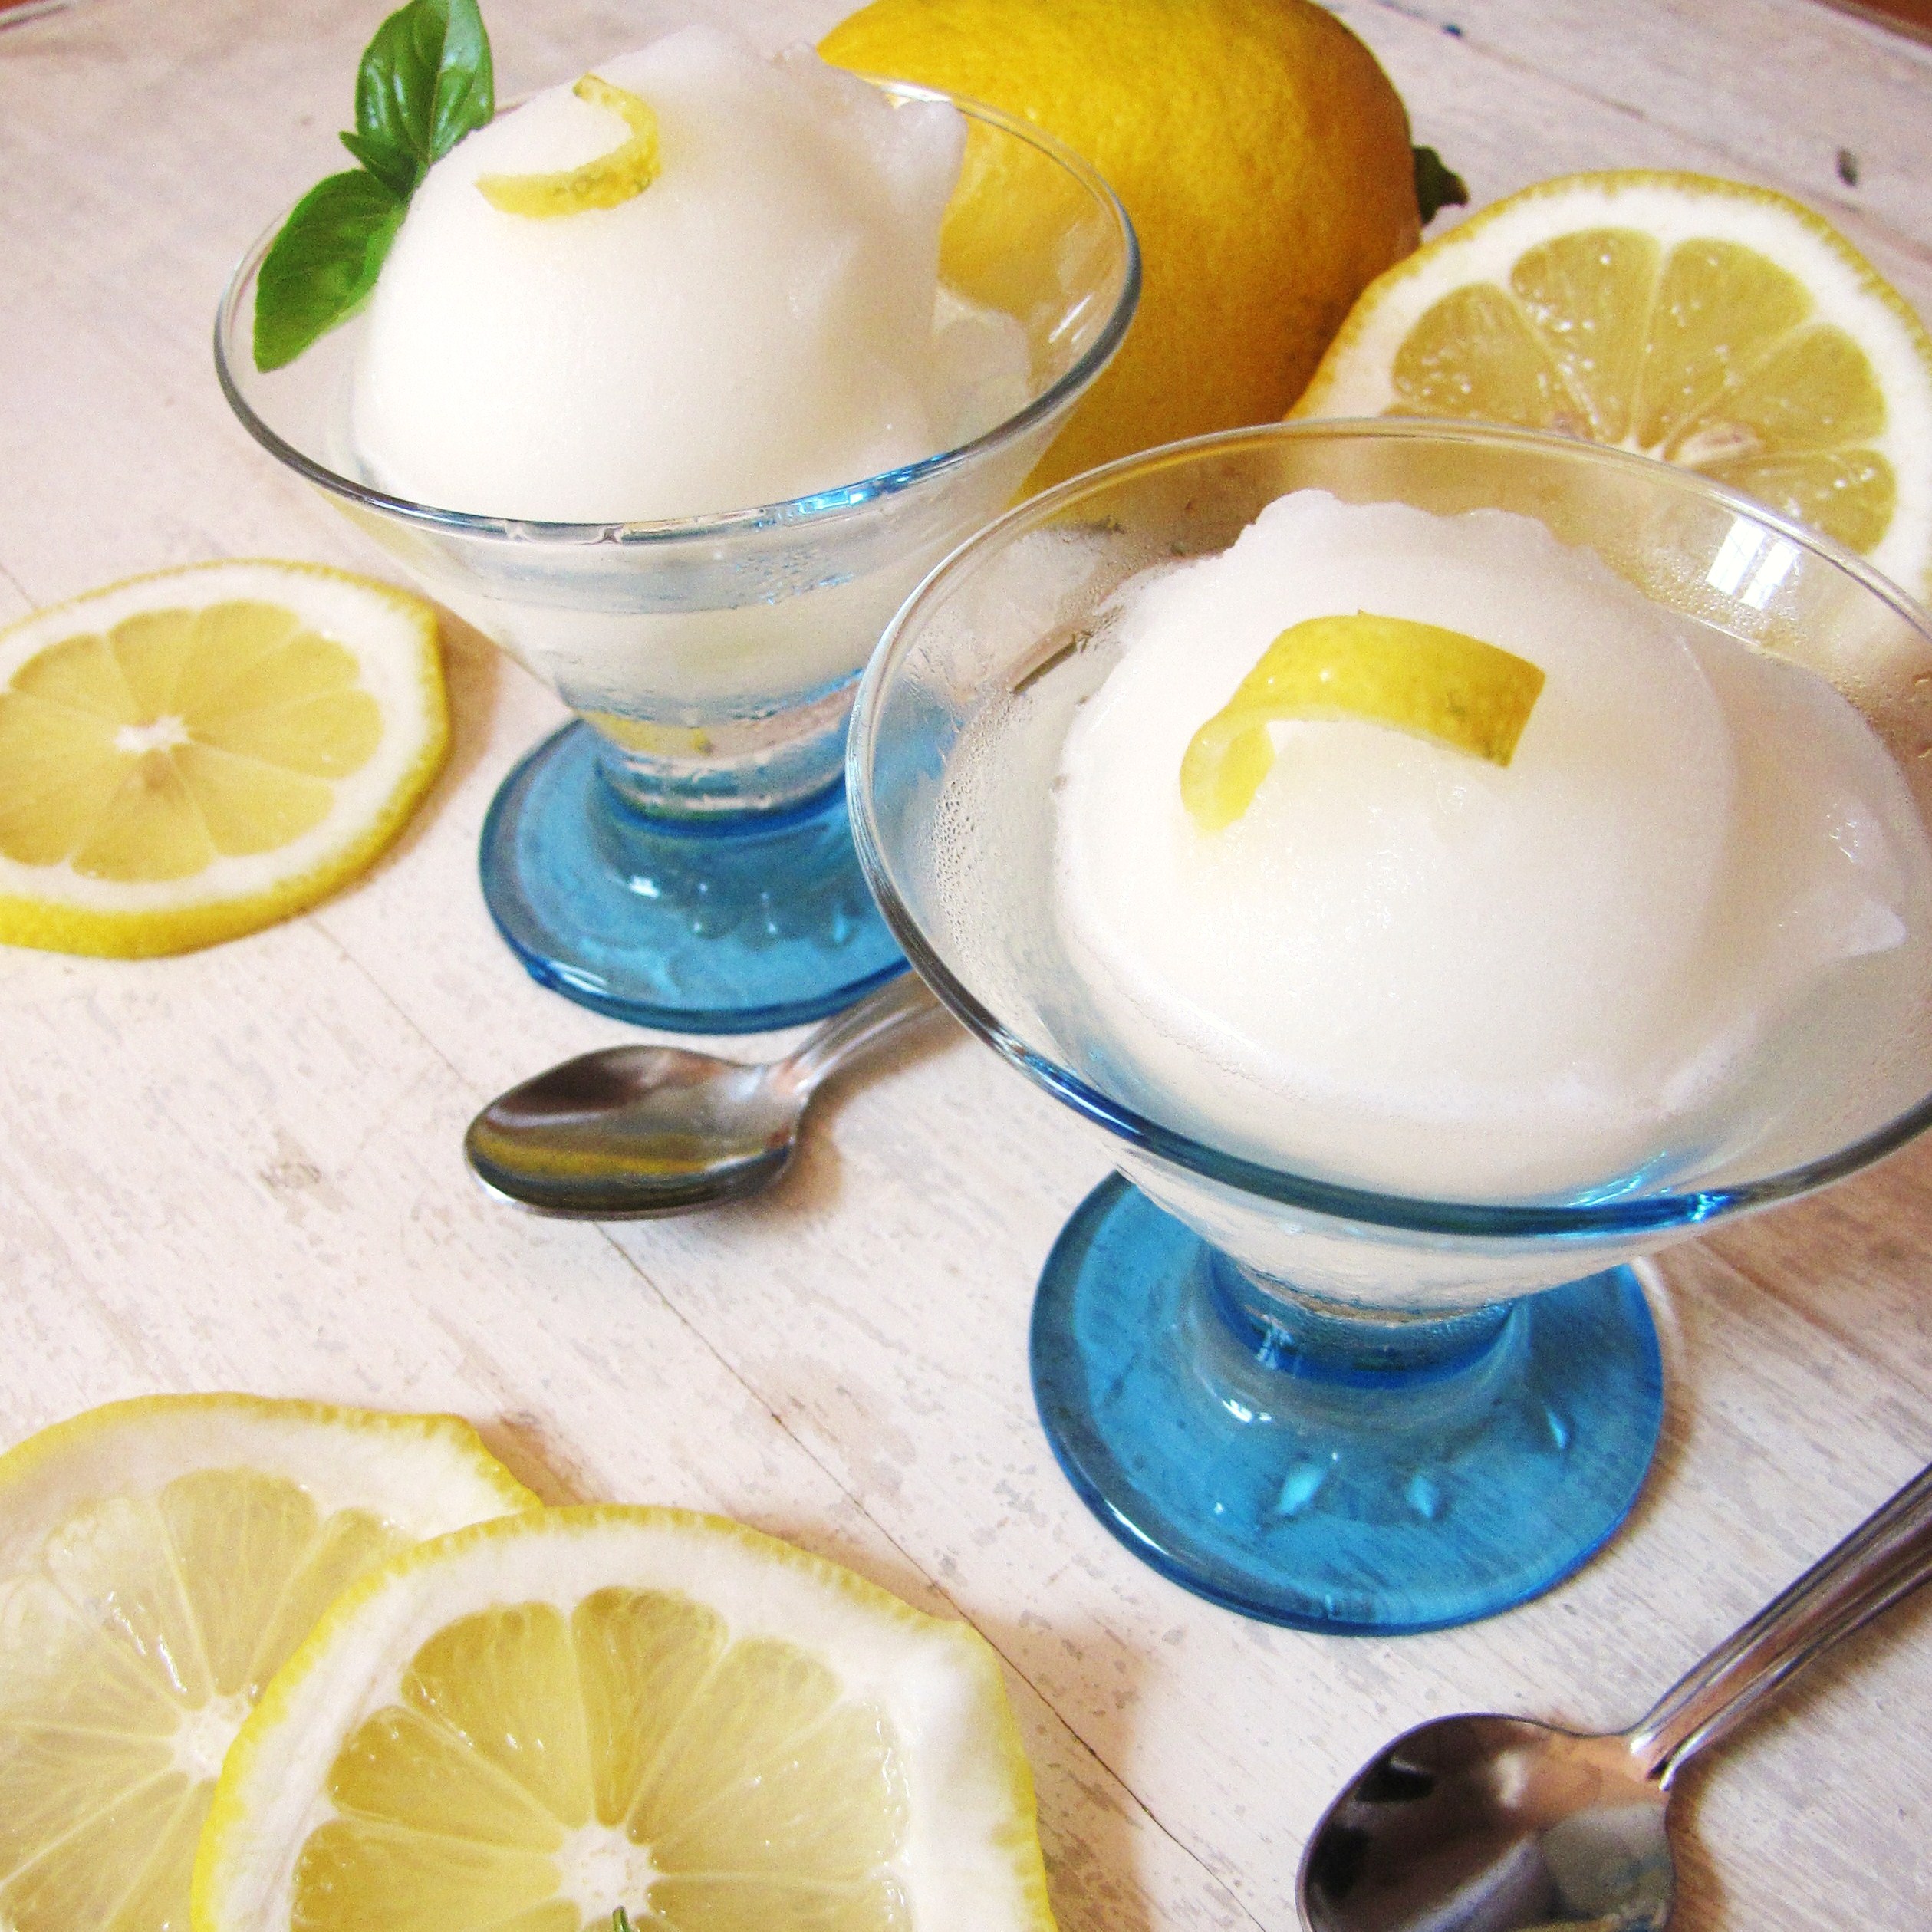
Now that summer is in full swing, it’s ice-cream time.  For my birthday this year, my parents got me the cuisinart ice cream maker – one of those cute bright red ones – that had been at the top of my kitchen wish list.  Soon after my birthday (in April it was already summer in North Carolina), I made the inaugural batch of frozen goodness, a lemon-basil sorbet with such a strong, refreshing flavor that if I ever have a fancy-schmancy restaurant, this will be the palate cleanser I serve on a spoon between courses.  It was awesome, and I was super proud of it.  Then came graduation, and May, and I packed up the ice cream maker along with the rest of my belongings and tucked it away into the U-box I had ordered, which I had been assured I would receive within 5-7 days of putting it in their hands.  (If you don’t like frustrating customer service stories that might also be construed as plain old whining, skip to the recipe now.)

Ha.  Hahaha.  That did not work out exactly as planned.  Or at all as planned.  From the moment I arrived home from Miami and saw that Megan’s box was still sitting in the parking lot 5 days after it was supposed to be picked up, I had a bad feeling about U-box.  Then I called the office and they had lost the online reservation I had made a month in advance.  Now I had a really bad feeling about U-box.  Then they didn’t drop it off until 5 minutes before closing time.  Then, when I called and really needed them to pick it up by 1 in order to make my flight home, I spent half my moving day on hold, and the guy with the trailer didn’t show up until 5 minutes before my cab arrived to take me to the airport.   Not to mention the fact that every time I did manage to speak to a person they said, “now this is getting stored in Chapel Hill, correct?”  “No,” I would answer, “it’s getting shipped to Massachusetts.”  By the time they drove away with all of my personal belongings, U-box was pretty much at the top of my least favorite companies list.  After Time Warner Cable and The Belmont.

About 10 days later, after several more calls to remind them that it was supposed to end up in Massachusetts, I received an email saying my box had arrived.  “I guess I should have given them the benefit of the doubt,” I thought.  Upon arrival at the storage facility, the guy clipped off the lock (I forgot my keys), opened the bolts, swung open the door and… voila!  It was not my stuff.  My name was written on the box in sharpie.  The serial code matched the one on my order.  But the belongings were not mine.  Luckily, I had snapped a picture of the serial code on my actual box just before it pulled away.  So, in an ideal world, they should be able to track it down pretty quickly.  Sigh.  Not so much.  To make a long story just a little bit less long, it took them 5 days to find the box in Texas, another 10 days to actually ship the box from Texas (so much for expedited), and 3 days in transit.  All told, it took over a month from the day the box left to receive my stuff (I really started missing my shoes, man), probably over 8 hours on the phone with 6 different offices, and a whole lot of headache before the issue was resolved.  You, too, can have this experience for only $800!  Ugh.

In the meantime, I’ve been craving this sorbet.  Every time I walk by the basil and get a whiff of it I think, mmm, sorbet.  Too bad I can’t make any.  But, the past is the past, all’s well that ends well, forgive and forget, etc: I have my ice cream maker, and ice cream has been made!  Like I said, made at full intensity, this sorbet is too strong flavored to eat a full bowl of it – it makes a better amuse bouche or palate cleanser.  Watered down a bit though, it’s infinitely refreshing.  The basil really comes through and adds a little bit of herbal intrigue to every bite.  So here’s to summer, fresh herbs, ice cream makers, and having my shoes back.

Lemon-Basil Sorbet

Makes about 4 cups.

  • 1 c. sugar
  • 2 c. water
  • 15-20 large leaves fresh basil
  • zest of one lemon
  • 1 c. lemon juice
  1. In a medium saucepan, heat water and sugar over medium-high heat, stirring until sugar is completely dissolved.  Remove from heat, and add basil and lemon zest.  Let steep for 10-15 minutes, then remove and discard the basil leaves and mix the lemon juice into the syrup. Place the mixture in the fridge for at least 2 hours, until completely chilled.  Set up ice cream maker, then pour the chilled mixture into the ice cream maker and follow the manufacturer’s instructions.  Note: for stronger flavored, but slushier sorbet, reduce the water to 1 cup and the lemon juice to 1/2 cup.

0 June 19, 2011 Dessert

Strawberries

Every spring, people begin waxing poetic about strawberries.  Tiny, perfect, juicy wild strawberries.  Up until now, I didn’t really get it.  Pretty much every time I get strawberries at the store they’re the same – big, very red, a little lumpy, pretty sweet but nothing to write home about, with about 20% too overripe to enjoy.  Just regular old strawberries.  Then, my mother brought these beautiful berries home from Mann Orchards, the 130 year old local farmstand and orchard (that, for me, is synonymous with absolutely perfect apple pie), and I got it.  These berries are beautiful.  They’re tiny.  They’re incredibly sweet.  Every single one was perfectly red all the way through.  They are deserving of starring in a very special dessert.  Which I’ll tell you about soon.  After I talk about strawberries some more.

More strawberries: I am on a mission to salvage the strawberries in our own, struggling orchard.  It was sort of a nice surprise when I came home and was reminded of all the things already growing at our house in Andover, especially after the trauma of leaving behind my well-loved shoebox garden in Durham.  Sure, the Andover garden is hiding under loads of weeds and none of the trees in the orchard have ever produced a piece of fruit that wasn’t munched by deer, but with my new-found farming inspiration and my father’s instruction, I’ve been slowly loving the garden back to a more attractive state.  The zucchini are planted, the cilantro survived my rather rough transplanting process, and the dill seems to have recovered from losing all the weeds that were holding it up.  The strawberries, however, are a bit of a battle, seeing as how they’re planted up in the orchard way behind the house, where each new strawberry is eaten just before it’s ready, and I cry a little when I go up to check them and they’re all gone.  The current solution is to place a sawed-off soda bottle over each bunch of green berries to protect them.  I don’t know when I got so good at loving plants, but I really love them.  Maybe it’s the absence of children under the age of 5 in my life these past two years – now I have excess love for small things.

Back to dessert.  These strawberries were begging not to be mashed, macerated, stewed, or otherwise transformed.  They were very vain. They wanted to stay whole.  And who am I to mush up something so naturally beautiful?  So I decided to make a tart, one of the pretty kinds you see in pastry shop windows with magically perfect fruit arranged on the top that cost twice as much as you’re willing to spend, but you buy them anyways.  And then the pastry cream is always a little too thick and flavorless and the crust is soggy and you’re disappointed, unless of course you’re in Paris in which case your tart is undoubtedly perfect… but I digress.  I wanted to make a tart equally as pretty as the pastry shop ones, but also delicious.  I had had a recipe for a strawberry almond cream tart for over a year, but upon closer inspection (it’s the Cooking Light one that you’ll find all over the web) I decided it was a little too pre-packaged for me, with the graham cracker crust and cream cheese filling.  Still, I loved the sound of the flavor combinations, so I took the idea my own route, baked a shortbread crust, filled it with almond pastry cream, and topped it with the berries as well as a strawberry-orange glaze.  Success!  Pretty, delicious, strawberry-y.  And, happily, the day the strawberries were really needing to be used happened to coincide with Father’s Day, so I got to dedicate and share this lovely treat to my papa.  Happy Dadhood to you!  And to all father’s everywhere; we (your children) love you.

Strawberry Almond Cream Tart

Serves 8.  Pastry cream recipe from The New Best Recipe.

  • 1 qt. strawberries, washed, hulled, and sliced lengthwise
  • 1 1/4 c. flour
  • 10 TBS butter, room temperature
  • 1/3 c. powdered sugar
  • 1/4 tsp. salt
  • 2 c. half and half
  • 1/2 c. sugar
  • pinch salt
  • 5 egg yolks
  • 3 TBS cornstarch
  • 4 TBS cold butter
  • 1 1/2 tsp. almond extract
  • 1/2 c. strawberry jelly
  • 1 TBS water
  • 1/2 TBS orange liquer
  1. Preheat oven to 350°F.  Butter and flour a 9 inch tart pan.  In a large bowl, mix together flour, 1/4 tsp. salt and powdered sugar.  Cut in room temperature butter.  Mix together with a pastry cutter or the back of a fork until dough sticks together in pea sized crumbles.  Press dough evenly into tart pan, pushing up around the edges to form sides.  Poke the bottom of the crust several times with a fork, to keep dough from bubbling.  Bake 15 minutes, until just turning golden brown.  Remove from oven and allow to cool.
  2. In a medium sized saucepan, bring half and half, pinch of salt and 6 TBS of the sugar to a full simmer, stirring occasionally to prevent scorching.  In a large bowl, whisk together egg yolks and remaining 2 TBS sugar until dissolved.  Whisk in cornstarch until the mixture is pale yellow and slightly thickened.
  3. When half and half comes to a simmer, slowly pour into the egg yolk mixture, vigorously whisking the egg yolks all the while, to temper the yolks.  Pour custard back into pan, and cook, stirring constantly, until thickened and just beginning to bubble, about 2 minutes.  Remove from heat, stir in almond extract, and cut in chilled butter, stirring until it melts.  Strain through a fine-meshed sieve into a clean bowl, and allow to cool to room temp.  Press a piece of plastic wrap tightly against the surface of the custard and refrigerate until well chilled, about  2 hours.
  4. Use a spatula to spoon the chilled custard into the tart crust and smooth evenly across the surface.  Decorate with sliced strawberries.  Bring the jelly, 1 TBS water, and liquer to a boil, then gently spoon over fruit to create a glaze.  Chill tart until ready to serve.  Best served soon after being assembled.

2 June 17, 2011 Latin and Mexican

Colorado/Calabacitas

Yes, I’ve been home from Colorado for almost two weeks.  Meaning to write about my trip.  Meaning to make this great new side dish I discovered there.  But now that my life has slowed way down, to a level where for the first time in years, I have to create tasks for myself rather than do the ones that other people have assigned me, I’ve been lacking in inspiration a little bit.  I’m happy to be at home, happy to feel so calm, and very happy to spend a perfect June afternoon napping in the hammock, just a little bit directionless.

Anyway, I’m still here.  Ready to blog.  And I really had an incredible time in Colorado.  Almost my entire extended family on my mom’s side lives there – my grandparents, 3 of her sisters, her brother, and 8 cousins – and I used to go out to visit every other year.  Sadly, that ended after my freshman year in high school, when my school vacation calendar diverged from my brothers’, and so this was my first trip out there in 7 years.  They live in Grand Junction, a medium-sized city on the Western Slope encircled by the Mesa to the North, the Rockies to the East, the Colorado National Monument to the South, and Utah only 20 miles to the West.  It’s a beautiful place, with pretty much all the outdoor activity you could want right at your fingertips.  Heaven.  I was thrilled to be able to hike almost every day, with just a 5 minute drive bringing me to several different trailheads for the monument.  Actually, the hikes I went on were one of the highlights of the trip – particularly the trip to Royal Arch in Boulder with my friend David and to Liberty Cap on the monument with my brother and cousin Alex.  Luckily, I was there right in the middle of the desert wildflower season, and I couldn’t stop taking pictures of the flowering cacti and other scrappy mountaintop flowers.  Or the sweet lizards.

Other highlights included a drive up and over the mesa with my Aunt Lynn to the site of their future yurt, during which we startled a herd of deer in the most picturesque, sun-dappled stand of aspens I have ever been privileged enough to encounter.  I’m pretty sure the pictures I took there are the best I’ve ever taken.  Photography career, you may begin.

Of course, I should probably mention that a big part of the reason I headed out to Colorado now, as opposed to any other time of the year, was that Trevor was competing in the college Ultimate Frisbee Nationals in Boulder.  I’d never seen him play before, and to be honest, I was a little skeptical about how compelling watching a frisbee tournament was going to be.  Let’s just say I’ve had a frisbee-riddled past and have not always taken the sport seriously.  However, it ended up being awesome.  With the help of my brother, who plays for Cornell, I picked up the rules, and by Tufts’ final game vs. Harvard, one of their biggest rivals, I was really into it.  Like holding my breath on the sidelines into it.  And also really impressed by how athletic the play is.  So, I stand a little bit corrected when it comes to Ultimate.  It should be stated, however, that it is still not, nor shall it ever be, more important than me.  Take note.

Lastly, and probably most importantly, it was so good to spend time with my family.  Just being able to sit around the dinner table swapping stories with aunts and uncles and cousins, to call up in the morning and make hiking plans, was a luxury.  And, to bring things back to food, at one dinner in particular, my Uncle Mark’s girlfriend, Julie, contributed the most delicious vegetable dish I’ve had in a long time – a mixture of summer squash, zucchini, corn, green chile, and a little bit of sharp cheese, a traditional New Mexican recipe called Calabacitas.  Not usually a fan of squash in any form, I loved the sharpness of the cheese and chiles against the soft freshness of the zucchini and corn, and immediately decided it needed to be added to my repertoire.  Julie shared her recipe with us, and I’ve pretty much followed that to the T here, although there is a lot of wiggle room to adjust for personal taste.  It’s a great summer side dish, especially given that gardens and farm stands always seem to overflow with zucchini in late summer and it’s always good to have another way to prepare it.

Calabacitas – Cheesy Corn and Zucchini Salad

Serves 4 as a side dish.

  • 2 zucchini, 1/2 in. dice
  • 1 yellow summer squash, 1/2 in. dice
  • 2 TBS olive oil
  • 2 TBS water
  • 1 1/2 TBS minced garlic
  • 10 scallions, finely chopped
  • 1/3 c. diced green chile (I used the pre-chopped canned kind)
  • 2 ears fresh corn
  • 1 tsp. dried thyme
  • 1/2 tsp. onion powder
  • kosher salt and pepper to taste
  • 1/2 c. cheddar jack cheese
  1. Heat olive oil and water over medium-high heat.  Add washed, diced zucchini and squash, and sautee for 7 minutes, stirring occasionally.  Add garlic, green chile, scallion, dried thyme, onion powder, salt, and pepper, and cook for another 2 minutes.  Add kernels from corn cob.  Lower heat, and cook until everything is soft, about 5 minutes more.  Remove from heat and stir in cheese, allowing to melt completely and spread evenly throughout dish.  Serve warm.

0 June 2, 2011 Dessert

Nutella and May and Stuff.

Oh, May.  What a month you were.  I flew six different times in May.  That’s a lot of planes.  I also graduated, moved, spent at least 5 hours on hold with U-haul trying to orchestrate said move, hung out in Miami with my dad, hung out in Denver with my cousin, hung out in Boulder with some stellar Ultimate players I know, hung out in Grand Junction with my baby bro, and got pedicures/shot guns with my grandmother within 4 hours of each other.  Busy times, yo.  Hence, not a lot of blogging.  Or cooking for that matter.  Eating, yes.  Cooking, no.

However.  I did take some time to make these super delicious nutella-raspberry mousse hybrid whoopie pie-ice cream sandwich things.  They were kind of an experiment, and an experiment gone right.  See, Ryan and I are still chilling in Colorado, where my Aunt Deanne has very graciously allowed us to use her house (and her car.  I’m totally staying here: everybody spoils me and I have a car to drive with a working suspension system.  Plus my skin loves it here and I can go hiking every day.  Win, win, win.)  So, in a few hour break from Aunt Lynn’s wonderful social calendar (God, Lynn, a gap?  You slacker), I decided to make some dessert to bring along to fajita night at Grandma’s.  Because spending a few hours baking is super appealing if you happen to be me on vacation.

The reasons that the nutella-raspberry combination came about?  One: Ryan and I spent a lot of last week hoofing it from point a to point b with lots of stuff on our backs, and in order to minimize fainting spells due to lack of nutrients as well as overdrafting our bank accounts, we needed snacks.  Portable, cheap snacks.  But, lame, he’s allergic to peanut butter, my favorite snack.  So nutella it was.  (As a side note, I just realized that not once in my two years living in my own apartment at Duke did I buy nutella.  Not because I don’t love nutella, just because I was terrified of how quickly I would eat it if it appeared in my cupboard.  Is that self-control or complete lack of it?)  Two: raspberries cost $1 here.  This is miraculous to me.  I’m tempted to eat raspberries for every meal just because I will probably never be able to afford this many again.

Not to brag, but these were really pretty awesome.  The cookies themselves – decent.  The mousse – pretty tasty.  Together?  Way better than the sum of their parts.  I love it when that happens.  All of the family members present seemed to heartily approve, although to be fair, half of them were teenage boys.  In any case, I would absolutely make these again.  And again.  They’re pretty quick, easy to store in the fridge or freezer, and a good summer crowd pleaser.  And don’t worry, Deanne, I stuck four in your freezer as a tiny thanks for your generosity this week.  Also, we didn’t kill your fish, so there’s that too.

Nutella and Raspberry Mousse-wiches

Nutella cookie recipe from Rock Recipes.  Mousse recipe original.  Makes about 14 sandwiches.

For nutella cookies:

  • 2 sticks salted butter, room temperature
  • 2 c. sugar
  • 2/3 c. nutella
  • 2 tsp. vanilla
  • 3 c. flour
  • 2/3 c. cocoa powder
  • 2 tsp baking powder
  • 2/3 c. milk
  • 6 oz. chocolate chips
  • sea salt
  1. In a large bowl, cream together butter and sugar until light and fluffy.  Add vanilla extract and nutella and mix until well combined.
  2. In a medium bowl, sift together flour, cocoa powder, and baking powder.  Stir until fully incorporated.  Add flour and milk to nutella mixture in two or three batches – starting and ending with the flour mixture, and stirring to incorporate between each addition.  Add chocolate chips and mix in.  Cover dough and refrigerate for half an hour.
  3. Preheat oven to 325°F.  (340 if you’re in Colorado!)  Place spoonfuls of chilled dough on baking sheet and flatten into rounds with your fingers.  Sprinkle a tiny bit of sea salt on each cookie, if desired.  Bake for 11-13 minutes.  Allow to cool slightly on the pan, then remove to a wire rack or plate to finish cooling.
For the raspberry mousse:
  • 1 6 oz. container fresh raspberries, gently washed
  • 1/2 stick unsalted butter
  • 1/3 c. sugar
  • 3 egg yolks, lightly beaten
  • pinch of salt
  • 1-2 tsp. lemon juice
  • 3/4 c. heavy whipping cream, well chilled
  • pinch cream of tartar
  1. In a heavy bottomed saucepan over medium-low heat, melt butter.  When fully melted, add raspberries, sugar, egg yolks, and salt.  Stir constantly (to avoid scrambling the yolks) for 10-15 minutes, gently crushing raspberries against the side of the pan.  When custard has thickened and is bubbling gently, remove from heat and allow to cool completely.  Press through strainer if desired (I left mine with the seeds in).  When cool, add lemon juice and stir to incorporate.
  2. In a cold bowl, whip cream and cream of tartar until it holds stiff peaks.  Mix in raspberry custard with a whisk.  Place a heaping spoonful of the raspberry mousse between two nutella cookies.  If serving within a few hours, keep cookie sandwiches in fridge.  If keeping longer, place in freezer, wrapped tightly in plastic wrap.  Allow to thaw 20 minutes before serving.

0 May 17, 2011 Breakfast

Congratulations, self.

I can’t think of any other way to start this post than “I made it.”  So:

I made it.

And yes, I am singing that in my head a la Kevin Rudolf.  It was that or Vitamin C, people, and that song got old after 5th grade graduation.

The past few weeks (months, semester, four years…) have been a bit of a roller coaster.  First there was the stress of finding a job, then the excitement of finding a job, then the relief of finishing my thesis, and then the fear of failing ECE27 and rendering all of my other accomplishments void.  Then, suddenly, way too suddenly, it was the last LDOC, and for a week I partied like I was a freshman again and thoroughly convinced myself that I never wanted to leave Duke.  Or even the premises of Shooters, for that matter.  And then even more suddenly it was this past weekend, and a whirlwind of events and dinners and parties and ceremonies and packing left me (and pretty much everyone else I know) exhausted, exhilarated, and a little bit numb.  And now, we, the class of 2011, are graduates.

I have a love-hate relationship with Duke.  As a freshman I had a blast, but drank like a fish, did poorly in class, and didn’t resemble any version of myself that I’d ever been.  Sophomore year I hit the wall and realized I had to get back to being myself, but that realization and process left me miserable, lonely, and ungrounded.  Escape came in the form of a semester in Prague, which was the best thing I could have done for myself.  While there I found balance, independence, and an everyday happiness I’d forgotten about.  Upon returning to Duke for junior spring, I promised myself that I would focus on staying true to myself and let the things I didn’t like about Duke be what they were, and for the most part, it worked.  Senior year was a mixed bag – I learned to truly value the friendships I’d been ignoring, I threw myself into class and the job search, and about every other week I felt that Duke was my home.  I stopped going home at every chance that I got, and I did a lot of the things I’d been wanting to do for the past four years.  I started to wish I’d experienced this side of Duke earlier on.  So the other day when my dad asked me to name the things I love most about Duke, I decided that that was the way to think about things – what I loved, what I gained, what I learned, and what I survived, not what got me down, or what I regret.  So, without being too wordy, I’d like to try to sum up the best parts of my Duke experience.

Engineering.  It surprises me, too, but my engineering education was one of my favorite parts of my Duke career.  Engineering pushed me, challenged me, and overwhelmed me, but it also gave me a community when I felt alone, a close relationship with incredible professors, small classes where I could learn pretty much without bounds, and a class of students who shared my experiences almost exactly.  Especially this past year, when I got to know the other civil engineers better than I had in previous years, the classroom became somewhat… enjoyable.

Pride, strength, and independence.  I’m really proud of myself for what I’ve accomplished at Duke.  We all should be.  Given that there were so many days I spent hating Duke, blaming every negative feeling I had on the slightly twisted social atmosphere, and researching schools to which I could transfer, I’m proud that I stayed.  I’m proud that I turned Duke into a place where I felt at home, that I love, even if it’s a bittersweet sort of love.  Like our engineering president rapped so well at our ceremony “that that that that don’t kill me, can only make me stronger.”  Duke challenged me – academically, morally, and personally – and I came out knowing better who I am, what I believe, and what I can accomplish.  And for that I’m grateful.

Friends.  I didn’t feel particularly sad at graduation, or saying goodbyes, because I know that I will take the small group of people that really matter to me with me throughout the rest of my life.  As lonely as I felt some days, without a big group who I could party with, in the end I realized that the friends I had were keepers, people I genuinely love, and that that’s enough for me.  What I will miss are the everyday encounters – smiles and waves on the plaza, laughing over a shared misunderstanding in class, meeting new people during games of beer pong – the campus experience is a friendly one.  So thank you to all the people – close friends, casual friends, and even those who only recognize me and smile – who filled my days at Duke.

The future.  Though leaving college is sad and terrifying, I’m excited about the rest of life.  I feel both lucky and proud to have so much good lined up for myself – a summer of traveling and relaxing, entirely work free; a job that I honestly think I’m going to enjoy; a beautiful house and exciting new roommates in Davis Square; a life close to the family that I missed more than I expected to.  There’s a lot of potential there, and a chance to start fresh, be the person that I wanted to be at Duke but couldn’t find the courage to do so, except with a few people in a few places.  It’s good to move forward.

I know this is way longer and sappier than my usual droning, so thanks for bearing with me.  I promise, I’ll never graduate and go all mushy on you again.  And with all that said, what better way to celebrate graduation than with a cake?  However, since a. I feel like a total cow after so many delicious celebratory dinners, and b. I’m still trying to use up all the odds and ends in my kitchen, I went for a light, breakfast-y, cranberry-cornmeal cake.  I started by following a Giada recipe, but halfway through realized that it used dried cranberries, so I made a few quick substitutions and crossed my fingers.  And it worked!  The cake was moist, flavorful, and well balanced.  I might reduce the sugar by 1/4 cup when I make it again, but other than that, a winner.

Cranberry Cornmeal Cake

Serves 8-10.  Original recipe.

  • 1 1/2 sticks butter, room temperature
  • 1 3/4 c. sugar, divided
  • 1 tsp. vanilla
  • 2 whole eggs
  • 2 egg yolks
  • 2 c. fresh or frozen cranberries
  • 1 c. AP flour
  • 1/2 c. fine cornmeal
  • 1 tsp. baking powder
  • 1/4 tsp. salt
  1. Preheat oven to 350°F.  Grease and flour a 9 inch round cake pan.
  2. In a large bowl, cream together butter and 1 1/4 cups of the sugar until pale and fluffy.  Add vanilla and stir to incorporate.  Add eggs and egg yolks one at a time and stir to incorporate.
  3. In a medium bowl, whisk together flour, cornmeal, salt, and baking powder.  Fold into wet ingredients in two batches.
  4. In a food processor, briefly pulse cranberries and remaining 1/2 c. sugar, until cranberries are in small pieces but not pureed.  Gently stir cranberries into batter, then spoon into pan and smooth with a spatula.  Bake for 50 to 55 minutes until a toothpick inserted into the center of the cake comes out clean, and the top of the cake is golden brown.

0 May 6, 2011 Pasta

Cupboard Cleansing

So yesterday I took my last college final.  And I’m not really sure I’m ready to go into all the weirdness and emotion and excitement and out-of-character behavior that seems to be going hand in hand with all this … endness.  All this time I couldn’t wait to get out into the real world and now I desperately want to stay.  Emotions are running rampant.  We’ll talk more when things calm down.

Even though I’m not ready for the goodbyes, and the moving, and the “what nows,” I am ready to start cleaning out the freezer.  And the pantry.  And the other pantry.  Seriously, between the lamb, chicken, meatballs, beef, veggies, broths, and pizza dough in the freezer, apples, oranges, rhubarb, cabbages, and potatoes in the fridge, and pounds of beans, tomatoes, canned olives, dried fruits, flours, and grains in the pantry, I could probably survive for at least 8 months.  Actually.  I’m not sure how I’ve managed to accumulate such a large amount of extra food in the 16 months that I’ve lived here [that’s not true, I know exactly how it happened], but I am sure that it’s going to be tough to find anyone who wants my half-used bottles of vinegar and bags of beans after I graduate.  So, until I move out in 15 days, no more groceries, except essential dairy products and fresh produce.  (N.B. Chocolate falls firmly into the dairy category).

Using up the odds and ends that I have might stretch my culinary creativity a bit, but hopefully it will result in at least a few good meals.  Luckily, about half of the brainpower I’ve been using all semester on school and learning and stuff has been returned to me and is available for kitchen inventiveness.  As for the remainder of my brain, one quarter has been absorbed by emotional instability and I’m pretty sure the last quarter is on vacation.  Either that or it’s permanently gone.  Anyway.  To start out, I made a corn broth quinoa risotto, which kicked some frozen veggies, a cup of quinoa, and those corn cobs I tossed in my freezer last summer thinking I would be dying for fresh corn broth at some point this winter.  Whatever, Katie.  So maybe it’s a bit of a stretch to call it a risotto, but it worked fairly well, I ate the leftovers (always a sign of a good recipe), and it didn’t require any ingredients not already hanging around.  The corn broth itself is really interesting (in a good way), and I could see it working as the base for a lot of different recipes.  It has a strong corn essence, but not in the sweet way I expected – it’s more of a starchy, nutty corniness.  Topped with some fresh parmesan and a sprinkle of lemon juice, this is a quick and light weeknight dinner.

Corn Broth Quinoa Risotto

Serves 2-3.  Original recipe.

  • 2/3 c. quinoa
  • 1 c. corn broth (recipe below) or vegetable broth
  • 2/3 c. dry white wine
  • 1 TBS butter
  • 1/2 onion, diced
  • 5 cloves garlic, minced
  • 2/3 c. frozen corn and peas
  • 1/2 c. packed grated parmesan cheese, plus more for topping
  • 1/2 lemon, for dressing
  • salt and pepper to taste
  1. In a large dutch oven, melt butter over medium heat.  Sautee onion in butter for 3-4 minutes, then add minced garlic and cook for a minute longer.  Add quinoa to pan and toast, stirring frequently, for another 3-4 minutes.  Add corn broth, bring mixture to a simmer, and allow to cook for 8 minutes, until most of the broth is absorbed.  Add wine and continue to cook quinoa, stirring frequently, until all of the liquid is absorbed and the quinoa is tender (the “tails” will unfurl when the quinoa is done).
  2. Add the frozen vegetables and cook until heated through, about 2 minutes.  Remove from heat and stir in parmesan cheese until fully melted.  Serve warm with extra parmesan or feta, a squeeze of lemon juice, and a sprinkling of salt and pepper.

Corn Broth

Makes about 4 cups

  • 6 ears of corn, kernels removed and used elsewhere
  • 8 c. water
  • several sprigs of fresh herbs – I used rosemary
  • salt and pepper to taste
  1. In a large stockpot, place corn cobs and water and bring to a boil.  Water should fully cover cobs – add more than 8 c. if necessary.  Add herbs and reduce heat to bring stock to a simmer.  Cook for about an hour, checking and stirring frequently, until the stock has a translucent yellow color and a corny flavor.  Remove from heat and strain into a clean container.  If desired, cook stock down further to intensify flavor.  Once flavor is as desired, season with salt and pepper.  Store in an airtight container in the fridge for 4-5 days, or the freezer indefinitely.

0 April 12, 2011 Location

ASB: Growing Things

I know, I know, we’re closer to graduation than to spring break (ha! can you believe that?!), but I wanted to talk about the final component of my alternative spring break “food and farming” trip – the farming.  To be honest, I signed up for this trip mostly for the food part, and a little bit because I thought it would be nice to spend a few days out in the sun, doing a little honest work.  However, the farming component of this trip left me more inspired than all the scrumptious food and inspiring chefs combined.  Maybe because it’s a newer concept for me than cooking.  Maybe because I’ll never be able to kick that nurturing urge that extends even to tiny green things growing in a shoebox on my windowsill.  Or maybe because I have this hazy, completely idealized, rosy image of myself waking up early to collect eggs and milk the cow, working in the dirt all day, and sleeping the way you only can after a hard day’s work.  Whatever the reason, this trip got me excited.

Over the course of the four day trip we visited three farms and Durham’s community garden, SEEDS.  On Monday we spent the morning at Prodigal Farm, a goat farm run by Kathryn and Dave, ex-New Yorkers who recently decided to follow their dreams back down South.  Kathryn’s story resonated particularly well with me – a Duke graduate and practicing lawyer for 15 years, she gave that world up to live in rural North Carolina with Dave and their goats.  Now she spends her time caring for the goats (who live in an old school bus!), whipping up fresh goat cheese cheesecakes, and restoring the old farm they bought.  Oh, and taking on the Plum Island center for biological warfare research when they wanted to start a mainland operation and chasing them out of Durham, NBD.  While at Prodigal Farm, we ASB-ers played with the goats, who were surprisingly friendly and didn’t try to eat any of my belongings – I guess that’s only the unloved goats at petting zoos – and then spent an hour helping Dave to clear trees.  It’s amazing how much land you can clear in an hour with 20 college kids trying to earn their lunch – I kept thinking about how much my dad would love it.  Then Dave and Kathryn treated us to an incredible lunch of fresh goat cheese, jerusalem artichokes just pulled from the ground, okra pudding and … roasted goat leg.  Which was incredibly tender, delicious, and not at all what I expected.  Yes, it was a little bit odd at first to eat goat while simultaneously watching goats frolic, but after getting over the initial uncomfortableness, it was the coolest experience, being able to actually see the source of each food we were eating.  Inspiration, part one.

Later that afternoon we headed to Four Leaf Farms, where Tim and Helga run the neatest, most organized little operation I’ve ever seen.  On the very small plot of land surrounding their house, they grow enough produce to supply Watt’s Grocery, themselves, and several farmer’s markets, raise chickens, grow mushrooms in the woods, and even have a kiwi tree. (Who knew that kiwis grew in North Carolina?!)  I was amazed with how well they used the little bit of space that they had – I’m not sure I’ve ever been in such a supremely well organized place in my life – and standing in the greenhouse I was a little bit in awe of the rows and rows of green thriving in the middle of March.  More than anything, I think being at Tim and Helga’s gave us all the sense of “Hey, I could do this…”  I don’t think anyone’s dropped out of school to start a farm since break yet, but you never know.

Tuesday morning we spent 2 hours at SEEDS, Durham’s community garden.  SEEDS is a well-established, well-loved piece of Durham culture, where high-school students can work to grow and sell their own produce, younger children can attend day camp, and anyone who would like to can sign-up for their very own plot in which to grow their own vegetables, herbs, and flowers.  While at SEEDS we got some of our energy out digging out the bermuda grass from a new plot [side note: google has revealed to me that Jamaica grass – an energy drink that I’m pretty sure has marijuana in it – is not the same thing as Bermuda grass] and helping to sort the compost.

From SEEDS we headed to the newly established Duke Campus Farm, the reason behind this whole trip.  On 12 acres of old tobacco land in the Duke forest, several Duke students are farming a 1-acre pilot plot, new this year.  Duke dining services has agreed to buy all of the produce, and dreams for the farm are big, but there’s a lot of work that goes into creating a farm-able area before you get to the harvesting part.  On the two days that we were there, we helped build an 8-foot tall deer fence around the plot, hoed the soil into rows, shoveled manure, and finally, as the sun was setting on the last day of the trip, got to plant the first baby lettuces and kales.  I wish that the farm had gotten started when I was a freshman, as it’s something that I’d love to be involved in, but I’m glad that it exists now and I hope that it succeeds.

Since all this farming business ended, I’ve been a little bit obsessed.  The night after going to Tim and Helga’s farm I went to Kroger and got three packs of seeds and a bag of potting soil.  I now have four sage plants, four lettuce plants, and four basil plants that I am absurdly happy about.  Sometimes Megan finds me sitting on the windowsill in the morning, literally just watching the plants, and she has to remind me how weird I am.  I’ve also been devouring books like “The Dirty Life,” and one of my classmates caught me looking up how to grow asparagus in the middle of class, at which point he had to remind me that I am, in fact, a 21 year old college student and not yet a farmer.

To go along with all this springtime greenery, farm-ness, and inspiration, I baked these pea, pancetta and chevre tartlets, inspired by a recipe I’ve been eyeing in Sarah Banbery’s “Tarts,” for over a year now.  The fresh peas are the essence of spring, the goat cheese brought me back to lunch at Prodigal Farm, and the pancetta… well, pancetta just makes everything better.  These were delicious – light and creamy filling with bites of salty pancetta and sweet peas, and a flaky crust flecked with parmesan.  A little indulgent, but one or two makes a perfect Saturday afternoon lunch.

Pea, Pancetta, and Chevre Tartlets

Inspired by Tarts.  Makes 4 tartlets.

For the crust (makes enough for 6-7 tartlets, freeze extras)

  • 3/4 c. flour
  • 1/4 tsp. salt
  • 5 TBS cold butter, cut into small pieces
  • 1/4 c. finely grated parmesan cheese, packed
  • 2-3 TBS very cold water

For the filling

  • 1/2 c. fresh peas, from 1/2 lb. peapods
  • 1 TBS butter
  • 2 shallots, peeled and finely diced
  • 3 oz. pancetta, cubed
  • 2 TBS finely minced fresh basil
  • 3 oz. goat cheese
  • 4 egg yolks
  • pepper to taste
  1. Grease four 3″ tartlet pans (I used pam and the tarts came out really easily).  Set aside.  In a medium bowl, sift together flour and salt.  Cut in cold butter, using a fork or pastry cutter to mash mixture until a crumbly dough is formed.  Add parmesan cheese, mix to combine.  Add water a tablespoon at a time, stirring between additions, until dough just comes together.  Set bowl in freezer for 5 minutes to firm up.
  2. Divide dough into 6 or 7 equally sized lumps.  Stick the extra two or 3 into the freezer for next time!  Or make double the filling.  On a floured surface, roll out into a circle, and press into tartlet pans. Trim excess dough from edges, crimping as you go.  Put tartlet pans in freezer for 5 minutes.  Preheat the oven to 400°F.
  3. Bring a small pot of salted water to a boil.  Add peas and cook for two minutes, until bright green and just tender, then drain and rinse under cold water.  Set aside.
  4. Remove tartlet pans from freezer, and place on a baking tray.  Cut a circle of parchment paper to fit inside each tartlet pan, and cover with pie beans or rice to keep the crust from bubbling.  Blind bake the crust for 8 minutes.
  5. In a medium frying pan, melt the tablespoon of butter over medium heat.  Add the shallots and cook until translucent, about 5 minutes.  Add the pancetta and cook until brown all over and shallots are caramelized, about 5 minutes more.  Add peas to warm for 30 seconds.  Remove from heat.
  6. In a medium bowl, mix together egg yolks, goat cheese, and minced basil until smooth.  Add pea-pancetta-shallot mixture and season with pepper.  Divide filling evenly among four tarts, and bake for 12 minutes, until set.  Serve warm.

0 April 9, 2011 Dessert

Bake Sale!

When Becky sent me an email with the subject line “big question,” I was fairly worried.  About what, I’m not entirely sure – it seemed unlikely that she was going to ask me to move in with her, give her money, or ask to take things to the next level.  Still, it was a little daunting.  So, when I opened the email (with faint trepidation) and found out that the big question was whether or not I would help her with a bake sale, I was relieved.  In my book, “bake sale?” is a very small, easily answered question, with the answer being “absolutely.”

Becky is working with an organization called Promise of Play to build a new playground at the Durham Crisis Response Center, a shelter and support center for victims of domestic and sexual abuse.  Although I’ve never really found my calling when it comes to service, I think this project is one of the coolest I’ve heard of.  The idea of kids having a safe, happy place to play while their parents attend meetings and therapy sessions really strikes a chord with me – I can’t imagine having been a kid without being surrounded by a feeling of safety and joy, and any opportunity to give a child without that privilege a brief sense of safety and fun is so important.  Additionally, the playground will be dedicated to the memory of my classmate Drew Everson, who passed away this fall.  Drew and I weren’t close friends, but we shared a class freshman year and always said “hi” to each other on the path.  The whole campus really struggled with his death, and with finding an appropriate way to remember him.  To me, at least, Drew embodied playfulness – he was always ready with a smile or a joke or to run off on an adventure with whoever would accompany him – and I can’t think of a more perfect way to remember him than by sharing the joy he seemed to experience so constantly through the simple act of play.

DPS and PlayTime2011 will be tabling on the plaza every day this week in order to try and meet their fundraising goal before the playground build next week.  (For more information on the build or to sign-up, see the PlayTime2011 Facebook page).  Which is where I come in.  Every day I hope to have 2 or 3 treats ready for the tabling crew, with all proceeds going to the playground.  I’m pretty excited about this, and no way was I sticking with chocolate chip cookies and brownies – so you should be excited too.  To start things off, on Monday there will be Snickerdoodle Cupcakes, Mini Strawberry-Rhubarb Crumbles, and these Chocolate-Peanut Butter Truffles that you see all around.  I haven’t finished the cupcakes or the crumbles yet, so I won’t make any claims as to their deliciousness, but these truffles… they are really good.  Like, really really good.  Personally, I think they’re better than Reeses, and I really like Reeses.  In fact, for those of you who have ever been to Sweet Mimi’s… I think they’re as good as Wows.  Yep, I went there.  They’re a bit time consuming to make, but the final product is totally worth it – I’ve been having a hard time limiting myself to the one or two I’m allowed for quality control purposes.  Don’t believe me?  Try for yourself!  Come by the plaza Monday and snag one or two of these before I end up buying them all back.  And be sure to stop back throughout the week to see if I’ve come up with anything else worthwhile!

Chocolate Peanut Butter Truffles

Adapted from Food Network.  Makes about 70 truffles.

  • 1 c. heavy cream
  • 1 c. smooth peanut butter
  • 12 oz. white chocolate
  • 18 oz. semisweet chocolate
  • pretzels, sea salt, turbinado sugar, for decorating
  1. Heat white chocolate just until melted.  Mix peanut butter and white chocolate in large bowl until smooth.  Set aside.
  2. Scald cream over medium heat.  Pour into a small bowl and refrigerate for 30 minutes or freeze for 10, until chilled.  Mix chilled cream with peanut butter and white chocolate.  Cover and store filling in fridge for 24 hours.
  3. Use a melon-baller or teaspoon to scoop out balls of the chilled filling.  Place in rows on a baking sheet.  Freeze baking sheet for 10 minutes, until balls are firm.  In the meantime, heat water in a large saucepan (filled 1/3 of the way) over low heat, then melt semi-sweet chocolate in a smaller saucepan over it (double boiler).  Heat chocolate just until melted, then remove from heat.  Dip chilled filling balls into chocolate, coating on all sides, and place on a baking sheet lined with parchment paper.  I used a toothpick to allow easy dipping.  Freeze coated truffles for 5 minutes to firm up, then remove from freezer.  Dab with a small bit of warm chocolate where you wish to roll in a topping – turbinado sugar and sea salt, crushed pretzel bits, or cocoa powder.  Store finished truffles in the refrigerator (or freezer) until you wish to serve.

0 April 1, 2011 Dessert

ASB: Locavore Durham Restaurants

Yes, it’s been a while since my initial post about the awesome food and farming alternative spring break I took part in a few weeks ago, but I’m definitely not over how cool it was, so I thought I’d share a little bit more.  The trip focused on eating locally and sustainably, as well as learning about where your food comes from and the people who are creating it.  Durham happens to be one of the country’s biggest hotspots for local food – as a growing urban area sitting on miles of tobacco land which is slowly being converted to other types of crops, the city has access to a wide variety of locally-sourced vegetables and animals, as well as a young population ready to commit to eating locally.  The NY Times wrote an article last April about the local food movement here, and this year, named Durham one of the top 41 places to visit in 2011 in the entire world, due to the wealth of excellent, sustainable restaurants in town.  Pretty cool place to be if you’re into food, right?  Even cooler was getting to meet some of the chefs behind the incredible food Durham’s top restaurants are turning out, and then dig in (for free!  Thanks, Duke).  Below you’ll find a brief summary of each of the local restaurants we visited, who we met, and what we learned.

Piedmont – Marco Shaw, the chef and part-owner at Piedmont, is one of the most inspiring people I’ve ever met.  His passion for what he does is apparent in everything from the way he speaks to the way he cooks.  Having worked with Alice Waters at the beginning of his career, the decision to cook locally was an easy one for Marco – when asked why his menus don’t loudly proclaim their sustainable ingredients, he answered that not every restaurateur can afford to make the same choices, but for him, it’s a responsibility.  He also makes it a point to use every part of the animals he gets – my pig trotter tronchon was delicious – and does all of his own butchering (which, after reading Heat’s 50 page description of how complicated it is to butcher anything, completely impressed me).  A final fact – he changes 50-90% of his menu every single day, based on what his farmer’s are able to get to him.  Dedication.

Fullsteam Brewery – Durham’s own micro-brewery, Fullsteam uses local produce to create its seasonal specialty beers, which include rhubarb, persimmon, and basil beers, as well as their famous Sweet Potato Ale.  The brewery is also a favorite destination for the young and old alike – while we were there on a Sunday afternoon there were kids riding tricycles across the open room and even having birthday parties while their parents relaxed with friends and had a few beers, but on a weekend night it has the vibe of any other cool, slightly off-beat bar.

Ninth Street Bakery – Frank, the owner and head-baker at the Durham institution, Ninth Street Baker, has a great hippie baker’s life story.  After dropping out of UC Davis in the ’70s, he lived in a zen Buddhist monastery, which is where he learned to bake.  And baking turned out to be his thing.  Thirty years ago he and his wife began 9th street bakery, way before 9th street was a fun, safe place to go.  Now they’re located downtown, and we had the pleasure of touring the bakery and learning how one churns out hundreds of loaves of bread a day (my favorite part was punching down the dough … that filled an industrial-size trash barrel).  All of their breads and pastries use organic flours and grains, and are completely delicious.  You can buy their sandwich bread at both Wholefoods and Kroger, and it’s 100% worth the extra dollar.

Bull City Burger and Brewery – A brand new restaurant on the Durham scene, Bull City Burger and Brewery opened a week ago to an overwhelmingly positive response.  We met with Seth Gross, the owner and chef, a few weeks before the restaurant was set to open, and he graciously took a few minutes out of the overwhelmingly busy pre-opening schedule to talk to us about his concept.  The restaurant is completely sustainable in its concept – even the tables are made from recycled barn beams.  The beef (grass-fed, but of course) will all be from the region, and hopefully 100% from North Carolina.  The restaurant will use burger toppings from local farmers – so don’t expect tomatoes on your burger in January! – and buns made from locally processed flours.  Even the beer will one day use barley and hops from North Carolina.  On top of all that localness, pints will be $4.50 and burgers are around $6, meaning even I can afford to go there.  A final cool fact about BCB&B – they sponsored the “golden bull contest” for the months before the restaurant opened, hiding 5 golden bulls (Durham – “Bull City’s” – mascot) in various locations downtown, providing clues as to the locations of the bulls each day on their website.  The finders of the bulls won a free lunch every week for a year, and the competition was fierce.

Watt’s Grocery – One of the restaurants I frequent most in Durham, Watt’s ascribes to the same concept as Piedmont, and attempts to source as many of their ingredients locally as possible.  While after listening to Marco some of us were a bit disappointed to hear that they don’t change their entire menu every day, it was important for us to learn that using local ingredients is a serious commitment for a restaurant.  All of the restaurateurs we spoke with mentioned the difficulty of adapting to the variability of what farmer’s can give you in any given week – if you planned your entire menu around the availability of 6″ tomatoes and your farmer can only give you cherry tomatoes, you have to adapt fast, and not every restaurant has the resources to do so.  Watt’s is up there with the best in terms of sustainability, and their food is delicious.  During our extended three course dinner I had their hush puppies with basil mayo, rib eye with farmer’s cheese dumplings, and incredible lamb meatloaf with a farro salad.  Then, for dessert, our table ordered every single dessert on the menu and demonstrated excellent sharing abilities by each taking one bite and passing the dessert on.  The almost unanimous favorite dessert was the espresso pot de creme, which brings me to today’s recipe!

My version of the incredible espresso pot de creme we had at Watt’s is not quite as good as theirs, but it is pretty excellent.  The recipe is straight forward and not too time-consuming, although it does use a large number of bowl (never a plus in my kitchen).  It is an extremely thick and rich dessert, and a little goes a long way.  I do wish that it was a bit creamier – the density of this is similar to that of pumpkin pie, and next time I might up the cream to egg ratio in order to achieve a more “mousse-y” consistency.  To serve with it I made a batch of lemon peel tuiles to emulate the Italian tradition of serving espresso with a twist of lemon.  The tuiles were fun to make, used up all the leftover egg whites from the pot de cremes, and turned out perfectly – wonderful lemon flavor, well formed, and a crunchy bite!  A great afternoon snack for this rainy spring week.

Chocolate Espresso Pot de Creme

Recipe adapted from Gourmet.  Serves 4.

  • 3 oz. high quality bittersweet chocolate, broken into small pieces
  • 3/4 c. heavy cream
  • 1/4 c. whole milk
  • 1 1/4 tsp. espresso powder
  • 3 egg yolks
  • 1 TBS sugar
  1. Preheat oven to 300°F.
  2. Place chopped chocolate in a medium heat-proof bowl.  In a separate, larger bowl, beat the egg yolks with the sugar, and set aside.  Bring cream, milk, and espresso powder just to a boil over medium heat, whisking until all espresso powder is dissolved.  Pour hot cream over chocolate, whisking continuously, until mixture is smooth.  Then pour hot chocolate mixture over egg yolks in a slow stream (so as not to scramble the eggs), whisking continuously, until smooth.  Pour custard through a sieve into a glass bowl and let sit for 15 minutes.
  3. Prepare a hot water bath: place a kitchen towel or dishcloth on the bottom of a baking pan large enough to hold your 4 ramekins.  Bring a pot of water to a boil.  Divide the chocolate-espresso custard evenly between 4, 4-oz. ramekins, and place on top of the dishcloth in your baking pan.  Carefully pour the boiling water around the edges of the ramekins so that it rises 2/3 of the way up the sides of the ramekins.  Cover the baking pan and ramekins with a piece of aluminum foil, poking several holes in the top to allow steam to escape.  Place in preheated oven and bake for 30-35 minutes, until custards are set on the edges but still slightly soft in the middle.  Remove from oven and allow to cool.  Cover and refrigerate for at least 4 hours before serving.  Will keep covered in the fridge for 3-4 days.

Lemon Peel Tuiles

Recipe from Gourmet.  Makes 3-4 dozen cookies.

  • 1/2 c. sugar
  • lemon zest from 4 medium lemons
  • 1/2 stick salted butter, softened (room temperature)
  • 1/2 tsp. vanilla
  • 2 egg whites
  • 1/4 c. AP flour
  1. Preheat oven to 350°F.  Line a baking sheet with parchment paper.
  2. In a food processor, pulse the sugar and the lemon zest a few times until evenly mixed.  (This lemon-sugar smells lovely and could be used for lots of other purposes…)
  3. Beat the lemon sugar with the butter until smooth and fluffy.  Add vanilla and egg whites and mix until well-combined.  Add flour and mix until just combined.  Spoon batter into a pastry bag (or a ziploc bag with the tip snipped off), and gently pipe 6 inch long stripes about 3 inches apart.  Cookies should only be about 1/4 inch wide, as they will spread a lot in the oven.  Bake for 8 minutes, or until the edges are beginning to brown.  (Underbaked cookies will not form shapes as well and will have a chewy texture; golden-brown cookies will form very well and have a great crunch plus a slightly caramelized taste).  Remove tray from oven and immediately and gently remove cookies from pan and drape over a dowel, forming an enclosed circle lengthwise around the dowel.  (You could also use a mixing spoon handle, but you’ll run out of space quickly!)   If cookies begin to harden to much to form, place the tray back in the oven for 30 seconds to re-soften.  Repeat with remaining batches of cookies.  Don’t remove cookies from dowel until hardened, which takes about 3-4 minutes.
  4. Cookies can be stored in an airtight container at room temperature for up to 5 days.

4 March 27, 2011 Dessert

Grapefruit Buttercream

Over the weekend, I developed three wasabi-centric recipes for the last round of the Marx Food contest that I’ve been participating in for the past 7 weeks.  I only submitted one of my three recipe so the contest, but I still enjoyed the other two.  One of the rejected recipes was for wasabi cupcakes with grapefruit buttercream and caramelized grapefruit.  While the wasabi cupcake wasn’t my favorite, the grapefruit buttercream was incredible and I’m pretty proud of myself for developing the recipe.

My problem with most grapefruit flavored baked goods is that they don’t taste at all of grapefruit – it’s a hard flavor to instill because grapefruit juice is fairly dilute, so it’s hard to maintain its bright, juicy flavor while also keeping a reasonable wet-dry ratio in your recipe.  I’ve tried grapefruit curd that only tasted slightly citrusy, grapefruit frosting that was far too runny to use, and grapefruit cake with a cup of grapefruit juice but no flavor to it at all.  This time, I wanted to really get that grapefruit flavor, so I decided to create my own grapefruit concentrate and use that as my flavoring.  I boiled a cup and a half of ruby red grapefruit juice for about 40 minutes, reducing it to about 1/4 cup of viscous liquid.  This grapefruit reduction was so tart, while retaining its juicy flavor, that I had high hopes for it.  I mixed a basic buttercream up, omitting half the liquid ingredients (cream and vanilla) and added 3 TBS of the grapefruit concentrate to it.  Voila!  The frosting was firm, pipable, a lovely pink-orange color, and actually tasted like grapefruit.  Great success.

Grapefruit Buttercream

Makes about 1 1/2 cups, or enough for 12-14 cupcakes

  • 1 1/2 c. grapefruit juice
  • 1 stick salted butter, room temperature
  • 2 c. confectioner’s sugar
  • 1 TBS heavy cream
  1. Cook the grapefruit juice over medium-high heat in a small saucepan, stirring occasionally, for about 30-40 minutes, or until the juice has reduced to about 1/4 c. and is beginning to act syrupy.  Skim any foam off the top and discard.  Allow to cool completely before using in the frosting, or store in the fridge until ready to use.
  2. In a large bowl, beat the stick of butter with a wooden spoon until it is smooth.  Add 1/2 c. of the confectioner’s sugar and stir in until all of the sugar is incorporated.  Then beat vigorously for a minute or so.  Add the remaining confectioner’s sugar, scraping any excess down the sides.  Incorporate, and then beat vigorously for 3 minutes, until fluffy and smooth.  Add the 1 TBS of heavy cream and beat in.  Add 2-3 TBS of the grapefruit reduction and incorporate thoroughly.  Taste.  If it needs more flavor, add the remaining grapefruit reduction as well as an extra 1/2 c. of confectione’rs sugar in order maintain the consistency.
  • « Go to Previous Page
  • Go to page 1
  • Interim pages omitted …
  • Go to page 48
  • Go to page 49
  • Go to page 50
  • Go to page 51
  • Go to page 52
  • Interim pages omitted …
  • Go to page 57
  • Go to Next Page »

Primary Sidebar

Subscribe!

Get creative recipes and menu ideas delivered straight to your inbox.

Most Popular

A House // Sweet Potato and Coconut Milk Soup with Brown Rice and Lentils

Monthly Fitness Goals: July // Homemade Spinach Wraps with Chopped Greek Salad

A New Job // Classic Seven-Layer Bars

Butternut Squash Carbonara with Fried Sage and Caramelized Onions

Happy Birthday, Trevor! // Peanut Butter Fudge

Cookbook Review and Giveaway: Home Made Winter

Drizly

Please note!

Full disclosure: if you purchase anything at Amazon using the above links or any other links to Amazon on this site, I will receive a small commission. Just so you know!

Copyright© 2025 · Cookd Pro Theme by Shay Bocks

This site uses cookies: Find out more.