• Skip to primary navigation
  • Skip to content
  • Skip to primary sidebar
  • Home
  • Recipes
  • Features
    • Cookbook Reviews
    • Ingredient of the Week
    • Sunday Dinner
    • Fitness Goals
  • Travel
  • About
    • Privacy Policy
    • Cookie Policy
  • Work With Me

Katie at the Kitchen Door

Globally-inspired, seasonal recipes

Blog Page

Strawberry, Chocolate, and Whipped Mascarpone Parfaits

June 18, 2012 Dessert

Strawberry, Chocolate, and Whipped Mascarpone Parfaits

I went a little strawberry crazy last week.  It’s just that I saw so many people writing about strawberries, taking pictures of strawberries, making strawberry jam, etc., that I couldn’t resist.  So I bought a quart of tiny, bright red local strawberries at WholeFoods on Thursday night.  Then, on Friday, one of my coworkers just dragged me to the farmer’s market at Copley for lunch, and when a cute farmer yelled out “we just picked these this morning, you know you want some!” well, how could I say no?  Another quart in the bag. And these strawberries are not the big hearty California ones that will last for weeks in your fridge; these strawberries beg to be eaten, with little embellishment, right away.

Sometimes when I’m surrounded by beautiful produce I forget that I’m only one person, and that it’s hard for one person to eat 2 quarts of strawberries in 4 days.  So I had to find uses for these berries other than eating them out of hand.  I made a few things, including a batch of my favorite strawberry and sage muffins, and by tonight, after popping this strawberry-rhubarb pie in the oven to share with my dad (it’s his favorite pie, and it was just father’s day…), I only have a handful of berries leftover – just enough for a lovely breakfast tomorrow morning of strawberries, fresh cherries, Greek yogurt, and granola.  Of all these treats, however, the star were these strawberry and whipped mascarpone parfaits with chocolate shortbread.  These things are delicious.

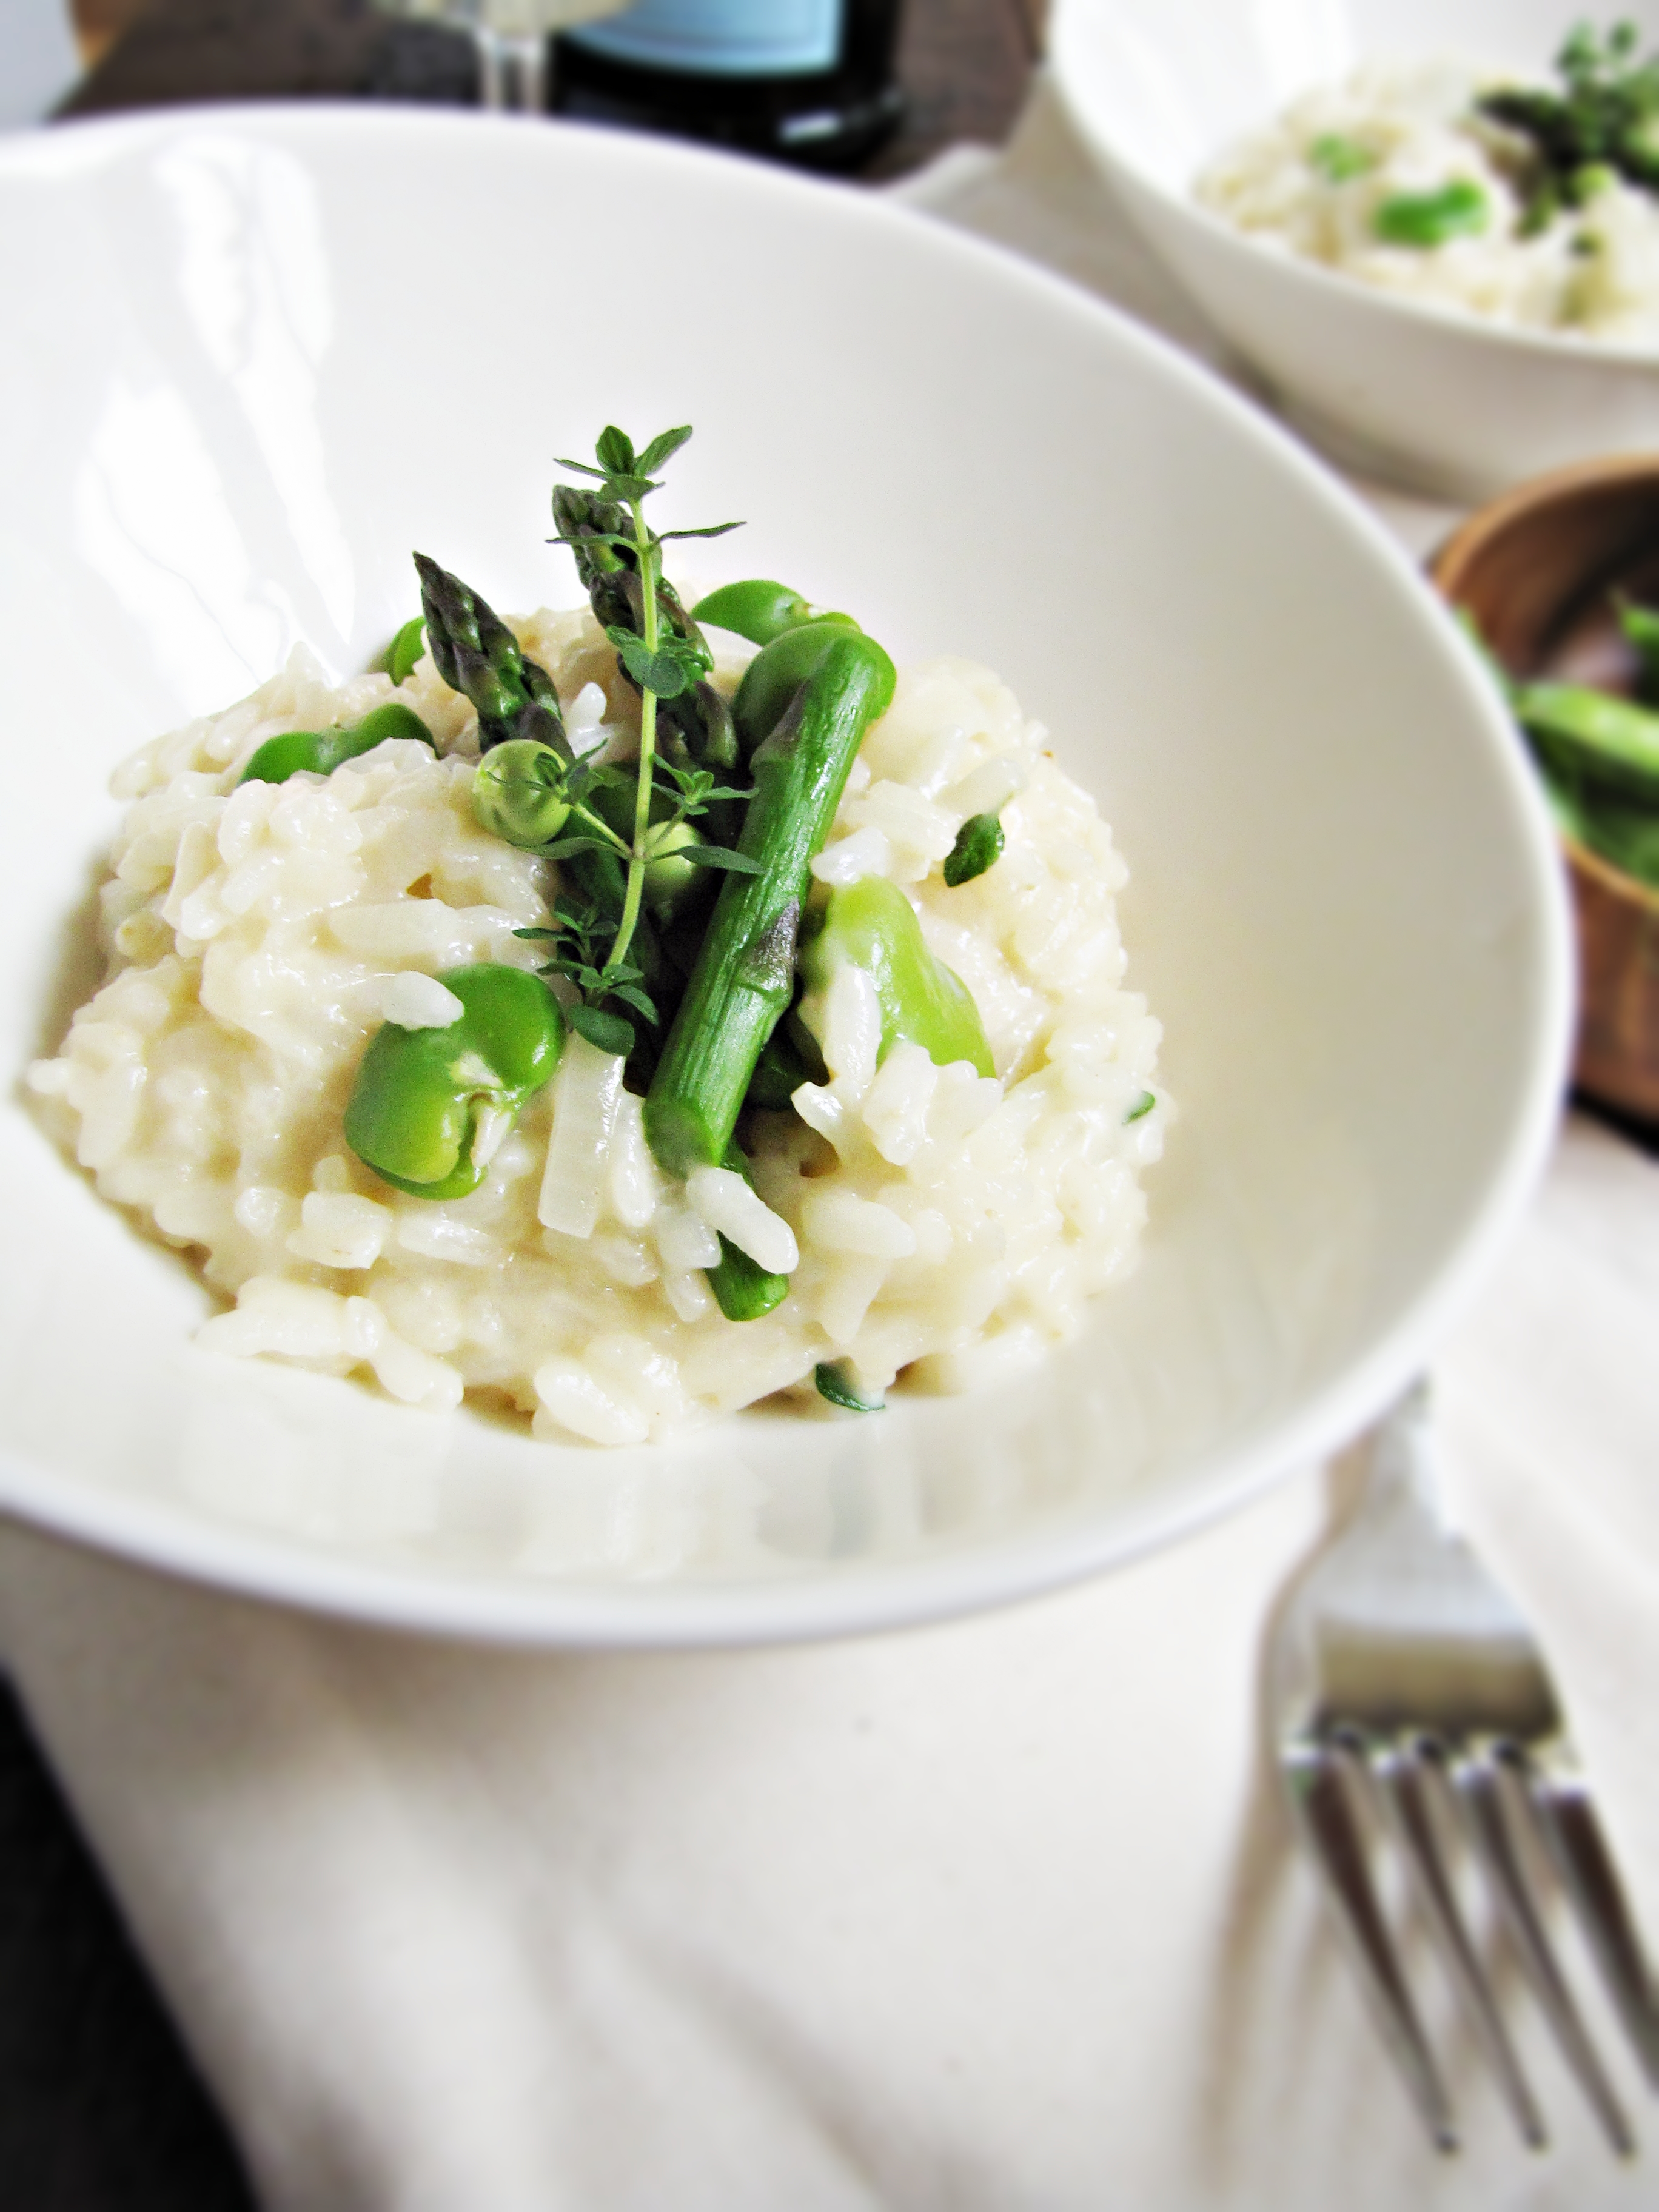
I spent a good chunk of Saturday cooking and baking, which was really nice, given that I haven’t had much time to spend in the kitchen lately.  Trevor was at tryouts all day, so I decided to make us a nice risotto dinner for when he got back, with something strawberry-based for dessert.  I had been toying around with the idea of finally making a fraisier, but all the individual components – sponge cake, pastry cream, marzipan – started to seem daunting as the day crept on.  Then the idea of doing something resembling a dirt cake, but with strawberries, of course, popped into my mind, and wouldn’t leave.  I had all the ingredients I needed on hand to make a quick batch of chocolate shortbread (which is so buttery and chocolaty and crumbly it’s amazing), and I was already using mascarpone in the risotto, so I whipped it with heavy cream, sugar, and vanilla to give it a little more silkiness, and we were good to go.  I love pretty much anything that is layered with cream, but I have to admit that this recipe was partly inspired by all of my recent lunchtime trips to Via Matta, where they serve every single dessert with whipped mascarpone and it’s totally heavenly.  In particular, I was thinking of their “Mascarporeos” – a tray of do-it-yourself “oreos” with rich chocolate cookies and whipped mascarpone.  Anyway, the combination of the buttery shortbread, sweet cream, and fresh strawberries was incredible – sophisticated and comforting at the same time, fresh, and not too sweet.  I may or may not have eaten one for breakfast the next morning while doing this shoot.  Food blogger problems.

I did so much brainstorming about other things to make with strawberries that I might have to double up on berries again next weekend.  It’s a short season, after all – I might as well make the most of it!  Plus, I really do want to make a fraisier, and also this sour cream and strawberry ice cream, and why not some jam while I’m at it.  So I guess you can probably expect to see some more strawberries around here, and pretty soon, too.

Strawberry, Chocolate, and Whipped Mascarpone Parfaits

A Katie at the Kitchen Door original.  Serves 4.

  • 1 pint fresh strawberries, hulled and cut into small (1/2 inch) pieces
  • 1/2 c. mascarpone cheese, chilled
  • 1/2 c. heavy cream, chilled
  • 1 tsp vanilla extract
  • 1 TBS sugar
  • 1/2 recipe dark chocolate shortbread (see below)
  1. Crumble shortbread cookies into pieces, with some tiny crumbs and some larger, bite-sized chunks.  You can do this easily by hand or by using a rolling pin to roll over a plastic bag filled with crumbs.
  2. In a medium bowl, whisk mascarpone and heavy cream until thick and evenly combined.  Add vanilla and sugar and whip until it holds soft peaks.
  3. Divide 1/2 of cookie crumbs between 4 glasses.  Top each chocolate layer with a large dollop of whipped mascarpone, and a handful of strawberry pieces.  Follow with another dollop of mascarpone, then top with more strawberries and remaining chocolate crumbs.  Serve cold.

Dark Chocolate Shortbread

Recipe adapted from Epicurious.  Makes 2 cookies 6 inches in diameter (about 10-12 servings).

  • 1 stick salted butter, softened
  • 1/4 c. sugar
  • 1/2 tsp vanilla
  • 3/4 c. + 2 TBS flour
  • 2 TBS cornstarch
  • 1/4 c. cocoa powder
  • 1 TBS heavy cream (optional)
  1. Blend butter, sugar and vanilla together in a medium bowl until well combined.  Sift flour, cocoa and cornstarch on top of butter mixture, fluff dry ingredients together gently with a fork (it’s OK if they start to mix with the butter below), then proceed to mix into the butter and sugar, just until evenly combined.
  2. Pat dough together into 2 discs about 1 inch thick and 6 inches in diameter.  If dough is too crumbly to do this, add the heavy cream and mix in to moisten the dough.  Place the dough discs on a baking sheet and refrigerate for half an hour, uncovered.
  3. Preheat the oven to 375°F while the dough chills.  After half an hour in the fridge, prick the dough all over with a fork (to let steam escape).  Bake for 15 minutes, then let cool on cookie sheet for 10 minutes (if you try to move before it has cooled enough, it will immediately fall apart).
Garden: Pea, Fava Bean, and Asparagus Risotto

June 17, 2012 Food

Garden: Pea, Fava Bean, and Asparagus Risotto

I’m here to tell you about our garden.

Finally.

I’ve been looking forward to writing this post since the beginning of February, when I planted the first tiny parsley seeds and proceeded to check them hourly for signs of growth.  I’ve taken hundreds of pictures, from those first tiny sprouts to the squash flowers that have just opened up to the fat little pea pods on the vines (peas! actual peas!)  and I’ve been dying to share them.  Well, I’ve shared a couple.  But really, I didn’t want to say too much about the garden in case it was a total failure.  Having written about it prematurely would only have compounded my disappointment.  I love this garden.  Like, I really love it.

From the get-go, I decided that if I ate even one thing from the garden, I would consider it a success.  And now that I’ve harvested not one, but two things from the garden (arugula! peas!), I’m taking a deep breath and declaring success.  And telling you all about it.

Dork alert: I’ve been keeping a garden diary.  Growing things is not something I have that much experience with, and when I’m unsure about something, I write about it until I understand it.  That’s why I have 8 journals full of notes about boys – they’re not as simple as they seem at first, what can I say?  But looking back at the notes I’ve taken in the past 4 months reveals how much uncertainty there is for a first time gardener – there was the week when the trees leafed out and the raised bed stopped getting morning sun, and I wondered if the sun would ever be high enough in the sky to give it afternoon sun (it is).  The days when the lemon tree suddenly dropped all it’s leaves caused a bit of panic too (it’s covered in blossoms now, although still a little low on greenery).  Just the other morning I found that some creature had hopped into the raised bed and eaten an entire kale plant, leaving no signs that the plant had ever existed.  Little heartaches are left and right in this process, but working in the garden with Trevor has become one of my favorite activities, and eating the first fresh peas this week has seemed more like icing on the cake than the natural outcome of all the hard work we’ve put into it.

I started planning the garden out in January.  I’ll admit, we were a little over-zealous, and the garden quickly spread from being contained in a 16 sq. ft raised bed, to a 16 sq. ft raised bed and about 20 pots and containers along the driveway.  With the exception of 1 eggplant, the thyme, the oregano, and the trees, we started everything from seed.  In February, we started the basil, sage, parsley, oregano, thyme, broccoli, eggplant, and tomatoes.  I invested in a heating mat and found that, even though they seem like a waste of money, the Jiffy pop-up seed pods were much more effective than planting in little pots with seed starter.  The oregano and thyme sprouted but never really grew, so we replaced them with big plants from Pemberton.  That first batch of basil got dried out when I went away for the weekend and had to be restarted.  The parsley was a slow-starter, but is now doing OK in the raised bed.  One of the eggplants really took off, and has it’s first flowers now.  The tomatoes have been the biggest success – San Marzanos and Sweet 100 cherry tomatoes.  The 5 cherry tomatoes are all huge and just getting their first tiny green tomatoes.  In March, the shelling peas and fava beans got planted directly in the bed, the lettuces went into a large stone bird bath, and brussels sprouts and kale got planted inside.  Then in April, the squash, cucumbers, and beets went in.

And now?  In the raised bed are 2 varieties of English shelling peas, fava beans, parsley, broccoli, cucumbers, roma beans, edamame, kale, and brussels sprouts.  On the porch?  A fig tree and a strawberry plant.  In the backyard, a planter that’s overgrown with arugula, parsley, radicchio, and lettuce, and containers with raspberries, more broccoli, mint, and sage.  In pots along the driveway, where it’s the sunniest, are the meyer lemon tree, tomatoes, summer squash, watermelons, basil – both green and purple, and cucumbers.  It’s a giant hodge podge of green, and I have no idea what will work and what won’t, but it’s the best experiment I’ve done in a long time.

To celebrate the arrival of the peas, the success of the garden, and the beginning of summer, I had a little dinner for Trevor and I on Saturday night.  An actual dinner – with a glass of prosecco, a main course, and a dessert, where we sat down at the same time at the table with bowls and forks rather than eating out of tupperware from the fridge.  Mostly I just eat the peas straight while I’m sitting in the garden – they are so incredibly sweet and cool and juicy – but I wanted to use at least a few in a real meal.  So I made a spring risotto, with peas, fava beans, asparagus, mascarpone, and pecorino – all the flavors of spring.  The fava beans and asparagus aren’t from our garden, but they are local and very tender and flavorful, so we’ll take ’em.  It was delicious.  And for dessert, there were parfaits with chocolate shortbread, whipped mascarpone, and lovely red-ripe strawberries from the farmer’s market… but you’ll have to wait for Tuesday for that recipe!

Spring Risotto with Peas, Favas, Asparagus, and Mascarpone

A Katie at the Kitchen Door original.  Serves 4.

  • 1 1/2 c. arborio rice
  • 4 c. chicken stock
  • 1 c. water
  • 1 small onion, diced
  • 1 TBS olive oil
  • 1/2 c. white wine
  • 1/2 c. shucked fava beans (about 1 lb. with pods)
  • 1/2 bunch asparagus (about 15 thin stalks), trimmed and sliced on a bias into 1 inch pieces
  • 1/2 c. fresh or frozen English shelling peas
  • 1/3 c. mascarpone cheese
  • 1/2 c. grated pecorino romano
  • leaves from 10 sprigs fresh thyme
  • extra thyme and shards of pecorino romano for garnish
  1. Prepare the vegetables.  Heat the chicken stock plus 1 c. water in a large pot over medium heat until it comes to a low boil.  Add the fava beans and asparagus, and boil for 2-3 minutes, until asparagus is bright green.  Remove vegetables with a skimmer and plunge into very cold or ice water to stop the cooking.  When cool, skin the fava beans – the easiest way to do this is to puncture the skin (which should feel a bit loose after cooking) with your thumbnail and then gently pop the bean out of it’s skin.  The bean on the inside should be bright green.  Set aside the vegetables, and lower the heat of the chicken stock to maintain a gentle simmer.
  2. In a large frying pan, heat the olive oil over medium-low heat.  Add the onion and saute for 2-3 minutes, until translucent.  Dont’ allow it to brown.  Add the rice to the pan and cook, stirring, for 1 minute, until edges are translucent.  Add the white wine and cook, stirring until fully absorbed.
  3. For the remainder of the cooking process, add the hot stock to the rice 1 ladleful (about 1/2 c.) at a time, stirring all the while and cooking until each ladleful is absorbed.  The entire process will take about 20 minutes.  If you find that you are running out of stock, add a bit of water to the simmering stock.  The risotto is done when it is mostly tender but retains a bit of bite – you don’t want it to get mushy.  When it reaches this stage turn off the heat.  Stir in the grated pecorino, the mascarpone, and the thyme leaves until the cheese have melted.  Add the prepared vegetables and the fresh or frozen peas.  If the peas are very young and tender, the heat from the risotto will cook them just enough.  If the peas are tougher and starchier, you may want to prepare them in the same manner as the fava beans and the asparagus.
  4. Serve hot, with extra thyme and shards of pecorino romano.
Almost Molasses Chews

June 13, 2012 Dessert

Almost Molasses Chews

I’ve been battling off a nasty summer cold (which I’m beginning to suspect may even be the flu) since Saturday morning, with little luck.  This one’s a fighter.  Cough drops, tissues, and Nyquil are my new best friends.  Anyway, I’ve been wanting to come say hi and share a little baking, but I’ve pretty much been asleep during all the hours I’m not at work.  (Actually.  I slept from 7pm to 7am last night.  Unheard of.)  I’m feeling marginally better tonight, though, and I’ve really been craving a little time in the kitchen, so I made some soft, chewy molasses cookies to have with my 800th cup of tea today.

I thought a lot about gingery molasses-based cookies tonight, while making these.  I suppose that tends to happen when you spend an hour thinking about nothing but baking while running on 50% brain power – you can get very deeply invested in a very particular topic.  It’s just, there’s several very distinct types of ginger cookies, and they fit on a spectrum.  On the one end, you have ginger snaps.  Ginger snaps are small, thin, hard, and very spicy, and, in my mind at least, are for eating in the summer, with a cold glass of milk for dunking.  Molasses chews are an entirely different beast.  They should be large, soft, chewy, mildly spiced, and preferably a little underdone in the very center.  They’re  a wintery, rainy-day sort of cookie, best with a cup of coffee or a chai.  Then you have your typical “gingerbread man,” which is a little cakey with a harder outside, and doesn’t crack on the top.  And beyond that, there’s a whole range of in-between cookies.  And when  you order a ginger-molasses cookie at a cafe, you never quite know which kind you’re going to get, do you?

Now, I tend not to discriminate too much when it comes to eating cookies, but if you made me decide, I would have to say that molasses chews – the extra-big, extra-chewy kind – are my ginger cookie of choice.  Like the ones they used to have at Starbucks that were half an inch thick and as big as your hand.  That’s what I was hoping I would get out of this recipe, but they weren’t quite what I was looking for.  Don’t get me wrong, they’re still really, really delicious cookies, as vetted by my roommate, they just spread a little too thin and crisped a little too much to be “true” molasses chews.  If, on the scale of ginger cookies, gingersnaps were a 1, gingerbread men were a 5, and molasses chews were a 10… these would probably be an 8. So I’ll take them.  (Just fyi, I briefly tried to make a graphic of a ginger-cookie scale.  I don’t have a mouse on my computer, so I gave up.  But I wanted to.  That’s how much I love you.  And also how much I’ve learned to think in terms of powerpoint slides from my job.)

To recap: These are very good cookies, you should try them.  But if you have a recipe for really soft, really chewy molasses chews, please share it with me.  I will love you for it.

Almost Molasses Chews

Adapted from Sunday Suppers at Lucques.  Makes 20 cookies.

  • 1 stick butter, melted, then cooled to almost room temperature (or 1/2 c. shortening, melted)
  • 1 egg
  • 1/4 c. molasses
  • 1 c. sugar
  • 2 c. flour
  • 2 tsp baking soda
  • 1 tsp ground cinnamon
  • 1/2 tsp ground ginger
  • 1/2 tsp ground cloves
  • 1/2 tsp salt
  • turbinado sugar (sugar in the raw)
  1. Preheat oven to 325°F
  2. In a large bowl, cream together the melted-then-cooled butter and sugar until light and fluffy.  Add the egg and the molasses and beat until combined, then beat together vigorously for 1-2 minutes.  Mixture should be evenly colored and creamy.
  3. In a medium bowl, sift together flour, baking soda, cinnamon, ginger, cloves, and salt, and whisk to combine.  Add 1/2 of the flour mixture to the wet mixture and stir until combined, then add the remaining half of the flour mixture to the wet mixture and stir until fully incorporated.  Refrigerate dough for 15 minutes.
  4. Roll dough into balls slightly smaller than a golf ball, and flatten between the palms of your hand.  Place on a cookie sheet, and sprinkle with turbinado sugar.  Bake for 11-12 minutes, until slightly cracked on top.
Greatist Collaboration: Shakshuka with Sausage and Potatoes

June 8, 2012 Food

Greatist Collaboration: Shakshuka with Sausage and Potatoes

Time for another easy, healthy dinner over on Greatist!  I really enjoy doing these posts, since it forces me to work within parameters that I would ideally apply to myself for most dinnertimes – light and nutritious meals that take 30 minutes or less to put together, but that don’t skimp on flavor.  I don’t always accomplish all of those things – like on the nights I resort to eating ice cream with granola and just call it a day (don’t worry, Mom, that’s not that frequently) – but when I do, it makes me feel pretty good.  Especially when there’s leftovers, like is always the case with this meal, and I can feel good about what I’m eating again the next day at lunch.  Planning ahead – it pays off.

I found this recipe via my friend Ranjani’s blog Four Seasons of Food.  Shakshuka – a traditional Middle Eastern breakfast dish of eggs poached in a spicy tomato sauce – is a dish I’ve seen quite a bit around the blogosphere in the past year, and one that I’ve always found intriguing.  But when I saw that the version Ranjani shared included sausage and potatoes, I was more than intrigued – I made it within 3 days of seeing the recipe.  Since then I’ve made it a handful of times (which is saying a lot, given that the only recipes I repeat are my absolute favorites), but I only just realized that it would be a perfect fit for Greatist.  It’s definitely comfort food – warm, spicy, sausage-y tomato sauce, tender potatoes, and barely poached eggs – but without the guilt that usually accompanies comfort food.  I mean, it’s comfort food without cheese – it has to be good for you!  In fact, the sausage is the only questionable ingredient in terms of health, and there’s only a little in the dish – just enough to give it a slightly smoky, meaty flavor.  It might be a little challenging to find the ras el hanout spice mix (or alternatively to round up all the spices and make it yourself, which is what I do), but this dish is 100% worth it.  Plus, once you have all the spices you can enjoy this whenever you’re needing a little comfort food but don’t want to go all out on a plate of spaghetti or a pizza.

You can find the recipe over at Greatist – enjoy!

White Bean, Kale, and Pesto Soup

June 5, 2012 Food

White Bean, Kale, and Pesto Soup

I had sort of thought that soup season was over, but apparently the weather disagrees with me.  All the cold, rainy weather we’ve had in New England (did someone switch April and June?) has had me drinking a lot of tea, baking, and craving cold-weather dishes.  I guess it could be worse, since soup is one of my favorite things to make – and eat.  It’s easy, quick, and pretty much the best way to pack a massive dose of vegetables into a single meal.  And this recipe is no exception.

I’ve tried a lot of recipes for soups and stews over the past two years, but there are a handful that I come back to time and again.  Portuguese kale soup, corn and cheddar chowder, minestrone, pork and black eyed pea chili, and this one.  I love how the pesto melts into the soup and gives it a smooth, creamy texture and an herbal, slightly sharp flavor.  Plus, the pesto makes this a good summer soup – perfect for a cold-rainy-wintery day in June.  I always use pecorino for this recipe, as I love how the sharp nutty tang plays off the creaminess of the white beans, but if you’re not a pecorino fan, substitute parmesan, or another hard, salty cheese.

In other news, I am immensely tired.  My trip to Spain was productive, if not super-fun, and I did manage to find blogging inspiration in some of the incredible meals we ate, which I’ll share with you later.  But the nutty schedule is starting to catch up with me a little bit, and I’m feeling kind of worn out.  Hopefully things will calm down soon and the sun will come back out, and you’ll be seeing a lot more of me (and with recipes for ice cream and grilling instead of soup)!

More like this…

Roasted Tomato and Lentil Soup

Roasted Tomato and Lentil Soup

Black Bean Soup with Roasted Poblano

Black Bean Soup with Roasted Poblano

White Bean and Parsnip Soup with Guanciale and Fried Sage

White Bean and Parsnip Soup with Guanciale and Fried Sage

White Bean, Kale, and Pesto Soup

A Katie at the Kitchen Door Original.  Serves 4.

  • 2 TBS olive oil
  • 1 onion, coarsely chopped
  • 4 carrots, peeled and sliced about 1/4 in. thick
  • 4 cloves garlic, minced
  • 1/2 tsp dried oregano
  • 1/2 tsp dried parsley
  • 4 c. chicken or vegetable broth (use vegetable broth to make the recipe vegetarian)
  • 1/2 large head fresh kale, roughly torn into bite-sized pieces (or 1 1/2 c. frozen chopped kale)
  • 1 can cannelini beans, rinsed
  • 1/2 c. prepared pesto (homemade is best, but store-bought is fine too)
  • 1/2 c. grated pecorino cheese
  • 1/4 tsp nutmeg (optional, but I love the interplay of pecorino and nutmeg)
  1. Heat oil in a large stockpot over medium heat.  Add onion and carrot, and saute, stirring occasionally, for 5-8 minutes, or until vegetables have begun to soften.  Add garlic, oregano, and parsley, and cook 2 minutes more, stirring.
  2. Add chicken broth, kale, and beans, bring to a boil, then lower heat and simmer for 15 minutes, until kale and carrots are tender.  Remove from heat and stir in pesto, cheese, and nutmeg.  Serve hot with additional grated cheese and crusty bread.
Girlfriends and Toffee-Coconut Crack Cookies

May 27, 2012 Dessert

Girlfriends and Toffee-Coconut Crack Cookies

I was thinking a lot about my girlfriends on Friday night, and how nice it is to have people out there who love you, and who tell you they love you, besides your mom and your grandma and your boyfriend. (And your dad and your brothers and your all your crazy aunts… I don’t want anyone to feel left out).  Trevor’s been away for a week and I won’t see him until the end of the next one, so I was missing him a little and remembering the feeling I had for so much of sophomore year – part loneliness, part boredom – and being so glad I’d moved past that phase, when Steph called, just to see how I was doing.  And we chatted for a little bit, and then we both had to go, and so we said our goodbyes, followed by quick “I love you”s.  And it’s really nice, hearing that, in a sincere way, from someone who is far away but still cares.  Later, I talked to Becca, and the same thing happened.  And then I was less lonely, and happier.

I also got some not-so-great news about another girlfriend on Friday night, someone who I love very much.  It’s the sort of thing where there’s not much you can do other than wait and be supportive and try your best to understand.  And let them know they’re loved.  So this weekend, I’ve been thinking about her and sending love her way.  And to all my other girlfriends, past and present.  Even though that might be the hippy-dippy-est sentence I’ve ever written, that’s what I’m doing.

Point being, go remind someone that you love them.

In other news, I’m headed to Spain for work until Wednesday.  It might be unlikely, but I’m hoping to get a few touristy hours in – any suggestions for the best thing to do in Madrid with 3 hours?  And I’m bringing a few of these cookies with me, which might just be the best cookies I’ve ever made.  Coconut, toffee, AND chocolate chips?  Yes, please!


Toffee-Coconut Crack Cookies

Recipe adapted slightly from Two Peas and Their Pod.  Makes 15 large cookies.

These might be the most delicious cookies I’ve ever eaten.  They’re super sweet, with a chewy-crunchy goodness from the melty toffee and toasted coconut.  The dough is a little bit dry when you put them on the pan, but they hold together really nicely, forming some of the prettiest cookies I’ve seen.  These are a must-try.

  • 1 c. shredded sweetened coconut (use unsweetened if you don’t love super-sweet cookies)
  • 1 c. flour
  • 1/2 tsp baking powder
  • 1/4 tsp baking soda
  • 3/4 c. brown sugar
  • 4 TBS (1/2 stick) salted butter at room temperature
  • 1 tsp vanilla
  • 1 egg
  • 3/4 c. Heath toffee bits
  • 3/4 c. chocolate chips
  1. Preheat the oven to 350°F.  Place coconut on a baking sheet in a single layer, and toast in the preheated oven for 5 minutes, until some pieces are golden brown.  Stir together and set aside in a bowl.
  2. In a medium bowl, whisk together flour, baking powder, and baking soda.  Set aside.
  3. In a large bowl, cream together softened butter and brown sugar.  Add egg and vanilla, and beat until smooth.  Mix in dry ingredients, then mix in toasted coconut, toffee bits, and chocolate chips.  Form into disks with your hands and place on baking sheet.  Bake for 12-15 minutes, until golden brown on the edges and beginning to crack on the top.
Greatist Collaboration: Fresh Snap Pea and Radish Salad

May 25, 2012 Food

Greatist Collaboration: Fresh Snap Pea and Radish Salad

Just a quick hello to bring you a quick super-seasonal salad I’m sharing over at Greatist this week.  I missed my last post over there (I know, you’ve heard it before, but work really has been crazy), so I wanted to make this one extra, er, healthy.  Which it totally is.  And not only is it healthy, it’s fresh, full of flavor, satisfying and a great use of some of the spring produce we already have in abundance – radishes, peas, and mint.

I made this salad last Saturday to go with the Vermont quiche we had for dinner.  Last Saturday was such a great day.  Even when I know I have to work weekends, I try and take one full day without touching anything related to work.  For me, that day is usually Saturday.  Sunday I’m getting organized and ready for the week, so working can feel like a natural part of that, but Saturday is my day to recover, catch up with Trevor, and do whatever I feel like doing.  And last Saturday, whatever I felt like doing consisted of a long run, a few photoshoots, and 3 beautiful hours gardening with T, taking plenty of breaks to sunbathe and drink rhubarb-hibiscus spritzers.

Our garden is tiny, and definitely an experiment, but it brings me so much joy.  I like taking a few minutes every day, either in the morning or when I get home from work, to just walk through and check on the progress of all the tiny vegetables and herbs.  It’s especially nice after a light rain, when everything sparkles a little.  I’m amazed at how much change can occur in a 24 hour period – today there were flowers on the fava beans that weren’t even buds yesterday, and 3 tiny new leaves appeared on every bean plant.  Even just standing there for a few minutes and watching all the green brings me this great centered calm feeling.  I sometimes wonder what my roommates think when they catch me just staring at a box of dirt and green things.  (Actually, I remember wondering the same thing about Megan last year, when I used to sit on my windowsill and watch my shoebox full of lettuce.  Literally, I planted a garden in a shoebox.  It didn’t go that well.  But Megan lived with me for 4 years; she knew these things about me already.)

Something about eating something as fresh and seasonal as this salad after a day spent working in the garden felt just right.  And I wanted to share that feeling with you.  Plus, it doesn’t get much faster, easier, or healthier than this, which is what Greatist is all about!  Head on over there for the recipe.

Other Greatist guest posts (fast, simple, and healthy!):

  • Chipotle-honey chicken tenders
  • Fruit and nut bars
  • Quinoa puttanesca
Vermont and a Maple-Apple & Brie Quiche

May 20, 2012 Breakfast

Vermont and a Maple-Apple & Brie Quiche

I’m currently supposed to be at work, working, but I’m shirking a little bit and sitting outside in the freshly manicured garden to write to you about our trip to Vermont, because amazingly beautiful spring Sundays don’t come around all that often, and when they do, I’m pretty sure they shouldn’t be spent inside at the desk where you’re going to spend the upcoming week.  There’s plenty of time for work, but not so much time lately for just enjoying life, and sometimes you have to make executive decisions about your own happiness.  Like, “I’ll go to work later.”

Trevor and I spent last weekend in Arlington, VT, down on the Southwestern border just a few miles from NY, smack dab in the middle of the Green Mountains.  We went to celebrate his birthday, as well as just to get away, which we haven’t done in a while.  It was lovely.  We stayed at the West Mountain Inn, thanks to a really good Groupon deal that included dinner, two breakfasts, and two nights at the inn.  The inn is a huge old place sitting on the top of a hill, surrounded by 150 acres of land filled with well-kept trails, quiet streams, and forest.  The inn was nice, the food was good, but it was the land that really got me.  Sunday morning we went for a run along the trails that was so refreshing and peaceful – it’s been ages since I’ve run in the woods, with no other people, soft dirt trails, and just the sound of your own breath and the morning birds.  I wish I could run like that every day.

We also spent a surprising amount of time just hanging out at the on-site alpaca barn, watching the alpacas (what funny creatures!) and the den of baby fox kits living under the barn.  The tiny kits were very active in the early evening, and we spent a few hours watching them roll and tumble on top of one another, prance and pounce, and catch a surprising number of small mice and voles in the adjacent field.  They were fairly used to people being around, although still quite cautious, which allowed us to sit and watch their whole evening ritual.  One of my favorite things to do (obviously) is take pictures – it’s part of vacation for me, and an afternoon spent alone in a beautiful landscape with just my camera is my idea of heaven – and having the foxes, as well as alpacas, chipmunks, frogs, and salamanders, to chase around with my lens was such a treat.

Since Sunday was such a beautiful day, we decided to spend as much of it as possible outside, hiking.  We took a 4 mile hike to Lye Brook Falls, which was fairly easy (but not boring-easy) climb to a gorgeous fall.  We chose a big flat rock at the bottom of the fall that jutted out into the sun and took a nap there, with mist from the falls blowing over our faces and the sun just warm enough that we didn’t get chilled.  The water was ice cold, but we stuck our toes in anyways.  Our first hike of the season!  Hopefully one of many.

The afternoon we spent relaxing over sandwiches, pickles, and cream sodas from Graze in downtown Manchester, the cute-if-yuppy nearby outlet town.  We ate in a park and continued to enjoy the sun, before heading back to the inn for the always-available coffee and brownies, and a shower (plus a nap, if you were Trevor).  Each night before dinner the inn put out a lovely tray of cheeses, crackers, and berries (including the sweetest blackberries I’ve ever had), which was half our dinner – the other half was popcorn at the tiny two-screen movie theater in Manchester, where we saw The Avengers.  (It was Trevor’s birthday, we had to do something he wanted to do…).  The theater was independently owned, meaning their advertisements were all local-local, like, “come to blah-blah farm to celebrate your birthday, only 5 minutes away!” and “join the VT skateboarders club!”  I got a kick out of it.  And Avengers was good, even if Scarlett Johansson’s Russian accent was really bad, I totally loved the Hulk character.

On the drive back Monday I had plenty of time to muse over what I could make to share with you that would represent our weekend.  Maple syrup was a given, because one of my favorite things about breakfast in Vermont is that real maple syrup is always available in the quantities that I like.  I will never, ever eat fake maple syrup, and one of those tiny little cups of “real maple syrup” they give you in Massachusetts restaurants is about 1/4 the amount I need.  The West Mountain Inn, though, served maple syrup in pitchers.  Just right.  From that starting point, my mind wandered until it settled on this quiche, which I knew would be perfect – apples caramelized in maple syrup, brie and aged gouda, sopressatta for just a little spice.  And it was perfect.  I didn’t get around to making it until last night, when, along with a fresh pea and radish salad I’ll share with you later this week, it made a filling and comforting dinner after a lovely day working in the garden.

And now I’ll do a little actual work.  But I’m not going inside just yet.  Last weekend was sort of a kickstart to summer, and now that it’s around, I plan on enjoying it every chance that I get.

Maple-Apple Quiche with Brie and Sopressatta

A Katie at the Kitchen Door original.  Serves 6.

  • 1 1/4 c. flour
  • 1/2 tsp salt
  • 1 stick butter, cut into small cubes, then placed in freezer
  • 3-6 TBS ice cold water
  • 4 eggs
  • 1/2 c. heavy cream
  • 3/4 c. milk
  • 1/4 tsp. nutmeg
  • 4 oz. aged gouda, grated
  • 4 oz. fresh brie, thinly sliced
  • 2 medium apples, cored and sliced
  • 1/4 c. maple syrup
  • small pat of butter
  • 1/4 c. diced sopressatta
  1. Make the crust: In a large bowl, mix together flour and salt.  Add in frozen butter cubes, and use a pastry cutter to blend until the mixture has the texture of coarse sand, with pea-sized chunks.  Add the ice water 1 TBS at a time, stirring with a fork between additions to moisten dough.  Use as little water as possible to get the dough to come together – I’ve never been able to accomplish this with less than 6 TBS, but some people can do it with only 1 or 2 TBS.  Shape dough into a disk and wrap in plastic wrap, then refrigerate for 1 hour.
  2. Preheat oven to 375°F.  In a large frying pan, place pat of butter, and melt over medium heat.  Add maple syrup and apple slices, and cook, stirring occasionally, until apples are soft, about 5-10 minutes depending on the thickness of your slices.  Add diced sopressatta and cook for an additional 2-3 minutes.  Remove all from heat.
  3. In a large bowl, whisk together eggs, cream, milk, nutmeg, and gouda, until fully combined.  Set aside
  4. Flour your counter and a rolling pin, and roll out the chilled dough into a 11-inch circle.  Place dough circle over 9 inch quiche or pie pan, and press gently into the sides.  You can either trim off the extra that hangs over the edge, or leave it, as we did.  Poke a handful of holes in the bottom of the crust (this is to prevent the crust from bubbling – you can also use pie weights instead) and place in preheated oven for 15 minutes, checking part way through to make sure the bottom isn’t bubbling up (if it is, poke gently with a knife to allow the air to escape).  Crust should be beginning to brown.  Remove from oven, and layer apples, sopressatta, and brie on the bottom.  Pour egg mixture over the top.  Carefully place in oven, and bake for 30-35 minutes, until top of quiche is golden brown, and the egg mixture is cooked all the way through.  Enjoy hot, warm, or cold!

Rhubarb-Polenta Cake with Cinnamon

May 15, 2012 Breakfast

Rhubarb-Polenta Cake with Cinnamon

This post was intended to be about the long weekend I just spent in Southern Vermont, hiking and sunbathing and resting.  But today was just one of those days, and when I arrived home from work at 9pm (far too late), soaking wet (forgot my umbrella), hungry, and disgruntled, I wasn’t really in the peace-and-sunshine sort of mood.  I was more in the judge-everyone-around-me sort of mood.  I’m looking at you, anxious guy on the subway playing molecule identification games on your iPhone and continuously jiggling your legs back and forth into mine.  And you too, large thighs girl eating chicken with your fingers on the subway.  And you, angry bus driver man with no pity for a soaking wet girl carrying a partially split bag of groceries.  Usually, none of you would bother me, but today, I judged you all.  In fact, the only person that I really liked when I got home from work was my roommate Allison, because she happened to be cleaning the bathroom, and it kind of made my day.

So, even though I’m over most of my grouchiness, no Vermont stories today.  But I did make a cake that I wanted to share with you, so I’ll do that for now.  And the story of me making this cake is actually kind of similar to the story of me being a grouch, in that it involves a rainy afternoon and needing a little comfort.  Because as soon as I stepped off the train on my way home yesterday afternoon, it started pouring.  Pouring in that torrential, summer way that you know can’t last for more than an hour and is kind of inspiring in its intensity and makes me want to kiss someone (preferably Trevor, unless Ryan Gosling is available) Notebook-style.  I didn’t actually mind the rain that much, but by the time I got to my front door, I was dripping, so I stripped down and threw everything into the laundry and hopped into bed with a bowl of fresh linguine, cream, and parmesan, and watched the Desperate Housewives finale.  (By the way, I can’t believe it’s over, like, forever.  I might have to start at season 1 again.)  And after that, my errands and ambitions for the rest of the afternoon started to seem very unappealing, whereas baking one of the gorgeous, simple, rustic cakes from Nigel Slater’s Ripe, which my parents had just given me as a birthday present, and staying in bed eating it seemed quite appealing.  So, that’s what I did.

Since my dad had given me several pounds of just-picked rhubarb on my way out the door earlier that afternoon, I used some of it to make this Cinnamon-Polenta-Rhubarb cake.  With a dollop of whipped cream and a drizzle of rhubarb syrup, it definitely hit the spot.  It seems that I have a thing for all things tangy and polenta-based, especially in the springtime, as is evident from this cornmeal-cranberry cake and this strawberry-cornmeal breakfast cake.  I just like the hearty unfussiness of these cakes – easy to make, easy to eat, not too sweet, with a burst of fresh tartness from the fruit.  This particular cake was a bit different from the others, somewhere halfway between a cake and a crumble, with a gritty crumb and smooth filling.  Given that I wasn’t digging leaving the house, I made some substitutions – brown sugar for golden baking sugar (don’t even know where I’d find that, anyway), orange oil extract for orange zest, grits for coarse ground polenta, etc. – but it still came out great.  Next time, I’ll try it exactly as written, but I don’t think the changes I made took too much away from the cake’s character.

Rhubarb-Polenta Cake with Cinnamon

Adapted from Ripe.  Serves 8-10.

  • 1 lb. rhubarb, rinsed and cut into 1/2 inch slices
  • 1/4 c. turbinado sugar (sugar-in-the-raw)
  • 4 TBS water
  • 3/4 c. coarse polenta or grits
  • 1 1/2 c. flour
  • 1 tsp baking powder
  • 1 tsp cinnamon
  • 3/4 c. light brown sugar (or sugar-in-the-raw, blended in the food processor for 5 seconds)
  • 1/2 tsp orange oil or zest of 1 orange
  • 10 TBS cold butter, cut into cubes
  • 1 large egg
  • 3 TBS milk
  1. Preheat oven to 350ºF.  Place sliced rhubarb, turbinado sugar, and water in a baking dish and stir to mix.  Roast for 30 minutes, then remove from oven.  Use a slotted spoon to remove rhubarb pieces to a bowl.  Reserve syrup for drizzling on cake.
  2. In a large bowl, whisk together polenta, flour, baking powder, cinnamon, and brown sugar.  Use a pastry cutter to cut in the cold butter until the mixture has the texture of wet sand, with the largest lumps the size of peas.  In a small bowl, beat together egg, milk, and orange oil (or zest if using) until combined.  Add to flour mixture and stir gently with a fork, mixing just until the dough is thoroughly moist and slightly sticky.  Take care not to overmix.  Add 1 more TBS milk if dough is not slightly sticky to the touch.
  3. Grease 8-inch cake pan.  Spoon 2/3 of the batter into the pan, pressing into the bottom and up around the edges.  Spread the rhubarb on top of this layer, leaving 1/2 inch between the rhubarb and the edge of the pan.  Spoon the remaining batter over the top of the rhubarb – it most likely won’t cover all the rhubarb, but don’t worry about it.  Bake for 45 minutes, then let cool on a cooling rack for at least half an hour before removing from pan.  Serve with fresh whipped cream and a drizzle of the reserved rhubarb syrup.
Cookbook of the Month: Girl in the Kitchen

May 7, 2012 Fall

Cookbook of the Month: Girl in the Kitchen

Don’t worry, I’m going to write about the book.  Especially after I left you hanging last month.  But I can’t tell you about it yet.

Because I have to tell you about this mac and cheese, first.

This mac and cheese is amazing.  AMAZING.  It has oomph – lots of rich, smoky, garlicky, spicy oomph.  I ate it for 3 out of 4 meals this weekend.  (What, you eat lunch on the weekend?  Hasn’t anyone introduced you to brunch??)  Then I brought it for lunch on Monday.  And I still wanted more.  But I have an affinity for weighing less than my boyfriend, so I froze the rest and hid it from myself and made broccoli and edamame soup to distract myself.  Which is currently working, but probably won’t for long.

Alright, let me break it down for you.

First, there’s the homemade breadcrumbs.  Made from soft french bread drenched in a red-pepper garlic butter, then toasted and blitzed with freshly crisped bacon to make the world’s most incredible bread crumbs.

Yes, I said bacon.

Then, there’s the cheese sauce, which starts with whole milk, gets infused slightly with onion, thickened into a roux, and then mixed with havarti, cheddar, and smoked gouda.

Not too shabby.

Add to the cheese sauce lightly browned sopressatta, granny smith apples, and the requisite macaroni, top with the afore-mentioned incredible bread crumbs, and bake.

Did I mention you cook the cheese sauce in the bacon pan?  Well, I should have.  Because the slight smoky hint throughout the whole dish puts this baby over the top.

Moving on to praise the woman responsible for this incredible, decadent recipe, Stephanie Izard – author of Girl in the Kitchen – knows food.  I’ve never been to her Chicago restaurant, Girl and The Goat, but next time I’m in town, I’m absolutely going, especially after testing out some of her recipes in my own kitchen (usually I estimate that what I can reproduce is about 60-80% as good as if the author of the recipe/original chef were making it, so recipes that turn out really well in my kitchen must be pretty amazing in a restaurant).  I also made (and loved) this Asparagus and Arugula Pasta with Almond-Parmesan Breadcrumbs recipe (she really works those breadcrumbs) from Girl in the Kitchen, as well as a nice spring salad with pickled rhubarb, goat cheese, and roasted asparagus.

I already wrote a little bit about the aesthetics of the book here, but I’ll recap briefly.  This book is fun.  It’s got beautiful, bright photographs, drink pairings for every recipe, ingredient spotlights and tips, and great recipes.  I even like the typeface (dork alert).  The recipes are unique, creative, and delicious.  However, these are “Sunday recipes,” as in they’re not something you can easily whip up on a work night when you have 20 minutes to eat and clean up before you crash.  Many of them take planning ahead, have multiple components, and take several hours.  It’s also not a particularly healthful book.  There are certainly very healthy and light recipes included, but there are also recipes like this one that could ruin any diet.  The effort to make these dishes (and calories to consume them) seems to pay off, but this is most likely a cookbook I’ll turn to more for special events and weekend dinners rather than my weekly menu planning.

Oh, and there’s no dessert section in this book, which I just feel like is something you should know.  But I kind of appreciate her sticking to the area she considers her strength, rather than rolling everything into one book.

And now let’s get you back to that mac and cheese.

Make this.  Soon.  Don’t think about the ingredients while you eat it.  Just enjoy it.

Macaroni and Cheese with Apples and Bacon

Adapted from Girl in the Kitchen.  Serves 8-10.

I’ve rearranged the steps of Stephanie’s original recipe to make it such that you only need 1 sauce pot and 1 9×13 baking pan, because I hate using multiple dishes, but if you’re pressed for time (or happen to have a resident dishwasher), feel free to do multiple steps simultaneously (like cook the pasta, warm the milk, toast the breadcrumbs and fry the bacon) in different pans.  Also, I only used about 3/4 of the sauce this made because I was worried it would overflow, but I left the proportions in the recipe below close to the originals.  If you have extra sauce, freeze and use at a later date as a pasta topping.

  • 1 stick salted butter, divided
  • 4 garlic cloves, minced
  • 1/2 tsp red pepper flakes
  • 4 c. cubed fresh french bread
  • 6 c. whole milk
  • 1 small onion, halved
  • 4 oz. bacon
  • 3 Granny Smith apples, cored and diced
  • 2 TBS apple cider vinegar
  • 8 oz. sopressatta or other dried Italian sausage, preferably spicy
  • 1 lb. orecchiette or other shell pasta
  • 1/3 c. flour
  • 8 oz. havarti, grated
  • 4 oz. cheddar, grated
  • 4 oz. smoked gouda, grated
  1. Preheat oven to 375°F.  In a large pot, melt the stick of butter over low heat.  Add garlic and red pepper flakes, and cook over low heat for 1-2 minutes, until garlic is fragrant.  Pour into a small bowl.  Spoon 1/4 c. of the garlic butter (about half) into a 9×13 in. pan and add the bread cubes, tossing to coat with the butter.  Toast in the oven for 15 minutes, or until very crisp.  Set aside.
  2. In the large pot, combine milk and onion and heat over medium heat.  Bring just to a simmer, then continue to cook at a gentle simmer, stirring frequently, for 15 minutes.  Pour hot milk into a large bowl and set aside.
  3. In the large pot, fry bacon until crispy.  Remove and place with bread cubes.  Place bread cubes and bacon in a blender or food processor and pulse several times to make breadcrumbs.  Reserve breadcrumbs.
  4. In the same pot, still with the bacon grease, cook sopressatta for 1 – 2 minutes over medium heat, until slightly crispy, then remove with a slotted spoon and add to 9×13 pan.  Add apples to pan (still with bacon drippings) and cook for 2 minutes, until just beginning to soften, then add to 9×13 pan.  Add the vinegar and toss to coat.
  5. In the same pot, melt the remaining garlic-red-pepper butter.  Add flour, and stir until flour becomes nutty and brown.  Slowly add hot milk, 1/2 c. at a time, whisking in between to make sure there are no lumps (this process is called making a roux).  Once all the milk has been added to the flour-butter mixture, bring just to a boil, stirring frequnetly, then reduce heat to a simmer and cook until sauce thickens enough to coat the back of a wooden spoon.  Remove from heat, stir in all the cheeses except for 1/2 c. of the havarti, and let melt.  Pour cheese sauce into 9×13 pan with apples and sopressatta.
  6. Rinse out the pot, then fill with water, and salt heavily.  Bring salted water to a boil, then cook pasta according to package directions.  Drain pasta, then add to the 9×13 pan with the cheese sauce, apples, and sopressatta.  Sprinkle breadcrumbs over the top as well as remaining 1/2 c. havarti, then bake for 5 minutes at 375.  Change oven setting to broil, and broil for 5 minutes.  Remove and serve while hot.
  • « Previous Page
  • Page 1
  • …
  • Page 40
  • Page 41
  • Page 42
  • Page 43
  • Page 44
  • …
  • Page 57
  • Next Page »

Primary Sidebar

Subscribe!

Get creative recipes and menu ideas delivered straight to your inbox.

Most Popular

A House // Sweet Potato and Coconut Milk Soup with Brown Rice and Lentils

Monthly Fitness Goals: July // Homemade Spinach Wraps with Chopped Greek Salad

A New Job // Classic Seven-Layer Bars

Butternut Squash Carbonara with Fried Sage and Caramelized Onions

Happy Birthday, Trevor! // Peanut Butter Fudge

Cookbook Review and Giveaway: Home Made Winter

Drizly

Please note!

Full disclosure: if you purchase anything at Amazon using the above links or any other links to Amazon on this site, I will receive a small commission. Just so you know!

Copyright© 2018 · Cookd Pro Theme by Shay Bocks

This site uses cookies: Find out more.