• Skip to primary navigation
  • Skip to content
  • Skip to primary sidebar
  • Home
  • Recipes
  • Features
    • Cookbook Reviews
    • Ingredient of the Week
    • Sunday Dinner
    • Fitness Goals
  • Travel
  • About
    • Privacy Policy
    • Cookie Policy
  • Work With Me

Katie at the Kitchen Door

Globally-inspired, seasonal recipes

Blog Page

Cider-Jam-Glazed Salmon and Potato Latke Eggs Benedict

October 9, 2015 Breakfast

Cider-Jam-Glazed Salmon and Potato Latke Eggs Benedict

Apple-Cider-Jam-Glazed Salmon and Potato Latke Eggs Benedict {Katie at the Kitchen Door} #sponsored

I’m quite excited to be collaborating with Stonewall Kitchen on this post. Stonewall is a well-loved New England brand, based out of York, Maine. They are probably best known for their jams and jellies, but they also carry a broad range of other specialty food products, from Bourbon Pecan Caramel Sauce (yum) to Butternut Squash Risotto Mix (yum) to Maple Bacon Aioli (double yum!). Having Stonewall products in my pantry always feels like a bit of a special treat – the kind of treat that inspires such scenarios as “oh, yes, I have raspberry hot fudge sauce in the fridge! I should definitely have some ice cream tonight.” And for other New Englanders, I can attest that visiting their store/production facility/cooking school in York is a worthwhile detour on any trip from Boston up north (or honestly, as a destination in and of itself).

Apple-Cider-Jam-Glazed Salmon and Potato Latke Eggs Benedict {Katie at the Kitchen Door} #sponsored

Apple-Cider-Jam-Glazed Salmon and Potato Latke Eggs Benedict {Katie at the Kitchen Door} #sponsored

But I don’t want to gush too much lest you think I’m going to forget about sharing this delicious-looking brunch dish you see here. Right now everything seems like it’s fall, fall, fall. That’s true all over the U.S., I’m sure, but I have to imagine that the everything-fall-craze is especially prevalent here in New England, land of apples and brilliant foliage and quaint Vermont towns. Fall is by far my favorite season, and I’m so happy that I’m actually home for it – the first season of the year that I’m truly here for, in fact. Fall cooking is no small part of the reason that fall is my favorite, what with the abundance of squash and apples and cruciferous vegetables to roast and braise and stew. When the team over at Stonewall sent a list of fall products that I might be able to put to good use in a new Katie at the Kitchen Door recipe, the list read like a celebration of all the delicious autumnal flavors you could ever hope to pack into one kitchen: Apple Cranberry Chutney, Caramel Apple Butter, Maple Bacon Onion Jam, Butternut Squash Pasta Sauce, and so on. It was a hard list to choose from, but ultimately I couldn’t resist the Apple Cider Jam, which I knew would be absolutely delicious in a savory-sweet application.

Stonewall Kitchen - Apple Cider Jam Glazed Salmon {Katie at the Kitchen Door} #sponsored

Apple-Cider-Jam-Glazed Salmon and Potato Latke Eggs Benedict {Katie at the Kitchen Door} #sponsored

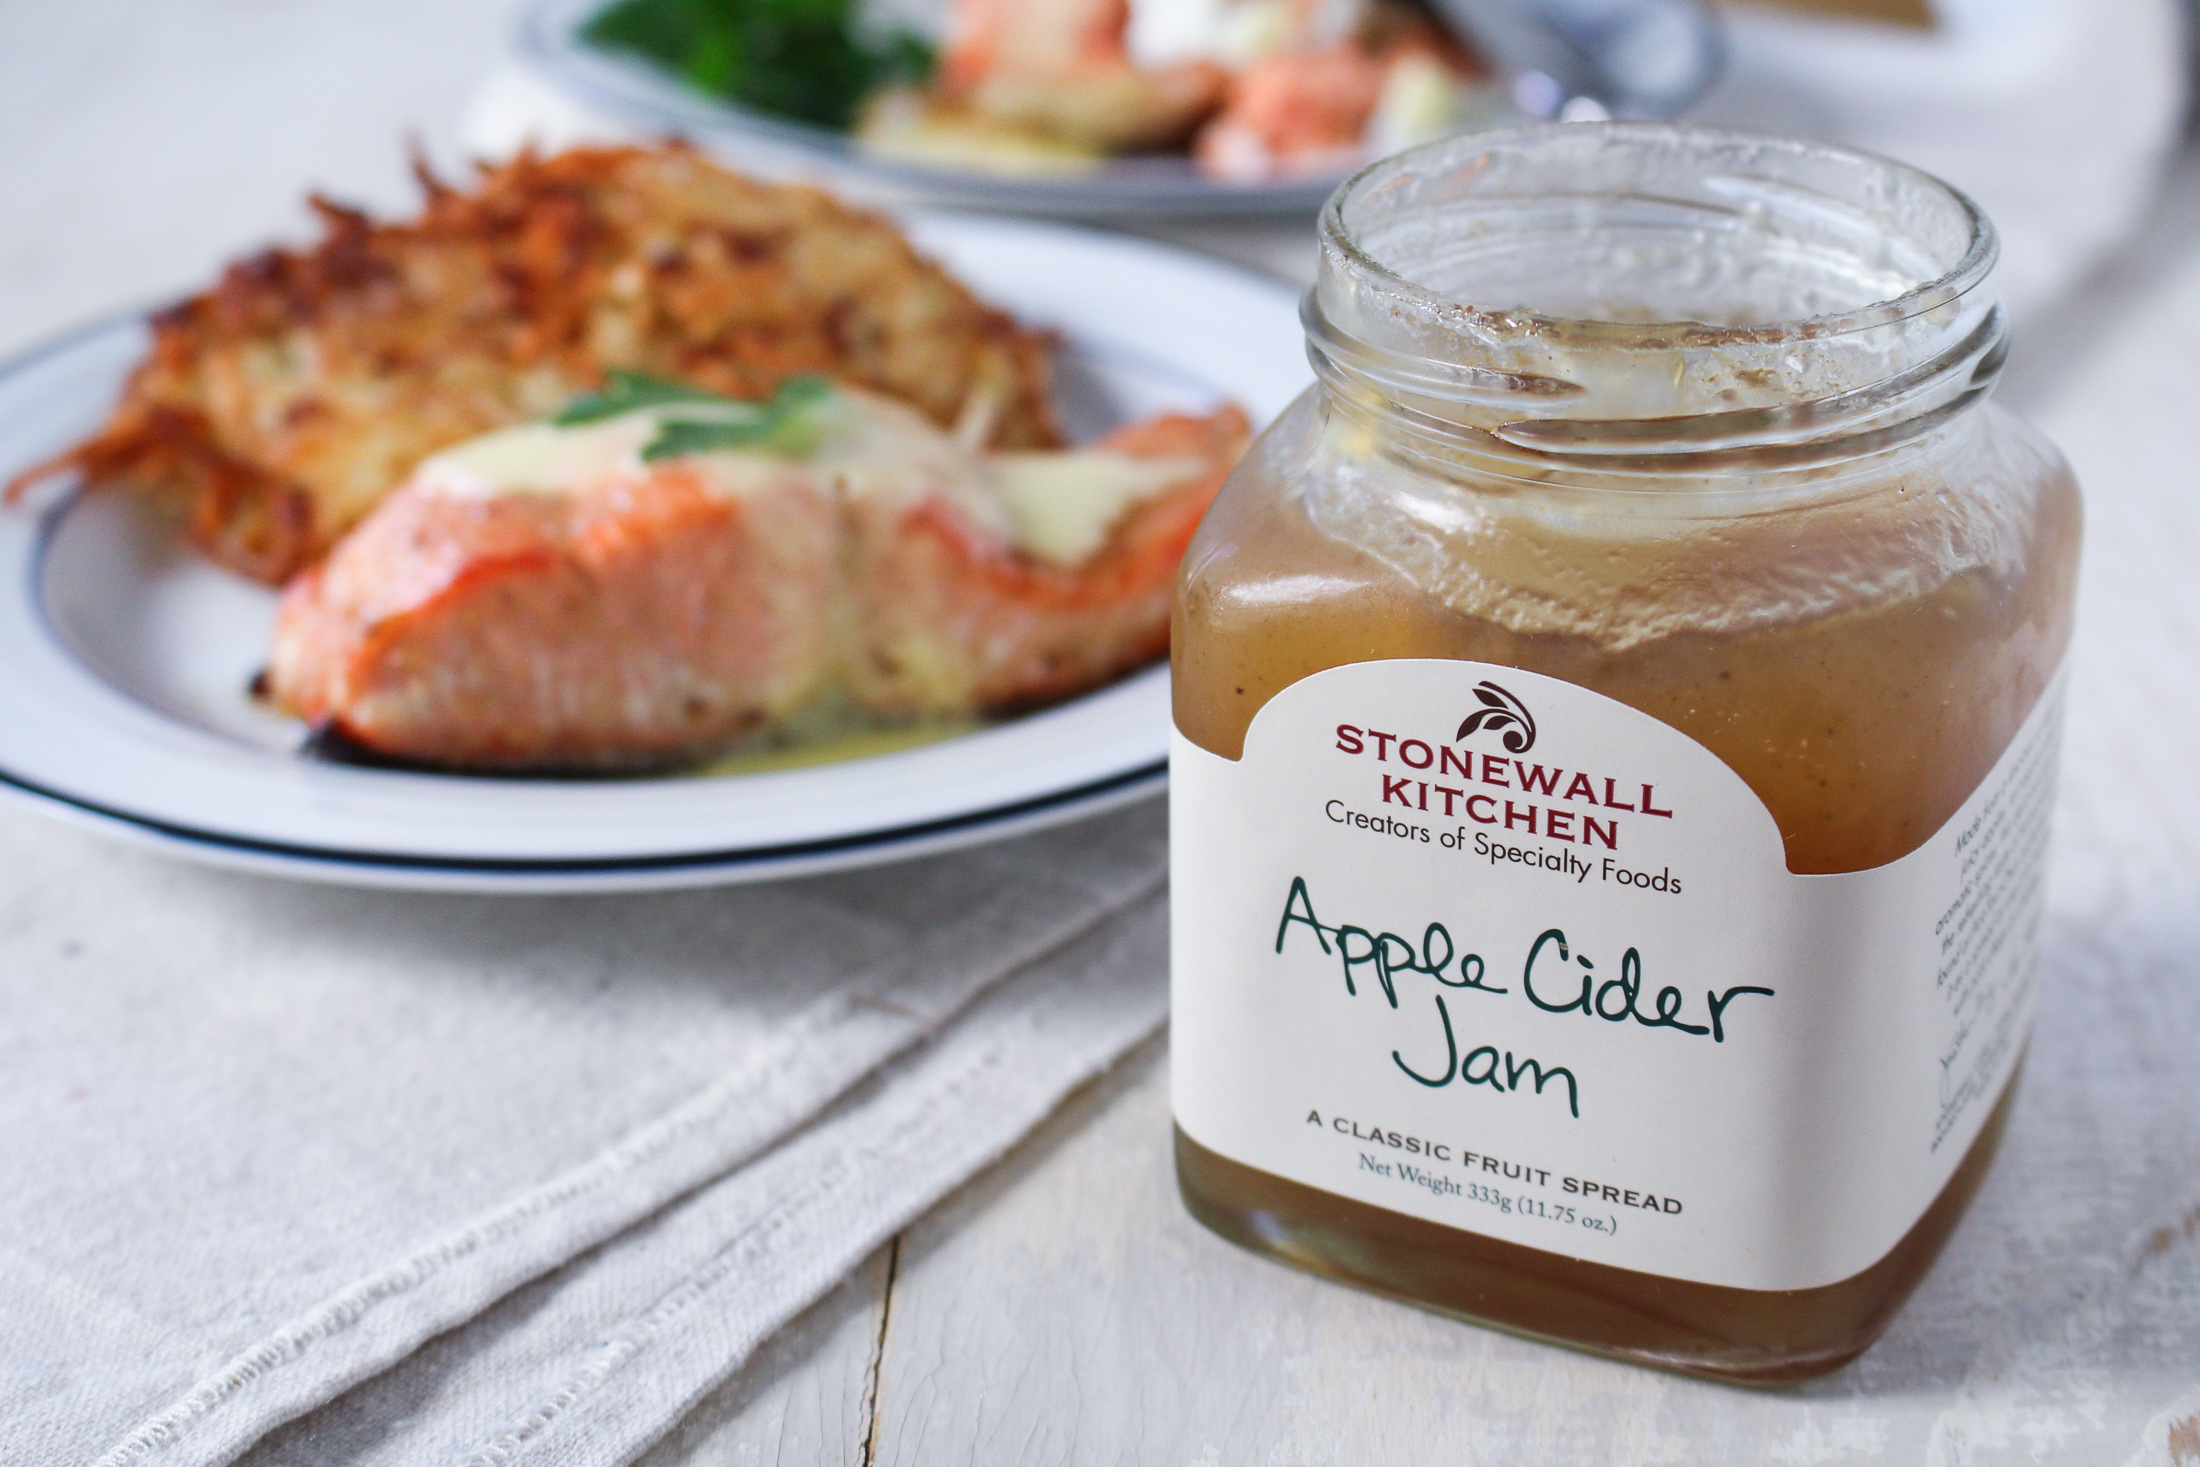
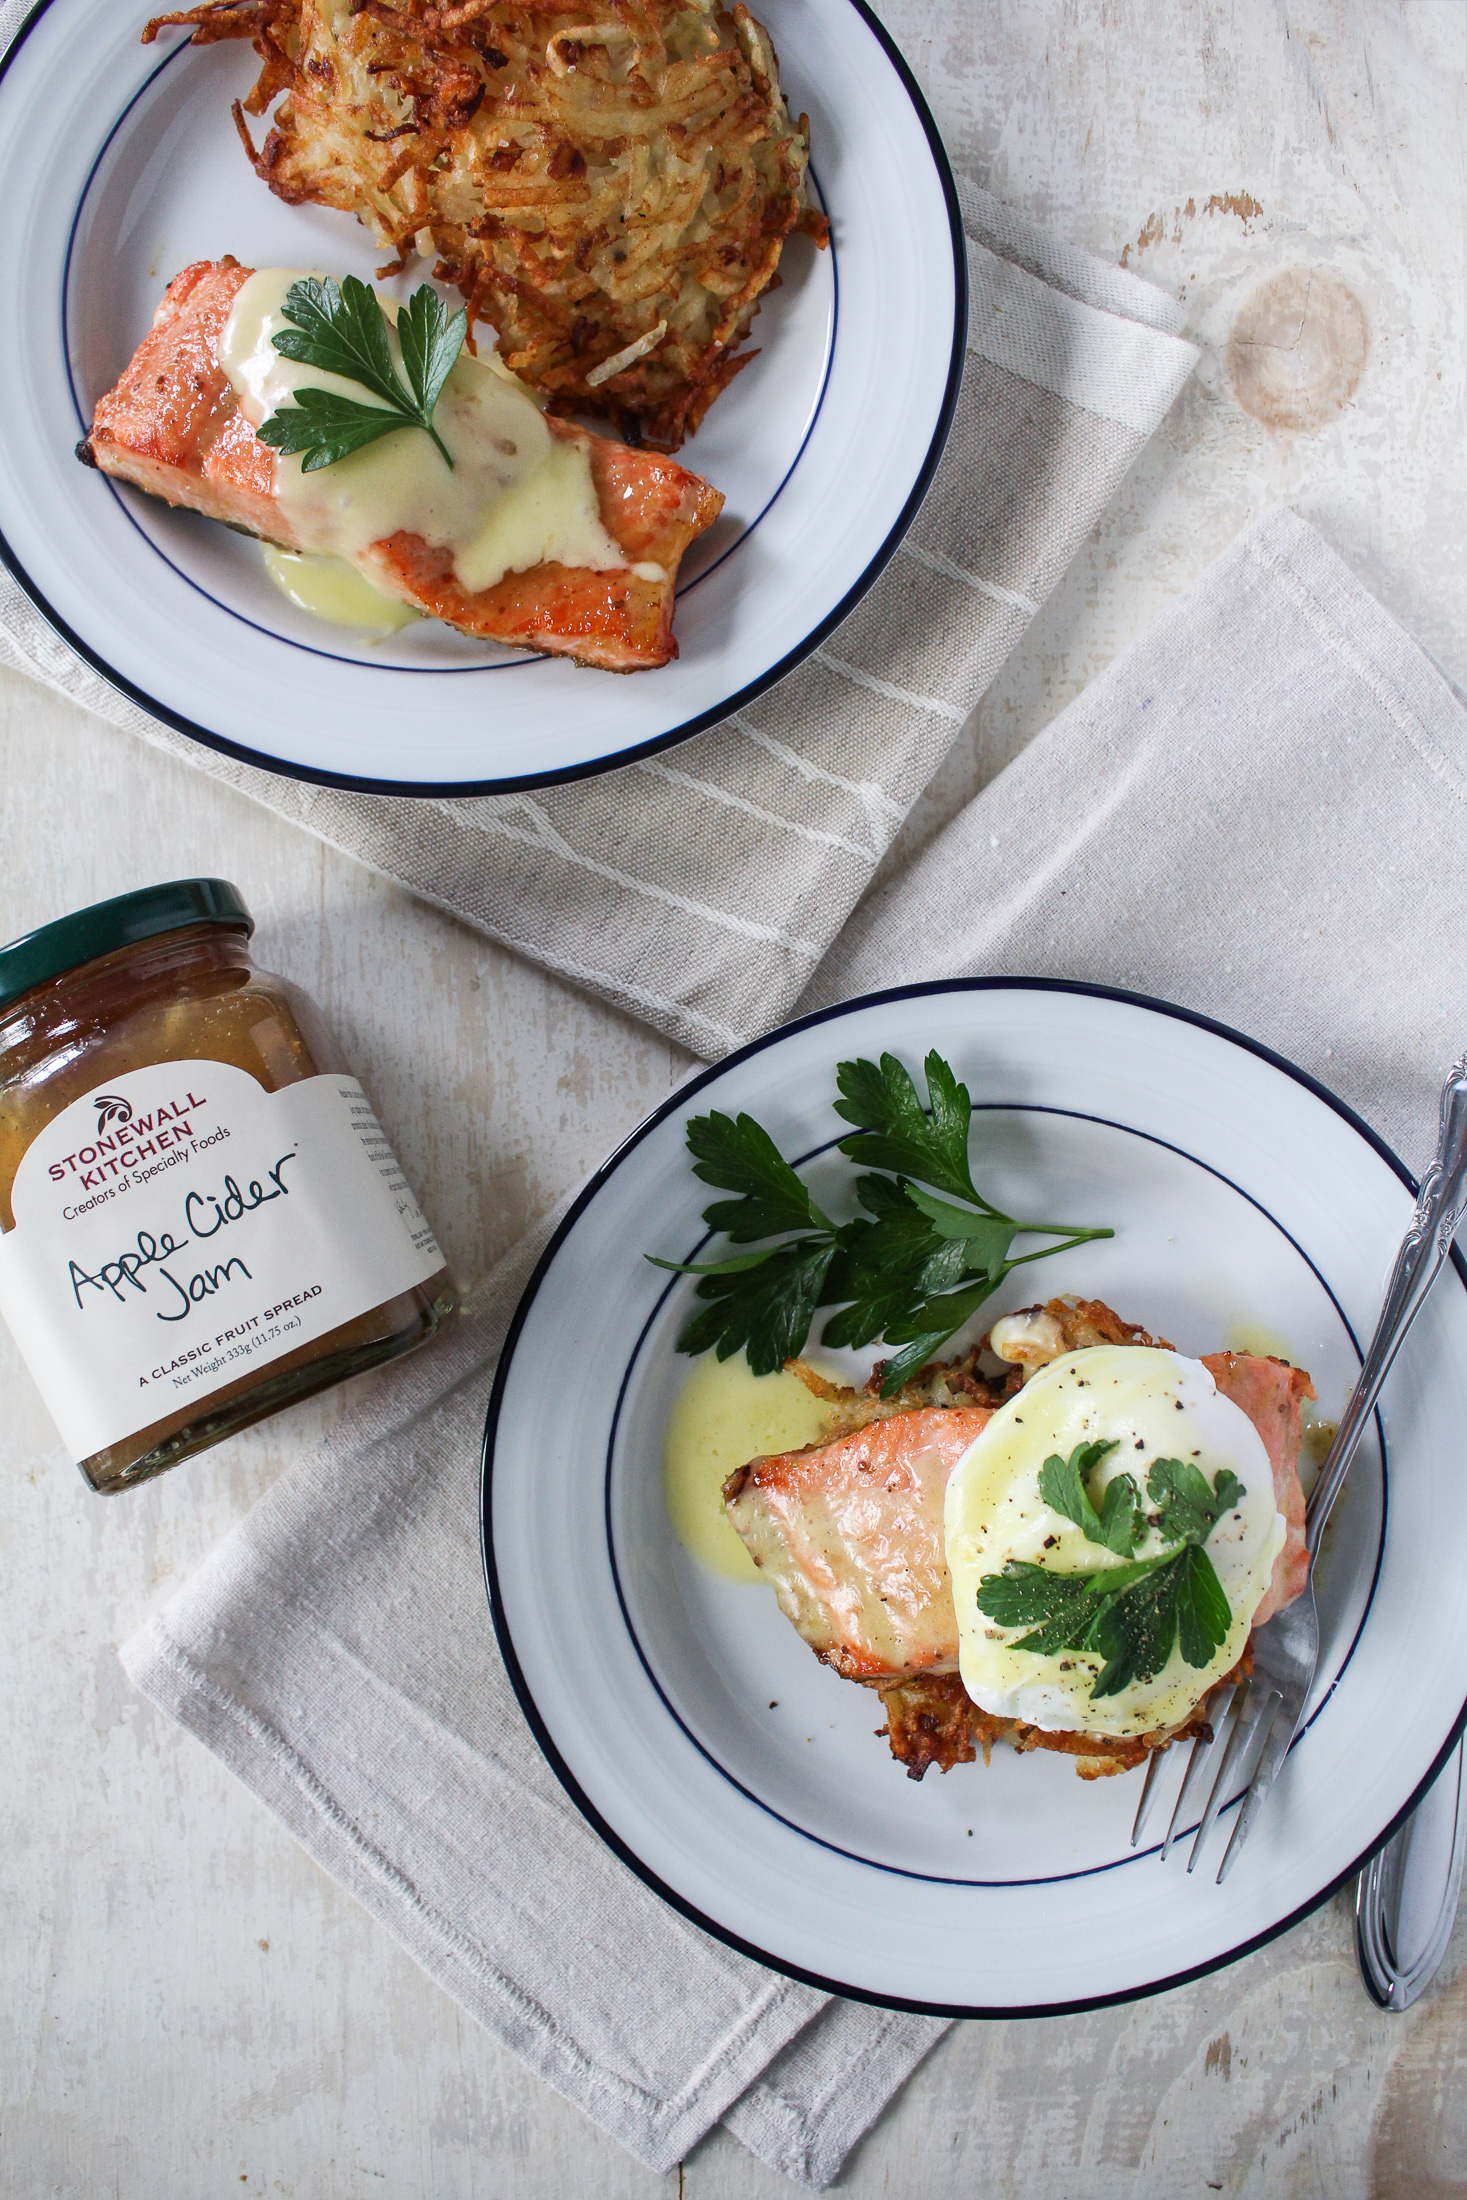
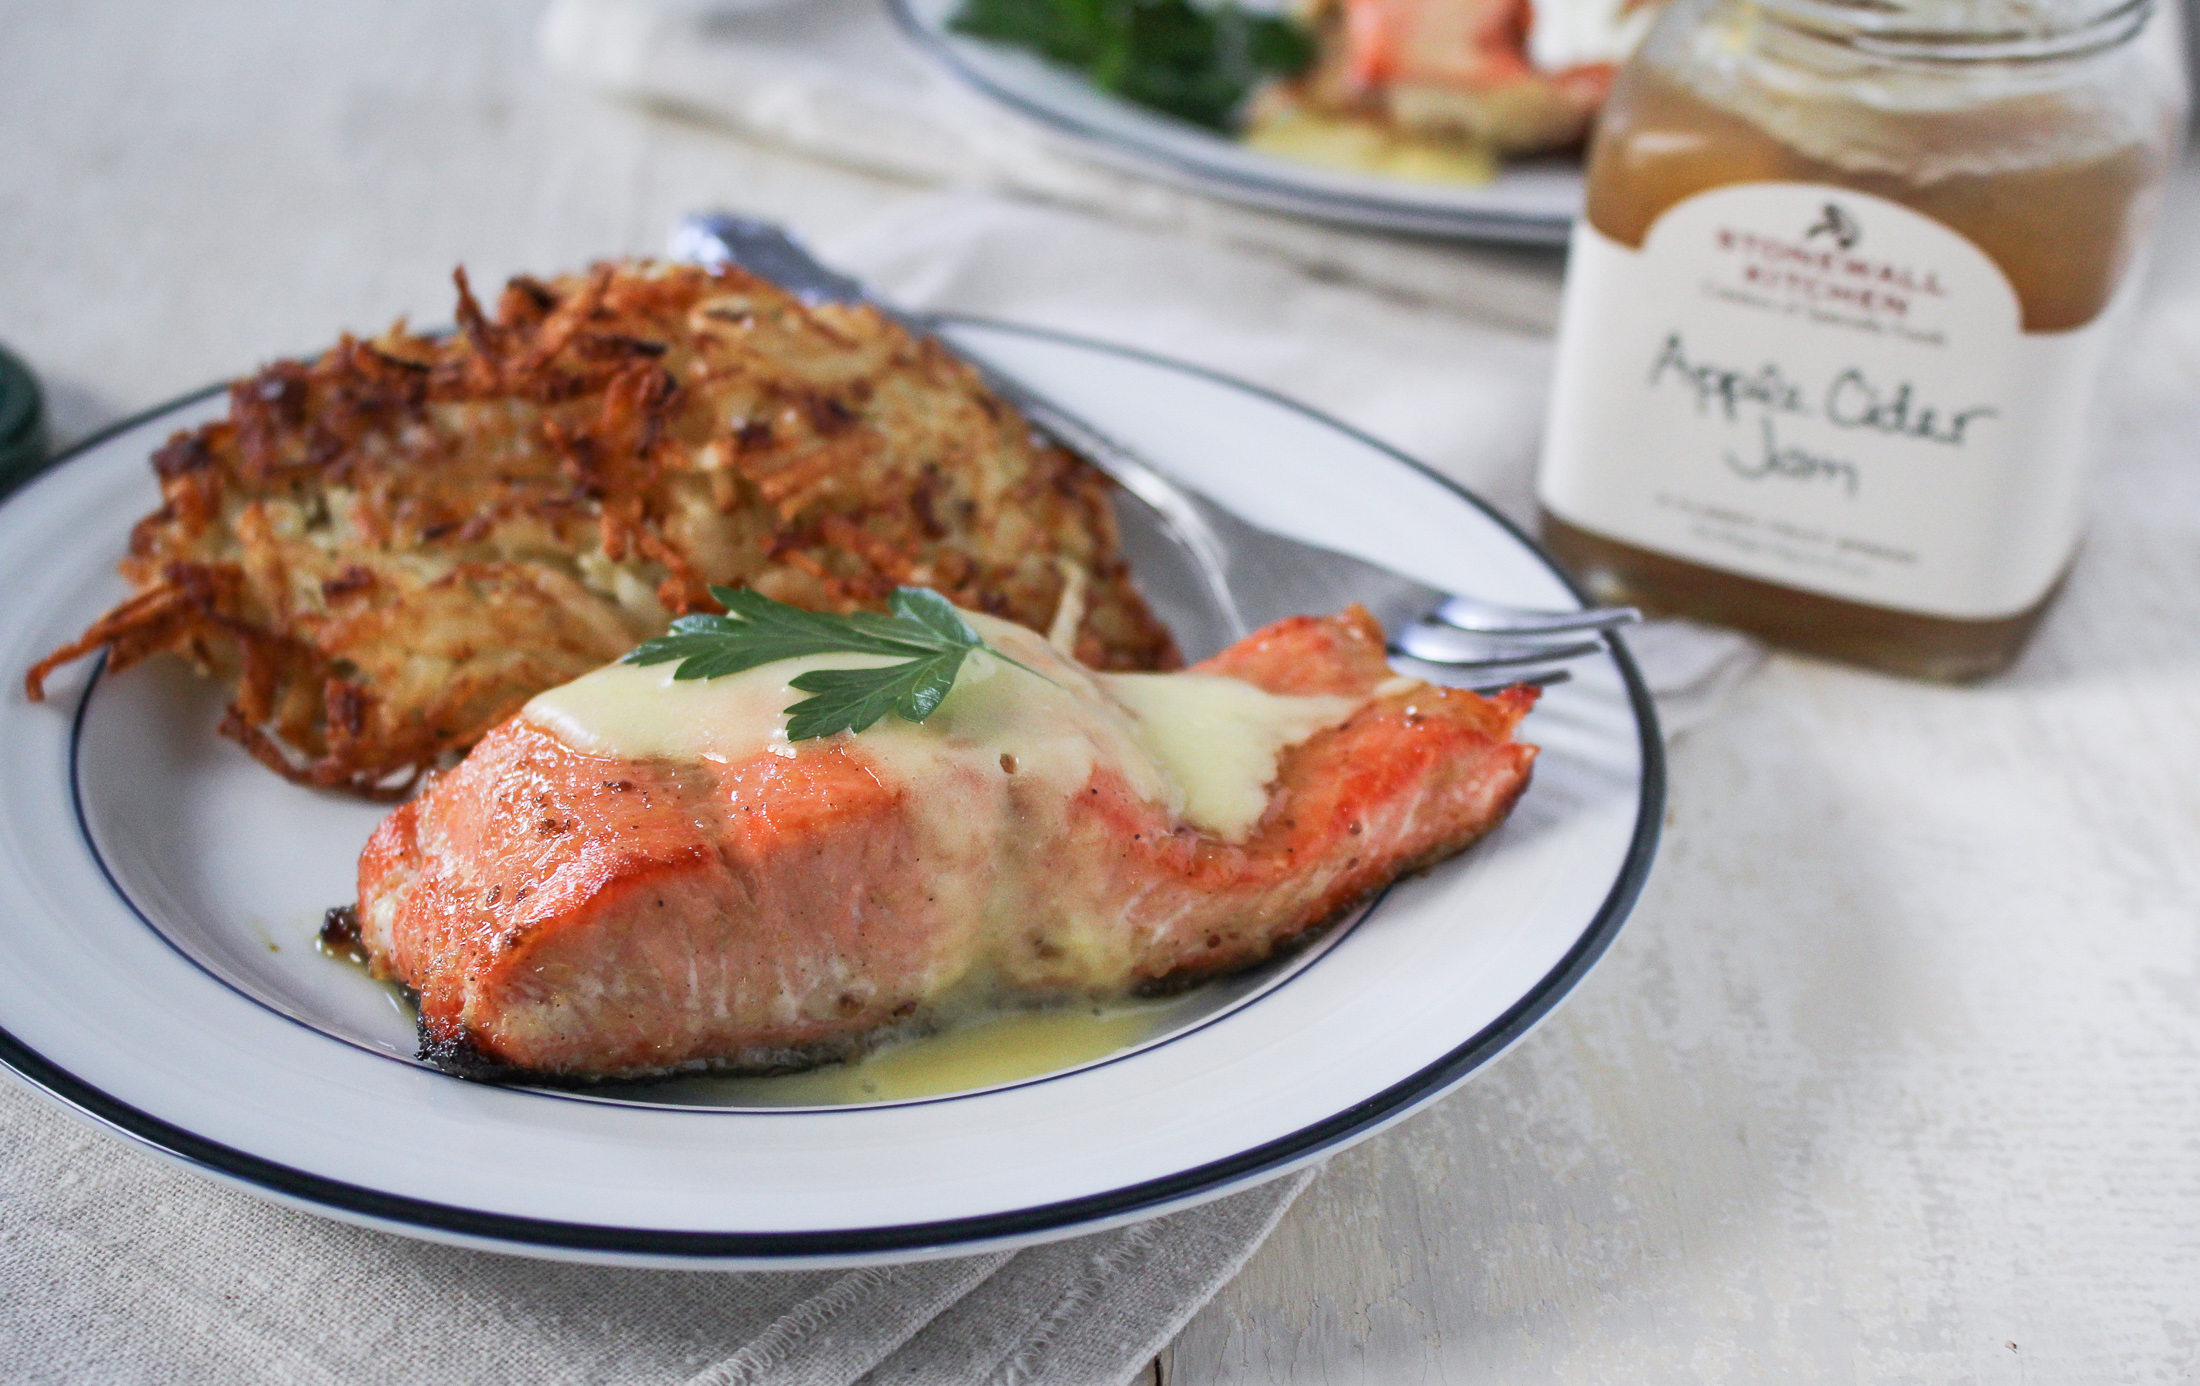
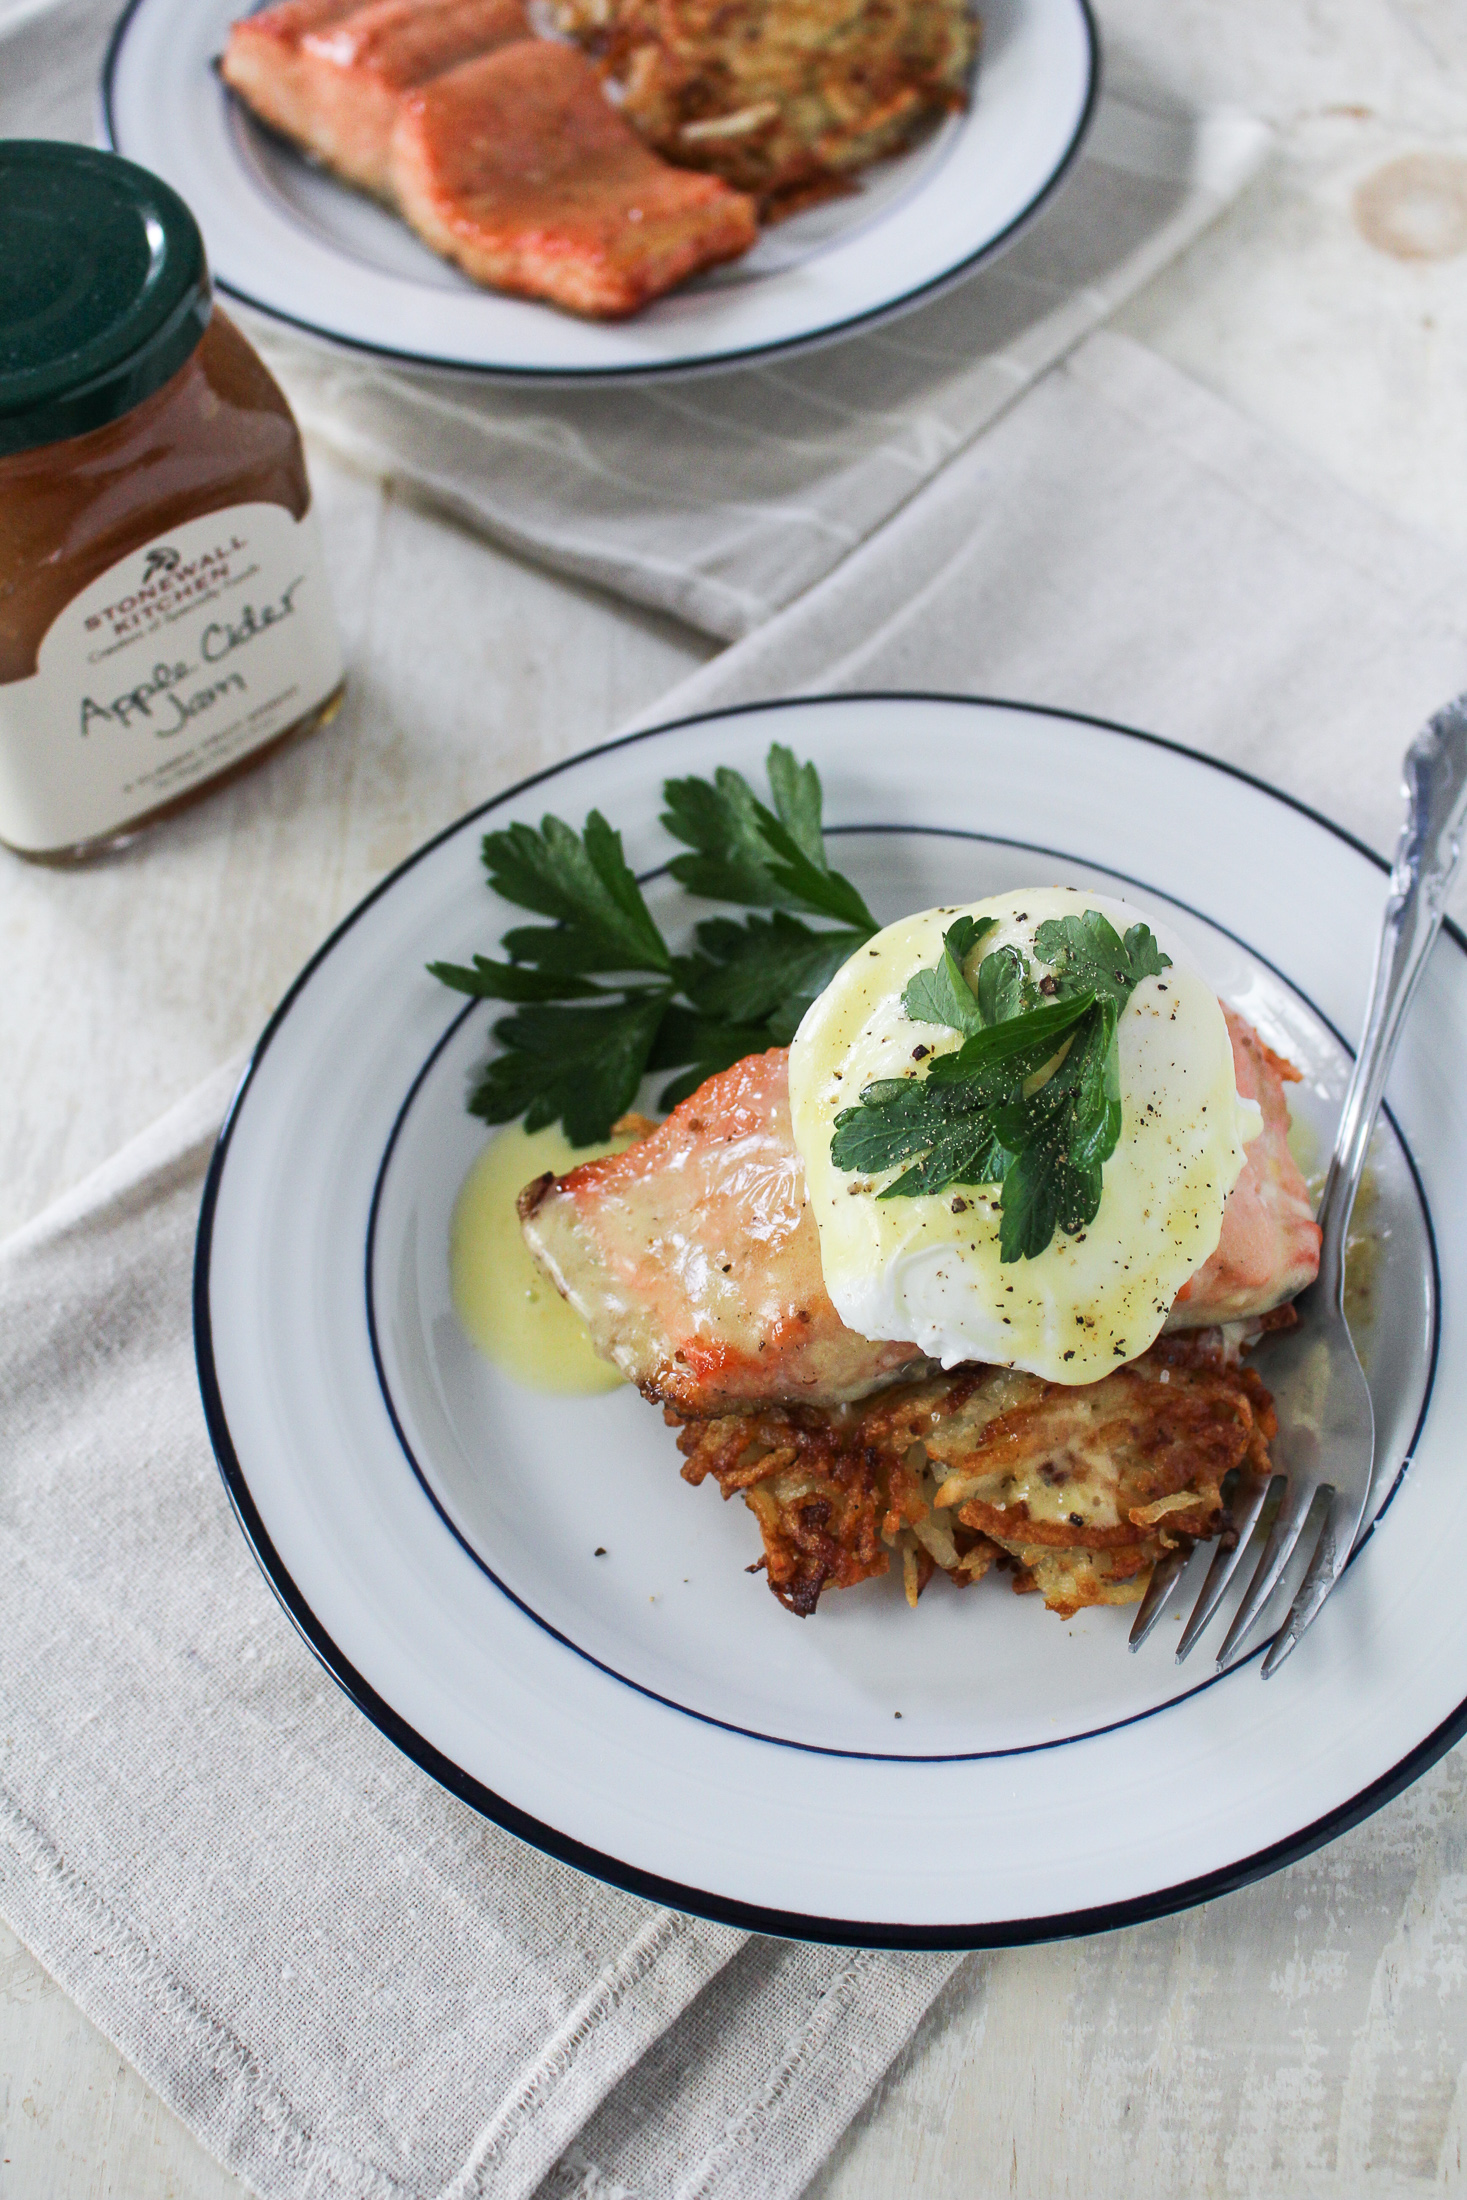
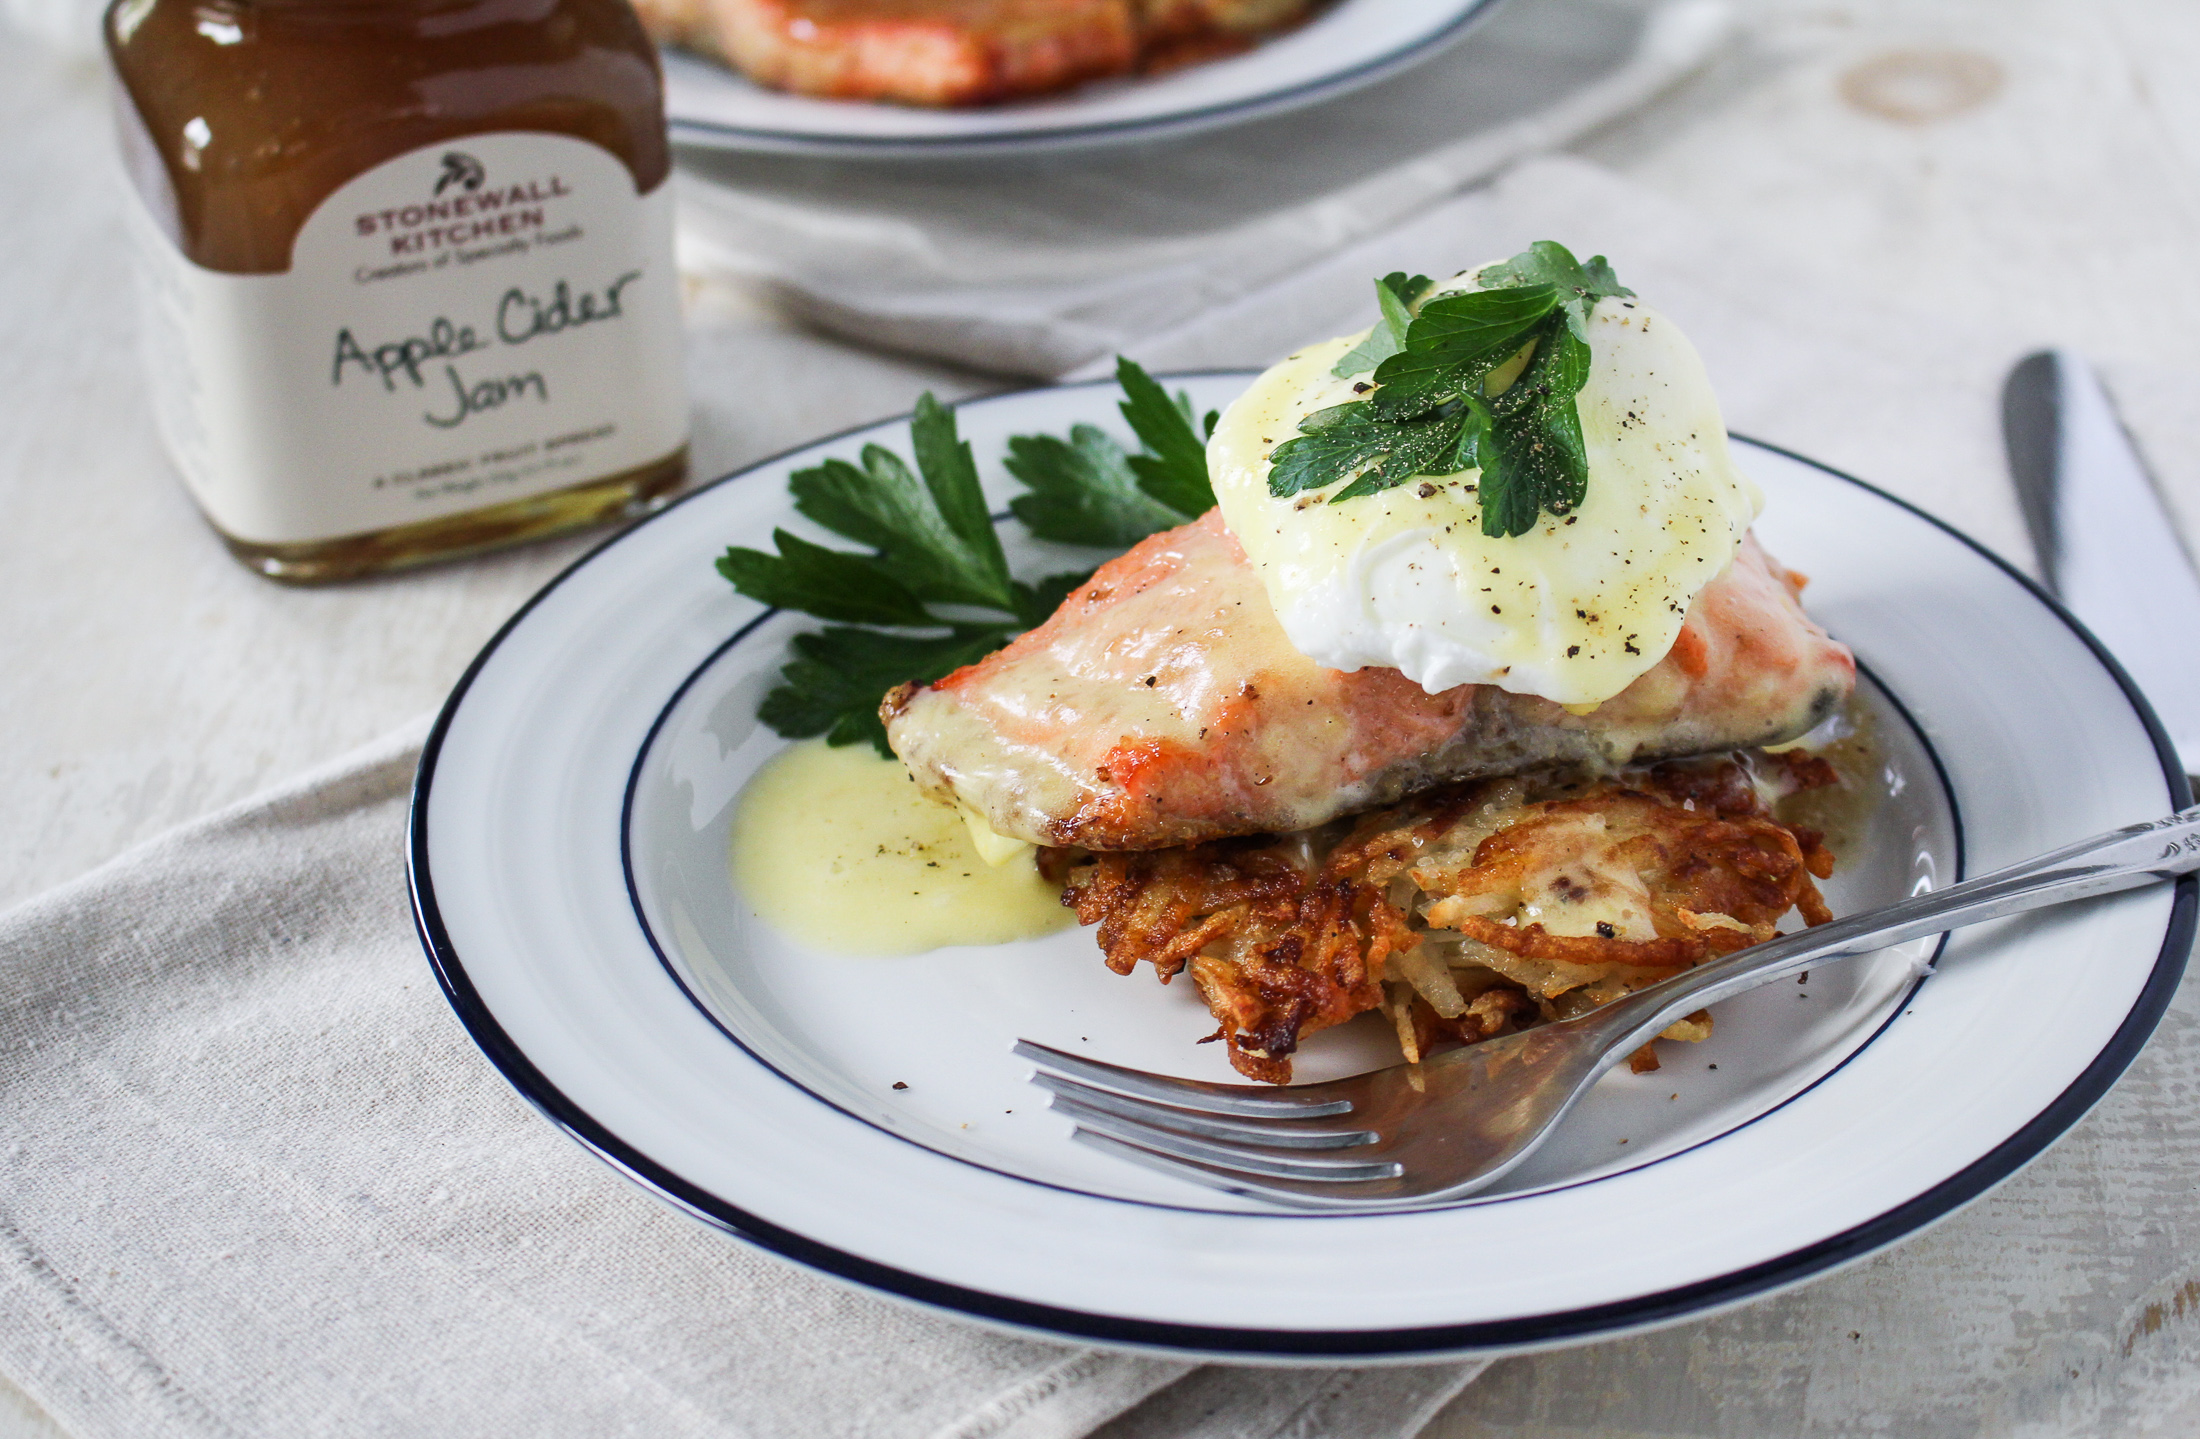
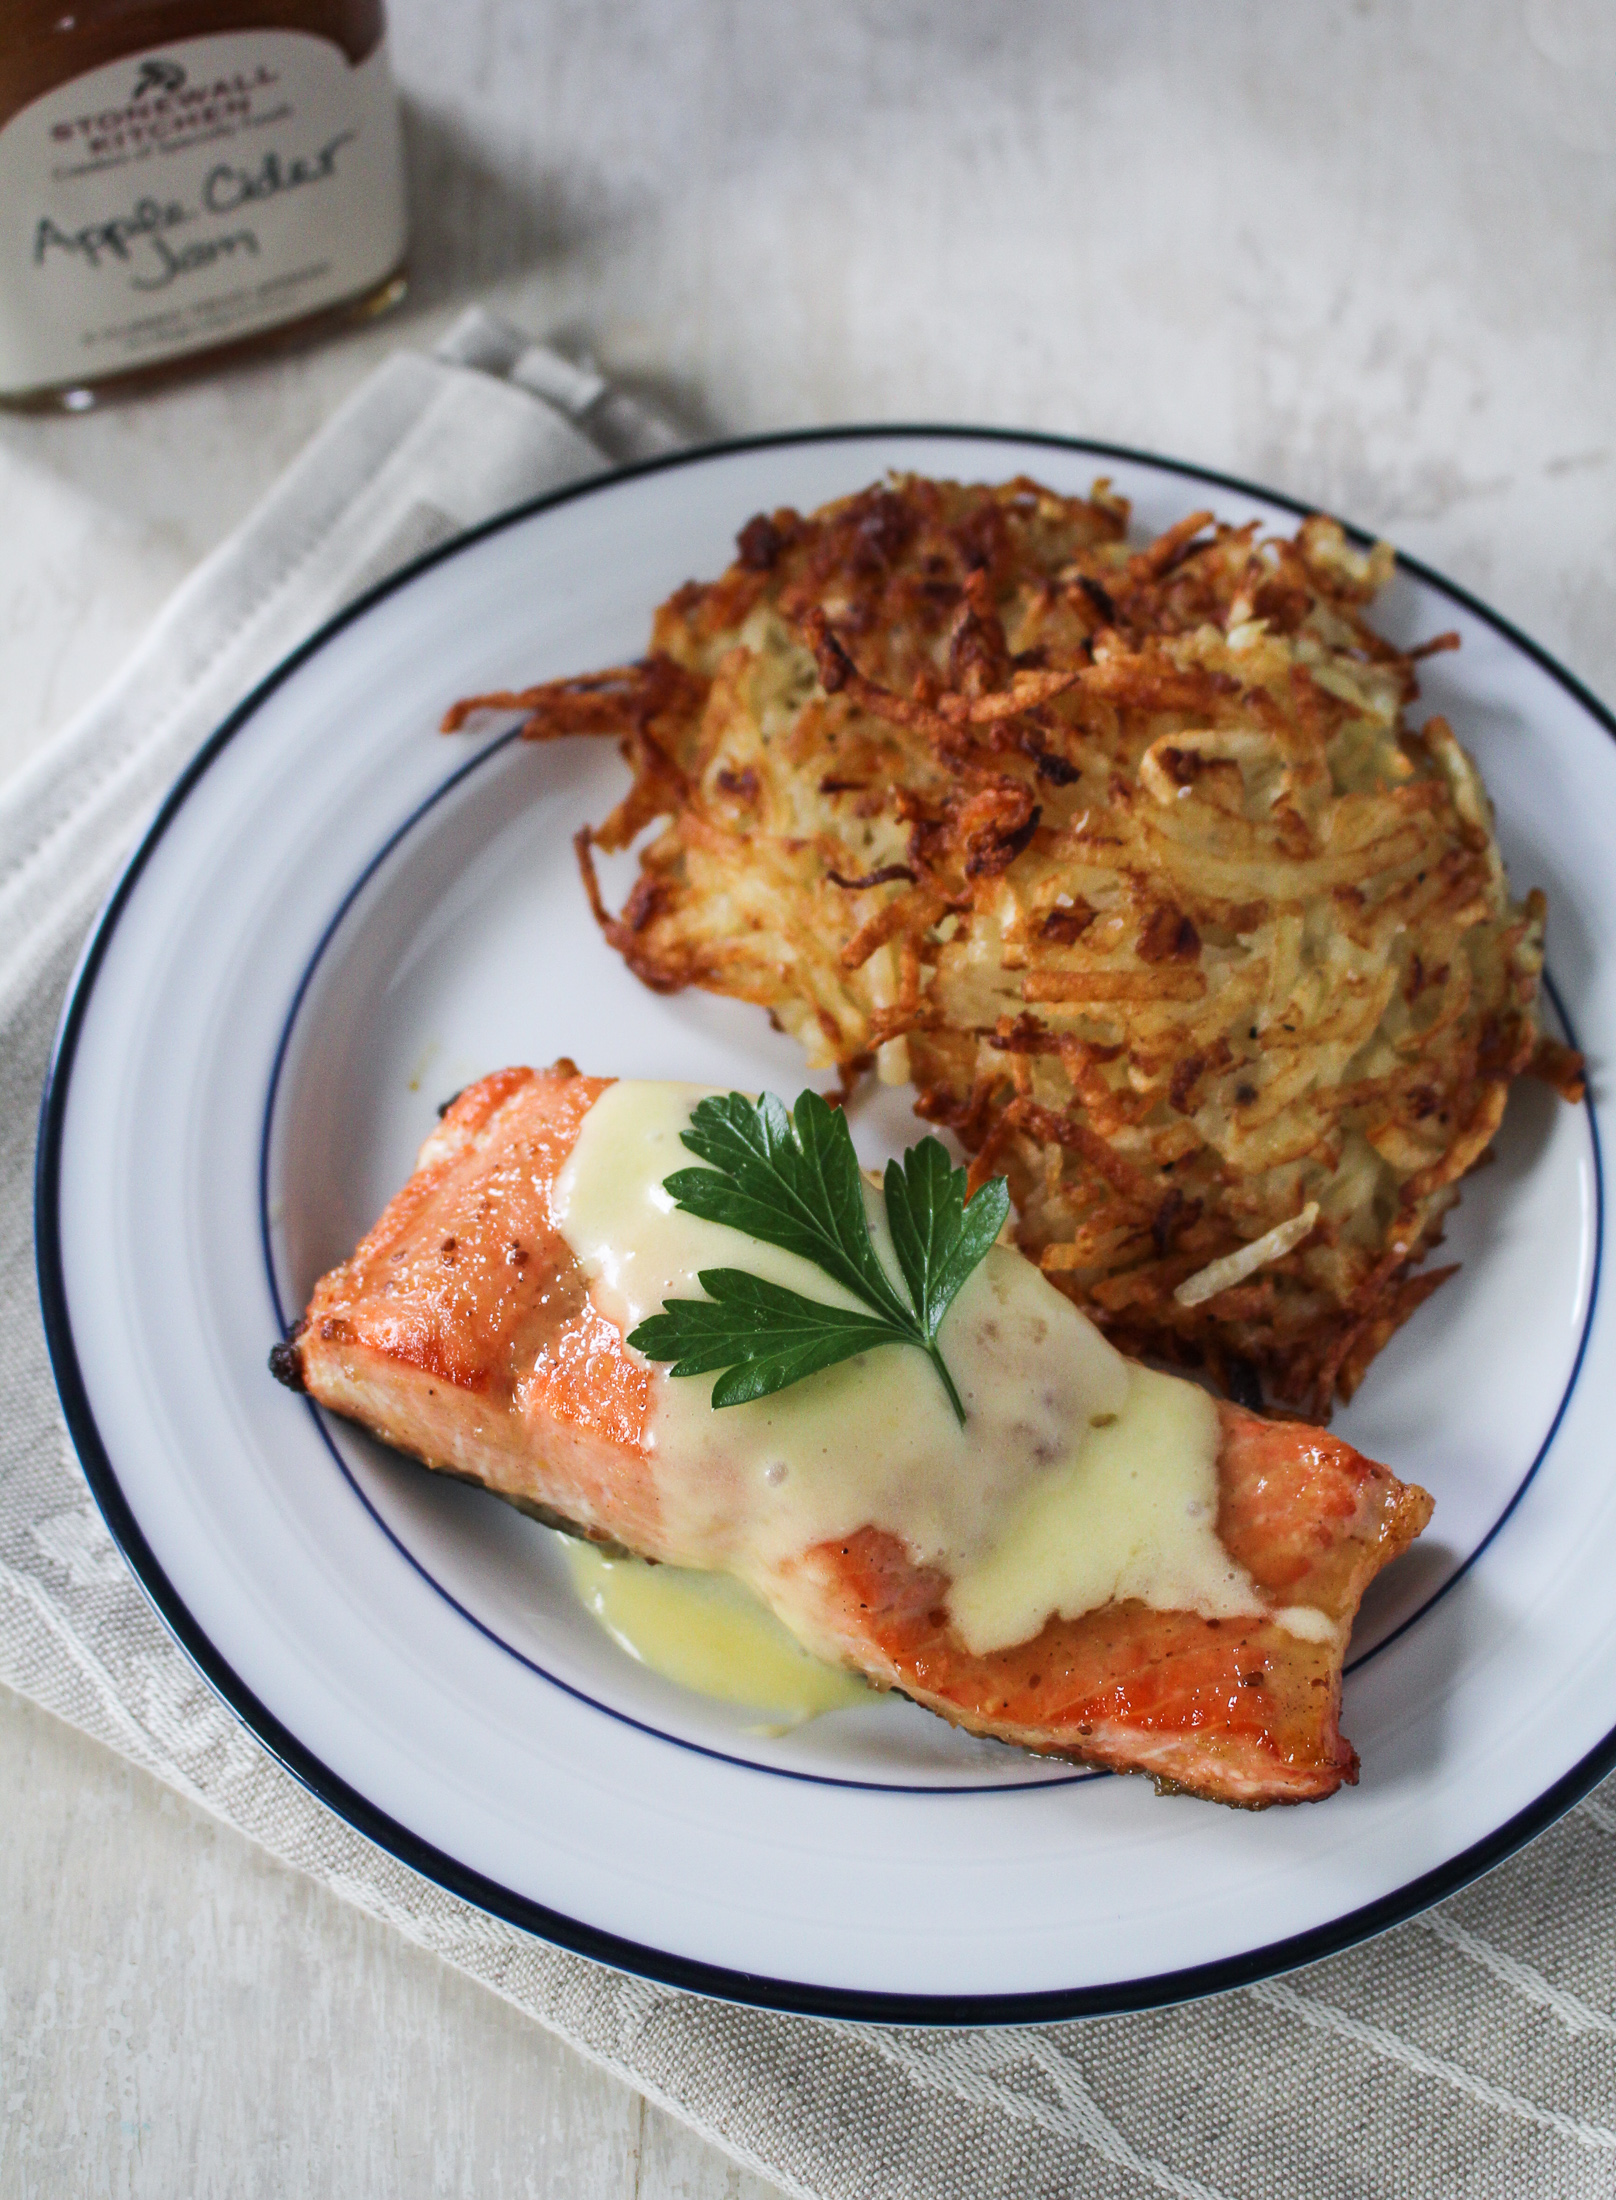
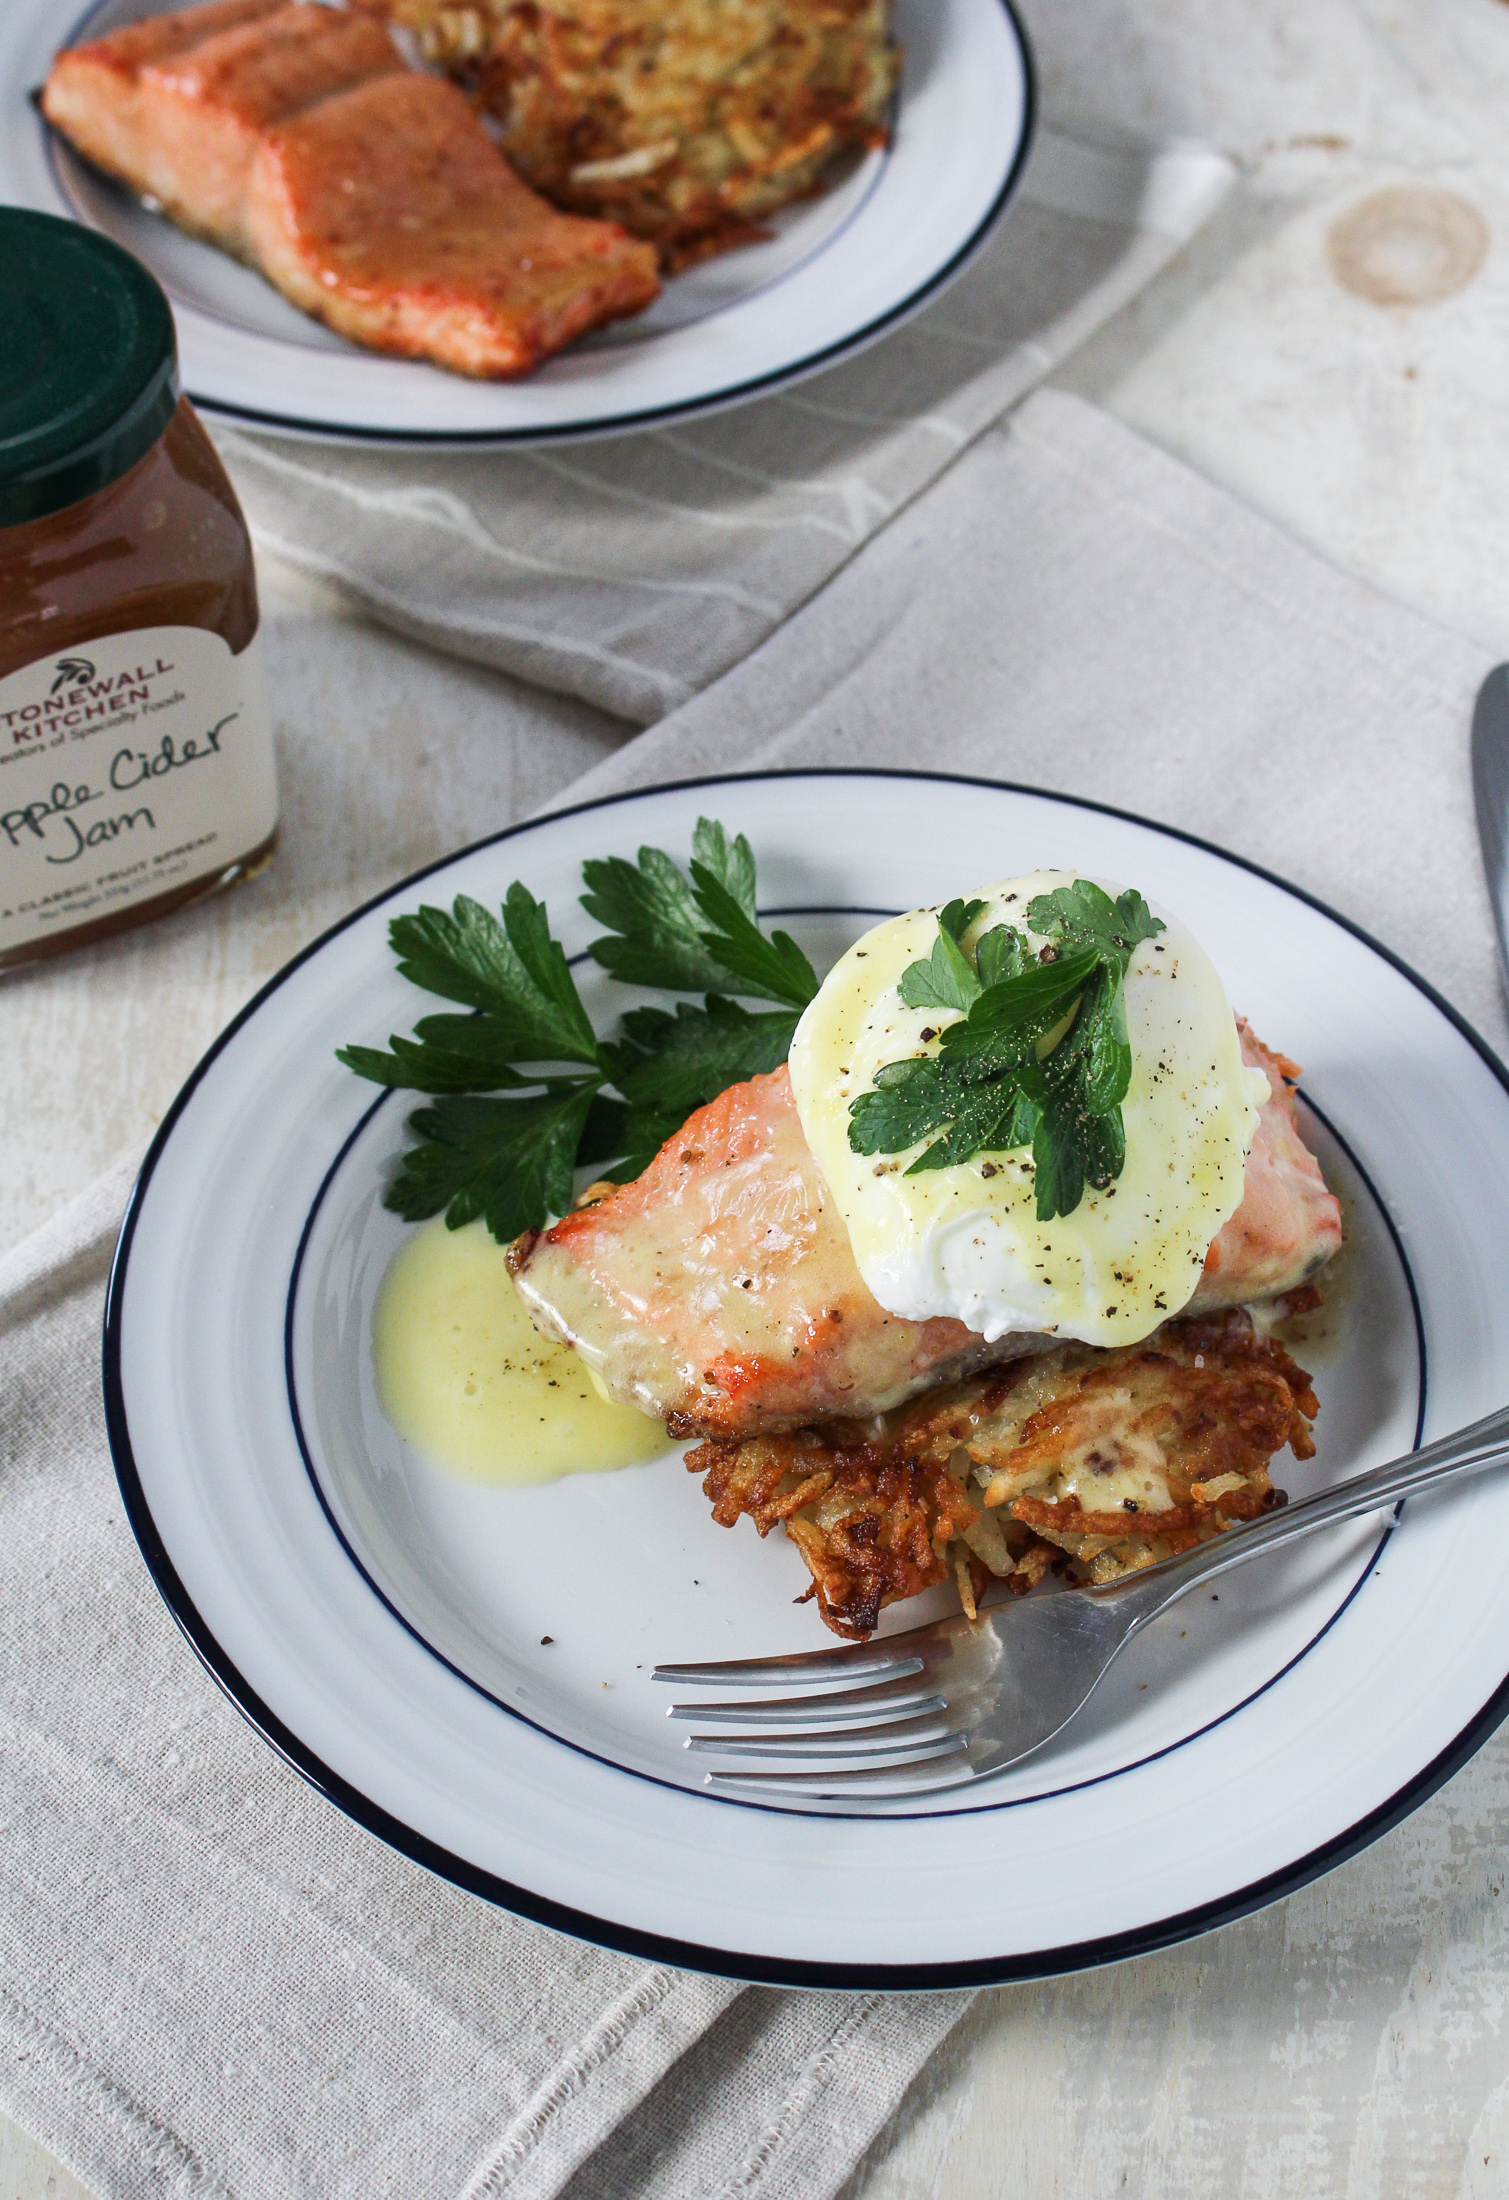
The Apple Cider Jam is thick and sweet and heavily spiced with holiday spices (I’m not sure precisely what’s in it – trade secret? – but think along the lines of cinnamon, nutmeg, ginger, etc.). Having a spoonful is like eating apple pie filling but concentrated down into one delicious bite. That said, it needs a little bit of tempering for use in a savory context, so for this recipe I mixed it with apple cider vinegar, mustard, olive oil, and salt and pepper for a sweet-and-tangy glaze. We brushed the glaze on wild salmon, which we then broiled until just cooked through, and served on top of potato-apple latkes with a poached egg and hollandaise for a fancy-pants version of eggs benedict. It was incredible – crunchy fried potato latkes, rich sweet-and-tangy salmon, soft and runny eggs (although I’ll admit I overcooked them slightly – it was my first time poaching an egg, if you can believe that!), and of course, buttery hollandaise sauce. So much flavor and texture and deliciousness in every bite.

Apple-Cider-Jam-Glazed Salmon and Potato Latke Eggs Benedict {Katie at the Kitchen Door} #sponsored

Apple-Cider-Jam-Glazed Salmon and Potato Latke Eggs Benedict {Katie at the Kitchen Door} #sponsored

Now, I want to take a minute here to say that I get that making cider-jam-glazed salmon and latkes and poached eggs and hollandaise sauce is a time commitment. This is definitely a weekend luxury meal. But the salmon by itself is incredibly quick to prepare – it probably takes 10 minutes from start to finish – and would be a great weeknight dinner with any number of side dishes. So keep that in mind before you write this recipe off as too complicated! And when you do have an hour on a lazy Sunday morning, make the whole thing. I promise you, it will not be a wasted hour.

Disclosure: This post is sponsored by Stonewall Kitchen, but all opinions are honest and my own as usual.

Like what you just read? Subscribe to Katie at the Kitchen Door on Feedly or Bloglovin‘, or follow along on Facebook, Twitter, Pinterest, Instagram, or Google+. Thanks for reading!

Apple-Cider-Jam-Glazed Salmon and Potato Latke Eggs Benedict {Katie at the Kitchen Door} #sponsored

Cider-Jam-Glazed Salmon and Potato Latke Eggs Benedict

Serves 4. Latke-making guidance from Serious Eats. Hollandaise and poached egg recipes from linked sources.

For the latkes:

  • 2 large russet potatoes
  • 1 large apple
  • 1/2 medium yellow onion
  • 1 egg, lightly beaten.
  • 1/2 tsp coarse sea salt
  • 1/4 tsp black pepper
  • 1/2 c. canola oil, for frying

For the salmon:

  • 4 TBS Stonewall Kitchen Apple Cider Jam
  • 1 TBS plus 2 tsp apple cider vinegar
  • 1 tsp mustard
  • 1 TBS olive oil, plus more for greasing the pan
  • 1/4 tsp salt
  • 1/8 tsp black pepper
  • 1 lb. wild-caught salmon fillets with skin-on, cut into individual portions
  • 1 TBS canola oil

To assemble:

  • 4 poached eggs
  • 1 c. hollandaise sauce
  • fresh parsley leaves for garnish
  1. To make the latkes: Peel the potatoes. Using a food processor with a grating disk attached, or the large holes on a hand-held box grater, evenly shred the potatoes. Place in a large bowl and squeeze the potatoes to remove excess liquid, pouring the liquid off into another bowl as you work. You should try to squeeze as much liquid as possible out of the potatoes – it may help to set the potatoes aside for 2-3 minutes in between rounds of squeezing them dry. Let the separate potato liquid sit for a few minutes, then pour off the water on top, leaving the thick white potato starch on the bottom of the bowl. Add the potato starch back to the shredded potatoes and stir to mix.
  2. Shred the apple and the onion in the food processor or on the box grater. Squeeze to remove excess liquid, discarding the liquid, and add the shredded onion and apple to the potato. Stir in the beaten egg, salt, and pepper. Heat the canola oil in a large frying pan over medium heat for 2-3 minutes, or until a piece of potato sizzles when dropped into the oil. Form the potato mixture into palm-sized patties and place gently in the oil. Fry the latkes in batches, for 3-4 minutes per side, draining the finished latkes on a paper-towel lined plate. If you are making the latkes in advance, you can re-heat the latkes in a low-temperature oven immediately before serving.
  3. To make the salmon: Preheat the broiler on the high setting. In a medium bowl, whisk together the apple cider jam, apple cider vinegar, mustard, olive oil, salt, and pepper until smooth. Grease a foil-lined baking sheet with a little bit of olive oil. Brush the salmon fillets with the jam mixture, spreading it on thickly. Heat the canola oil in a large frying pan over medium heat, and place the glazed salmon fillets skin-side down in the pan. Cook for 2-3 minutes, just to crisp the salmon skin and cook the bottom of the fillets. Do not flip the fillets. Transfer directly from the frying pan to the prepared baking sheet, skin-side still down. Put the salmon under the broiler and broil until salmon is just cooked through, about 5-6 minutes. Remove from the oven.
  4. To assemble: Place a warm latke on each place, and top with one of the salmon fillets. Gently place a poached egg on top of the salmon, and drizzle with the hollandaise sauce. Garnish with parsley leaves and serve immediately.


Ireland Travelogue // Olive Oil Scones with Red Currants and Sour Cherries

October 4, 2015 Breakfast

Ireland Travelogue // Olive Oil Scones with Red Currants and Sour Cherries

Ireland Travelogue - Inch Abbey, Northern Ireland {Katie at the Kitchen Door}

Ireland Travelogue - Fallow Deer, Phoenix Park, Dublin {Katie at the Kitchen Door}

If you look at my travelogue collection, which currently includes Ecuador, Italy, St. Thomas, and bits and pieces from around New England and Canada, it sorely under-represents my actual travel history. Where is Russia? Malaysia? Chile and Colombia? Travelogues are some of my favorite posts to look back on, but I often fall into the trap of putting them on my editorial calendar, meaning to sort through all my pictures and memories to share with you and document for myself, and then dragging the post forward month after month until my memories are a little jumbled and I’m not sure exactly what to say. Case in point – I’ve been meaning to write about the 6 weeks I spent in Russia for two years. Two years!

Olive Oil Scones with Red Currants and Sour Cherries {Katie at the Kitchen Door}

Ireland Travelogue - Dublin {Katie at the Kitchen Door}

But I’m determined to change this, starting with my trip to Ireland in August. It was a short trip, just 6 days, but after 8 months of hectic and often stressful work travel, it reminded me that traveling for vacation is an entirely different matter – it’s fun and thrilling and wonderful to be on your own discovering someplace new. The trip was just me and my two younger brothers, Ryan and Robbie, and it was special to have time together just the three of us (even when I was screaming at them to stop fooling around and get dressed as we all bumped into each other in the teeny-tiny B&B room we shared in Galway).

Ireland Travelogue - Cliffs of Moher, Ireland {Katie at the Kitchen Door}

Ireland Travelogue - Salthill, Galway County {Katie at the Kitchen Door}

Galway, The Aran Islands, The Burren

I won’t give you a day-by-day hour-by-hour breakdown of our trip – in fact, what I really want to share is just the one, perfect day we spent exploring the Burren. We flew into Dublin on Friday morning and after spending the day wandering, trying not to take a nap and enjoying our first few pints, we took the train from Dublin to Galway. The main event in Galway was a full day tour to the Aran Islands and the Cliffs of Moher – with only a short time in the country (and because none of us felt comfortable driving), we opted to do most of our sight-seeing with tour groups, and it worked out perfectly. We went on this tour with The Galway Tour Company, and I would highly recommend it – there was a good balance between the guided, tour-like parts and being able to explore on your own, and it allowed us to see a ton in the one day we had.

Ireland Travelogue - Inisheer, Aran Islands {Katie at the Kitchen Door}

Ireland Travelogue - Inisheer, Aran Islands {Katie at the Kitchen Door}

We went to the smallest of the Aran Islands, Inisheer, which has a population of only 250. The ferry across from Doolin to Inisheer was exciting, to say the least. I have spent a lot of time on boats of all shapes and sizes throughout my life, and this went straight to my “Top 3 most nerve-wracking boat experiences.” Just looking at the ocean from the dock made me nervous – when they say Wild Atlantic here, they really mean it. I’m sure we were perfectly safe – it is a ferry, after all – but the pitch of that boat and the size of those waves was both awe inspiring and terrifying. And they told us it was a “pretty good” day for crossing.

Ireland Travelogue - Inisheer, Aran Islands {Katie at the Kitchen Door}

Ireland Travelogue - Inisheer, Aran Islands {Katie at the Kitchen Door}

Once we were on the island (a relief in and of itself), we rented bikes and pedaled our hearts out – up the winding roads to the ruined castle, down through the stone wall-lined paths to the lighthouse, and back around to the rusted shipwreck. It was an exhilarating morning, one that I will look back on for a long time for its beauty, freedom, and sense of discovery. The weather was gray and just a little wild, and the island was incredibly beautiful, with its maze of low stone walls and verdant green pastures. I would go back in a heartbeat – and for more than 2 hours next time.

Ireland Travelogue - Crossing to the Aran Islands {Katie at the Kitchen Door}

Ireland Travelogue - Cliffs of Moher, Ireland {Katie at the Kitchen Door}

After a slightly less harrowing ferry ride back to Doolin, this time taking a detour by the base of the Cliffs of Moher (awe-inspiring, but slightly hard to appreciate whilst also worrying you might get swept off the boat), we stopped in at a very efficient pub for beef stew and brown bread and a warming Guinness. Next up were the Cliffs themselves, one of Ireland’s most famed attractions. Unsurprisingly, they were flooded with people, but somehow it didn’t matter – it was still an incredible thing to see in person. Plus, if you walk just a little bit beyond the official visitor areas, the crowds thin to a more manageable point. We had just a little over an hour to wander the paths snaking over the top of the cliffs, which was enough to take it all in and take some lovely pictures. Again, though, if I ever find myself back there, I’ll slow down a little and walk to the top of the cliffs from Doolin, taking the time to appreciate them properly. As it was, we left at 6pm and had a long, sleepy bus ride back to Galway, watching the rocky landscape of the Burren pass us by through the windows.

Ireland Travelogue - Cliffs of Moher, Ireland {Katie at the Kitchen Door}

Ireland Travelogue - Inisheer, Aran Islands {Katie at the Kitchen Door}

The Burren is what I’ll be going back to Ireland for – the wild wind-swept landscapes, tumble-down stone houses, and juxtaposition of green and gray and the steely blue of the Atlantic. To rent a house and a little car, spending my days going for long rambling walks and ending them with hot stew and fresh beer in cozy little pubs sounds like the ideal sort of vacation. I got just a taste this time but now I know that this part of Ireland is exactly how I always imagined Ireland would be.

Olive Oil Scones with Red Currants and Sour Cherries {Katie at the Kitchen Door}

Scones

Ireland is not exactly known for its food, and although we had several tasty meals, nothing was particularly memorable. Nothing, that is, except the brown bread and the scones and the butter. The scones, in particular, were far better than any others I’ve had. The best one I had was at the most unassuming place – the museum café in the National Museum of Ireland for Decorative Arts and History. The café was a little serve-yourself place, with charming blue tablecloths and no pretentions whatsoever, and the scones were just perfect. I think the fact that I went by myself, on our first afternoon while my brothers were sound asleep, added to the loveliness of the moment, and so I’ve taken it away as my primary food memory from Ireland – and the one I want to share with you.

Olive Oil Scones with Red Currants and Sour Cherries {Katie at the Kitchen Door}

Olive Oil Scones with Red Currants and Sour Cherries {Katie at the Kitchen Door}

I’ve made scones a number of times (like these Peach Scones with Bourbon Glaze), but they are always much too close to biscuits for me. I don’t want a scone to flake – I want it to crumble. I realize there are many different interpretations of the perfect scone out there, but for me it’s pretty close to that museum scone – soft, more cakey than biscuity, studded with fruit, and served with lots of butter and jam. Here’s instagram evidence of that particular scone, if you’re curious.

So I did some research on the best way to make Irish scones and in doing so, stumbled upon an Atlantic article called “The Secret of the Irish Scone.” The title certainly seemed promising, but I have to say I was a bit skeptical when I got to the end of the article and discovered that the secret to Irish scones was olive oil. And by skeptical I mean I am 100% positive that no traditional Irish baker ever made a scone with foreign, grassy olive oil in place of all that lovely Irish butter they have everywhere. But the reasoning behind using a liquid fat instead of a solid fat stuck with me, and I decided to give them a try. I added dried sour cherries and the last of the frozen red currants in place of the raisins and frozen raspberries, and really they were lovely. Perhaps not the most Irish, as you can taste a hint of olive oil, but certainly closer to the real thing than the flaky buttery versions I’ve made in the past. So I present these scones to you, not as authentic Irish scones, but as truly delicious scones that are wonderful reminders of a wonderful trip.

Olive Oil Scones with Red Currants and Sour Cherries {Katie at the Kitchen Door}

Olive Oil Scones with Red Currants and Sour Cherries

Adapted from The Atlantic. Makes about 12 scones.

  • 1 3/4 c. AP flour
  • 1 c. pastry flour
  • 2 tsp baking powder
  • 1/2 tsp salt
  • 1 c. buttermilk
  • 1/2 c. light-flavored olive oil
  • 1/2 c. sugar
  • 1 egg
  • 1/2 c. dried sour cherries
  • 1/2 c. frozen red currants
  • egg wash (1 egg mixed with 1 tsp water)
  1. Preheat the oven to 500°F. Line a baking sheet with parchment paper and set aside.
  2. Mix the flours, baking powder, and salt together in a large bowl. Sift the flour mixture twice using a sifter or fine-mesh sieve so that the flour is very light. Set aside.
  3. In a medium bowl, whisk together buttermilk, olive oil, sugar, and egg until evenly combined. Make a well in the center of the flour and pour the buttermilk mixture into. Add the sour cherries as well. Use a wooden spoon to gently mix the flour and buttermilk mixtures together until just combined. The mixture should be fairly wet.
  4. Generously flour a work surface and turn the dough out onto it. Pat the dough into a rectangle about 1-inch high. Sprinkle the frozen currants over half of the dough, then gently fold the other half of the dough on top of it. Press dough lightly to embed the currants into it. Pat the dough into another rectangle that is about 1 and 1/2 inches high. Use a biscuit cutter to cut out round circles from the dough, placing these circles on the prepared baking sheet. Pat any extra scraps of dough into rough circles and add to the baking sheet. Brush the scones with the egg wash, then refrigerate for 15 minutes. Brush once more with the egg wash, and place in the oven. Immediately lower the oven temperature to 425°F. Bake until just golden brown on top, about 15-18 minutes. Let cool on a cooling rack. Serve within a few days for best flavor. Freeze any extras wrapped tightly in plastic wrap.
Book Club: A Southern Gentleman’s Kitchen // White Bean Chicken Chili

September 26, 2015 Food

Book Club: A Southern Gentleman’s Kitchen // White Bean Chicken Chili

White Bean Chicken Chili {Katie at the Kitchen Door}

The Book: Like many people, I love Southern food, and I’m hard pressed to turn down an opportunity to get my hands on another Southern cookbook. So when author Matt Moore reached out to me about reviewing his new book, A Southern Gentleman’s Kitchen: Adventures in Cooking, Eating, and Living in the New South, I couldn’t say no. I think a good word to describe this book is friendly – you’ll find simple and accessible recipes, large format, colorful pictures on every page, and personal and candid stories from Matt introducing each recipe. The recipes here are Southern but not exclusively so; in fact, I found that this book reads like a greatest hits list of classic meat and potatoes American home cooking – meatloaf, bolognese, fajitas, skirt steak, roast chicken, pan-seared pork chops, and so on. There’s even a recipe that’s called “Meat’n’Potatoes.” For the most part, the recipes are simple and hearty, with the occasional more sophisticated exception (I’m looking at you, Roast Quail with Pomegranate Quinoa). With lots of beef, pork, cheese, and potatoes, odds are you are not going to be eating light if you’re cooking from this book – so don’t come looking for something other than satisfying soul food to share with family and friends.

White Bean Chicken Chili {Katie at the Kitchen Door}

The long and the short of it is, I think a lot of people will find this book very appealing, and the 60 glowing Amazon reviews seem to back me up on that one. The recipes are simple and unabashedly American, but with a twist here or there that will elevate the dishes enough to impress the home cook hoping to put a delicious and hearty dinner on the table. That said, I’m not sure this book will be getting much use from me – it’s just a little heavier, a little more meat-centric, and a little more traditional than the way I typically cook. Still, I can see it coming in handy when I need a quick solution for a weeknight dinner, or Trevor is tired of eating bowls of grains and greens and salmon, or when we just want something homey and comforting.

White Bean Chicken Chili {Katie at the Kitchen Door}

The Food: The recipe I made from this book – Callie’s White Bean Chicken Chili – is the kind of thing I should make more often (which perhaps contradicts my statement above about how much I will use this book…). It’s super fast to make, using ingredients that require almost zero prep – canned beans, rotisserie chicken, canned green chiles, and shredded Monterey Jack cheese. It’s a convenient way to cook – I almost felt like I was cheating somehow – and the result was decadent, satisfying, and quite flavorful. I only made a few tweaks to the recipe: first, I blended the soup after adding half the beans and before adding the chicken, to give it a nice creamy thickness, and second, I only used about two thirds of the one pound of cheese the recipe called for, and I still found it almost too cheesy. And I love cheese. The way I’ve written the recipe below reflects these changes. Definitely don’t skip the corn chips! They add some much needed texture to the chili.

Recipe Shortlist: Creole Popcorn – Fried Crawfish Tails; Fried Dill Pickles with Cayenne Sauce; Pulled Pork BBQ Nachos; Peach Caprese Salad; Baked Trout with Prosciutto and White Cheddar Grits; Blackened Catfish with Salsa Fresca; Bone-In Pork Chops and Sweet Heat Peaches; Pimiento Mac’n’Cheese; Chorizo Roasted Potatoes with Vidalia Onions; Cast Iron Skillet Jalapeno Cornbread; Grilled Georgia Peach Crumble

Like what you just read? Subscribe to Katie at the Kitchen Door in the box on the right, on Feedly or Bloglovin‘, or follow along on Facebook, Twitter, Pinterest, Instagram, or Google+. Thanks for reading!

Disclosure: I received a review copy of A Southern Gentleman’s Kitchen from author Matt Moore, but I was not otherwise compensated and all thought and opinions are my own.

White Bean Chicken Chili {Katie at the Kitchen Door}

Callie’s White Bean Chicken Chili

Adapted slightly from A Southern Gentleman’s Kitchen. Serves 6.

  • 4 (15-oz) cans of Great Northern Beans
  • 1 TBS olive oil
  • 1 large sweet onion, finely diced
  • 3 cloves garlic, minced
  • sea salt, to taste
  • 1/2 tsp freshly ground black pepper
  • 1/2 tsp ground cumin
  • 1/4 tsp crushed red pepper flakes
  • 2 (4-oz) cans of chopped green chiles
  • 3 c. chicken broth
  • Meat from 1 rotisserie chicken, removed from bird and cut into bite-sized pieces
  • 2 c. (8 oz) shredded Monterey Jack cheese
  • Blue corn chips, for topping
  1. Drain and rinse three of the four cans of beans. Do not drain the fourth can.
  2. Heat the olive oil in a large stockpot over medium heat. Add the onion and saute until translucent, about 5 minutes. Add the garlic and saute until fragrant, about 2 minutes longer. Season the vegetables with sea salt, then add the black pepper, cumin, and red pepper flakes and continue to saute for 5 minutes, stirring frequently.
  3. Add the green chiles, chicken broth, and 2 cans of the drained beans to the pan. Bring to a simmer, then remove from the heat. Transfer the soup to a blender and blend on high until smooth, then return to the pot and place back on the stove. Add the second two cans of beans and the chicken, bring to a simmer, and simmer for 10 minutes.
  4. Remove the soup from the heat. Add the cheese and stir into the soup until it is melted. Serve the soup immediately, garnished with the corn chips.
Old El Paso Back-to-School // Enchilada-Style Vegetarian Stuffed Peppers

September 17, 2015 Fall

Old El Paso Back-to-School // Enchilada-Style Vegetarian Stuffed Peppers

Enchilada-Style Vegetarian Stuffed Peppers {Katie at the Kitchen Door} #oldelpaso #sponsored

Although I personally am not going back to school this year (and I don’t have any little ones to account for either), I still am very much feeling the back-to-school vibe these past few weeks. Perhaps it’s just part of living in an area with such a high concentration of universities, or maybe it’s due to the fact that I have so many friends who are in grad school that are just coming back to the area after summers away. Or, it could simply be because when I’m on my morning runs the neon-vested crossing guards are back in place at every crosswalk and I usually jog by at least 2 or 3 elementary school kids, walking to school with backpacks and sneakers that still look conspicuously new.

Enchilada-Style Vegetarian Stuffed Peppers {Katie at the Kitchen Door} #oldelpaso #sponsored

Enchilada-Style Vegetarian Stuffed Peppers {Katie at the Kitchen Door} #oldelpaso #sponsored

Despite the fact that I’m not a student, teacher, or parent of a student, I still love the back-to-school feeling that September brings. It reminds me of cracking open brand new notebooks, family dinners around the kitchen table (after a summer of casual outdoor eating at dusk), and wearing maroon sweaters when it’s still way to hot to wear sweaters, because you just can’t resist. This September, I’ve teamed up with Old El Paso and Shaws to help create an easy, nutritious recipe perfect for those busy evenings when you’re just picking the fall routine back up. These Enchilada-Style Stuffed Peppers are a great solution for after-school weeknight dinners – they do take a little bit of planning ahead to account for overall cooking time, but require very minimal active time. They’re completely vegetarian (great for Meatless Mondays!), using lentils and brown rice flavored with Old El Paso taco seasoning mix as the filling in place of the more traditional ground beef. Once the filling is prepared and the peppers are stuffed, all you need to complete the dish are a can of enchilada sauce, some shredded cheese, and a quick bake in the oven. These have plenty of protein and limited fat, and they are just as satisfying (if not more so!) as a meaty version.

Enchilada-Style Vegetarian Stuffed Peppers {Katie at the Kitchen Door} #oldelpaso #sponsored

Enchilada-Style Vegetarian Stuffed Peppers {Katie at the Kitchen Door} #oldelpaso #sponsored

And don’t forget to clip the Box Tops from your Old El Paso products! Man, I used to get really excited about Box Tops. Now that I’m no longer a 5th grader they aren’t quite as exciting for me personally, but if you do have kids, it’s kind of a fun way to help generate money for schools. At my current life stage, my closest connection to schools is probably all of my teacher friends, and I know they appreciate every dime they can get towards improving their classrooms.

Enchilada-Style Vegetarian Stuffed Peppers {Katie at the Kitchen Door} #oldelpaso #sponsored

Enchilada-Style Vegetarian Stuffed Peppers

Serves 4-6.

  • 5 large red or yellow bell peppers
  • 2 TBS olive oil
  • 1 onion, peeled and thinly sliced
  • 1 packet Old El Paso Original Taco Seasoning Mix
  • 1 c. brown rice, rinsed and drained
  • 1 c. black French lentils, rinsed and drained
  • 2 c. water
  • 2 c. vegetable broth
  • 1 c. chopped fresh tomatoes
  • One 10-oz. can Old El Paso Mild Enchilada Sauce
  • 1/2 c. shredded monterey jack cheese
  1. Bring a large pot of water to a boil. Stem and seed the peppers, then cut peppers in half lengthwise. Blanch the peppers in the boiling water for 2-3 minutes, then remove with a slotted spoon and set aside, cut-side up, in a casserole dish.
  2. Heat the olive oil over medium heat in a large saucepan. Add the onions and the Old El Paso taco seasoning mix to the oil and stir to thoroughly coat the onions with the seasoning. Saute the onions, stirring occasionally, until tender and beginning to brown, about 10 minutes.
  3. Add the rice and lentils to the onions and stir to coat with the seasoning. Cook, stirring, for 1 minute, then add the water and vegetable broth. Bring the mixture to a boil, then stir in the tomatoes, cover, and reduce the heat to low. Simmer the mixture, covered, until rice and lentils have absorbed all of the liquid, about 30-40 minutes. Taste to be sure they are tender then remove from the heat.
  4. Preheat the oven to 400°F. Spoon the rice and lentil mixture into the peppers in the casserole dish. Pour the enchilada sauce over and around the peppers, then sprinkle the cheese on top of each pepper. Bake for 20-25 minutes, until cheese is golden brown on top. Remove from oven and serve hot.

Only Box Tops For Education registered schools can redeem Box Tops. Each Box Top is worth 10 cents to redeeming school. Limit $20,000 per school, per school year for Box Tops redeemed through the Clip Program. See www.boxtops4education.com for program details. 

Old El Paso products, found at your local Shaws store, are an easy weeknight meal solution.
Shoppers can clip the Box Tops found on the Old El Paso packaging, and on other General Mills products, to earn 10 cents each for their schools through the Box Tops for Education program. 

This is a sponsored conversation written by me on behalf of Albertsons Safeway / Shaws and Old El Paso . The opinions and text are all mine.

Summer Goodbye // Harissa-Butter Roasted Corn Soup with Chorizo

September 15, 2015 Fall

Summer Goodbye // Harissa-Butter Roasted Corn Soup with Chorizo

Harissa-Butter Roasted Corn Soup with Chorizo {Katie at the Kitchen Door}

Reading all of the blog posts out there about the end of summer is making me a bit sad. Fall is and has always been my favorite season, and I’m also guilty of having started writing my farewells to heat and long days and tomatoes, but now I’m feeling torn. Amidst all the manic travel and moving and house buying and WORK, did I miss summer? I think I might have. And there’s no going back now – the seasons are the seasons and they move whether we like it or not. We have no choice but to walk along with them – that or fly to the other side of the world. But I can tell you with certainty, having visited the other side of the world quite a bit this year, that another place’s summer is not quite the same as your own summer. Especially not a New England summer, that desperately awaited and gloriously sweet reward for New England winters.

Harissa-Butter Roasted Corn Soup with Chorizo {Katie at the Kitchen Door}

Harissa-Butter Roasted Corn Soup with Chorizo {Katie at the Kitchen Door}

The only thing for it, I think, is to enjoy all the time I do have here in the next month – to embrace the hot and humid days that still feel like August with the same enthusiasm that I enjoy blustery autumn ones and damp and drizzly ones. To go to the beach when it’s hot and photograph the leaves when they turn and drink chai lattes while wearing oversized sweaters when it’s gray and damp. The fact that I need to travel for work is not going to change in the near term, but what I do with my time at home is my decision. I’m not saying that every day is going to be great or that all my daily responsibilities are going to disappear, but the least I can do is enjoy each day for what it is.

Harissa-Butter Roasted Corn Soup with Chorizo {Katie at the Kitchen Door}

One other thing I did about all this summer’s ending melancholy? Buy as much sweet corn and peaches as I could carry home at the farmer’s market. There’s really nothing like sweet corn eaten the same day it was picked – it doesn’t even need to be cooked. When I was sitting on the porch shucking it I couldn’t resist taking a couple of bites out of each ear to test the sweetness, and boy is it sweet right now.

Harissa-Butter Roasted Corn Soup with Chorizo {Katie at the Kitchen Door}

Sunday was cool and drizzly all day, and all I could think about was soup and freshly baked bread. The new oven is so spotlessly clean and works so well that it’s making me dive head-first back into cooking, and part of me was sort of grateful to the drizzly weather for giving me an excuse to bake and roast the afternoon away (see? appreciating each day for what it is!). We turned the abundance of corn into a sweet and slightly spicy corn soup, topped with a deeply savory corn, chorizo, and manchego cheese mixture. The soup base is extremely simple – olive oil, onions, garlic, broth and raw corn kernels, simmered briefly then pureed into a sweet and frothy soup. The topping is a bit more complex, made from corn roasted on the cob with a generous slather of harissa-butter, then cut from the cob and tossed with hot chorizo. The sweet, salty, spicy balance on this was just right, and the fresh buttermilk rolls that Trevor made to go with it was like the icing on the cake. And it matched my feelings, too: corn because summer’s not over yet, soup because fall has already begun. It’s all a balance.

Like what you just read? Subscribe to Katie at the Kitchen Door in the box on the right, on Feedly or Bloglovin‘, or follow along on Facebook, Twitter, Pinterest, Instagram, or Google+. Thanks for reading!

Harissa-Butter Roasted Corn Soup with Chorizo {Katie at the Kitchen Door}

Harissa-Butter Roasted Corn Soup with Chorizo

Serves 3-4

  • 4 ears of corn
  • 1 1/2 tsp harissa (jarred with olive oil, not ground spice)
  • 1 TBS butter, room temperature
  • sea salt to taste
  • 1 TBS olive oil
  • 1 small onion, finely chopped
  • 4 cloves garlic, minced
  • 3 c. chicken or vegetable broth
  • 4 oz. fresh chorizo sausage
  • 1 oz. manchego cheese
  1. Preheat the oven to 400°F. Husk the corn. In a small bowl, mix together the harissa, butter, and a pinch of sea salt. Place 2 ears of the corn on a large sheet of tinfoil and rub all over with the harissa butter. Close the tinfoil to make a package and place on top of a baking sheet. Roast the corn in the foil for 20-25 minutes, until tender.
  2. Heat the olive oil in a medium saucepan over medium heat. Add the onion and saute until translucent, about 5 minutes. Add the garlic and saute for 2 minutes longer. Use a serrated knife to cut the kernels off of the remaining 2 ears of corn, then add the kernels to the saute and saute for 2 minutes. Add the broth and bring to a simmer. Snap the corn cobs in half and add to the pot. Simmer for about 20 minutes, then remove the corn cobs from the pot and discard. Transfer the soup to a blender and blend on high until it is a smooth and slightly thick puree. Return to the pot and set aside, keeping warm over low heat until ready to serve.
  3. When the roasted corn is done, remove from the oven and let cool until it is comfortable to touch. Use a serrated knife to cut the corn kernels off of the cobs. Set the kernels aside. Heat a frying pan over medium heat, and crumble the chorizo into it in bite-sized pieces. Cook the chorizo, stirring frequently, until it is browned on all sides and cooked through. Add the roasted corn and toss to coat with the chorizo, and cook for 2-3 minutes or until corn is heated through. Season to taste with salt, then transfer the mixture to a bowl.
  4. Ladle the smooth corn soup into bowls. Divide the roasted corn and chorizo mixture between bowls, piling it into the center of the soup. Top each bowl with a few pieces of thinly sliced manchego cheese, and serve immediately with crusty bread or freshly-baked rolls.
La Crema Pork and Pinot #5: Pulled Pork with Blackberry Pinot BBQ Sauce

September 10, 2015 Food

La Crema Pork and Pinot #5: Pulled Pork with Blackberry Pinot BBQ Sauce

Pulled Pork with Blackberry Pinot BBQ Sauce {Katie at the Kitchen Door} #lacremastyle #spon

Well, summer is officially over, with Labor Day come and gone. I have to admit, though, that it doesn’t feel like it yet (and I’m still hoping to get one or two more beach days in, having been forced to cram all of my summery activities into the last few weeks). And grilling season, well that’s certainly not over. In fact, you could argue that we’re getting into one of the best times for grilling – it’s a little bit cooler and pleasant to spend time outside, there’s an incredible abundance of produce available that benefits from a slight charring (think peppers, corn, peaches, eggplant…), and when does a nice piece of steak or rack of ribs not sound appealing?

Pulled Pork with Blackberry Pinot BBQ Sauce {Katie at the Kitchen Door} #lacremastyle #spon

For the last installment of my summer Pork and Pinot collaboration with La Crema Wines, we headed out to the grill, for what is arguably America’s favorite form of pork – barbecue. One of Trevor’s favorite things to cook is big cuts of pork (ribs, Boston butt, etc.) long and slow over a smoky charcoal grill. And it just so happens, having spent my college years in North Carolina, a great pulled pork sandwich is one of my favorite things to eat. We’re a good match, no?

Pulled Pork with Blackberry Pinot BBQ Sauce {Katie at the Kitchen Door} #lacremastyle #spon

Pulled Pork with Blackberry Pinot BBQ Sauce {Katie at the Kitchen Door} #lacremastyle #spon

This particular version of the pulled pork uses a variation on our standard rub, which includes sweet and smoked paprika, brown sugar, salt, and a touch of cayenne. We grill it for about 3-4 hours in aluminum pans, and then serve it smothered with sauce on soft rolls. I made a homemade BBQ sauce too, with blackberries, Pinot Noir, and chipotle as the dominant flavors, to play up the smokiness in the pork and to make it pair even better with La Crema Pinot Noir.

Pulled Pork with Blackberry Pinot BBQ Sauce {Katie at the Kitchen Door} #lacremastyle #spon

My mom and Robbie joined us for the somewhat impromptu cook-out. They’ve just come home after spending all summer in Maine (something I’m going to do again one of these years) and it’s nice to have them back within “you wanna have dinner?” distance, especially since it’s Robbie’s last year at home before heading off to college. The pork was the star of the meal, but we also had grilled corn, chicken wings, cole slaw, plenty of La Crema Monterey Pinot Noir, and burgundy pie with the last of the goat cheese and blackberry ice cream. It was a good meal – and it turned out to be the first of several over the course of the long weekend, including an extravagant dinner out in Newburyport and steak tips and peach sangria at my cousin’s BBQ on Monday. But what’s Labor Day for if not for a final hurrah of summer eating and drinking?

Pulled Pork with Blackberry Pinot BBQ Sauce {Katie at the Kitchen Door} #lacremastyle #spon

P.S. Several of these Pork and Pinot recipes I’ve been developing for La Crema were recently featured on Food and Wine (as was this Oyster Shooter picture I took for one of my restaurant clients earlier this year). Go check it out!

For full instructions and the recipe for Pulled Pork with Blackberry Pinot BBQ Sauce, head over to the La Crema Blog!

More Pork and Pinot posts…

  • Prosciutto, Mozzarella, and Sage Pesto Stuffed Pork Tenderloin
  • Red Wine Caramelized Pork Belly
  • Pork Belly Banh Mi Sandwiches
  • The Perfect Charcuterie Board

Like what you just read? Subscribe to Katie at the Kitchen Door on Feedly or Bloglovin‘, or follow along on Facebook, Twitter, Pinterest, Instagram, or Google+. Thanks for reading!

This is a sponsored conversation written by me on behalf of La Crema. The opinions and text are all mine.

Welcome, September // Fig Bourbon Old-Fashioned

September 6, 2015 Drink

Welcome, September // Fig Bourbon Old-Fashioned

Fig Bourbon Old Fashioned (with Fig-and-Vanilla-Infused Bourbon) | Katie at the Kitchen Door

September is here and I’m thrilled by it. This month has been the light at the end of the very long tunnel of this year. I’ll be here all month, it’s the beginning of my favorite season, we’ve settled into the new house enough that it feels exciting to work on it instead of overwhelming, and, did I mention, I’ll be here all month? NO AIRPLANES.

Fig Bourbon Old Fashioned (with Fig-and-Vanilla-Infused Bourbon) | Katie at the Kitchen Door

We’re off to a good start, September and I. I took Friday off to get organized before going into the long weekend, and take care of a few things that I’ve been meaning to do for months: giving the house a thorough cleaning, ordering office furniture, processing the huge backlog of blog receipts I have, etc. Friday night we went out with good friends – it was cool enough to wear jeans and there was a back-to-school buzz in Harvard. I had one too many glasses of wine and had a great time. Saturday when I woke up there was a pleasant chill in the air – the kind that makes you snuggle a little longer in bed and revel in the simple pleasures of a good sweatshirt and a bowl of apple pie oatmeal. We did yardwork all day and then had my mom over for a big pile of pulled pork. Today we spent at the beach, soaking up the still-strong sun and finally-warm-enough water. And there’s still an entire day of the weekend left to enjoy!

Fig Bourbon Old Fashioned (with Fig-and-Vanilla-Infused Bourbon) | Katie at the Kitchen Door

I have a few things I’m focused on this month. First and foremost, I want to enjoy myself and relax, spending as much quality time with Trevor and with friends as I can. Second, I have to get rid of this travel weight, so long fall runs and healthy meals are in order. And third, I’m going to get this blog back up and running! It’s been a slow summer here on Katie at the Kitchen Door, and I mean to make up for that with plenty of delicious new recipes in the next few months. It will help that, with the arrival of our new stove next Friday, we’ll finally have a fully functional kitchen… and temperatures that make us feel like cooking again.

Fig Bourbon Old Fashioned (with Fig-and-Vanilla-Infused Bourbon) | Katie at the Kitchen Door

Fig Bourbon Old Fashioned (with Fig-and-Vanilla-Infused Bourbon) | Katie at the Kitchen Door

So here’s a fall drink to celebrate the arrival of this lovely month. A few weeks ago I was doing some recipe development for a client that involved figs and bourbon and I decided to set aside some of both to make a fig-and-vanilla-infused bourbon. Now that it’s ready I wanted to showcase it in a simple twist on a classic old fashioned, adding a splash of maple liqueur and a twist of orange to the bourbon and topping it off with a little club soda. It’s stronger and less sweet than my typical cocktail choices but it feels just right for fall – dark and brooding and featuring one of fall’s most sensual fruits.

Like what you just read? Subscribe to Katie at the Kitchen Door in the box on the right, on Feedly or Bloglovin‘, or follow along on Facebook, Twitter, Pinterest, Instagram, or Google+. Thanks for reading!

Fig Bourbon Old Fashioned (with Fig-and-Vanilla-Infused Bourbon) | Katie at the Kitchen Door

Fig-Bourbon Old Fashioned

Serves 1.

  • 1 sugar cube
  • Dash of bitters
  • Chilled club soda
  • 2 oz. fig-and-vanilla-infused Bourbon (recipe below)
  • 1 oz. maple liqueur
  • ice
  • 1 orange twist
  • 1 maraschino cherry
  1. Place the sugar cube in a short glass. Top with the bitters and a splash of club soda and use a muddler to stir/smash until the sugar cube is dissolved. Add the Bourbon and the maple liqueur and stir to combine. Add ice to fill the glass and garnish with the orange twist and maraschino cherry. Top off with more club soda if desired.

Fig-and-Vanilla-Infused Bourbon

Adapted from Bourbon and Toast.

  • 2 c. Bourbon
  • 6 figs, washed and halved
  • 1/2 vanilla bean
  1. Place the figs and vanilla bean in a sterilized pint jar. Top with the Bourbon and seal the jar with a lid. Place in a cool dry place out of direct light and let sit for 2-4 weeks, until the Bourbon has taken on the color and flavor of the figs.


Kitchen Update // Goat Cheese Ice Cream with Blackberry Red Wine Swirl

August 24, 2015 Dessert

Kitchen Update // Goat Cheese Ice Cream with Blackberry Red Wine Swirl

Goat Cheese Ice Cream with Blackberry Red Wine Swirl {Katie at the Kitchen Door}

Goat Cheese Ice Cream with Blackberry Red Wine Swirl {Katie at the Kitchen Door}

We have a fridge! A fridge with a freezer! Which means: it’s high time for the summer’s first batch of homemade ice cream. Beyond high time, if we’re being truthful, as it’s been more than a year since I made a batch of ice cream. And the last batch was a really good one, too, so it didn’t last more than a week. Plus, I consider having enough time to make at least one batch of homemade ice cream per summer to be an essential indicator of sanity.

This particular ice cream is one that I’ve been mulling over for more than 2 years. It’s loosely based on this incredible Strawberry Sour Cream Ice Cream, which is still the best ice cream I’ve ever made. Adding cultured dairy products, like sour cream or cheese, to the ice cream base ensures that it is extra thick and sets up really nicely when frozen, which can be a problem with homemade ice creams. Using sour cream or goat cheese also adds a delicious tang to offset the sweetness of the ice cream.

Goat Cheese Ice Cream with Blackberry Red Wine Swirl {Katie at the Kitchen Door}

Goat Cheese Ice Cream with Blackberry Red Wine Swirl {Katie at the Kitchen Door}

Since I knew that I wanted to try a recipe similar to the original that used goat cheese in place of the sour cream, we get an abundance of blackberries from our bushes every year, and blackberries and goat cheese and red wine are a great combination on a cheese platter, I decided that those three elements were the basis for what was sure to be a delicious dessert. The ice cream base would be a sweet goat cheese custard with a hint of vanilla, and the blackberries and red wine would enter the picture via a sweet and jammy swirl of fruit sauce. I added a splash of balsamic to the blackberry-red wine component for a little extra depth. The result was everything I imagined, and just as good as the strawberry sour cream version. It’s a good thing I made this 2 days before leaving for a week, or it would already be gone.

Goat Cheese Ice Cream with Blackberry Red Wine Swirl {Katie at the Kitchen Door}

Goat Cheese Ice Cream with Blackberry Red Wine Swirl {Katie at the Kitchen Door}

I also wanted to use this celebration of our new freezer to take a minute to share the first pictures (and progress!) of our new house. When we knew we were buying the house I had grand plans of becoming a design blogger and documenting all the cool DIY updates we did to the house. But, considering that I seem to be barely managing to find the time to be a food blogger, I suppose I should probably stick with what I know for now. So here’s the summary version, at least as far as the kitchen is concerned…

Kitchen Update

Kitchen Update


We started with a kitchen that is basically a blank slate: linoleum floors, cheap cabinets that have seen better days, yellow walls, ancient appliances, and plenty of space. Since the day we moved in we have 1) replaced the dishwasher and fridge with modern, stainless steel versions; 2) removed some of the counters and cabinets and replaced them with these sweet industrial DIY pipe shelves; 3) added a temporary kitchen island and stools; 4) refinished one of the walls and repainted it to a dolphiny gray; 5) added an awkwardly bulky washer and dryer that we can’t wait to move to the basement. We’re also in the process of continuing to replace the upper cabinets with shelves to match the pipe shelving, replacing the disposal, and swapping out the kitchen sink and faucet. Where we are now is certainly not our dream kitchen, but we are at least getting to the point where it feels usable and friendly – good enough until we’ve saved up enough to remodel for real. And good enough to make delicious ice cream!

Kitchen Update

DIY Industrial Kitchen Shelves

Like what you just read? Subscribe to Katie at the Kitchen Door in the box on the right, on Feedly or Bloglovin‘, or follow along on Facebook, Twitter, Pinterest, Instagram, or Google+. Thanks for reading!

Goat Cheese Ice Cream with Blackberry Red Wine Swirl {Katie at the Kitchen Door}

Goat Cheese Ice Cream with Blackberry Red Wine Swirl

Inspired by the NYTimes. Makes about 1 1/2 quarts.

  • 7 egg yolks
  • 1 1/3 c. sugar, divided
  • 1 1/2 c. heavy cream
  • 1/2 c. whole milk
  • 8 oz. goat cheese
  • 1 tsp vanilla extract
  • 12 oz. fresh blackberries
  • 1/3 c. red wine
  • 2 TBS balsamic vinegar
  1. Beat the egg yolks with 1/2 cup of the sugar in a heatproof bowl until smooth. Set aside. Place the heavy cream and whole milk in a medium saucepan and whisk in 1/2 cup of sugar. Whisking regularly, heat the cream mixture over medium heat just until bubbles begin to appear around the sides of the pan. Remove the cream from the heat.
  2. Slowly drizzle the hot cream into the egg yolks, whisking the egg yolks vigorously as you do so. Once you’ve poured most of the cream into the egg yolks, pour the mixture back into the pan and return to the heat. Whisking constantly, heat the egg yolks until the mixture has thickened into a custard thick enough to coat the back of a spoon, which should take from 5-10 minutes. Remove from the heat.
  3. Crumble the goat cheese into a large bowl. Strain the custard through a fine-mesh strainer into the bowl (to remove any bits of scrambled egg). Whisk the mixture until the goat cheese has fully melted into the custard. Stir in the vanilla. Let cool to room temperature, then cover the bowl with plastic wrap so that the plastic wrap touches the surface of the custard and refrigerate until cold, at least 3 hours.
  4. In a medium saucepan, combine the blackberries, the remaining 1/3 c. sugar, the red wine, and the balsamic vinegar. Heat over medium heat, stirring frequently to prevent the bottom from burning, until thickened and bubbly, about 15 minutes. Mash the blackberries with the back of a wooden spoon so that the mixture has a jam like consistency. Refrigerate the mixture until cold.
  5. To make the ice cream, churn the goat cheese custard in an ice cream maker according to the manufacturer’s instructions. Scrape half of the ice cream into a storage container in an even layer. Top with half of the blackberry mixture, then drag a knife through the two layers to create a swirl. Repeat with another layer of custard and another layer of blackberries. Freeze until solid, at least 2 hours.
Sicilian Eggplant Caponata

August 17, 2015 Food

Sicilian Eggplant Caponata

Sicilian Eggplant Caponata {Katie at the Kitchen Door}

Portrait of an Eggplant {Katie at the Kitchen Door}

I’m home! It’s lovely to be here, truly. I have one more trip to Chile the last week of August and then it looks like I might be here for six weeks. Six weeks! After the year I’ve had, that is my idea of the ultimate luxury – it will be the longest stretch of time that I’ve had at home all year. Fingers crossed that nothing changes and it actually happens.

Sicilian Eggplant Caponata {Katie at the Kitchen Door}

I needed this weekend. A weekend with no work, no house projects – just hanging out with Trevor and doing summery things. I think it might be the first weekend we’ve had like that all summer – June and July were consumed with packing and moving (and a long weekend in Colombia thrown in there), plus a few trips to Maine which is one of my favorite favorite things to do but is not the same as being at home, doing home things. We checked on the garden, spent a few hours at the beach, took a long Sunday afternoon nap, and ate plenty of good, summery food. It’s really nice just to be together, too – absence makes the heart grow fonder and all that stuff.

Sicilian Eggplant Caponata {Katie at the Kitchen Door}

After visiting the garden, which is sort of in disarray since it hasn’t exactly been a priority this year, we used the handful of tomatoes we picked and the eggplant my dad brought us to make a quick caponata for lunch. Caponata is a lovely way to use up August produce – it’s easy, herbal, doesn’t require you to turn on the oven, and is as good cold as it is hot. It can be tossed with pasta, or simply slathered on a good piece of sourdough along with a dollop of creamy ricotta. We opted for the latter serving method and it was perfect.

Sicilian Eggplant Caponata {Katie at the Kitchen Door}

Sicilian Eggplant Caponata

Adapted slightly from Green Kitchen Travels. Serves 4.

  • 1/4 c. olive oil
  • 1 large eggplant, cut into 1-inch cubes
  • 1 sweet red pepper, seeded and cut into 1-inch pieces
  • 2 tsp dried oregano
  • 1/2 tsp red pepper flakes
  • sea salt
  • 4 garlic cloves, peeled and thinly sliced
  • 1 small onion, minced
  • 1 large handful basil leaves, torn into pieces
  • 1 large handful parsley leaves, roughly chopped
  • 1 large handful mint leaves, roughly chopped
  • 4 medium tomatoes, cut into large pieces
  • 3 TBS capers, drained
  • 16 green olives, cut in half
  • 1 TBS apple cider vinegar
  • 1 loaf sourdough bread, for serving
  • 1/2 c. ricotta cheese, for serving
  1. Heat the olive oil over medium heat in a large frying pan. Add the eggplant, red pepper, oregano, and red pepper flakes. Season with sea salt. Saute until eggplant is beginning to brown, about 5-8 minutes.
  2. Add the garlic, onion, basil, parsley, and mint to the pan. Saute until onion is soft and herbs are wilted, about 3-4 minutes. Add the tomatoes, capers, olives, and apple cider vinegar and cook until veggies are soft and saucy, about 15-20 minutes. Taste and adjust seasoning as desired.
  3. Cut sourdough into thick slices, and spread each slice with a thick layer of ricotta. Top with a heaping spoonful of the caponata and serve. Caponata will keep in the fridge for 3-5 days.
La Crema Pork and Pinot #4: The Perfect Charcuterie Board

August 7, 2015 Food

La Crema Pork and Pinot #4: The Perfect Charcuterie Board

Charcuterie 101: Assembling a Board {Katie at the Kitchen Door}

Charcuterie 101: Assembling a Board {Katie at the Kitchen Door}

Some of the best dinners we have really barely qualify as dinners. A baguette and a wheel of brie. Ice cream eaten out of the carton. Cold beer and chips and salsa. I think the very fact that you don’t have to put any effort into it is part of what makes it so rewarding to enjoy. Charcuterie definitely makes the list of our favorite low-effort, high-reward meals – a link of good artisan salami, a few slices of prosciutto, and some sharp mustard is really all you need. And with the increasing availability and variety of high-quality artisan charctuerie, putting out a nice charcuterie board as part of a dinner party or event is fast becoming the most popular way to kick off an epic meal.

Charcuterie 101: Assembling a Board {Katie at the Kitchen Door}

Charcuterie 101: Assembling a Board {Katie at the Kitchen Door}

As part of their Pork and Pinot series, I’ve teamed up with La Crema Wine to share how I put together a nice charcuterie board to pair with a bottle (or two! invite friends!) of Pinot Noir. Whether it’s the opener to a dinner party or Trevor and I are sharing in front of the TV, a well-balanced plate of salty, rich pork and a glass of Pinot Noir is an addictive match.

Head over to the La Crema Blog for tips on what to include on your next charcuterie board!

More Pork and Pinot posts…

  • Prosciutto, Mozzarella, and Sage Pesto Stuffed Pork Tenderloin
  • Red Wine Caramelized Pork Belly
  • Pork Belly Banh Mi Sandwiches

Like what you just read? Subscribe to Katie at the Kitchen Door on Feedly or Bloglovin‘, or follow along on Facebook, Twitter, Pinterest, Instagram, or Google+. Thanks for reading!

This is a sponsored conversation written by me on behalf of La Crema. The opinions and text are all mine.

  • « Previous Page
  • Page 1
  • …
  • Page 8
  • Page 9
  • Page 10
  • Page 11
  • Page 12
  • …
  • Page 57
  • Next Page »

Primary Sidebar

Subscribe!

Get creative recipes and menu ideas delivered straight to your inbox.

Most Popular

A House // Sweet Potato and Coconut Milk Soup with Brown Rice and Lentils

Monthly Fitness Goals: July // Homemade Spinach Wraps with Chopped Greek Salad

A New Job // Classic Seven-Layer Bars

Butternut Squash Carbonara with Fried Sage and Caramelized Onions

Happy Birthday, Trevor! // Peanut Butter Fudge

Cookbook Review and Giveaway: Home Made Winter

Drizly

Please note!

Full disclosure: if you purchase anything at Amazon using the above links or any other links to Amazon on this site, I will receive a small commission. Just so you know!

Copyright© 2018 · Cookd Pro Theme by Shay Bocks

This site uses cookies: Find out more.